starman
Well-Known Member
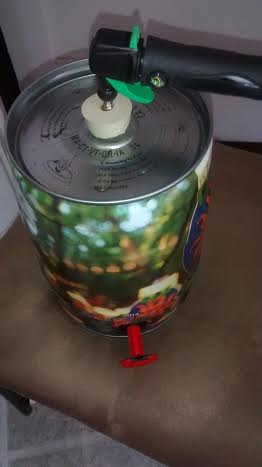
This project expands principals of the DIY Carbonator Cap to work as a 5L mini keg bung. Since I usually bottle, this also utilizes a 16g cartridge based Cornelius Keg C02 charger for pressurization.

First off, credit to Richard J. Kinch http://www.truetex.com/carbonation.htm for the original DIY write up. Thanks Yuri for the link.

Bung Material List: (prices estimated)
5L Mini Keg with gravity spigot and original bung removed. (Not Heinie or Newcastle)
(1) Victor Metal Tubeless Tire Valves ~$5.50 for 2 via Advance Auto Parts
(2) 1" Neoprene washers w/ 3/8" holes ~$0.60 via Ace Hardware
(1) 7/8" Neoprene washer w/3/8" hole ~$0.60 via Ace
(1) 2 1/8" Neoprene washer w/ 3/8" hole ~$2.20 via Ace
(1) 1 1/4" SS washer w/ 7/16" hole
(3) Victor Metal Stem Extensions ~$4.00 for 4 via Advance Auto Parts
1/2" of thin stainless steel wire - free... still keep finding bits of that crap from my batch sparge braid build...
Victor 4 in 1 Valve Stem Tool (Optional)

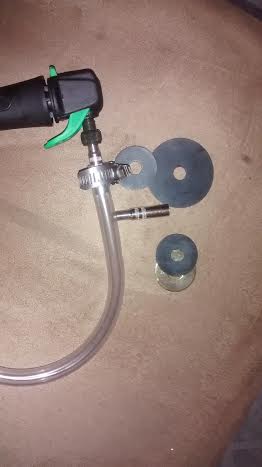
This is a pretty straight forward build. Disassemble the Tire Valve and discard all the rubber washers. (Note: Unlike Mr. Kinch's system, you can leave the valve installed) Put the (2) 1" washers on the post first, followed by the 7/8" washer. Temporarily screw on one of the stem extensions to make the next couple steps easier. (Without the extension, I dropped the whole thing in the keg, which was a total PITA to get out.) Push the three washers thru the hole in the keg and snug it up. The 7/8" should fit perfectly flush in the hole. Next, I applied a little KY... er keg lube on the top of the keg and then the last large neoprene washer, followed by the large stainless steel washer. Follow it with the Victor supplied ss small washer and nut. Wrench the nut a bit and violla. Mini Keg, meet Bungonator.
Next we have to modify two of the stem extensions in order to make a filling 'chuck' and an air vent for serving. About 1/8" down from the top of the valve, drill a pair of 1/16" holes opposite each other thru the stem wall. Take care not to go the middle. Next depress the plunger and run the stainless wire through across the top to hold the plunger down. Bend the wire around the outside.

Screw one extension in the end a 1/4" ID CO2 supply tube and secure with a clamp. You now have a threaded chuck that allows the keg to seal up when you remove from the system. Use the second modified extension to provide a vent tube when serving from the gravity tap.
Cool, crash carb, enjoy! Refill...

First off, credit to Richard J. Kinch http://www.truetex.com/carbonation.htm for the original DIY write up. Thanks Yuri for the link.

Bung Material List: (prices estimated)
5L Mini Keg with gravity spigot and original bung removed. (Not Heinie or Newcastle)
(1) Victor Metal Tubeless Tire Valves ~$5.50 for 2 via Advance Auto Parts
(2) 1" Neoprene washers w/ 3/8" holes ~$0.60 via Ace Hardware
(1) 7/8" Neoprene washer w/3/8" hole ~$0.60 via Ace
(1) 2 1/8" Neoprene washer w/ 3/8" hole ~$2.20 via Ace
(1) 1 1/4" SS washer w/ 7/16" hole
(3) Victor Metal Stem Extensions ~$4.00 for 4 via Advance Auto Parts
1/2" of thin stainless steel wire - free... still keep finding bits of that crap from my batch sparge braid build...
Victor 4 in 1 Valve Stem Tool (Optional)

This is a pretty straight forward build. Disassemble the Tire Valve and discard all the rubber washers. (Note: Unlike Mr. Kinch's system, you can leave the valve installed) Put the (2) 1" washers on the post first, followed by the 7/8" washer. Temporarily screw on one of the stem extensions to make the next couple steps easier. (Without the extension, I dropped the whole thing in the keg, which was a total PITA to get out.) Push the three washers thru the hole in the keg and snug it up. The 7/8" should fit perfectly flush in the hole. Next, I applied a little KY... er keg lube on the top of the keg and then the last large neoprene washer, followed by the large stainless steel washer. Follow it with the Victor supplied ss small washer and nut. Wrench the nut a bit and violla. Mini Keg, meet Bungonator.
Next we have to modify two of the stem extensions in order to make a filling 'chuck' and an air vent for serving. About 1/8" down from the top of the valve, drill a pair of 1/16" holes opposite each other thru the stem wall. Take care not to go the middle. Next depress the plunger and run the stainless wire through across the top to hold the plunger down. Bend the wire around the outside.

Screw one extension in the end a 1/4" ID CO2 supply tube and secure with a clamp. You now have a threaded chuck that allows the keg to seal up when you remove from the system. Use the second modified extension to provide a vent tube when serving from the gravity tap.
Cool, crash carb, enjoy! Refill...


![Craft A Brew - Safale S-04 Dry Yeast - Fermentis - English Ale Dry Yeast - For English and American Ales and Hard Apple Ciders - Ingredients for Home Brewing - Beer Making Supplies - [1 Pack]](https://m.media-amazon.com/images/I/41fVGNh6JfL._SL500_.jpg)


