Decided to jump in head first…

Homebrew Talk - Beer, Wine, Mead, & Cider Brewing Discussion Forum

Help Support Homebrew Talk - Beer, Wine, Mead, & Cider Brewing Discussion Forum:

This site may earn a commission from merchant affiliate links, including eBay, Amazon, and others.

mmanolis2001

Member
Joined
Dec 29, 2015
Messages
5
Reaction score
3
I have been wanting to get into home brewing for a couple years now but I always find an excuse not to start another hobby. I have watched hours of videos on YouTube over the last two years and even stashed empty bottles here and there for a time.

This year I received a Mr. Beer for a Christmas present and it got gears grinding again. I made my first batch with this kit on Saturday and I made some mistakes right off the bat. :eek:

I had a hard time bringing my batch of wart down to the 70 deg mark. It was a mess. I didn’t read the instructions with the kit closely enough and boiled up to much water to mix the wart with. Then I poured this into the little fermenter and added not so cold water. The result was 2 gallons of wart sitting at 120 deg in the fermenter. It sat on my counter for 20 mins only dropping a few deg’s. Then I placed the whole thing in the freezer until the temp was safe to pitch the yeast. Good thing that little fermenter is small.:)

Who knows how this batch will come out. It was the Diablo IPA that came with the kit. Now its infused with freezer burn and whatever else made it into the batch while sitting on the counter top at 120 deg. I guess I will bottle it if it smells good and there is no white fuzzy stuff on top after the ferment.

So that disaster got me thinking about modifying things, adding chillers etc…
Instead of engineering something to use with the Mr Beer I decided to upgrade to a better beginner kit. I think Mr Beer is going to be a small batch bottling container after its first ferment. Poor little fellow I pushed him to the side before the batch started fermenting.

I found a local Home brewing store right up the street from me and picked up some goodies on the way home today.


I also stopped at Home Depot for some more supplies. Now I have the following sitting in my basement waiting for me to jump into.


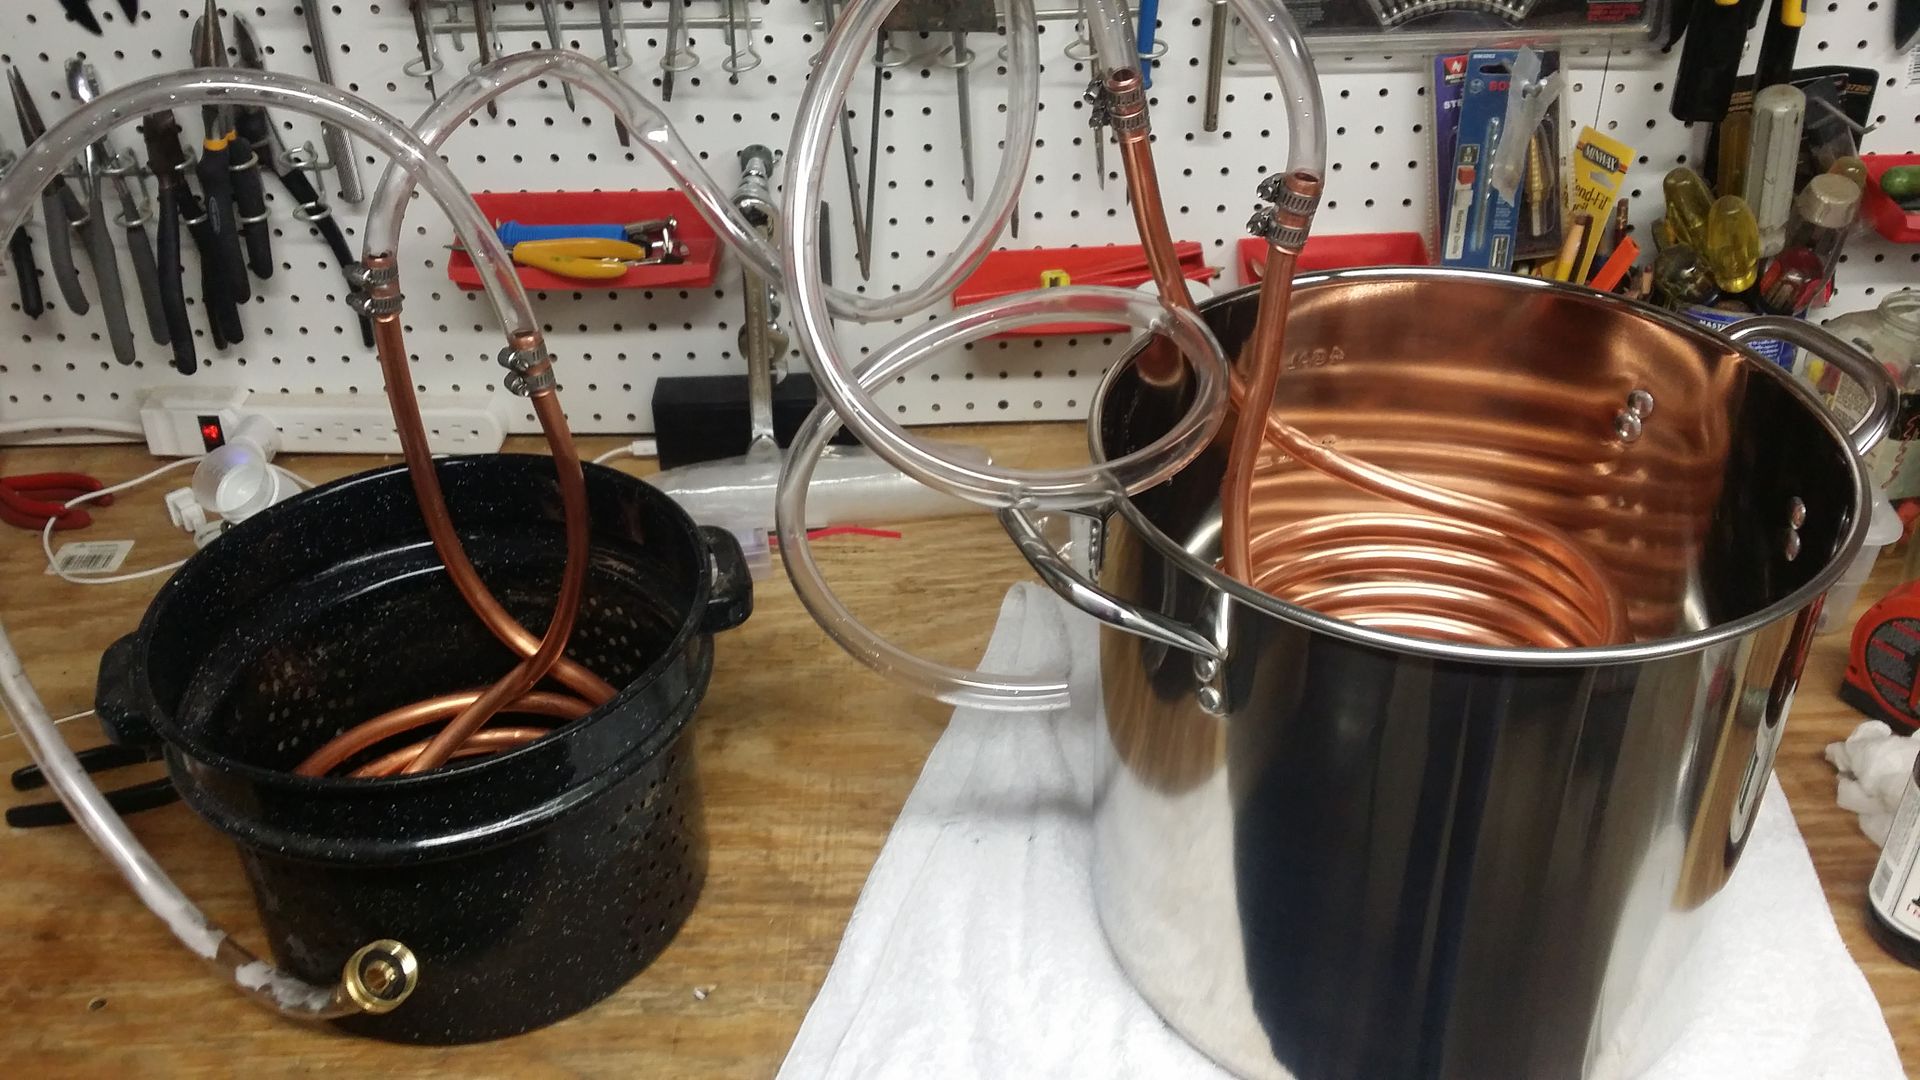
Decided to make a pre chiller to go ahead of the immersion chiller. This will sit in a pot with Ice water. Hopefully this combination will bring the 3 to 4 gallon wart down to the pitching temp much quicker.

The Pre chiller is made with 10ft of 1/2" soft copper and the immersion chiller is 20ft of 1/2" soft copper. I tried not to mangle the bends but I did everything by hand without the use of a pipe bending tool. I did use a paint can to roll the copper into a coil. I found out that 1/2" soft copper is a pain in the tail to bend. I watched videos online where people were bending the uprights and elbows with little effort. I had the hardest time pulling the bottom coil thru without kinking and gave up trying to evenly space the uprights or put 90 deg bends on the ends. I just added 2 hose clamps to each connection and tightened the hell out of them.

Is 1/2" tubing the common copper size used in home made chillers or 3/8”? I better hit the gym if everyone is bending 1/2” that easy by hand without kinking the tube.

I pressure tested the setup and had no leaks which is great and its compact enough to fit into the 5 Gallon kettle for storage. It will be a pain to drain both sets of coils though.

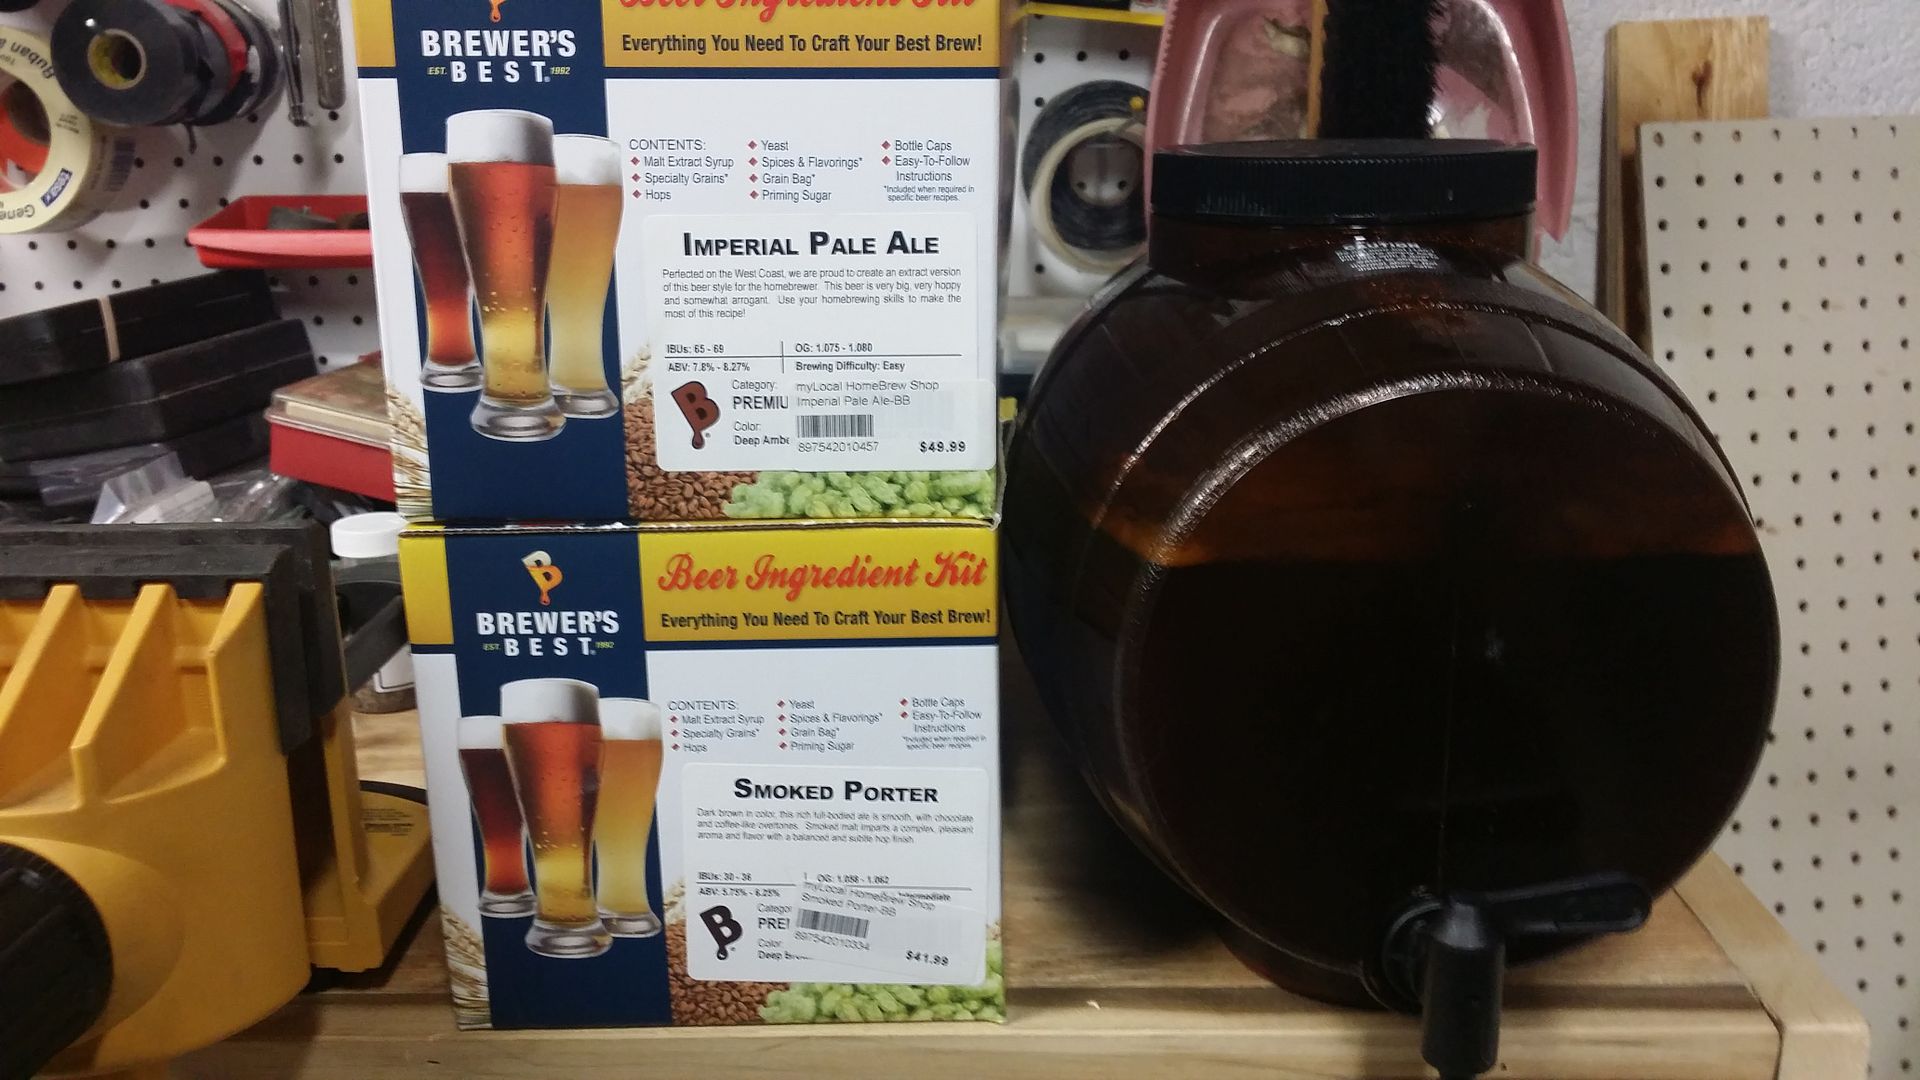
And these kits to get the pipeline started.


Now im kicking myself for throwing all those 22 oz Ranger bottles in the recycle bin over the years.

So now that I’m jumping in head first I'm sure I will be bugging you all for tips over the foreseeable future.

Cheers :mug:
 
Does not sound like anything catastrophic on your initial batch. People use all types of strategies for chilling the wort. Some don't chill it at all - just let it sit overnight and come down to temp on its own.

That said - your new set up looks great! The double chiller/prechiller is going to make a huge difference. You are going to be able to cool very rapidly. I have been brewing for almost 20 years and keep thinking I should make a pre-chiller and never get around to it...... I think you inspired me to get going on it.

Good call on the system upgrades..... looks like you are off to a good start. Great place to answer all your questions too - there are tons of people willing to share their knowledge here.
 
I agree that your first brew should be fine. And, yes, 3/8 is kind of the sweet spot for chillers but what you have looks great. BTW, if you want to try doing some bends you should be able to find a set of bending "sleeves" (not sure of the correct name) in the plumbing section at Lowes or HD for about $10. They look like a long spring with one flared end. You slide it over the pipe and the spring supports the pipe as you bend it.
 
Woohoo! You wont wanna stop now. I think it was a good idea to upgrade kits. I wish I was as good at diy stuff. I dont have a chiller and just do ice baths. Good luck on your IPA and whatever future brews you'll be doing.
 
Your Mr Beer kit will be fine.

Nice chiller. Only comment on it, is that the weak joint in the whole thing is the plastic to copper tube connection. You may be OK, but 2 clamps may not be sufficient to ensure a seal for long. I uses 3/8 copper tubing for mine, and the ends terminate/connect outside the plane of the boil pot. If that connection should leak, you will end up with lots of cooling water in the wort ...... and of course the inevitable question as to whether the wort is contaminated or not.

I had leaks in mine early on, but since it was outside of the pot, I just laid a cloth over it to prevent the water going everywhere. I changed to using smaller I/D plastic tubing (warm it in boiling water and push it over the copper), pushing it on further, and I think I have 3 clamps on mine too. No leaks in at least 100 brews now.

To make you feel better; Ranger bottles (22 ozs) are some of the worst that you can have. I have had a number of NB bomber bottles develop cracks. I inspect every bottle pre and post use, and every few weeks I have another that seems to have developed a crack. It is only the NB bottles that I have any problem with. Fortunately no disasters so far, but that is probably only because I am checking the bottles every use.

That was the area i was worried about. Maybe i will sweat some 90 deg elbows on the uprights and throw some 4 in extensions on the wart chiller. In fact thats exactly what im going to do. Heading to home depot after work :)

Want to do it right the first time.

Thanks for the info on the ranger bombers. I going to end up buying some boxes of empty bomber bottles to get my inital supply stocked up. I cant drink enough to be ready to bottle in time. :tank:

Will 30 22 oz bottles cover a 5 gallon batch? If so im looking at 5 dozen at $15 a dozen :( = $75 ouch..

I will be chasing friends down for the empty's after passing beers out...

I do have 60 empty 12 oz bottles but im not looking forward to de-labeling those suckers.

I was going to suggest sweating some 90 degree bends, but thought I'd leave it up to you to figure out what is best. I'd go with longer than 4 inch extensions if cost is minimal; it is very easy to shorten them in the future if you want, but takes a bit more effort to extend them. I'd go long enough to get a decent hand hold on them while the chiller is in the pot, maybe 8 inches or more. I think mine extends about 8 inches and is plenty.

25 bombers will probably do 5 gallons - you will lose some volume to trub.

Chase friends down now and have them save whatever bottles they have. Use the 12 ozs-ers for now until you collect enough 22 ozs-ers. Never pay for bottles unless they have beer in them already.

Put the bottles in a bucket of hot water with some oxi-clean. Labels on many bottles will come off easily after a soak for an hour or so.
 
I do have 60 empty 12 oz bottles but im not looking forward to de-labeling those suckers.

Soak them in PBW for a half hour or longer. The labels fall right off. I've had a few stubborn ones, which I don't waste time on.
 
Started my first batch in the new setup on New Year’s Eve. I went with a Brewers Best Smoked Porter


All the goodies in the kit


I heated up 3 gallons of bottled water in the 5 gallon kettle and started steeping the grains at 156 deg.


I maintained this temp over the next 30 min's trying to pull all the good stuff out.


While brining the wart up to a boil I drained the grain into the pot and patiently waited for the boil to start. I have to come up with a contraption to hang the grain bag from.


When the wort started a slow rolling boil I cut the flame and added the two LME containers and stirred it all in. Once that was fully incorporated I brought it back to a rolling boil, Set the timer and added the first hops addition.


Then I waited staring at the pot and clock for the next 45 min's. With 15 min's left I added the Irish moss and Wart chiller. At 5 min's left I added the final hop addition and cut the flame at 60 min's.


Now it was time to test the chiller I made. Placed the pre-chiller in a pot of ice and water and turned on the faucet. My cold water is 64 deg coming out of the faucet which is good to begin with. I was surprised how efficient the system worked. It brought 3 gallons of wart from boiling to 70 deg in 9 min's. This was with constantly stirring the wart


I took an initial OG reading to get an idea of how much water to add to hit the 1.062 mark outlined by the kit. This first reading came in at 1.094 which was good and would allow me to add more water to bring the volume up and OG down. The target ABV for this is around 6.5%.

I added 1.5 gallons testing the OG while adding and came up with an OG of 1.064. Bingo
I racked the wart into a carboy trying to shake it up for oxygen and came it at 4.5 gallons of finished wart.


Sitting in the basement at 68 deg waiting to start the magic

 
I picked up a bottle rack and cleaner so I decided this was a good time to put it into use. Using the advice from this fine forum I started the de-labeling process on my stock of empties.


I wanted a better way to store my bottles so I did a little Google search and found some plans online. Cheap and easy crate made with 1x2 and 1x3 furring strips and some finish nails.


The next day The magic has begun…
Within 12 hrs the fermenter started going crazy. I Guess I got some good sugars in there. Looks like I’m making beer.


I went down the later that night and I see this.


Looks like its time for a blow off. I grabbed a 1 gallon jug and a piece of hose and rigged up this.


I cleared the wart out of the air lock and replaced it with clean water. Once the fermenter chills out a bit I will add a new sanitized air lock.
Now it’s a waiting game. I will give this 2 weeks in the primary and then test the FG and see if we are in range. Shooting for 1.015 ish

Thanks again for all the feedback I have received here. It much less intimidating jumping into a new adventure when you have a place like this to get answers.
 
Looks great. A few comments:
  • Use starsan solution for your blowoff water. If that blowoff water gets sucked back into the fermentor, you'll thank me. It happens, especially if you cold crash with the blowoff attached (don't!).
  • I don't know of any reason to add water to the airlock when using it with a blowoff tube.
  • I love the bottling rack and vinator. One thing that didn't occur to me for a long time was to put my caps into the vinator solution at the top of the rack to sanitize them. I used to boil the caps separately, then one day a lightbulb flashed in my head. Derp.
 
All looks good.

You only need enough sanitizer in the gallon jug to cover the end of the blow-off tube. The air volume in the tube is very small, and a change in temperature (fermentation stops and it cools 5 to 10 degrees, and maybe room temp drops another 5 degrees for some reason); I would not be surprised if you sucked some of that liquid back into the fermenter. Some people have reported whole half gallons being sucked back.

Minimize the level in the jug. It will minimize and maybe eliminate the potential sanitizer that can be sucked back in.

You will find an 'X' in the end of the airlock. that should be removed as it causes a restriction that can get clogged with hop and other debris from the fermenter and negate the benefit of the blow-off tube.
 
I went ahead and replaced the Blow off setup with a clean airlock the next day. The Foam started to subside so i took advantage of that while it was still pumping out plenty of CO2. Its stabilized now and chugging away still.


I forgot about adding sanitizer to the blow off water. :( I was rushing to make sure i did have wart on my ceiling. I don't think water made it back into the ferment as it was a constant CO2 release but i guess we will see.

Making mistakes hear and there and learning a ton along the way. :tank:

That's a great tip on the air lock. I was looking at that and wondering if it was needed.

I think the bottle rack paid for its self during the de-labeling process. Came in very handy.

I also tested out the bottle cleaner while bottling my Mr Beer batch. The plastic bottles that came with the kit have a larger opening and dont fit properly. This was solved simply by using the edge of the lip in the plunger. Worked great.

The Mr Beer batch stopped fermenting at day 5 so i let it settle out for another couple days. I might have jumped the gun but it was clear and i have ideas for the little fermenter.

Now i have a bottle in my kitchen that i keep squeezing checking for carbonation. :) Trying to be patient. I ended up with 10 bottles from the Mr Beer batch. Did a taste test and it was flat beer so that's good.

Thanks again for the tips. Learning allot here.
 
Back
Top