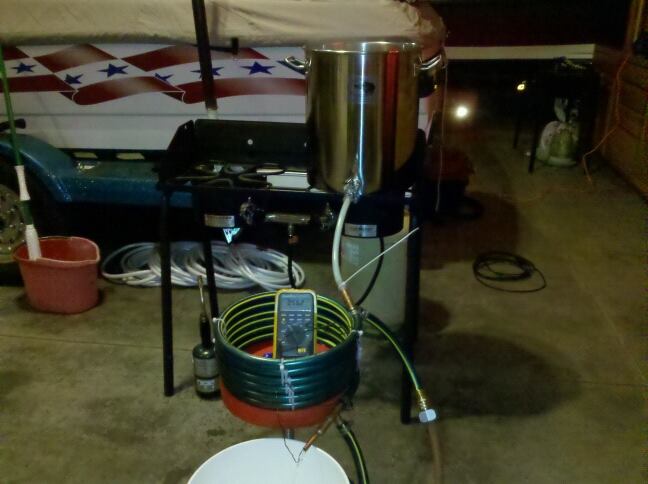
Counterflow Wort Chiller Build (and use)

Homebrew Talk - Beer, Wine, Mead, & Cider Brewing Discussion Forum

Help Support Homebrew Talk - Beer, Wine, Mead, & Cider Brewing Discussion Forum:

This site may earn a commission from merchant affiliate links, including eBay, Amazon, and others.
Haha that's my bad. I was in this thread but thinking of a different build. Too much HBT and YouTube at the same time. Thx tho, but my thinking was about if someone used brass fittings, obviously it works, why not use PVC and save money.

The PVC and epoxy combo is the same as brass/copper and soldering. Use pipe tape and clamps and theoretically it would work the same, right?!?


~RDWHAHB~
 
So in case anyone is interested, Lowes, or at least my local Lowes (Spokane, WA), has a sale on a bunch of their tubing. 60ft of 3/8" Type-L for about $25 (50% off). They have a few other sizes that are also 50% off, all Mueller brand. Unfortunately, the 3/8 refrigeration tubing is not on sale, but they had 60ft 1/2" refrig tubing for $18. I already have a 5/8" rubber hose, and buying a new bigger hose wouldn't end up saving money. Anyone think it would be worth it to go with the sale stuff? I really don't want to lose cooling ability.

Cheers!
 
Does anyone know if I can use a 1/2 copper tubbing? additionally I was talking to the guy selling it and he only carried 1/2 and said they came in two types .22 and .28. Does anyone know what these points mean and which would be advisable to get?
 
Hi everyone just wanna clarify if I should use 1/2 to 3/4 reducers or 1/2 to 1/4 reducers because I read on bobby m's DIY tutorial to use 1/2 to 1/4 reducers. The guys at the shop I go to seem incompetent and can't tell me what would work. I read somewhere on here that there's a difference in ref measurements and plumbing measurements. Just wanna clarify before I screw something up.
 
New to HBT. I am in the process of building a CFC using 3/8 OD copper wort line and a pump from keggle with a ball-valve. The inlet of my design is practically identical to OP's. On the outlet wort line I have added a ball valve(I was told to never restrict inlet side of pump). I am interested in using my old IC as a prechiller(3/8 OD S.S.)

1)what size hose to use around wort line?(forgot to mention I am wrapping line with copper wire) I see 5/8 ID is popular however, I mistakenly bought 1/2 ID hose And tried a test fit and it will snugly fit. This brought me to another question: would I rather have a bigger hose for more volume and less flow or less volume and greater flow? I suspect my next question will help determine:

2)Is a pump on the water side advisable? Seems like a great idea. Since I have complete control on beer flow, it seems like my focus should be maximizing water temp and flow/velocity. The pump would have to go before prechiller(IC) for full inlet, but would be hindered by going through such small tubing in prechill. Of course I could make a new IC with 1/2 ID copper but I fear I will run into what I can pull from spigot anyway( chugger pump is 7gpm and I'm sure water service is less).

HELP! :s

Am I worrying to much about minor details? I don't want to over complicate the system. TIA for any and all suggestions.
Fish
 
Hi everyone just wanna clarify if I should use 1/2 to 3/4 reducers or 1/2 to 1/4 reducers because I read on bobby m's DIY tutorial to use 1/2 to 1/4 reducers. The guys at the shop I go to seem incompetent and can't tell me what would work. I read somewhere on here that there's a difference in ref measurements and plumbing measurements. Just wanna clarify before I screw something up.

I believe that you would want 1/2 to 1/4 to properly fit the copper coil inside. I tried with 1/2 to 3/8 and it was too big for my purpose.
 
Thanks for the reply really appreciate it!

The only thing you need to do in order to use the 1/4 reducer is drill it out slightly. All fittings have a stop point inside, which allows the 1/4" pipe to hit the 'end'. Use a drill bit to file this down a little, and the pipe will slip right through.
 
I believe that you would want 1/2 to 1/4 to properly fit the copper coil inside. I tried with 1/2 to 3/8 and it was too big for my purpose.

I second that I bought 1/2" tees and 1/2" to 3/8" reducers and they're too big to use...stopped me from completing the build yesterday...now I'm going to get the correct reducers and attempt to construct the chiller WHILE brewing beer...wish me luck
 
Ran into a snag...forgot my new hose at my dads house and decided to cut up one of my swmbo's hoses and just give her the new one....

However, AFTER I got the copper inserted and the chiller coiled I discovered her hose was smaller and the half inch T's don't fit into the hose, also I'm using a 1/2" o.d. 3/8" I.d. copper line so I don't know if the 3/8" tees will fit over the copper line...

Any ideas?
 
Tiber Brew you have given me ideas, hope, or motivation! I built this CFC using a 20 foot coil of 3/8" refer coil inside a 25' 5/8" heavy duty hose. I cut up a foot of 1/2" copper pipe into 2" pieces then soldered them into the tee's. I optioned to use 1/2" caps in lieu of the reducers. I just drilled 3/8" holes in them on my drill press so the refer tubing would pass through. I also brought everything into my house and let it warm up for a day then I carefully unrolled the flexible copper tubing. I was able to slide it into the hose without using any... ahem... lubricant ( :

I found it was helpful to have the wife pull the hose out tight while I slid the tubing right in! Then I carefully rolled the hose around a 5 gallon bucket without filling the flexible copper tubing with water and crimping the ends. After I finished soldering both Tee's I installed them into each end of the hose. During this step I did find it was easier to hold the end of the rubber hose under hot tap water for a little bit AND put a little soap on the copper Tee before I stuffed it into the hose. After I had everything positioned the way I wanted I soldered the 3/8" tubing where they poked thru each cap. I pressure tested it for leaks while I was boiling up about 4 gal. of water and my soldering joints were good to go. When I had a vigorous boil going I hooked everything up to my kettle, turned on the water and started to drain. Where I live it's above the 45th parallel and I use well water so it's cold also. On my first test I had both my garden hose and my kettle drain valve WFO. The discharge temp on the CFC outlet stabilized at 60 degrees after a few gallons of water drained through. Holy $hit!!! that's too cold!!! But it is better than I was expecting so I can probably just throttle down the water flow through the garden hose to compensate the temps I bet. Thank you for the inspiration! My previous immersion chiller would take about 25-30 minutes to cool the kettle down before I could drain it, plus I had to stir it constantly. Now I can just watch it drain and it should be cool enough to pitch yeast after it is finished!!!! Awesome... totally awesome ( ;

Bought everything I needed to build this from HomeDepot for about $53 and change...

Counter flow chiller.jpg
 
Holy smokes... Hey JL...64 if you rubber band the sensor to the bottom of the copper coil, you will pick up the wort temp and not run a risk of infection!
 
Holy smokes... Hey JL...64 if you rubber band the sensor to the bottom of the copper coil, you will pick up the wort temp and not run a risk of infection!

Thanks for the tip! That picture was just a test run with boiling water so I wasn't worried about infection. I have been thinking ahead to my first brew day with this CFC and I like your idea ( :
 
I did find it was easier to hold the end of the rubber hose under hot tap water for a little bit AND put a little soap on the copper Tee before I stuffed it into the hose.

This was very helpful, I thought the copper fittings were too big and so I was stuck with a half built chiller. Brought in one section of the hose stuck it under hot water gør a few minutes and put dish soap on the copper tee and it popped right on
 
I finally put mine together today. I'm missing a few parts like hose clamps but I got the copper in the hose, did my soldering, and got it coiled. Going to get the final parts this week and test it out. Tiber, I can't thank you enough for the original writeup. Great job and thanks for sharing.
 
Hey guys if the wort temp went too low (not like freezing) can you still pitch and let it rise to temp in a controlled fridge to start ferm? There's no harm in that right?
 
I finally put mine together today. I'm missing a few parts like hose clamps but I got the copper in the hose, did my soldering, and got it coiled. Going to get the final parts this week and test it out. Tiber, I can't thank you enough for the original writeup. Great job and thanks for sharing.

Hey, great! Glad I could help!
 
Hey guys if the wort temp went too low (not like freezing) can you still pitch and let it rise to temp in a controlled fridge to start ferm? There's no harm in that right?

Better to let it rise to temp and then pitch. You want conditions to be very yeast-friendly at pitch (right temp, big enough pitch and well-aerated) so they are happy and take off on their yeasty business. Generally speaking.
 
See that made me think of a problem too. If I let it warm up to temp then am I running the risk of natural yeast starting something. Curious. Is it harmful tho to let it warm to temp? Don't they just wake up when the temp is right? It's in my temp controlled fridge.
 
I had the same issue with my CFC over cooling below my pitch temperature on brew day recently. I just aerated and put the lid on my bucket to let it warm. After I cleaned up everything I pitched yeast as normal. I suppose if you left the wort exposed you would increase the risk of infection... but I wouldn't be concerned if the bucket/Carboy was sealed
 
Here is a side thought. What if you went from hot pot, out a valve, through a 1/2" coil packed in ice and water in a bucket, then out a temp probe to the ferm bucket. You can control the flow to match the cooling.

If it was 1/2" tubing and 50' what do you think the temp would be for the chilled wort?

The idea would work for me in the summer months in SoCal when the water just isn't cool enough.

It's a thought I'd like to put into plans.

What you're describing is often used as a "pre-chiller." Many people use an IC in an ice water bath upstream from the CFC cooling water input. This chills the cooling water to make the CFC more effective when tap water isn't cold enough.
 
Ya like with a pump to move the ice water through the chiller in the wort right?

But what about the wort going through the chiller and being a pitchable temp. I guess I had to re-scope my question.

Do you think 1/2" 50' coil would be too much, therefore, chilling the wort to a point that I'd have to warm it up to pitch temp? I guess if I were to build it I could always trim the copper down until I reach a correct temp. But that would only be if the wort was ridiculously cold.

Yes, the ice water would be recirculated via a pump through the CFC water port. I think 50' might be overkill if using a pre-chiller. With ice water, 25' should be plenty. As for wort temp, think of it this way: the best efficiency you can theoretically get from a CFC is 100%. Increasing the length of the CFC can get you closer to that, but longer isn't necessarily better because of the law of diminishing returns (i.e. the curve is asymptotic). At 100% efficiency, your wort will match your cooling water temp, and longer hose won't get it any colder. Instead, I would make your chiller around 25' and restrict the water flow from your pump and increase the wort flow from your kettle if the wort is coming out too cold.
 
Oh I see. It's all gravity so no pump, but restricting the flow is a great idea. The build would have a valve and it could be restricted.

I may actually put this plan into action. Thx 🍺
 
So I was able to draw my plan out. Was wondering if anyone can add input to this so I can see it with fresh eyes. A perspective that isn't my own. The coil is 1/2" and 25' and will be in a bucket of ice and water. Thx in advance. Eager brewer lol

View attachment 250793

Also if you'd like to see a parts list I can provide links

Is "cooling coil" your CFC? Or is it your pre-chiller? Either way, one of them is missing.

Assuming your tap water is as cold as it is in Michigan's beautiful Upper Peninsula, then let's call your "cooling coil" your CFC. In that case, your diagram looks like it will work. Keep in mind your overall Δh has to be sufficient enough to create enough head pressure to allow high enough wort flow rate through fittings and 25'+ of coiled tubing. One thing I've learned from early experience is that you should fill and boil in your kettle before lifting it to an elevation required for gravity flow. If you have a porch, brew tree, any kind of platform to elevate the kettle above your fermenter, set that up before you sparge.
 

Latest posts

Back
Top