Bubbles in RIMS when element kicks on?

Homebrew Talk - Beer, Wine, Mead, & Cider Brewing Discussion Forum

Help Support Homebrew Talk - Beer, Wine, Mead, & Cider Brewing Discussion Forum:

This site may earn a commission from merchant affiliate links, including eBay, Amazon, and others.

Geordan

Well-Known Member
Joined
Dec 16, 2011
Messages
242
Reaction score
9
Location
Kingston
Hey folks, I'm currently ironing out the kinks of my RIMS, and my latest hitch is bubbles in the system. I've found that if I lay the tube horizontal, but prop up the "in" end (element) slightly, it eliminates bubbles until I start mashing out -- then, when the element kicks on in high gear, I start getting lots of bubbles in the "out" hose. If I futz around and change how high one end is propped up, the bubbles will go away for a few minutes, and then return; then, raising or lower (no rhyme or reason to which, it seems) will temporarily hold them off.

My concern about bubbles is the first time I had them -- when I brewed with the kit the first time -- I scorched the wort something fierce, and had to scrub all the black crud off my element. I'd like to avoid that again! Clearly the bubbles are being created as the element aggressively heats the wort, but is there any solution that comes to mind? Or, is it ACTUALLY an issue at all?

System Notes: Chugger pump, Bobby's "old" RIMS tube (Threaded), 6000w 240v LWD (not uwld) Camco element running at 120v/1500w.
 
Update: Just ran off and the wort is completely scorched -- element is caked in black burned material again. What am I doing wrong?! This is the third batch I've had this happen on!
 
Update 2: the entire base of the element is distorted and melted -- no idea what caused this. Completely at a loss to explain what would have overheated the element so severely to melt the base, but the temperature of the wort returning to the MLT never got above 160f based on my handheld thermo. Thoughts, ideas or experience appreciated.
 
Can you post a picture of how you have the RIMS set up and mounted. A little more detail would help us help you a lot better.

Thanks.

P-J
 
Assuming there is nothing odd about your RIMS configuration, bubbles would indicate that air is entering the system somewhere in your plumbed fittings. If the air pocket displaces most of the wort in the RIMS tube, and your temp probe is in air, then it would not be a surprise to scorch the wort in the RIMS tube.

Where is your temp probe placed? Where is the RIMS tube in relation to the MT, and how is it plumbed?

P.S. P-J beat me to it.
 
I'm intrigued as well, so consider this post a sub.

In addition to what the others asked, I am wondering what the flow is set at through the rims tube as well. Ball park estimate.
 
Summary
System Flow:
  1. Wort exits MLT through copper manifold
  2. Wort passes through 24" hose to Chugger pump
  3. Wort exits Chugger (throttled to roughly halfway) via 24" hose to RIMS
  4. Wort enters "IN" side of RIMS (Element side)
  5. Wort exits RIMS, crossing Pt100 Probe
  6. Wort returns to MLT via 36" hose
  7. Note: "In" side of RIMS tube propped up approximately .75"-1" to prevent bubbles during mash
Equipment:
  1. Camco 240v 6000w LWD element running at 120V
  2. MyPIN TA4 PID, 40amp SSR, 50mm Pt100 Probe
  3. BrewHardware "X-Long" RIMS tube (old style, threaded)
  4. Cooler MLT with copper manifold
  5. Chugger pump
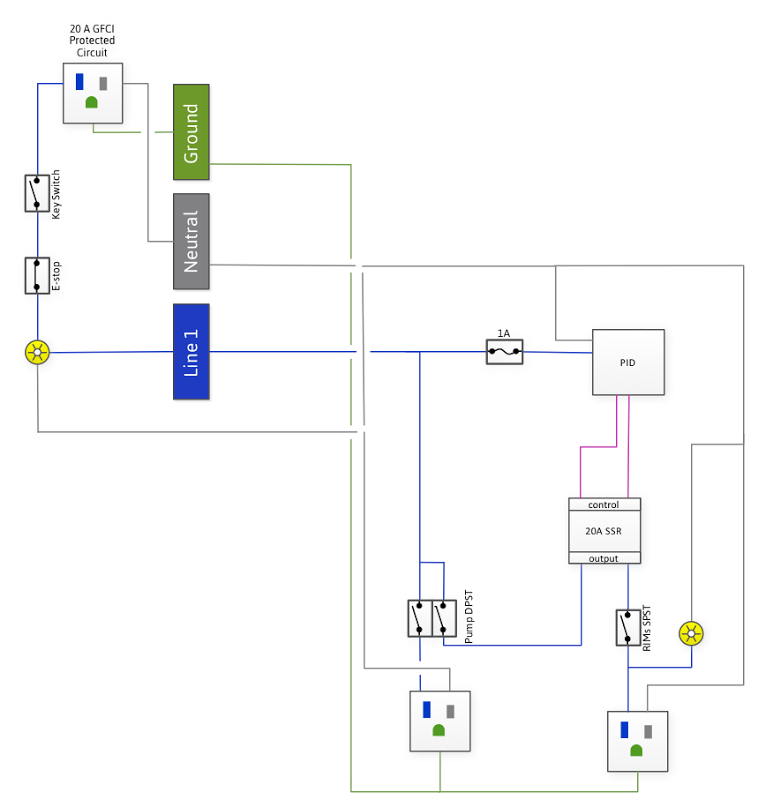
System Diagram:
i6Z8giD.png

Here is a quick sketch - the tube is simply sitting on the counter for now, with the "in" side propped up with some towels. The bubbles didn't seem to be an issue until I kicked the temp up for the mash out (149 to 170). Element is on the "in" side, the probe on the "out." The flow rate is throttled just a bit less than halfway on the chugger - any more than that seems to compact the bed too much.
I've also attached photos of the scorched element and the melted element base.


ImageUploadedByHome Brew1395616190.408766.jpg
ImageUploadedByHome Brew1395616439.082445.jpg
ImageUploadedByHome Brew1395616455.800239.jpg
 
Shucks... Another thread that is very hard to read
because the images are ganged together on a single line.

A new line inserted after each image would help a lot.

Oh well. I'm done with this one (thread) as it is painful sorting the info out.

(The grouchy old man said...)
 
Sorry folks I've posted this using the the IPhone app and used the app's native functionality. Until I get back to a desktop I won't be able to see how it appears in browser. PJ, sorry if it's messy, is there any info that would help that i have missed?


Sent from my iPhone using Home Brew
 
...
PJ, sorry if it's messy, is there any info that would help that i have missed?
I've no idea. It is very difficult for me to read the info you have posted. It displays as an image about 2 or 3 times wider than my PC can display. (No new line entered before images!) The post is really hard to read and understand. (Plus it messes with all of the posts before yours.)

P-J
 
I've popped onto a desktop computer here and reformatted the post, and also called out the key information in clearer, list form in addition to the "prose" description. Thanks for your patience.
 
This is just a rough guess as to what happened.

If you lay your tube down, but do not have the inlet/outlet ports facing upward you will have an air gap in the upper end of the tube. If your element is not fully submerged it could become hotter than the boiling point of the wort even though the passing wort is not actually boiling.

There would be a threshold to that though. As that element gets hotter it will start to boil a very small portion of the passing wort. That was probably the bubbles you saw passing in your line. Boiling wort.

As the wort boils it will develop a crust on the element like your picture shows. Since that crust is less conductive of heat from the element to the wort you will build up more heat in the element causing the crust to creep into the element over time.

Beyond this, if you have done this over multiple sessions and not clean the element. Then that effect would have compounded on itself each time you brew. So this time was the point of no return so to speak.

This could possibly happen with no air in the tube as well if your rate of flow is to slow and possibly have eddy currents in the tube where the wort is not passing straight through.

This is just a guess on my part. I hope you get 'er all figured out.
 
I agree that a portion of the element was running in air. I would recommend running a unit like that vertically with the element side down so you can be sure the element is wet at all times.
 
Running with the input/element end up is very bad - it means that air or steam is trapped around the element base in your tube. The bubbles you were seeing were still being produced, but were trapped around your element, allowing it to overheat and then scorch the wort at the surface. As it overheats, more bubbles are produced moving the contact point down the tube. I suspect that your element is now mostly dead, due to overheating and scorching, and should be replaced.

You need to allow any bubbles produced to exit the tube, so your element is always surrounded with wort. This means putting the outlet end higher than the inlet. You should probably also manipulate the tube as you start it up to get any air trapped in the tube out.
 
I have my RIMS oriented vertically with the outlet going straight up and the element inserted from the bottom. The wort comes in from the inlet just above the element and the prove sensor is on the other Tee near the outlet. This works nice for me because it ensures the element is fully submersed in liquid before I even kick it on so I don't chance dry firing it. I think this is the best way to get it set up. Here's a picture.

20140227_194417 (1).jpg
 
That's a GREAT example, thanks -- I'm going to try setting mine up EXACTLY like that. Do you mind if I ask you how adapted the element triclamp holder to the threaded fitting? I'd love to be able to pop the element out for easy cleaning.
 
That's a GREAT example, thanks -- I'm going to try setting mine up EXACTLY like that. Do you mind if I ask you how adapted the element triclamp holder to the threaded fitting? I'd love to be able to pop the element out for easy cleaning.

Absolutely. I used this adapter to thread into the 1.5" NPT Tee, I used this adapter to screw the .5" NPT probe into, and I have this temp prove from Auber. The length of the probe is perfect for how it's setup. It's practically sitting right in the middle of the tubing so the flow is right over it.

Edit: Sorry I just realized you asked about the element. I used this adapter for that. It's an adapter to 2" TC, but here is a link to the eBay listing. You can pick what size TC your connecting to.
 

Latest posts

Back
Top