• Please visit and share your knowledge at our sister communities:
  • If you have not, please join our official Homebrewing Facebook Group!

    Homebrewing Facebook Group

As they say: another BRUTUS is born!

Homebrew Talk

Help Support Homebrew Talk:

This site may earn a commission from merchant affiliate links, including eBay, Amazon, and others.

jcaudill

Well-Known Member
Joined
Dec 2, 2010
Messages
990
Reaction score
93
Location
VA Beach
I have been patiently waiting for months now to make this post. I decided to bypass all the build posts and instead start towards the end of the project when most of the build is done. All that's really in limbo now is the Brewtroller.

The short story:

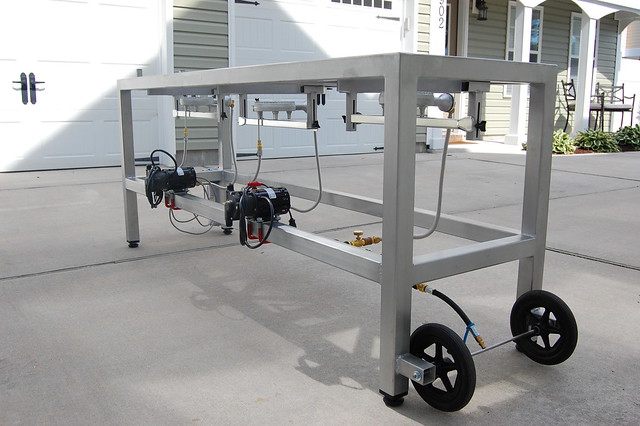
- 2" steel tube, coated in Cermachrome (Ceramic coating with a chrome like sheen when you can burnish it)
- Adjustable leveling legs
- Hose(s) holder(s)
- Heavy duty wheels to ease moving it around
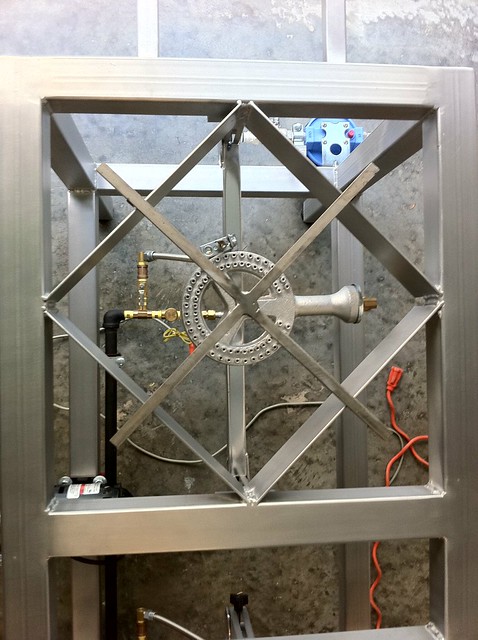
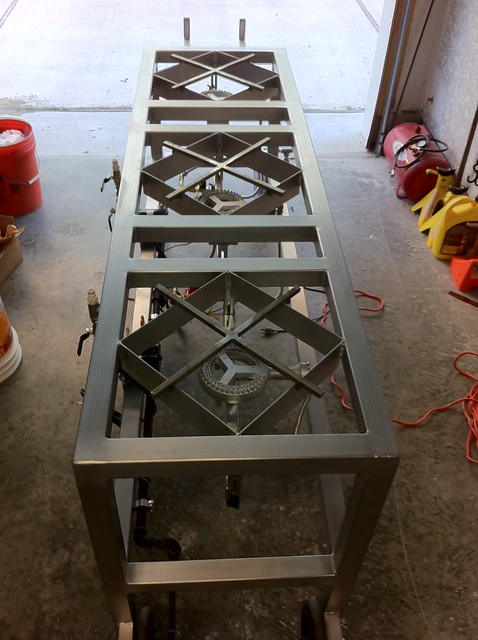
- Integrated wind shields
- 6" ring burners from Agrisupply
- Adjustable height burners (+/- 2")
- Adjustable height pilot light burners
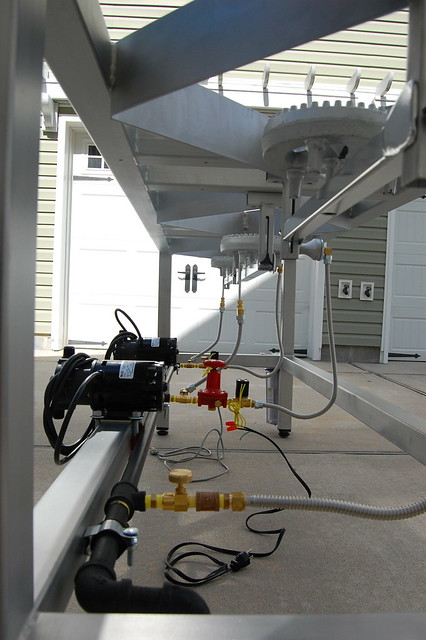
- BIP main rail painted black with high-temp paint and secured by conduit clamps
- A plethora of brass fittings, regulators, valves, etc. Open to any questions!
- 1/4" Aluminum tubing to the Q314A pilots
- 2 x 809HS March pumps secured by U-Bolts and Plastidipped to protect the frame
- Secured water filter with bypass for unfiltered water (cleaning pots, etc)

I think that's about it. Open to any questions or comments. Thanks!

Build Photo Set: http://www.flickr.com/photos/57569099@N06/sets/72157625905054883/
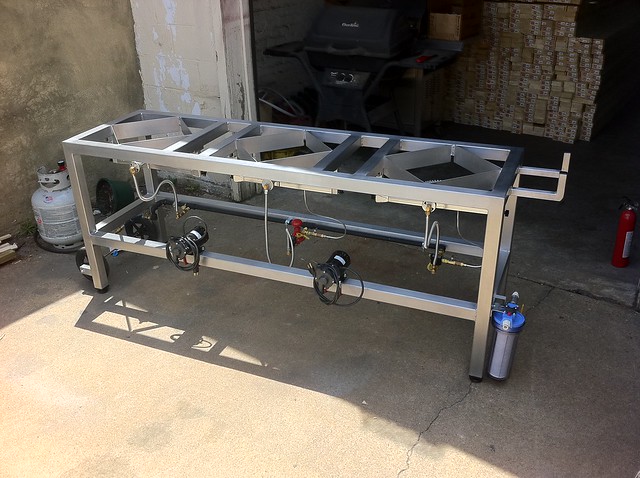

IMG_0765 by brewerJP, on Flickr
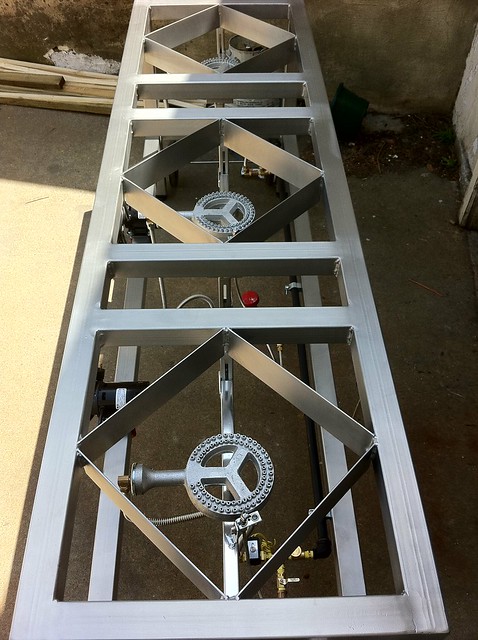

IMG_0777 by brewerJP, on Flickr


IMG_0767 by brewerJP, on Flickr
 
There should be warning: Pictures are full of awesomeness!
Something tells me that you wont stop on this...
 
LOL - thanks very much all! I will try and be gentle on the picture posting such as not to overexcite anyone too much :)
 
Very nice, although I refuse to be jealous of propane setups. That coating is sweet, I hope it stays on when the heat is applied.


_
 
Very nice, although I refuse to be jealous of propane setups. That coating is sweet, I hope it stays on when the heat is applied.


_

Can't say I had a ton of choice in that matter. It's LP or bust :)

I hope the coating holds up too although I'll be shocked if it doesn't: it's rated to 2000 degrees and used on hot engine parts like manifolds and downpipes.

-J
 
Tell me more about the coating, is it a true baked on ceramic coating, did you do it yourself? I priced my stand at a local powder coating company, and I could have used SS for the cost of ceramic coating. I really like your rig.
 
It is a true baked on ceramic coating. Lookup cermachrome on Google and you'll be able to find out more about it. Like I mentioned in the first post it is commonly used on very hot engine parts like exhaust manifolds, turbo downpipes, etc etc - things that have 1800+ degree exhaust running through them. If for whatever reason this does not hold up then I think it's reasonable to say nothing will.

It is not a particularly cheap coating - on the other hand it's not that much more expensive than a true high-temp powdercoat which only stands up to 600 degrees typically. I'm just hoping I can add an viable alternative to the mix because we all know the issues people have encountered with various finishes. This is one I had not seen tried and am fortunate the place that is capable of doing it is 5 minutes from my house!

Thanks.
 
Looks nice! Looks very pro. I have a few....err...bunch questions as I am going down the same path (gas brutus-style stand with brewtroller control). The questions are:

-What kind of gas controllers and valves were you planning to run in order to work with Brewtroller?

-Each burner looks to have a slightly different gas setup on it. Can you explain the differences?

-How did you decide on the height of your wind shields?

-How did you determine the initial mounting height of your burners? Did you fire them up before final welding or just made it adjustable enough to work (Trying to figure this one out for myself)?

-I really like your adjustable burner "bar!" In the pictures I can't figure out how you mounted the burner to the bar. Can you show a pic of that?

Again, really nice work. This is one of those things that needs it's own dedicated framed picture on the desk at work.

Thanks! I'll do my best:

- I am running 110v solenoids from valves4projects on eBay - they have a good reputation in the community and are cheap enough. I am only running those and the two pumps on manual relays - no valves as I don't ever intend on any automated transfers.

- Ok as for the differences: BK burner is just a ball valve for flame control and them direct to the burner. No BT intervention here. HLT burner has a ball valve for flame control to the solenoid operated by BT and then to the burner. The tee is for the pilot light which is manually lit and has a needle valve to control gas into the pilot. MLT is very similar to the HLT except instead of a ball valve I use a 0-10 psi regular that gives much finer control of the MLT burner.

- For the height of the shield/burner I used the height from the SQ-14 (and this is what I used to use for brewing). That is 3" and I can go about an inch below that so I have around 3" range (I obviously can't go all the way to the top so hence why it's 3" and not 4"). I also tried to use some data I found laying around on HBT as to where people mounted their burners.

- I will get some better pics of the individual components and post them up shortly. I'll be back at the shop I think mid-week. I'll let you know when they're up.

Hope this helps! Let me know if you have any more questions.

JP
 
Looks nice! Looks very pro. I have a few....err...bunch questions as I am going down the same path (gas brutus-style stand with brewtroller control). The questions are:

-What kind of gas controllers and valves were you planning to run in order to work with Brewtroller?

-Each burner looks to have a slightly different gas setup on it. Can you explain the differences?

-How did you decide on the height of your wind shields?

-How did you determine the initial mounting height of your burners? Did you fire them up before final welding or just made it adjustable enough to work (Trying to figure this one out for myself)?

-I really like your adjustable burner "bar!" In the pictures I can't figure out how you mounted the burner to the bar. Can you show a pic of that?

Again, really nice work. This is one of those things that needs it's own dedicated framed picture on the desk at work.

I put some closer pictures of the burner supports on the photostream linked in the first post. Hope that helps.

Thanks!
 
I would be more impressed if the kettles were shown with the stand. I sure hope they aren't crummy converted kegs, polished or not they would not do justice to this machine. What is the distance from the floor to the top of the MT when in use? Do you fear fire and explosion risk with continuous pilot burners like that? you're gonna shoot your eye out kid!
 
More pictures coming soon ;-) I finally was able to transport it to my house today. I will assure you that I did not choose Keggle's for pots. While price may be attractive the uneven heat distribution is not and I am trying to produce quality brew!

I'll give you the measurements tomorrow as well because I don't remember them off the top of my head. I can tell you I have no fear of explosion. About the most I ever see happening is a massive fireball if there's a leak somewhere in my plumbing. It's no more of a risk to me than a common household water heater is.
 
Excellent! Looking forward to more pics. I think we need some pics of it in action once you get it finished.
 
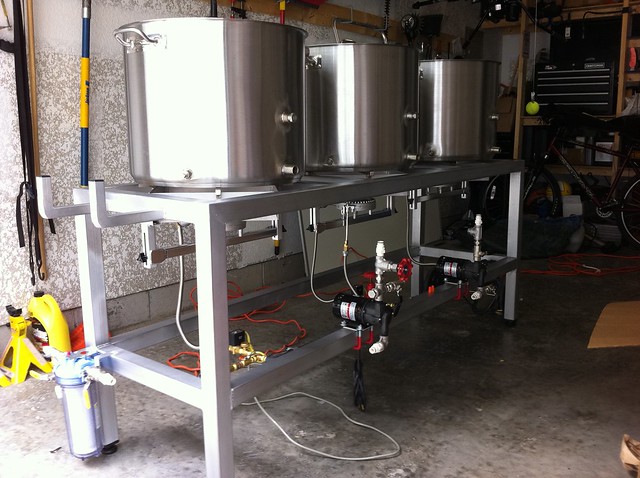
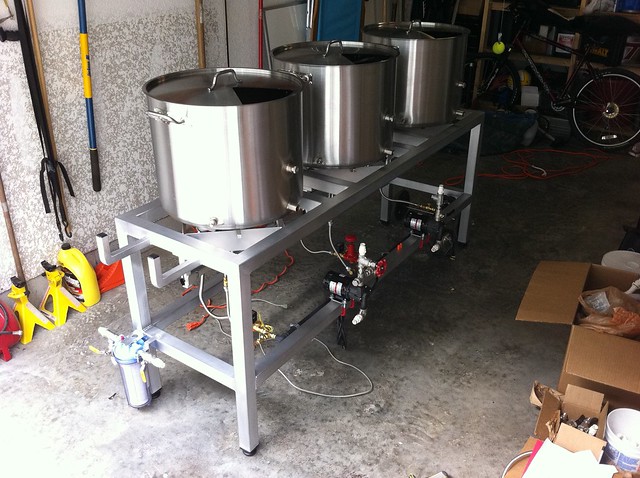
So it's been a bit slow the last few weeks because I've been waiting for shipments to arrive with the remaining parts. I did clean up the propane plumbing and convert the pilot hard lines into flex lines so that I could easily take them apart later if need be. Also have the pump plumbing figured out I believe - the one that has the gate valve on it is what it will end up being - the other ignore as I haven't fixed it yet. Also had some basic stainless grates made to sit on top of my wind screens and elevate the pots - KISS. As you can see, I set the pots on there to get a more complete picture. Enjoy!


DSC_0114 by brewerJP, on Flickr


DSC_0117 by brewerJP, on Flickr


photo 2 by brewerJP, on Flickr


photo 1 by brewerJP, on Flickr


photo 3 by brewerJP, on Flickr


photo 4 by brewerJP, on Flickr
 
I have been patiently waiting for months now to make this post. I decided to bypass all the build posts and instead start towards the end of the project when most of the build is done. All that's really in limbo now is the Brewtroller.

The short story:

- 2" steel tube, coated in Cermachrome (Ceramic coating with a chrome like sheen when you can burnish it)
- Adjustable leveling legs
- Hose(s) holder(s)
- Heavy duty wheels to ease moving it around
- Integrated wind shields
- 6" ring burners from Agrisupply
- Adjustable height burners (+/- 2")
- Adjustable height pilot light burners
- BIP main rail painted black with high-temp paint and secured by conduit clamps
- A plethora of brass fittings, regulators, valves, etc. Open to any questions!
- 1/4" Aluminum tubing to the Q314A pilots
- 2 x 809HS March pumps secured by U-Bolts and Plastidipped to protect the frame
- Secured water filter with bypass for unfiltered water (cleaning pots, etc)

I think that's about it. Open to any questions or comments. Thanks!


What PSI is your regulator? I build almost the same setup except with 3 of those burners. Seeing as how they are low pressure burners i thought i could bump up the regulator pressure then throttle that back with needle valves at the burner. Right now i only have a 10PSI regulator on it.

Also where did you get those needle valves that you are using?

Hello - the regulator on the tank is 0-30 and on the MT 0-10. Each of the burners are capable of 10psi or so but rarely if ever will all three run
full bore.

The needle valves came from www.flameengineering.com.

HTH, JP
 
I like the burner adjustability. Smart thinking. I have the Sabco brew frame. Made my own controller. The sabco is sealed for wind blockage I guess, but it's difficult to get enough air in there.

I got it tuned in, but it wasn't easily adjustable like yours.

You'll get some heat patina, but won't worry much because you'll be relaxing and having a homebrew!
Nice job.
 
Back
Top