And so it begins - My Brucontrol build

Homebrew Talk - Beer, Wine, Mead, & Cider Brewing Discussion Forum

Help Support Homebrew Talk - Beer, Wine, Mead, & Cider Brewing Discussion Forum:

This site may earn a commission from merchant affiliate links, including eBay, Amazon, and others.

shadow160

Well-Known Member
Joined
May 29, 2016
Messages
125
Reaction score
35
Location
Orlando
Let the madness begin...

I have been following the Brucontrol thread for just about a year, due to life getting in the way I am just getting around to starting the build.

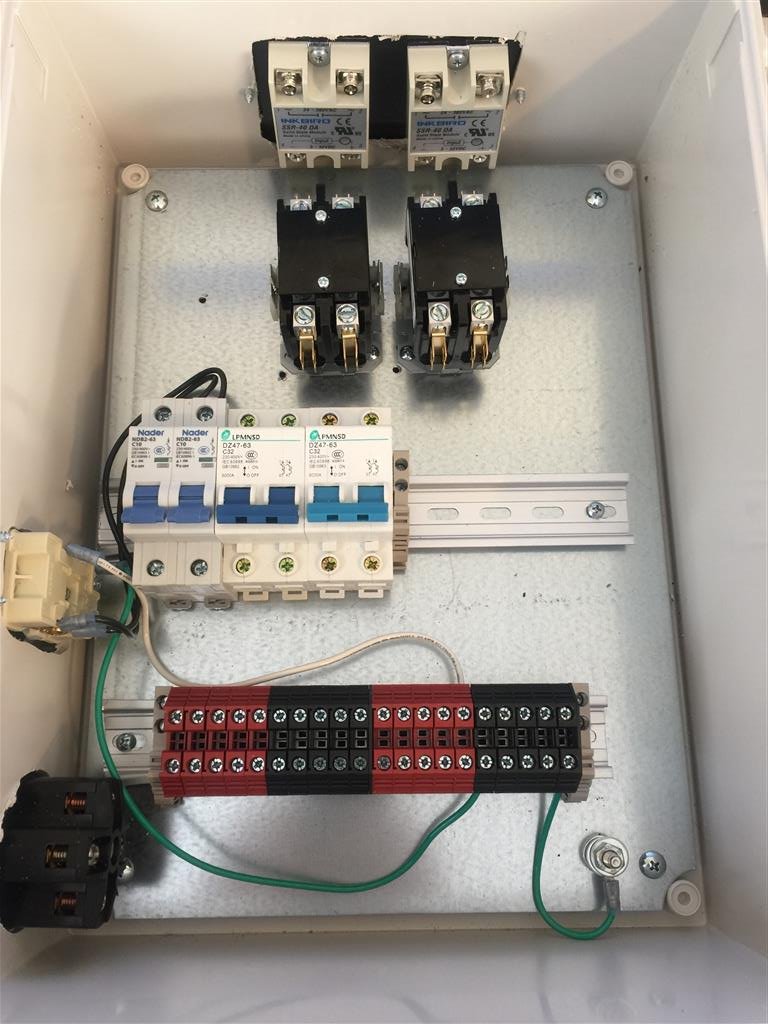
The box I purchased feels a lot smaller than it initially looked once I started laying parts in it so I have decided to go with one box for high voltage and another for low voltage. I put a piece of plywood in the back of the box for ease of mounting components but the more I look at it the more I think I do not like it.
 

Attachments

  • IMG_9310.JPG
    IMG_9310.JPG
    985.4 KB · Views: 304
Glad to see you getting going. Pretty good group here. We'll help you along. Most enclosure manufacturers offer a metal back plate. Get it and use it. That's how your rail will be grounded, and it will preserve the ground integrity throughout the enclosure. You definitely don't want a combustible material inside your enclosure!
 
Ok the wood is gone, I feel safer this way. I will see if this box has a metal insert, I did not see one when I purchased it from amazon. I was going to run a ground wire to each rail to keep it safe.
 

Attachments

  • IMG_9312.JPG
    IMG_9312.JPG
    903.9 KB · Views: 200
Ok I actually found the back-plate and ordered it so I am back in a holding pattern till Tuesday :(
 
This will be a multi part build but I guess they all are. I am going to build out the high voltage side then the low in another box. If there is any down time I will start to figure out the kettle config. This system will likely start is life as a semi automated system with the automated control valves coming in later. That way as a first time builder I do not have to wrap my head around so many parts at once.
 
@GParkins and I have wrestled with the one box/two box strategy. I personally think one large box is more efficient than two, but the arguments for two are somewhat compelling, so I am glad to see someone venture down this path.

What will be the “threshold”? Meaning what components will be where? For example, where will the DC power supplies be?
 
I am planning on the DC power supply being on the bottom rail of the high voltage box next to the breakers. When I bought the box I was planning on running this as an EBIAB so I *think* I could have got everything in here for that. Switching to the 50A to vessel there is no way I can squeeze everything in. I looked at getting a bigger box but they were kind of pricey and I did not want to waste the money that I spent on this one. Since I cut the outlets in I figured I am committed.
 
Since DC power is more susceptible to voltage drops, I'd put it in with the controller and relays. One 120VAC circuit from the power distribution box should cover 5, 12, and 24V supplies.
 
Last edited:
I also almost built multiple panels and separated the Ac from the low voltage stuff but in the end stuffed the brewing components in one panel and fermentation control in another.
 
Okay, so third time is a charm, I got the metal back-plate in. The heatsink for the SSR's came in but with the location of the holes the SSR's cover the mounting holes for the heatsink. I guess drill and retap is in order here? The more I look at this the more I think the 50A dryer outlet on the bottom left is not necessary, I should just bring the wiring in from the spa panel and it would be neater. So I may end up removing it.
IMG_9326 (Medium).JPG IMG_9325 (Medium).JPG
 
Okay, so third time is a charm, I got the metal back-plate in. The heatsink for the SSR's came in but with the location of the holes the SSR's cover the mounting holes for the heatsink. I guess drill and retap is in order here? The more I look at this the more I think the 50A dryer outlet on the bottom left is not necessary, I should just bring the wiring in from the spa panel and it would be neater. So I may end up removing it.
View attachment 588317 View attachment 588316

I used an epoxy to attach my heatsink to my control box (same box as you, but a bit bigger). I also used silicon to help seal any gaps for waterproofing.
 
I used an epoxy to attach my heatsink to my control box (same box as you, but a bit bigger). I also used silicon to help seal any gaps for waterproofing.
Yeah that was an idea I did not think of, I did not feel like hunting through the garage (my daughter is in the process of moving out so it is extra messy) to find my taps so I drilled and screwed the SSR's with a couple of sheet metal screws and also just ran a couple of sheet metal screws to hold the heatsink to the box for now. When I replace them with nuts and bolts I think I might just put some silicone under it for waterproofing
 

Attachments

  • IMG_9328 (Medium).JPG
    IMG_9328 (Medium).JPG
    119.9 KB · Views: 113
You should mount the SSRs with heat sink compound, not silicone.

Yes, thermal paste should be used when attaching ssr’s to the heatsink. We were discussing ways to attach the heatsink to the box. I guess I could have been mistaken though.
 
Correct I will be using thermal paste under the SSR's I was referring to the attachment to the enclosure to help with sealing against liquid entering the box in the event of an issue.

Here is the backplate http://a.co/d/jdh2onU @swimIan
 
So I will repeat what others before me have said. 6ga wire in enclosed spaces = no fun!
IMG_9335 (Medium).JPG
 
Taking advantage of the late night hours while everyone is sleeping. It is so much easier to get work done this way.IMG_9337 (Medium).JPG
So it looks like the high voltage side is almost done. As soon as I figure out what "safe" spot I put my thermal paste I can wire up the SSR's I have to mount the relays for the two pump outlets. the only other thing on this side i believe would be to bring in the wires that will connect to the spa panel. I removed the 50 amp receptacle and I will hard wire this panel to the spa panel with flexible conduit.
 
Does anyone know what size screws fit though the mounting holes on the relay boards?
relay.JPG
 
M3 should do it.
Sometimes m2.5 fits better, mainly when the components are spaced too close together/with the mounting hole... however, finding a m2.5 tap is difficult in Europe, I can't imagine the burden of locating one in the USA.
 
M3 did it, I used a nut and bolt with nylon washers and turned them into standoffs that I mounted to the side of the box.
IMG_9361.JPG
 
I hate detail soldering work. I am much better with larger items. But the part I have been postponing is done.

IMG_9350.JPG IMG_9351.JPG
 
So I will repeat what others before me have said. 6ga wire in enclosed spaces = no fun.

Just thinking “out loud”... could you use # 14 wire for a template, then bend the #6 to match and install?
Hoping to build my own some day.
 

Latest posts

Back
Top