
MOD EDIT: PUBLISHED
https://www.homebrewtalk.com/f36/all-grain-pictorial-video-tutorials-78963/
This weekend was my first adventure in to All-Grain brewing. I don't, however, have the money to secure any AG equipment, so I was forced to use a method that would work with only the equipment available in your basic extract starter kit. This is a GREAT way for a beginning brewer to start AG brewing, and to learn and practice the fundamentals. They can then spend the money down the line on more advanced equipment to make larger, more efficient batches.
Before I go any further, I wanted to give due credit to two other members. DeathBrewer's Easy Stovetop AG Brewing Method was really where I adapted all of my procedures from. Almost every step described below comes directly from his process. I just made a few minor changes. Also, the recipe I used in this example is a variation on BierMuncher's Belgian Wit. I learned a lot, not only from these two threads, but from asking both DeathBrewer and BierMuncher a lot of questions, and they were very helpful. Thanks guys!
Now for the good stuff.
To start off, it's important to point out that, without a 6.5 gallon kettle, you really won't be able to do a full-boil, which means you really will not be getting the efficiency you need for a good brew. I don't have a 6.5 kettle yet, so the example below is using a 5 gallon, stainless steel economy brew kettle, and I'm making 2.5 gallon batches. I actually made one 2.5 gallon batch on Sunday, then another on Monday, then combined the two. Everything else needed for this method that would not come in a basic starter kit can be purchased for a few bucks.
Equipment Needed for < 3 Gallon All-Grain Batch
-5 Gallon Kettle w/ lid
-Stock pot or Dutch Ovens capable of holding 10 quarts (you can use multiple pots if none of them are big enough, this will be used to heat the sparge water while the mash finishes)
-Stirring Rod (I will be using a 24 inch mash paddle)
-Dial Thermometer
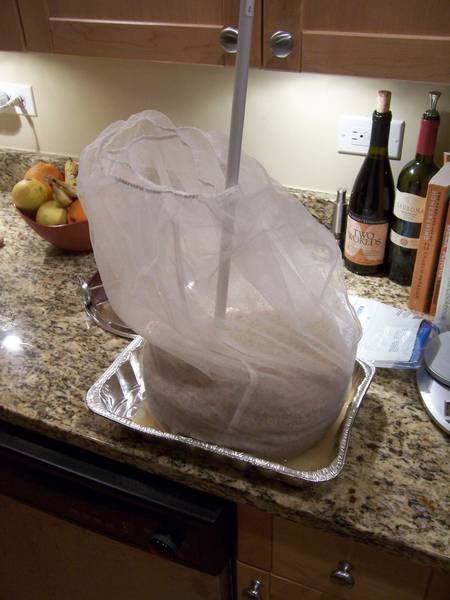
-Paint Strainer bags (5 Gallon) (Can be purchased at Home Depot)
-Clean bucket (Ale Pale works) to hold wort while sparging
-Canister to dispose of spent grains (in other words, trash)
-Pan, pot, baking sheet or drip tray to collect drippings from grain bag (I'm using a tin foil pan, which can be bought from any grocery store)
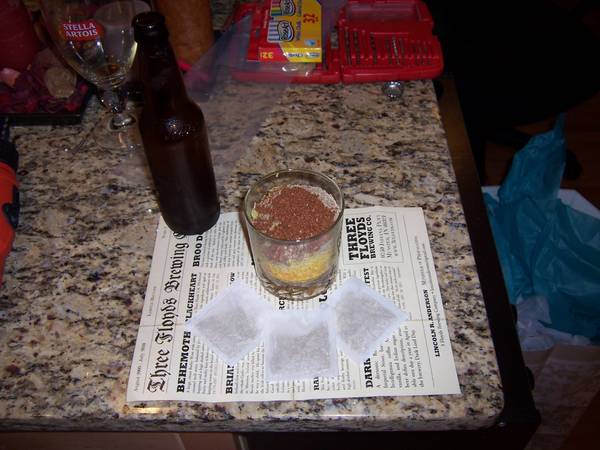
For this, I will be brewing up a Belgian Wit recipe. I will post my exact recipe at the bottom, but if you're interested, I suggest you check out BierMuncher's Belgian Wit.
Process:
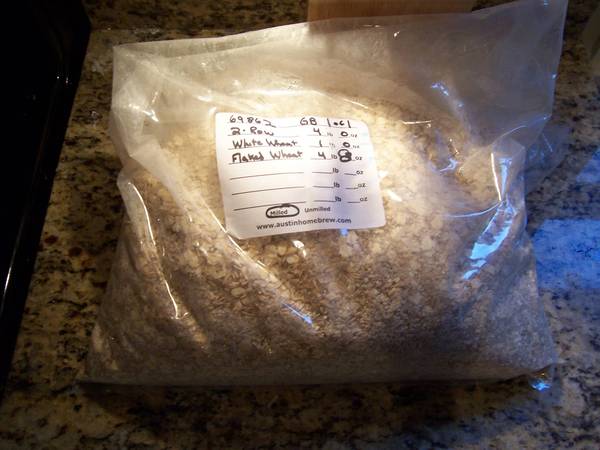
1. Calculate how much strike water will be required. In my example, I was using 4.75 lbs of grain for my 2.5 gallon batch. I decided to go with 2 gallons of strike water, for a water to grist ratio of 1.68 qts/lb.
2. Heat your strike water in your 5 gallon kettle.

3. Calculate your desired strike water temperature with the following formula:
Tw = (0.2/R)(T2-T1) + T2
Tw Temperature of infusion water
T2 Target Mash Temperature (this will be defined based on the recipe and grains you are using)
T1 Initial Temperature of mash (assumed to be 65F, ambient temperature of my kitchen)
R - Water to grist ratio
Tw = (0.2/1.68)(155F-65F) + 155F
Tw = 165.5F (This will change for your recipe and process, so make sure to run your own calculations.)
4. When you reach your strike temperature, turn off the burner, double bag paint strainer bags in boil kettle. Wrap edges of bag over the sides of the kettle if possible to hold the bags in place and to keep the grains from falling out of the bag. Add grains to the strainer bags. Pour the grains in slowly, and while stirring, to make sure that you are evenly distributing the grains in the strike water.

5. Once you are doughed in, you should be pretty close to your target mash temperature. If you are more than a couple degrees off, add a little hot water to heat it up, or add a little cool water to cool it down, until you're within a few degrees of your target temp.
6. Because I have an economy kettle, the stainless steel is very thin, and I imagine that a lot of heat will be lost. So I decided to wrap my kettle in a big beach towel to insulate it throughout the mashing process. This is an experimental step, and is by no means necessary. Cover your pot and let sit.
EDIT: In brewing another batch with this process, I found another method for maintaining mash temperatures that proved very effective. I preheated my oven for my approximate mash temperature and put the kettle in there for the duration of the process. It was a bit of a PIA to take out and put back to stir, but my mash temperature did not fluctuate a single degree in the entire hour. Remember, if you do this, take the racks out of your oven before you preheat it, I don't want you to burn yourself, or a pet. :cross:

7. It is recommended by some people to stir the mash every once in awhile to increase efficiency. I plan to do this every 10-20 minutes. The downside to this is that the wort will lose heat every time the kettle is opened to stir. It may be necessary to add hot water to the wort if the temperature drops significantly below the mash temperature.
8. Now would be a good time to enjoy a good homebrew. I prepared ahead of time and decided to try a new craft brew I had never had. Bell's Expedition Imperial Stout, it was delicious.

https://www.homebrewtalk.com/f36/all-grain-pictorial-video-tutorials-78963/
This weekend was my first adventure in to All-Grain brewing. I don't, however, have the money to secure any AG equipment, so I was forced to use a method that would work with only the equipment available in your basic extract starter kit. This is a GREAT way for a beginning brewer to start AG brewing, and to learn and practice the fundamentals. They can then spend the money down the line on more advanced equipment to make larger, more efficient batches.
Before I go any further, I wanted to give due credit to two other members. DeathBrewer's Easy Stovetop AG Brewing Method was really where I adapted all of my procedures from. Almost every step described below comes directly from his process. I just made a few minor changes. Also, the recipe I used in this example is a variation on BierMuncher's Belgian Wit. I learned a lot, not only from these two threads, but from asking both DeathBrewer and BierMuncher a lot of questions, and they were very helpful. Thanks guys!
Now for the good stuff.
To start off, it's important to point out that, without a 6.5 gallon kettle, you really won't be able to do a full-boil, which means you really will not be getting the efficiency you need for a good brew. I don't have a 6.5 kettle yet, so the example below is using a 5 gallon, stainless steel economy brew kettle, and I'm making 2.5 gallon batches. I actually made one 2.5 gallon batch on Sunday, then another on Monday, then combined the two. Everything else needed for this method that would not come in a basic starter kit can be purchased for a few bucks.
Equipment Needed for < 3 Gallon All-Grain Batch
-5 Gallon Kettle w/ lid
-Stock pot or Dutch Ovens capable of holding 10 quarts (you can use multiple pots if none of them are big enough, this will be used to heat the sparge water while the mash finishes)
-Stirring Rod (I will be using a 24 inch mash paddle)
-Dial Thermometer
-Paint Strainer bags (5 Gallon) (Can be purchased at Home Depot)
-Clean bucket (Ale Pale works) to hold wort while sparging
-Canister to dispose of spent grains (in other words, trash)
-Pan, pot, baking sheet or drip tray to collect drippings from grain bag (I'm using a tin foil pan, which can be bought from any grocery store)
For this, I will be brewing up a Belgian Wit recipe. I will post my exact recipe at the bottom, but if you're interested, I suggest you check out BierMuncher's Belgian Wit.
Process:
1. Calculate how much strike water will be required. In my example, I was using 4.75 lbs of grain for my 2.5 gallon batch. I decided to go with 2 gallons of strike water, for a water to grist ratio of 1.68 qts/lb.
2. Heat your strike water in your 5 gallon kettle.
3. Calculate your desired strike water temperature with the following formula:
Tw = (0.2/R)(T2-T1) + T2
Tw Temperature of infusion water
T2 Target Mash Temperature (this will be defined based on the recipe and grains you are using)
T1 Initial Temperature of mash (assumed to be 65F, ambient temperature of my kitchen)
R - Water to grist ratio
Tw = (0.2/1.68)(155F-65F) + 155F
Tw = 165.5F (This will change for your recipe and process, so make sure to run your own calculations.)
4. When you reach your strike temperature, turn off the burner, double bag paint strainer bags in boil kettle. Wrap edges of bag over the sides of the kettle if possible to hold the bags in place and to keep the grains from falling out of the bag. Add grains to the strainer bags. Pour the grains in slowly, and while stirring, to make sure that you are evenly distributing the grains in the strike water.
5. Once you are doughed in, you should be pretty close to your target mash temperature. If you are more than a couple degrees off, add a little hot water to heat it up, or add a little cool water to cool it down, until you're within a few degrees of your target temp.
6. Because I have an economy kettle, the stainless steel is very thin, and I imagine that a lot of heat will be lost. So I decided to wrap my kettle in a big beach towel to insulate it throughout the mashing process. This is an experimental step, and is by no means necessary. Cover your pot and let sit.
EDIT: In brewing another batch with this process, I found another method for maintaining mash temperatures that proved very effective. I preheated my oven for my approximate mash temperature and put the kettle in there for the duration of the process. It was a bit of a PIA to take out and put back to stir, but my mash temperature did not fluctuate a single degree in the entire hour. Remember, if you do this, take the racks out of your oven before you preheat it, I don't want you to burn yourself, or a pet. :cross:
7. It is recommended by some people to stir the mash every once in awhile to increase efficiency. I plan to do this every 10-20 minutes. The downside to this is that the wort will lose heat every time the kettle is opened to stir. It may be necessary to add hot water to the wort if the temperature drops significantly below the mash temperature.
8. Now would be a good time to enjoy a good homebrew. I prepared ahead of time and decided to try a new craft brew I had never had. Bell's Expedition Imperial Stout, it was delicious.
")


 but if your electric stove will fit a canning element you could try that to improve your boil. I purchased one for my stove off ebay for 22.58 shipped. I also only have a 20qt kettle but I was able to get that to boil about an inch from the top without too much trouble when I installed it. The one I purchased is a 2600 watt element