The FRP was actually given to me from as left-over from a job. It is pebbled on one side. I used the smooth side (back) as the inside of the hood thinking that condensation would be more apt to travel down to the drip channel.
You are using an out of date browser. It may not display this or other websites correctly.
You should upgrade or use an alternative browser.
You should upgrade or use an alternative browser.
5-1/2 foot DIY Hood for approx. $75
- Thread starter deprecated
- Start date

Help Support Homebrew Talk:
This site may earn a commission from merchant affiliate
links, including eBay, Amazon, and others.
masteraviator
Well-Known Member
FRP is also know as Marlite as a brand name of Masonite.
Great build! I might have to try this!
Badgerhops
Member
- Joined
- Dec 2, 2012
- Messages
- 8
- Reaction score
- 2
Went with a pretty similar design. Tried to keep things as ultralight as possible (semi-permanant setup on the cheap), so I went without the wooden 1/2 circle end pieces. Seam is epoxied between FRP parts. 6' L, 2.5' W, 1' H due to super low ceilings.
Finally brewed with this setup for the first time today...still some bugs to iron out (J-trays and exhaust drains are needed...leaks...LEAKS EVERYWHEEREEE). Working on a 'clean' design solution.
:smack:
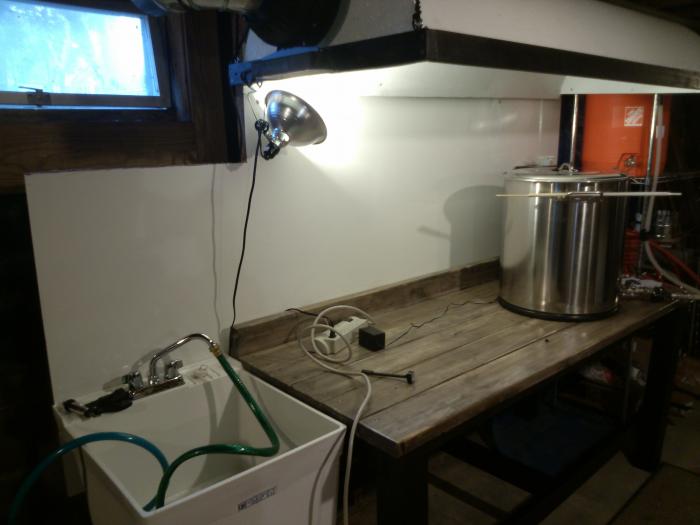
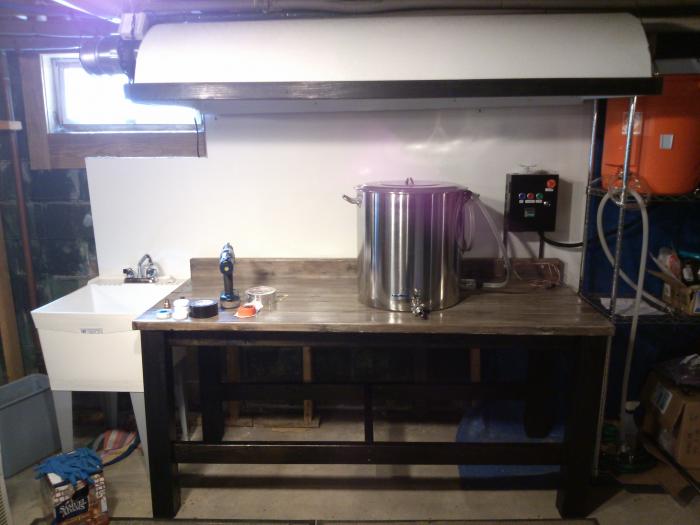
Finally brewed with this setup for the first time today...still some bugs to iron out (J-trays and exhaust drains are needed...leaks...LEAKS EVERYWHEEREEE). Working on a 'clean' design solution.
:smack:


$53.24
1pc Hose Barb/MFL 1.5" Tri Clamp to Ball Lock Post Liquid Gas Homebrew Kegging Fermentation Parts Brewer Hardware SUS304(Liquid MFL)
yunchengshiyanhuqucuichendianzishangwuyouxiangongsi

$10.99 ($31.16 / Ounce)
Hornindal Kveik Yeast for Homebrewing - Mead, Cider, Wine, Beer - 10g Packet - Saccharomyces Cerevisiae - Sold by Shadowhive.com
Shadowhive

$7.79 ($7.79 / Count)
Craft A Brew - LalBrew Voss™ - Kveik Ale Yeast - For Craft Lagers - Ingredients for Home Brewing - Beer Making Supplies - (1 Pack)
Craft a Brew

$176.97
1pc Commercial Keg Manifold 2" Tri Clamp,Ball Lock Tapping Head,Pressure Gauge/Adjustable PRV for Kegging,Fermentation Control
hanhanbaihuoxiaoshoudian

$53.24
1pc Hose Barb/MFL 1.5" Tri Clamp to Ball Lock Post Liquid Gas Homebrew Kegging Fermentation Parts Brewer Hardware SUS304(Liquid Hose Barb)
Guangshui Weilu You Trading Co., Ltd

$20.94
$29.99
The Brew Your Own Big Book of Clone Recipes: Featuring 300 Homebrew Recipes from Your Favorite Breweries
Amazon.com

$33.99 ($17.00 / Count)
$41.99 ($21.00 / Count)
2 Pack 1 Gallon Large Fermentation Jars with 3 Airlocks and 2 SCREW Lids(100% Airtight Heavy Duty Lid w Silicone) - Wide Mouth Glass Jars w Scale Mark - Pickle Jars for Sauerkraut, Sourdough Starter
Qianfenie Direct

$49.95 ($0.08 / Fl Oz)
$52.99 ($0.08 / Fl Oz)
Brewer's Best - 1073 - Home Brew Beer Ingredient Kit (5 gallon), (Blueberry Honey Ale) Golden
Amazon.com

$22.00 ($623.23 / Ounce)
AMZLMPKNTW Ball Lock Sample Faucet 30cm Reinforced Silicone Hose Secondary Fermentation Homebrew Kegging joyful
无为中南商贸有限公司

$58.16
HUIZHUGS Brewing Equipment Keg Ball Lock Faucet 30cm Reinforced Silicone Hose Secondary Fermentation Homebrew Kegging Brewing Equipment
xiangshuizhenzhanglingfengshop
BadNewsBrewery
Well-Known Member
So I built a similar version, but wanted to vent out the back and not the side. So I just made a triangle instead of a semi-circle. I had to cut the FRP and tape the seams (didn't do a great job, but it works). It's an option for those who want a slightly different but equally cheap design.
What is, or what do you think is, the smallest diameter FRP would bend to before breaking or unreasonably stressing, cracking, or otherwise going to pot?
Decoy/Mike,
I have a sheet rolled up in the garage that is probably 2 ft. diameter from the 8 ft. side of a 4x8 sheet. However, I don't know if there is a direction to the fibers that would prevent you from making that tight of a diameter along the 4 ft. side...
Went with a pretty similar design. Tried to keep things as ultralight as possible (semi-permanant setup on the cheap), so I went without the wooden 1/2 circle end pieces. Seam is epoxied between FRP parts. 6' L, 2.5' W, 1' H due to super low ceilings.
Finally brewed with this setup for the first time today...still some bugs to iron out (J-trays and exhaust drains are needed...leaks...LEAKS EVERYWHEEREEE). Working on a 'clean' design solution.
:smack:
Liquid leaks or exhaust leaks? Either way some silicon seal would probably fix it.
Liquid leaks or exhaust leaks? Either way some silicon seal would probably fix it.
Yeah, mostly keep getting liquid leaks from the seam on the vent fan. Just need to pull it all apart and get a good bead in there and tape the outside.
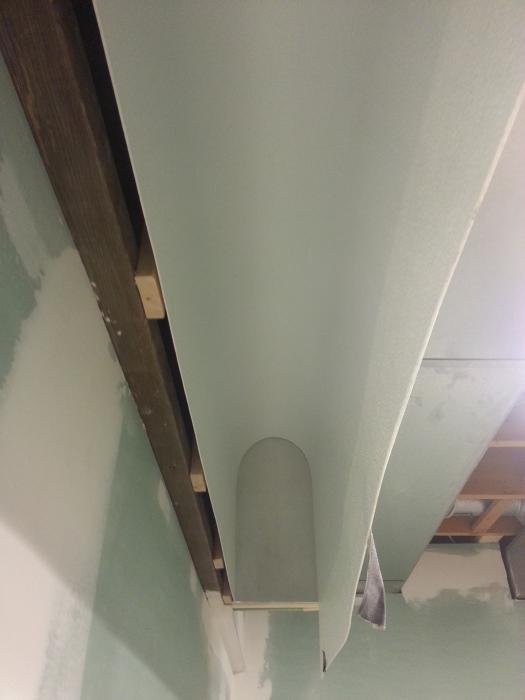
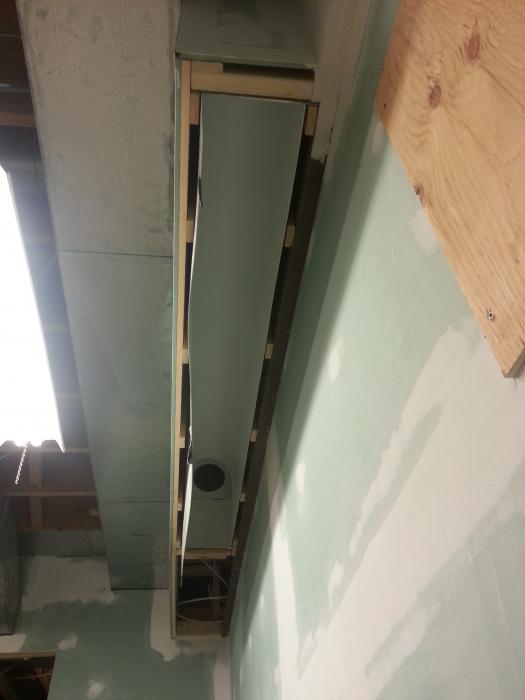
I pulled it off. The hood I framed is 8 inches from front to back, about 7 feet long, and 20 inches high. I cut the FRP on the table saw to 7 feet long, jammed it up into the framing and it makes a perfect round arc at the top leaving about 6 inches to trim off the front length. Pulled it out a little and trimmed with a jig saw. Nice solution - better than the all aluminum flashing I had planned originally. For the record, it took that 4-ish inch radius it took to get it in there without any cracking or any apparent abuse. SOLID! The end pieces are aluminum flashing glued with contact cement to plywood. Its a 6-inch duct and will be attaching a 400CFM fan. Will trim it with PVC moulding and caulk with silicone. One step closer to completing the electric brewery!



Last edited:
drksky
Well-Known Member
- Joined
- Feb 8, 2013
- Messages
- 362
- Reaction score
- 52
Once that is done, drop your 2x4 rectangular frame onto the hood. At this point you can work in your J-Channel between the FRP and 2x4's to catch condensation.
I like the design. What do you mean by "drop the rectangular frame onto the hood"? How is the rectangle joined to the rest of the assembly? Just screwed to the end pieces?
I like the design. What do you mean by "drop the rectangular frame onto the hood"?
Poor explanation on my part. I attached the larger piece of FRP to the end caps with the lathe screws and then dropped the already assembled 2x4 frame over the hood. It would be just as easy (easier?) to assemble the 2x4 frame around the hood.
How is the rectangle joined to the rest of the assembly? Just screwed to the end pieces?
Exactly. It's not a very good picture but if you look at the last pic of my first post, I think you can see where it's screwed in.
drksky
Well-Known Member
- Joined
- Feb 8, 2013
- Messages
- 362
- Reaction score
- 52
Exactly. It's not a very good picture but if you look at the last pic of my first post, I think you can see where it's screwed in.
Ah yes, I see that now. So the FRP isn't attached to the frame on the front and back? No issues with stability?
Ah yes, I see that now. So the FRP isn't attached to the frame on the front and back? No issues with stability?
There are a few lathe screws from the inside of the hood into the frame, but those are just to hold the J-channel in place. There aren't any stability issues as the FRP once attached to the endcaps is very rigid and relatively light. Of course you want to suspend or hang it by the 2x4 frame.
kpr121
Well-Known Member
Great build! I am in planning stages of vent hoods and this might be the one I go with! Does anyone know how well FRP takes painting? Like the picture with the wood frame stained the same as brewstand, but would prefer black instead of white surround. Im guessing some spray paint made for plastic would work.
Great build! I am in planning stages of vent hoods and this might be the one I go with! Does anyone know how well FRP takes painting? Like the picture with the wood frame stained the same as brewstand, but would prefer black instead of white surround. Im guessing some spray paint made for plastic would work.
I'm sure it would be fine. Now that you mention it...I think I have some plastic paint around here somewhere...

user 125772
Well-Known Member
- Joined
- Jul 18, 2012
- Messages
- 941
- Reaction score
- 272
Any kind of spray paint should be fine .
FPR is typically made with non-directional fiberglass matte impregnated with a mixture of clay and 2-part polyester resin. ...Not unlike what boats are made of.
Sand it, clean it, shoot it.
FPR is typically made with non-directional fiberglass matte impregnated with a mixture of clay and 2-part polyester resin. ...Not unlike what boats are made of.
Sand it, clean it, shoot it.
part16john
Well-Known Member
My hood inspired by this thread. Used an aluminum piece that I had left over.

drksky
Well-Known Member
- Joined
- Feb 8, 2013
- Messages
- 362
- Reaction score
- 52
What are you guys using to cut the FRP board? Jigsaw seems a little too rough of a cut?
For the straight cuts, I used a utility knife to score it good, then snapped it, just like cutting drywall. Edges aren't perfectly smooth, but clean up well with some light sanding. For the hole, I used a jigsaw with a finish wood blade.
For the straight cuts, I used a utility knife to score it good, then snapped it, just like cutting drywall. Edges aren't perfectly smooth, but clean up well with some light sanding. For the hole, I used a jigsaw with a finish wood blade.
Used a blade and scored like you said to knock the first big chunk off and then because I had some extra tried my jigsaw. Actually went through very clean so used that the rest of the way.
For the straight cuts, I used a utility knife to score it good, then snapped it, just like cutting drywall. Edges aren't perfectly smooth, but clean up well with some light sanding. For the hole, I used a jigsaw with a finish wood blade.
I used a table saw. It made a clean cut that didn't need any sanding. Got a little itchy - I did get the feeling I liberated a lot of glass particles into the air, though ... wear a mask.
Sent from my iPad using Home Brew
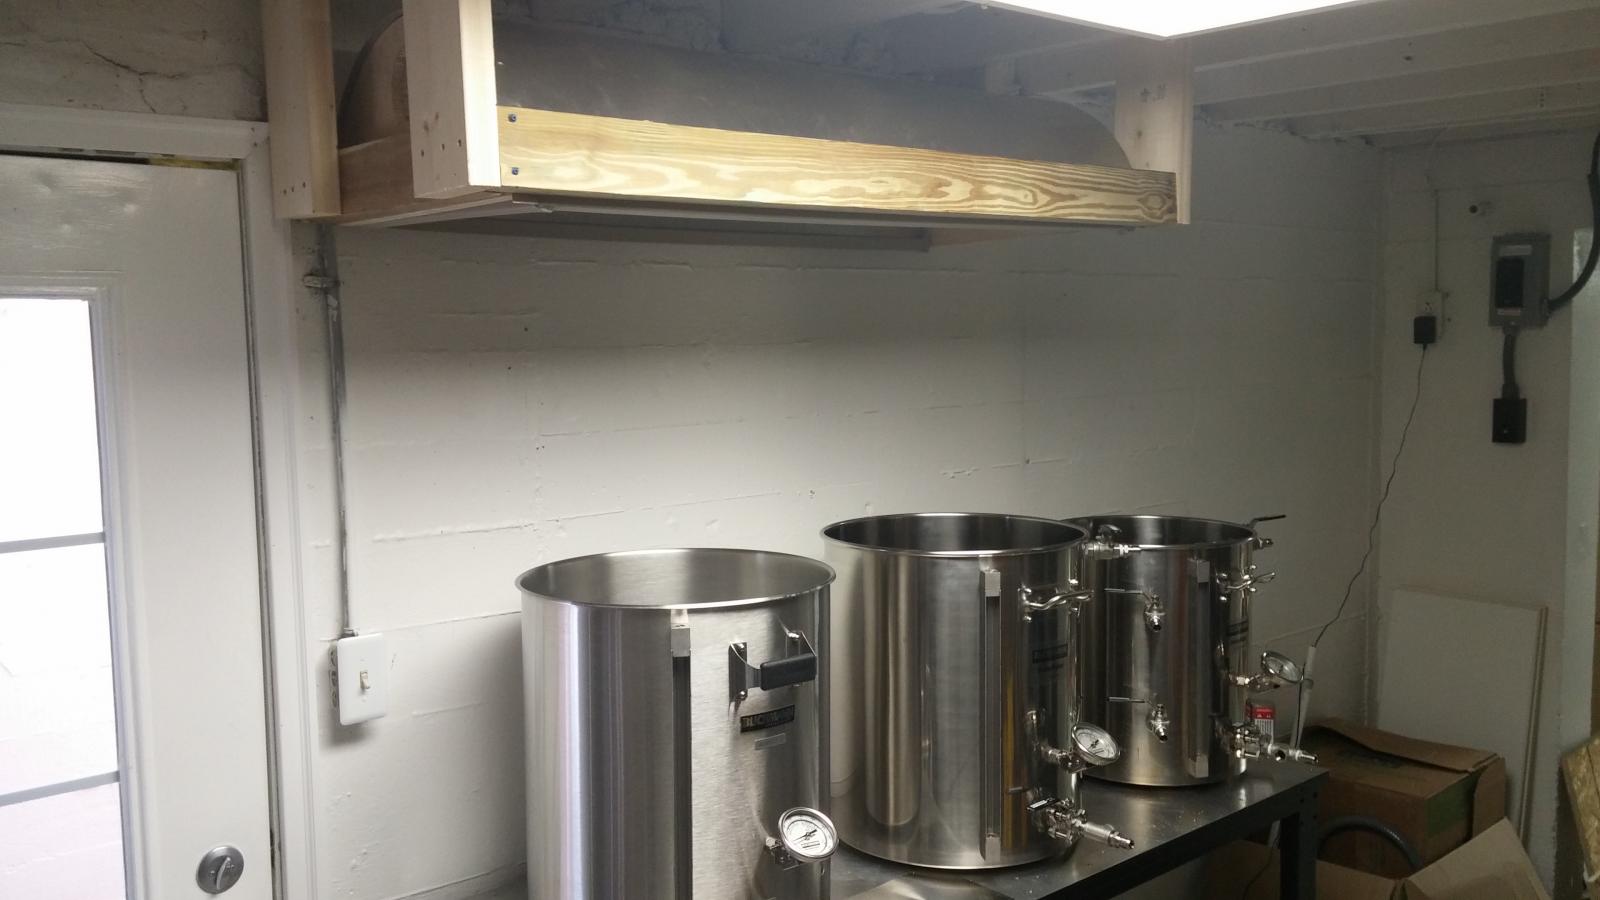
Been trying to up load pics but not able to. I have built one of these hoods over the weekend. I went with an 8 in fan with a higher than needed cfm. I did this because it is in the garage and figured I may need the extra cfm to kepp thing dry when the humidity rises. Thanks for the thread!
Still need to mount the motor and hang it
View attachment 1458697535172.jpg
View attachment 1458697560616.jpg
View attachment 1458697597506.jpg
View attachment 1458697639666.jpg
View attachment 1458697665846.jpg
View attachment 1458697535172.jpg
View attachment 1458697560616.jpg
View attachment 1458697597506.jpg
View attachment 1458697639666.jpg
View attachment 1458697665846.jpg
Was able to get it hung by myself this evening. Just need to add duct.
View attachment 1458787820240.jpg
View attachment 1458787820240.jpg
Similar threads
- Replies
- 1
- Views
- 1K
- Replies
- 10
- Views
- 3K
Latest posts
-
-
-
-
The Dysfunctional-Palooza Obnoxious Masshole BS Thread
- Latest: TheDudeLebowski
-
-
-


![Craft A Brew - Safale S-04 Dry Yeast - Fermentis - English Ale Dry Yeast - For English and American Ales and Hard Apple Ciders - Ingredients for Home Brewing - Beer Making Supplies - [1 Pack]](https://m.media-amazon.com/images/I/41fVGNh6JfL._SL500_.jpg)

