• Please visit and share your knowledge at our sister communities:
  • If you have not, please join our official Homebrewing Facebook Group!

    Homebrewing Facebook Group

2 or 3 vessels ???

Homebrew Talk

Help Support Homebrew Talk:

This site may earn a commission from merchant affiliate links, including eBay, Amazon, and others.

AkTom

Supporting Member
HBT Supporter
Joined
Jun 19, 2013
Messages
2,000
Reaction score
1,569
Location
Big Spring
I’m considering an electric brewery. I usually brew 5 gallons, with an occasional 10 gallon. I really need to do more 10 gallon batches as brew days sometimes are hard to come by.
My question is, should I go with 2 or 3 vessels? I like my 3 tier propane rig, but am ready for indoors electric. Give me pros and cons with each.
Thanks
 
I'm doing a 2-vessel electric brewing setup. It's a 10-gallon BK and a 10-gallon MT (rims system), so it won't produce a 10-gallon batch, but if I were doing 10-gallon batches regularly, that approach--2 vessels--would serve me well.
 
When you say 2 vessel, are you talking about a kettle RIMS setup? That's an approach I'm strongly considering, but I have concerns about efficiency (particularly for the really high gravity stouts I like to brew). I'm concerned that getting a 1.128 OG, for example, from a full volume mash may be problematic. I had no problems achieving that with my 3 vessel (cooler MLT, cooler HLT, boil kettle and batch sparge). rig.

It wouldn't be hard to heat up sparge water at the same time as the strike, draw it off into a cooler and perform a sparge, but it's not really a 2V system at that point.

If all I brewed were low-medium gravity beers, I'd probably just do a single vessel recirculating BIAB (but using a SS filter). I may end up trying to put together a rig that is flexible. Do a eBIAB for most beers using the boil kettle, but doing 3V for my big beers by adding an MTL & HLT or something. I've gone round and round on this for about 10 months now and every time I think I have it figured out, some new information throws a wrench in things.
 
I think it depends on the situation. I use 3 vessels and a rims, But I have a dedicated brew space with my equipment setup. if your system has to be packed up I would go with something more portable.

I find my setup works well for me, I started with herms and was not impressed. IMO having the HLT is a big plus.. otherwise your doing work arounds and pouring hot water into temporary vessels and such.. Coolers arent ideal for temps over 180 at all as the plastic becomes unstable and starts leaching into the water.(when a plastic cooler has warped this has already started happening).
I find my HLT useful for cleanup as well as mixing my water and correcting the ph... all things you may consider down the road.
 
Three works for me, since I fly sparge, and it gives me the ability to boil wort and get sanitizing water up to temp while at same time. I sanitize plate cooler, cool side transfer hoses/pump along with the fermentor I'm about to use just before I use them, so during boil is convenient.

I recently added tri clamp ferules to my keggles and went electric, saves time and gas money, eliminates need for boil foam control. Unless room is a limiting factor, i do not see any advantage in only two vessels, if you have the amperage to heat two at a time, it is not like you have to wash out the HLT when your done.
 
I used to be 3 vessel, but eliminated the HLT so now I'm 2 vessel. 10 gallon Igloo cooler Mash Tun, RIMS, and electric boil kettle. I do a modified fly/batch sparge - I heat my sparge water in the boil kettle, then transfer the entire sparge volume over to the mash tun (gently), so the upper layer of the mash tun is all water - kind of like a black and tan! Sparge as normal to the boil kettle. Mash efficiency is still the same as when I would do a traditional fly sparge.

Pros
  • Less space for the brew system to occupy
  • Less equipment to buy
  • Less plumbing needed
  • The potential is there to do on-demand sparge water heating
Cons:
  • Need 50 amp service to get simultaneous use of RIMS and Kettle heaters
  • Max. OG for a 5 gallon batch is around 1.080; I can do higher gravity beers, but I have to reduce the batch size. I'm ok with this, since 95% of what I brew is 1.060 or less, but it's an important thing to consider. I could go with a 15 gallon mash tun or on-demand sparge heating to allow more flexibility in the gravity, but I personally don't need it.
 
I went with two because space is a limiting factor for me. But I'm using a 5500w element in my RIMS tube (a la @BrunDog), so I can heat sparge water on demand if I want to make a beer big enough that I need to sparge. Most of the time I'll brew medium bodied beers, so I'll do no sparge with those.
 
I used to be 3 vessel, but eliminated the HLT so now I'm 2 vessel. 10 gallon Igloo cooler Mash Tun, RIMS, and electric boil kettle. I do a modified fly/batch sparge - I heat my sparge water in the boil kettle, then transfer the entire sparge volume over to the mash tun (gently), so the upper layer of the mash tun is all water - kind of like a black and tan! Sparge as normal to the boil kettle. Mash efficiency is still the same as when I would do a traditional fly sparge.

Pros
  • Less space for the brew system to occupy
  • Less equipment to buy
  • Less plumbing needed
  • The potential is there to do on-demand sparge water heating
Cons:
  • Need 50 amp service to get simultaneous use of RIMS and Kettle heaters
  • Max. OG for a 5 gallon batch is around 1.080; I can do higher gravity beers, but I have to reduce the batch size. I'm ok with this, since 95% of what I brew is 1.060 or less, but it's an important thing to consider. I could go with a 15 gallon mash tun or on-demand sparge heating to allow more flexibility in the gravity, but I personally don't need it.

the way I understand the way you sparge its still a fly sparge since your slowly running the sparge water through from top to bottom, but you just store all of the water on top of the grainbed instead of transferring a little at a time to the tun. I imagine it works quite well as I have experimented with that myself. Theoretically it should work exactly the same as a flysparge.

I know you mention 50a is needed but as you know I run my whole 3 vessel system off 30a including running my 4500w hlt and 1800w 240v rims at the same time so I think that all depends on the system design.
 
Last edited:
the way I understand the way you sparge its still a fly sparge since your slowly running the sparge water through from top to bottom, but you just store all of the water on top of the grainbed instead of transferring a little at a time to the tun. I imagine it works quite well as I have experimented with that myself. Theoretically it should work exactly the same as a flysparge.

I know you mention 50a is needed but as you know I run my whole 3 vessel system off 30a including running my 4500w hlt and 1800w 240v rims at the same time so I think that all depends on the system design.

Good points!

I don’t see any difference in results with my method vs. a traditional fly sparge.

I agree that 50 amp is not really “required” as there are ways to get it done with 30 amp as you have shown. However, it really does open your options up on the design end if you’re not limited to 30 amps...
 
I used to be 3 vessel, but eliminated the HLT so now I'm 2 vessel. 10 gallon Igloo cooler Mash Tun, RIMS, and electric boil kettle. I do a modified fly/batch sparge - I heat my sparge water in the boil kettle, then transfer the entire sparge volume over to the mash tun (gently), so the upper layer of the mash tun is all water - kind of like a black and tan! Sparge as normal to the boil kettle. Mash efficiency is still the same as when I would do a traditional fly sparge.

Pros
  • Less space for the brew system to occupy
  • Less equipment to buy
  • Less plumbing needed
  • The potential is there to do on-demand sparge water heating
Cons:
  • Need 50 amp service to get simultaneous use of RIMS and Kettle heaters
  • Max. OG for a 5 gallon batch is around 1.080; I can do higher gravity beers, but I have to reduce the batch size. I'm ok with this, since 95% of what I brew is 1.060 or less, but it's an important thing to consider. I could go with a 15 gallon mash tun or on-demand sparge heating to allow more flexibility in the gravity, but I personally don't need it.

I'm honestly surprised more don't do it this way. With the mash water being higher sg and colder in temperature, it is more dense and will stay where it is. The less dense "sparge" water sits on top, then it's leading edge rinses the grain during the drain - it theoretically work just as well as fly sparging because the only thing different is the extra sparge water that sits on top at the start of the drain (to the BK).

You don't have to have 50A for this... the RIMS can be turned off for a few minutes once the mash temp is achieved (and the BK water heated), though 50A is easier.
 
Good points!

I don’t see any difference in results with my method vs. a traditional fly sparge.

I agree that 50 amp is not really “required” as there are ways to get it done with 30 amp as you have shown. However, it really does open your options up on the design end if you’re not limited to 30 amps...

At some point, we'll tackle time-sharing in BC... this will allow you to "defer" once device (PID, duty, hysteresis) such that it can't turn on unless a priority one is off... meaning you can share the entire max power (e.g. 30A time split across two devices).
 
I'm honestly surprised more don't do it this way. With the mash water being higher sg and colder in temperature, it is more dense and will stay where it is. The less dense "sparge" water sits on top, then it's leading edge rinses the grain during the drain - it theoretically work just as well as fly sparging because the only thing different is the extra sparge water that sits on top at the start of the drain (to the BK).

You don't have to have 50A for this... the RIMS can be turned off for a few minutes once the mash temp is achieved (and the BK water heated), though 50A is easier.

It sounds intriguing if you're already fly sparging. Does it still require the slow drain process of regular fly sparge (i.e. is it still a 40+ minute process?). My MLT does not have a false bottom, so batch sparging (or no sparge, I guess) is my only real option.
 
It sounds intriguing if you're already fly sparging. Does it still require the slow drain process of regular fly sparge (i.e. is it still a 40+ minute process?). My MLT does not have a false bottom, so batch sparging (or no sparge, I guess) is my only real option.
It still sparges through the grain exactly the same, Basically the the only difference is where the presparge water is held. The first time I did it this way was an accident, I used to use a floatswitch on my sparge arm to kick my sparge pump on and off and grain got stuck in it causing the pump to just keep running. now I just make sure to pump enough sparge water to keep the grainbed covered and and fill the BK without sucking air in the MT and dont even get hung up on sparge volumes. It all works out in the end.

I only spend about 30 mins on my sparges for my 10.5g brews.. still manage to average 91% eff
 
It sounds intriguing if you're already fly sparging. Does it still require the slow drain process of regular fly sparge (i.e. is it still a 40+ minute process?). My MLT does not have a false bottom, so batch sparging (or no sparge, I guess) is my only real option.

Yeah, it still takes 45 minutes or so to sparge, but it only takes a few minutes to fill the entire mash tun with the sparge volume - that empties the boil kettle and allows me to drain the mash tun over to the kettle. The best part of the deal is that once you get your mash tun draining (I use a pump and throttle with a ball valve), you can pretty much ignore it until the end. No baby sitting the fly sparge to make sure the flows are matched and you can do other things while it's going on. As @augiedoggy points out, those float based sparge control setups are a bit unreliable, and I never could walk away from it with any kind of confidence.

I have found that if I go too fast on sparging, my efficiency drops a lot but I haven't done any formal tracking to see where my optimum flow rate is; something that's on my agenda once I get my BruControl based system up and can be consistent with my flow rate control.

Adding a false bottom to a mash tun is easy; lots of options there. One really good one is @Jaybird at Norcal Brewing; he'll make a custom fit false bottom that gets really excellent reviews. @Bobby_M at BrewHardware sells a lot as well. I currently use a cheap plastic one in my Igloo cooler, but I'm going to buy one of Bobby's domed stainless ones, mainly because it minimizes the dead space below the false bottom - this is important with my method because less dead space means more room for the grain + sparge water sitting on top of the grain bed.
 
Last edited:
Yeah, it still takes 45 minutes or so to sparge, but it only takes a few minutes to fill the entire mash tun with the sparge volume - that empties the boil kettle and allows me to drain the mash tun over to the kettle. The best part of the deal is that once you get your mash tun draining (I use a pump and throttle with a ball valve), you can pretty much ignore it until the end. No baby sitting the fly sparge to make sure the flows are matched and you can do other things while it's going on. As @augiedoggy points out, those float based sparge control setups are a bit unreliable, and I never could walk away from it with any kind of confidence.

I have found that if I go too fast on sparging, my efficiency drops a lot but I haven't done any formal tracking to see where my optimum flow rate is; something that's on my agenda once I get my BruControl based system up and can be consistent with my flow rate control.

Adding a false bottom to a mash tun is easy; lots of options there. One really good one is @Jaybird at Norcal Brewing; he'll make a custom fit false bottom that gets really excellent reviews. @Bobby_M at BrewHardware sells a lot as well.

Thanks. This is something to consider for when I move to electric. I'm pretty happy with my current batch sparge process on the existing rig, so no need to upgrade there.

I'm hoping that SS Brewtech will come out with a 15G version of their insulated mash tuns, then I'd consider building a system around that.
 
Just my 2 cents but the issue I have with many of those as I see them is they are pretty but a kind of step backwards IF you already have rims or herms in that they are heavy and bulky and require more work on every brewday for no real benfit in that scenerio. The 20g ss tun weighs almost 50lbs empty and special care has to be taken when cleaning since they scratch and dent easily.. I know everyone brew differently but I like to just be able to dump my MT directly in my compost instead of scooping into buckets and cip to avoid damage on the edge of a sink.

Then theres the complaints thats come up with the stainless wall make them less effective than a plastic cooler for holding temps so people end up using their supplemental heater kit or herms or rims with them anyway which makes the insulation redundant..

If I did not plan on herms or rims an insulated tun would definitely be on my radar but at the 5-10 sizepoint there just seems to be a lot of tradeoffs with the stainless ones.

I tend to agree with you, although I do see benefit in using an insulated mash tun even with a supplemental heating method like RIMS or HERMS. Basically, the more heat you keep in the mash tun, the more stable the temperatures and the lower wattage you need on the heating element.

The bling factor is nice, but in general, I tend to buy what get's the job done first, and bling is a distant second. Not always...I'm super jealous of all these fancy brew rooms and systems out there...but my brew room is going to have a plastic utility sink instead of stainless because I can't justify the cost difference.
 
I just want to plug bottom drains again (no pun meant there!)... IMO, nobody should EVER remove the kettle from its stand. CIP is the only way to live. Life is too short and time too valuable.

Another shameless plug (this one for automation): My personal rig's updates (pending) will require no manual cleaning other than scooping out the majority of the grain. The remaining bits will (theoretically) get flushed out as part of an automated cleaning cycle of flushing, rinsing, cleaning, and flushing again.
 
The thing is even with my uninsulated mash tun and low power 1800w rims the max Ive ever recorded my rim pid power (in brucontrol) at to maintain temps is 21%... So it makes the tradeoff less appealing when its really more or less about the bling with all the other disadvantages..
I get it. I too get jealous of many of the polished decked out home breweries too.. but at the end of the day, for the same reasons some find themselves going from full blown 3 vessel systems back to BIAB a person usually wants to go with what works best with less mundane unnecessary work involved and weve all fallen victim to wanting things for one reason, while convincing ourselves its worth it only to find the opposite is true down the road. I have plenty of gizmos from quick carb pumps to fancy sparge arms that I had to have , only to find they werent all what they were cracked up to be.

Brundog, I agree with you on bottom draining kettles... I think manufacturing costs and margins are the main reason we dont see them... if you look at the fact that many homebrewing kettles are basically repurposed soup kettles with fittings welded or bolted on and the profit margins that exist now by reselling them for homebrewing at twice what they would sell for in another market and the amount of extra proprietary manufacturing involved in an actual welded kettle with bottom drain. it starts to make sense why many avoid it. the cost would be closer to what stout charges and that a hard pill for many to swallow. im sure it factors into the manufacturing costs of the insulated tuns as well but again the bulk and unneeded weight ad well as cost for a main feature I wont appreciate in my configuration is what I cant justify.
 
Last edited:
The thing is even with my uninsulated mash tun and low power 1800w rims the max Ive ever recorded my rim pid power (in brucontrol) at to maintain temps is 21%... So it makes the tradeoff less appealing when its really more or less about the bling with all the other disadvantages..
I get it. I too get jealous of many of the polished decked out home breweries too.. but at the end of the day, for the same reasons some find themselves going from full blown 3 vessel systems back to BIAB a person usually wants to go with what works best with less mundane unnecessary work involved and weve all fallen victim to wanting things for one reason, while convincing ourselves its worth it only to find the opposite is true down the road. I have plenty of gizmos from quick carb pumps to fancy sparge arms that I had to have , only to find they werent all what they were cracked up to be.

Brundog, I agree with you on bottom draining kettles... I think manufacturing costs are the main reason we dont see them... if you look at the fact that many homebrewing kettles are basically repurposed soup kettles with fittings welded or bolted on and the profit margins that exist now by reselling them for homebrewing at twice what they would sell for in another market and the amount of extra proprietary manufacturing involved in an actual welded kettle with bottom drain. it starts to make sense why many avoid it. the cost would be closer to what stout charges and that a hard pill for many to swallow. im sure it factors into the manufacturing costs of the insulated tuns as well but again the bulk and unneeded weight is what I cant justify.

Yup, it's easy to get caught up in the bling. I am willing to pay for bling in many cases (after all, I could just BUY the beer...) and it all comes down to what's important to YOU as to what your system needs to be. Lots of different ways to brew and that's one of the cool things about this hobby.

On that note, the bottom draining kettles are bling I'd be willing to pay for. I agree that manufacturers don't make them for financial reasons, but if enough of us show there is a demand (and we're willing to pay a premium for it), they will start making them. Stout has some, but none in the 5-10 gallon range as far as I can see. I'm really hoping Spike will read all these threads and eventually come around and start offering some for the electric brewer. I love the custom offerings they do, since each brewer's needs are so varied.

I want a bottom drain kettle with tri-clamp ports for the heating element, level sensor, and one at the top for the steam condenser. Oh, and a recirc port, plus a temperature thermowell...Probably not enough demand out there for that specific configuration, so custom is the only way it's going to happen.

Come on Spike - give us a bottom drain option!
 
Maybe but I think the "all things to all brewers" is also a culprit. Spike, SS, etc. make tri-clad kettles because they don't want to shun the propane brewers, while likely still make up > half the customers. And they don't/cant weld through the tri-clad. Not a beautiful solution by any stretch, but couplings or flanges silver-soldered on the bottom of a cheap-o kettle is more betterer than a sweet quality kettle with a dip tube.

I'd go so far to say I probably wouldn't brew if I had to put up with non-bottom drain. The real holy grail is a conical bottom (slight taper, not like fermenter angles) so the liquid feeds into the drain... but now I am just getting greedy!
 
I just want to plug bottom drains again (no pun meant there!)... IMO, nobody should EVER remove the kettle from its stand. CIP is the only way to live. Life is too short and time too valuable.

Another shameless plug (this one for automation): My personal rig's updates (pending) will require no manual cleaning other than scooping out the majority of the grain. The remaining bits will (theoretically) get flushed out as part of an automated cleaning cycle of flushing, rinsing, cleaning, and flushing again.

With CIP, how/where do you drain the liquid used to clean and rinse?
 
Maybe but I think the "all things to all brewers" is also a culprit. Spike, SS, etc. make tri-clad kettles because they don't want to shun the propane brewers, while likely still make up > half the customers. And they don't/cant weld through the tri-clad. Not a beautiful solution by any stretch, but couplings or flanges silver-soldered on the bottom of a cheap-o kettle is more betterer than a sweet quality kettle with a dip tube.

I'd go so far to say I probably wouldn't brew if I had to put up with non-bottom drain. The real holy grail is a conical bottom (slight taper, not like fermenter angles) so the liquid feeds into the drain... but now I am just getting greedy!

You say kettle, but I assume this is for the mash tun, not the boil kettle, right?
 
I'm super jealous of all these fancy brew rooms and systems out there...but my brew room is going to have a plastic utility sink instead of stainless because I can't justify the cost difference.

Use a spray-on glue and attach aluminum foil (shiny side out) to the plastic utility sink and voila! All the bling of stainless without the expense!

My sink is an old metal sink with sideboard from, probably, the 1940s or so. Not pretty, but as you noted, it gets the job done.
 
You say kettle, but I assume this is for the mash tun, not the boil kettle, right?

MLT ideally has the drain in the center and a slight slope downward toward it. For the BK, flat would be fine. In mine, I have the drain near the edge, with a 1/2" lip and a trub dam to prevent the outwash of the whirlpool cone to exit before the liquid above it.
 
I’m considering an electric brewery. I usually brew 5 gallons, with an occasional 10 gallon. I really need to do more 10 gallon batches as brew days sometimes are hard to come by.
My question is, should I go with 2 or 3 vessels? I like my 3 tier propane rig, but am ready for indoors electric. Give me pros and cons with each.
Thanks

Hey Tom,

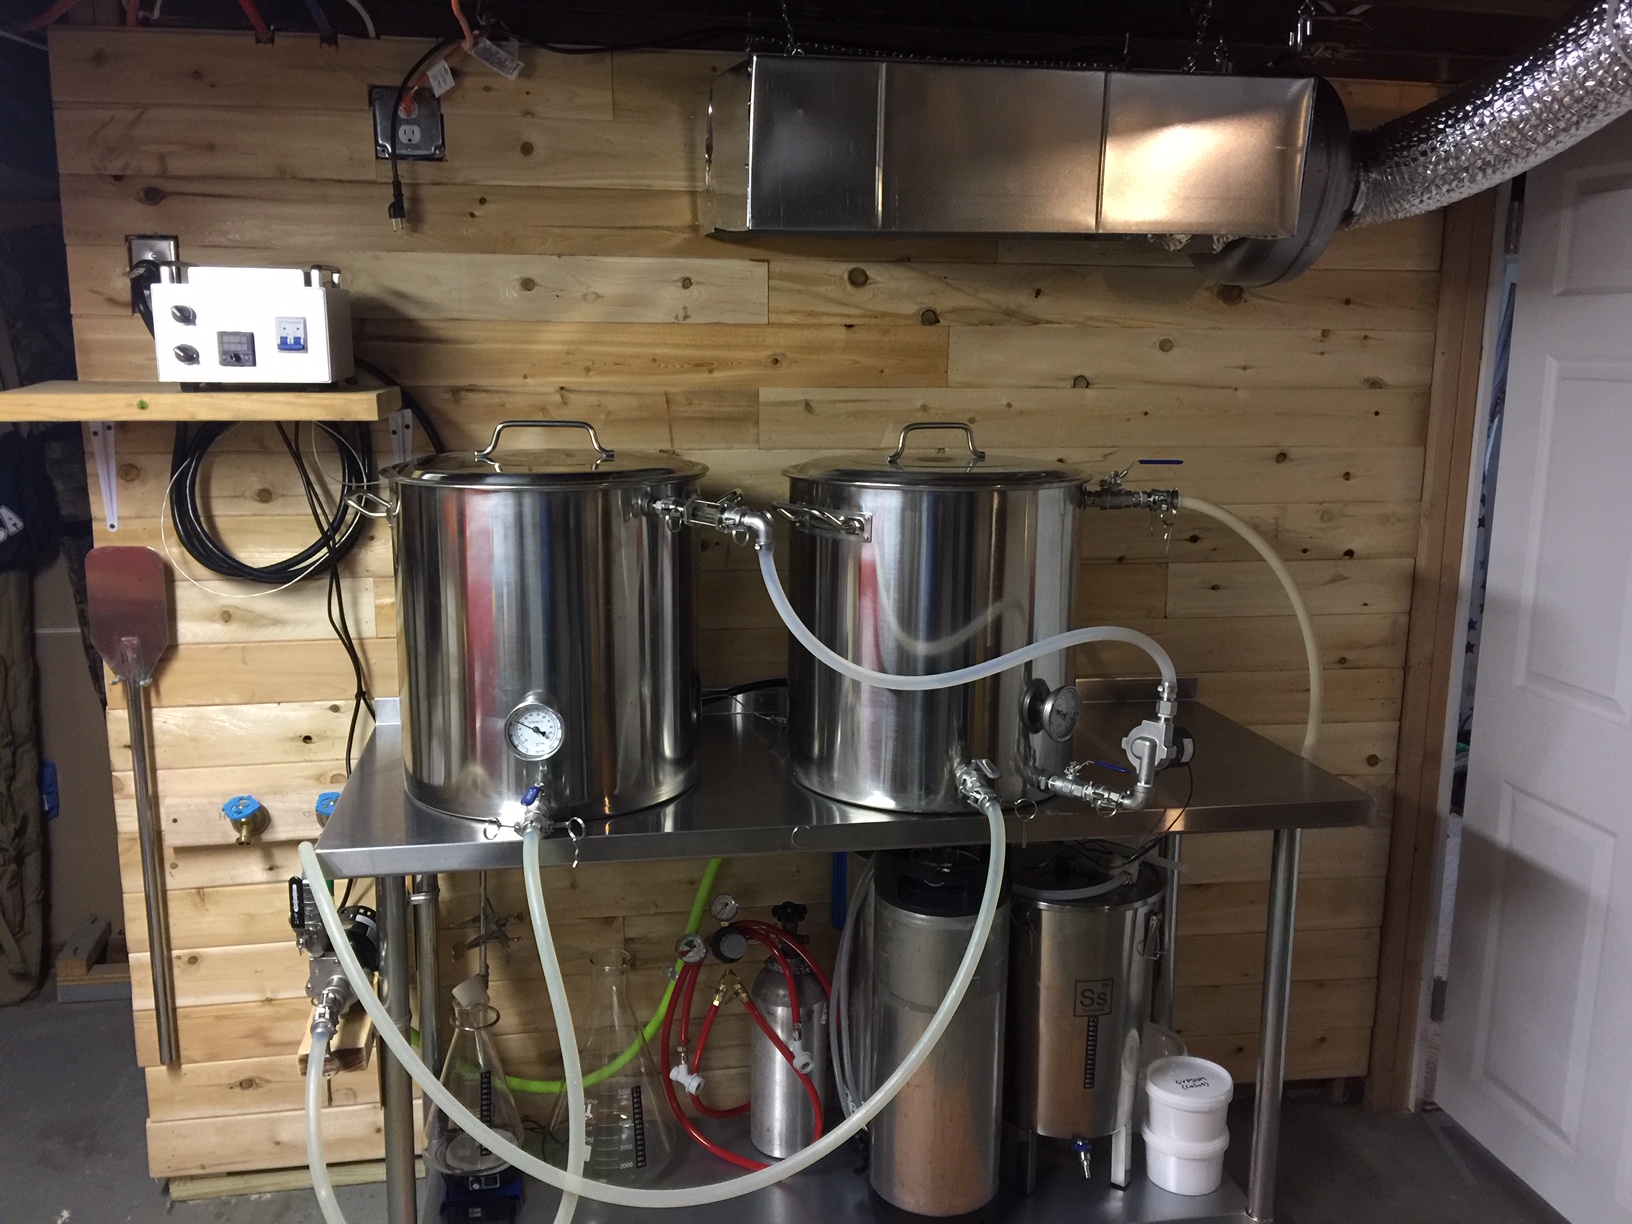
I used to do a 3 vessel propane system outdoors, but now am setting up a 2 vessel electric system in my basement, kind of based of the Brew Easy setup. It works pretty well and doesn't need a ton of space. Still have a few more tweaks and fittings to update, etc, but this gives you the general idea.

I have a second / spare fridge down there also, that the Ss brew buckets fit in perfectly to cold crash, and to put keg(s) in.

image1.jpeg
 
@Greeny87 looks nice. I’m in the pre-preplanning stage. I need to sell my house and move before I go electric. Unless I run across some killer deals. I’m thinking space is not going to be an issue as I have 2 sinks now, and plan on a nice basement brewery. I was curious what other than the obvious, 1 less vessel, difference there are. What brewers like about each system.
 
Back
Top