You are using an out of date browser. It may not display this or other websites correctly.
You should upgrade or use an alternative browser.
You should upgrade or use an alternative browser.
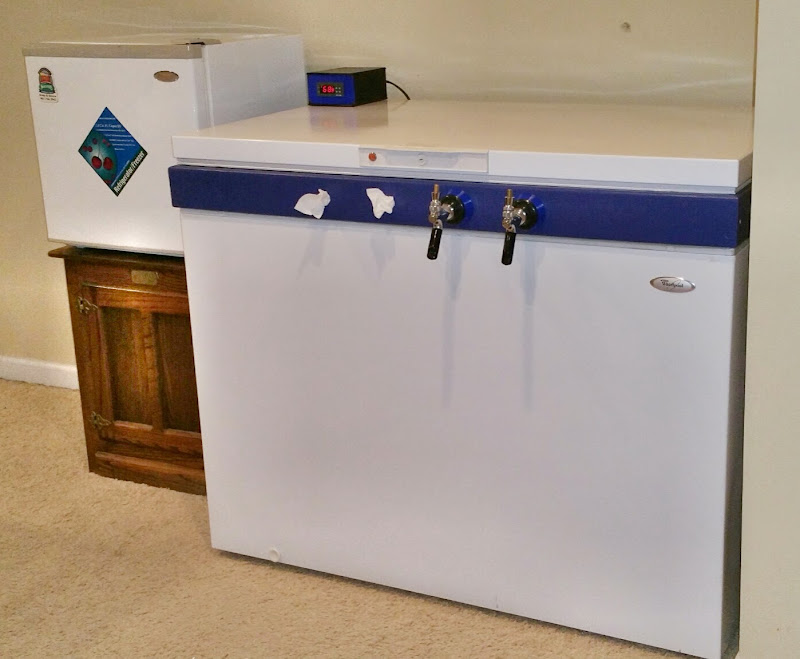
Keezer is pretty much finished - Lots of 3d printed parts
- Thread starter thehebs
- Start date

Help Support Homebrew Talk:
This site may earn a commission from merchant affiliate
links, including eBay, Amazon, and others.
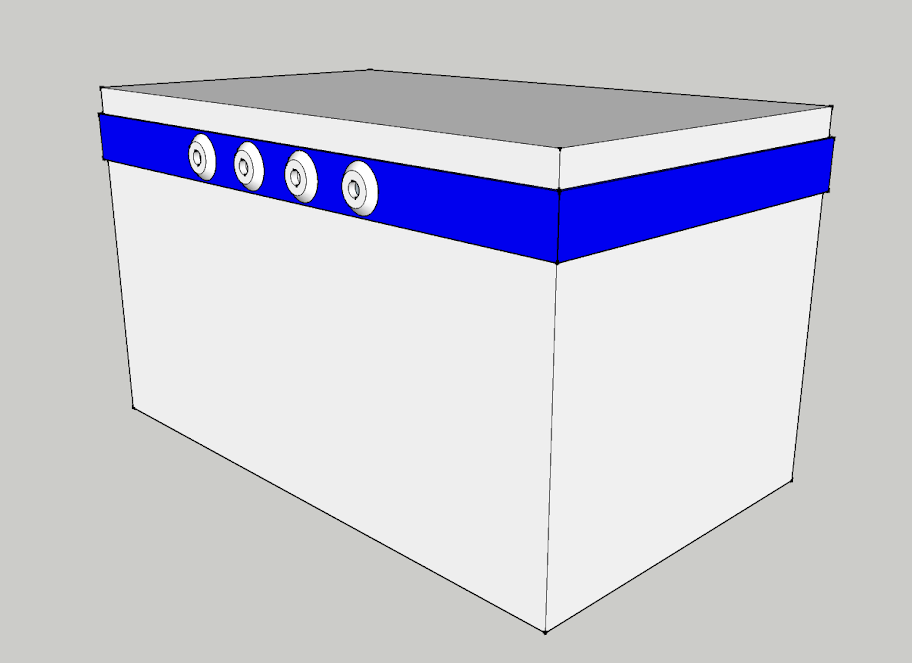

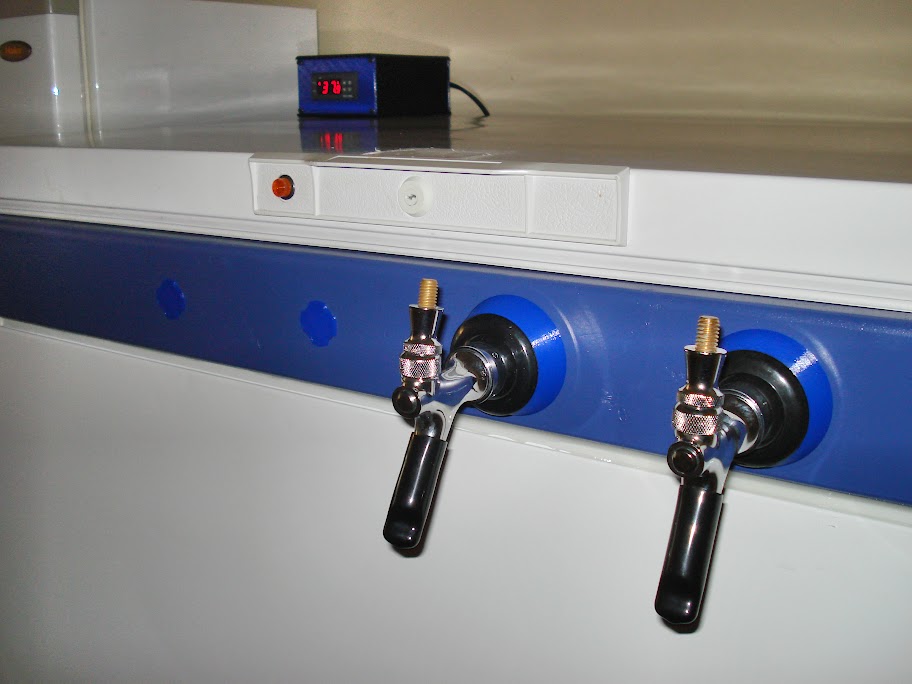
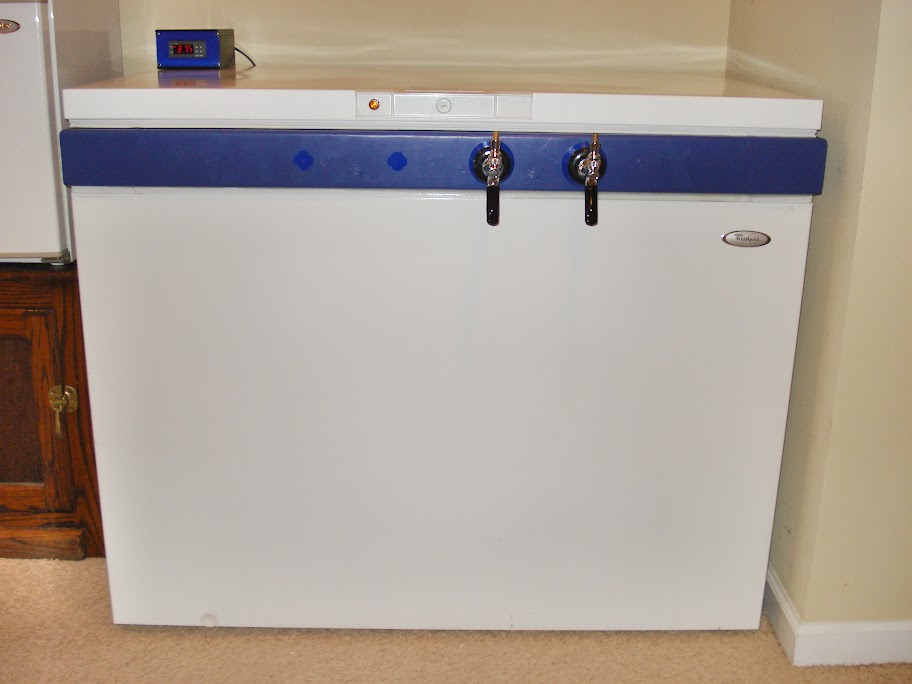
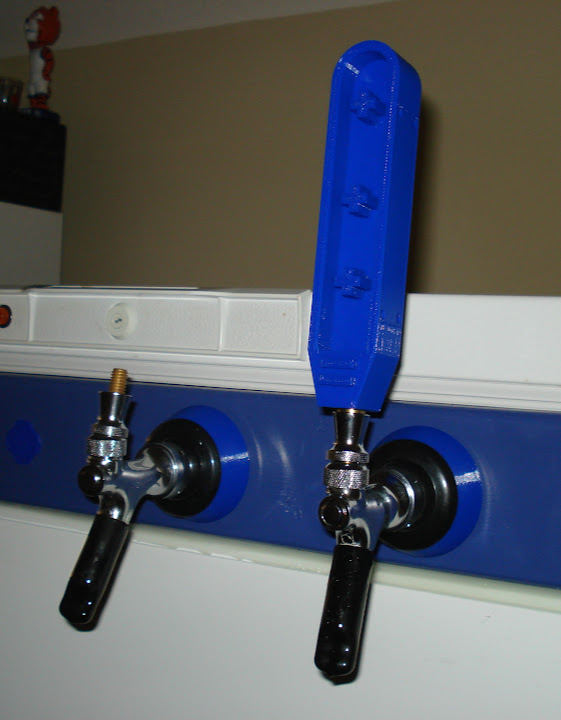
Since I used 2x4's (my mitre saw wont do 2x6@45), I wanted to push the faucets out a bit to keep the freezer lid/handle from hitting the back of the taps when I open and close it. So I designed and printed some little spacers to do so:
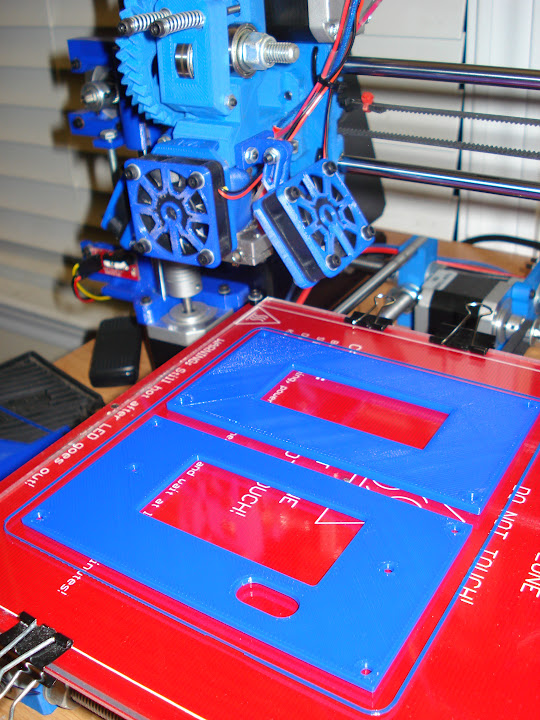
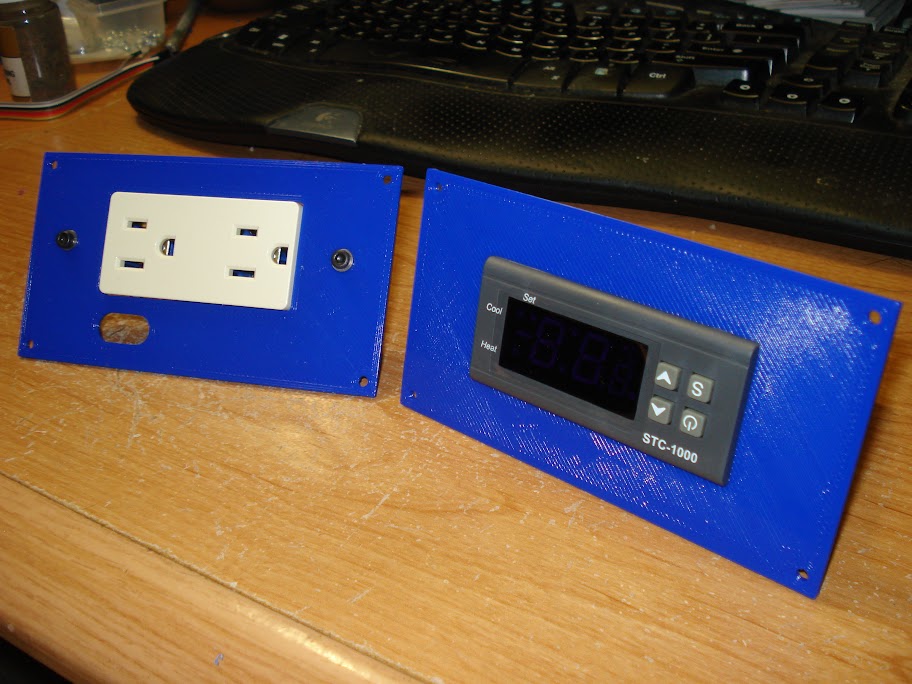
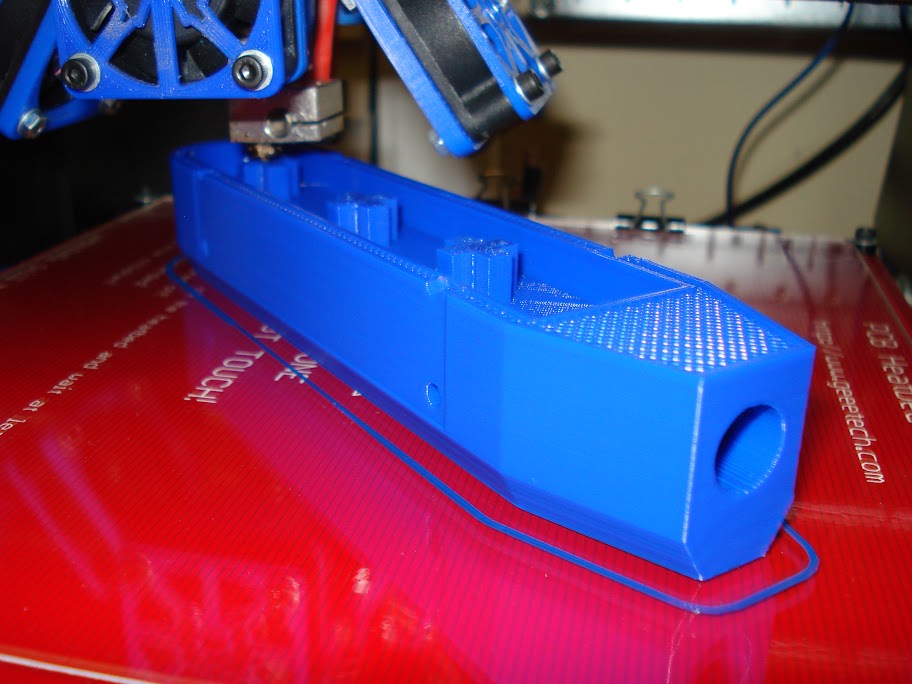
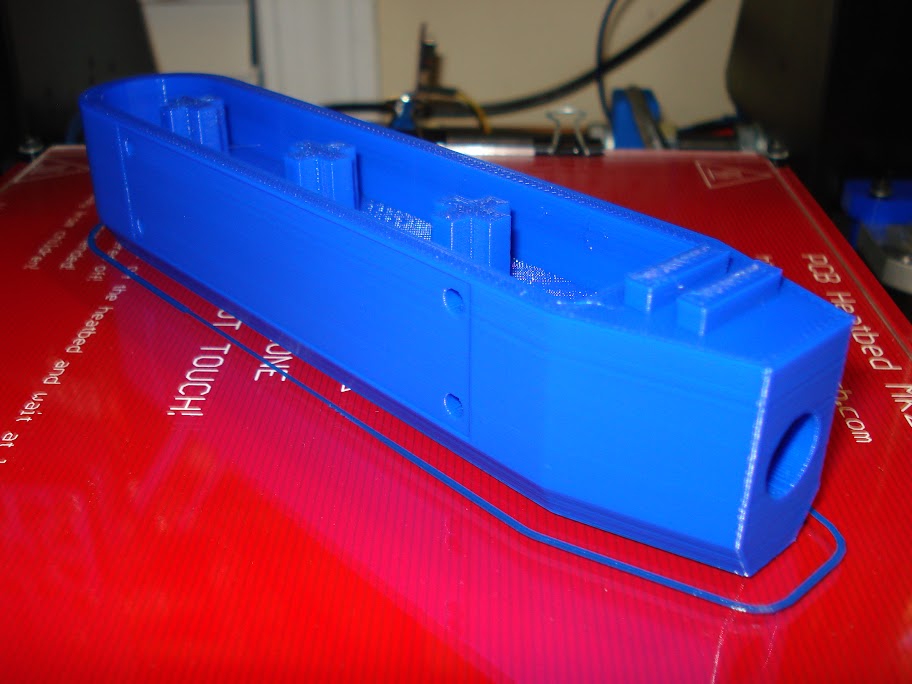
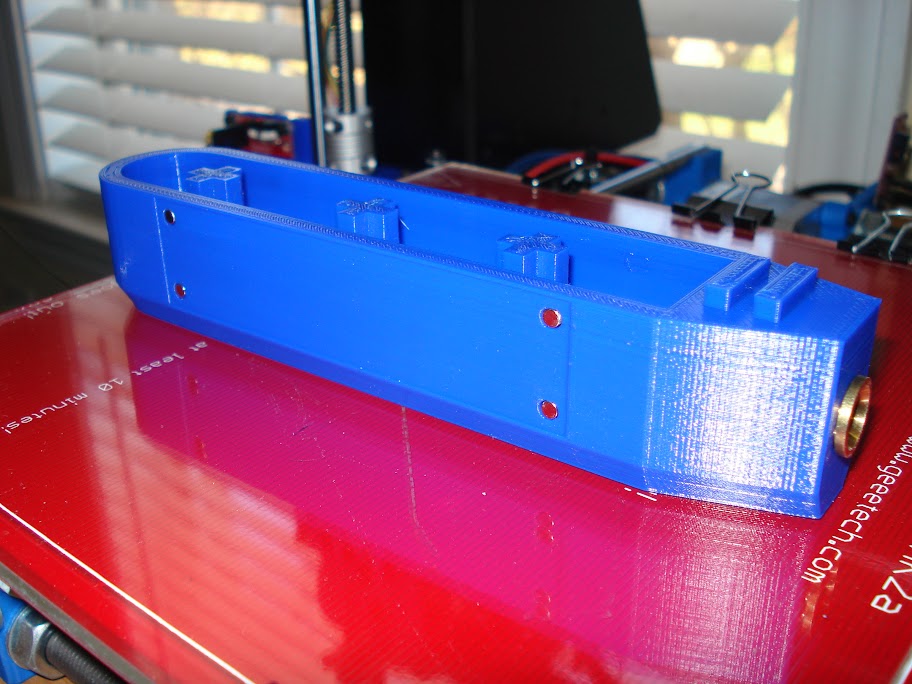
I use an stc1000, flashed with + firmware. I remixed an enclosure I found, by making it larger to fit a standard outet receptacle. Left outlet does heat, right side does cool (if I want to use it for a ferm chamber).
Bottom

Top
Front and Back
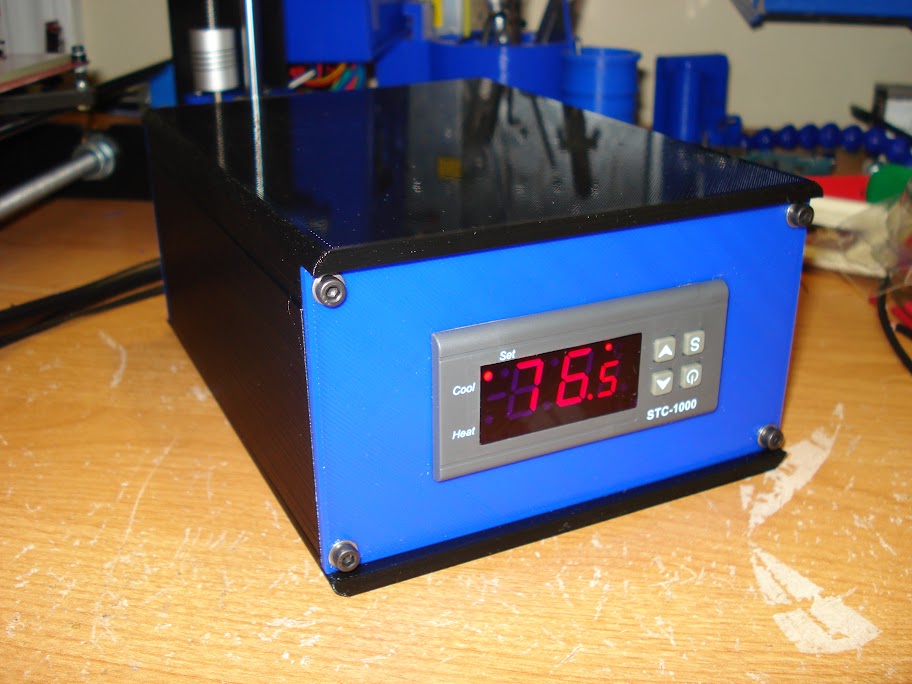
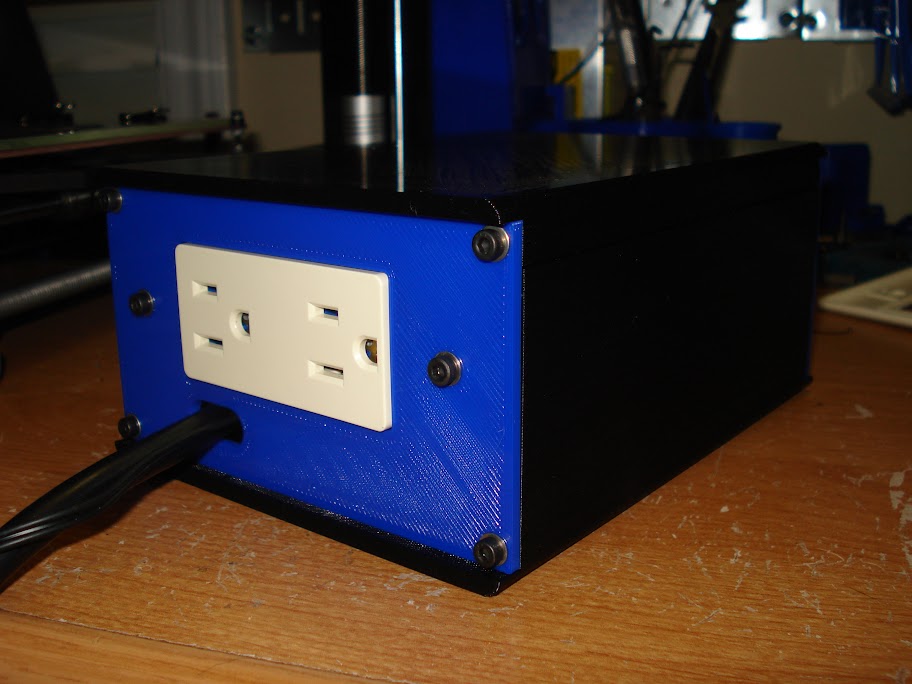
Complete
Front
Back
Almost there:
Bottom
Top
Front and Back
Complete
Front
Back
Almost there:
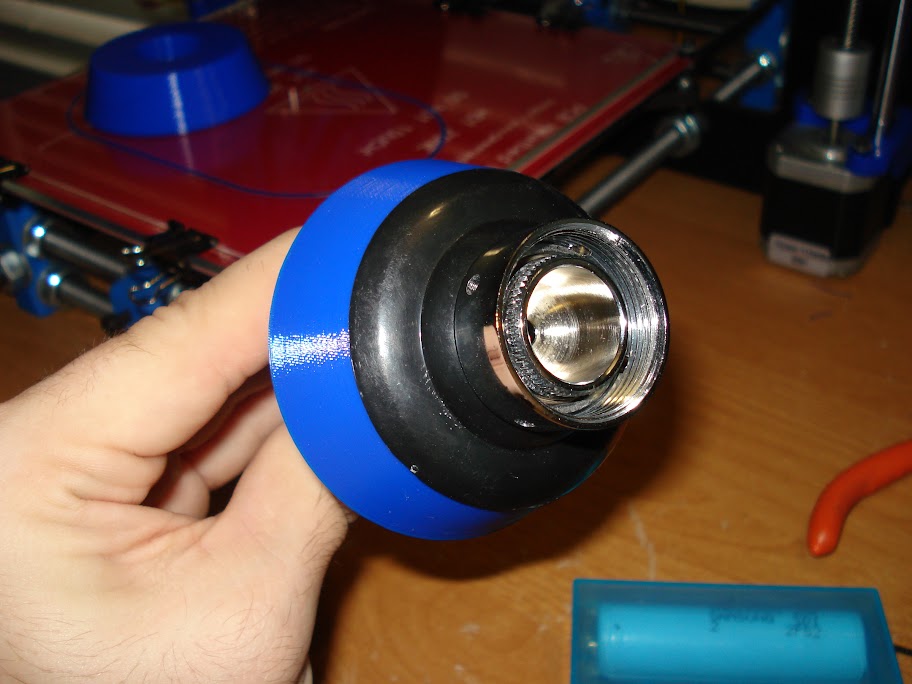
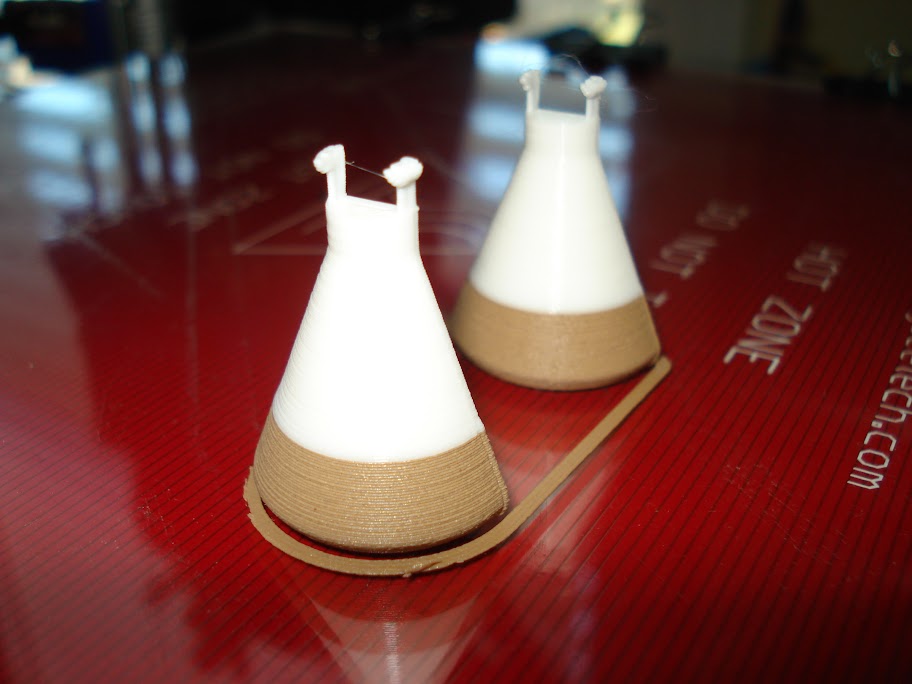
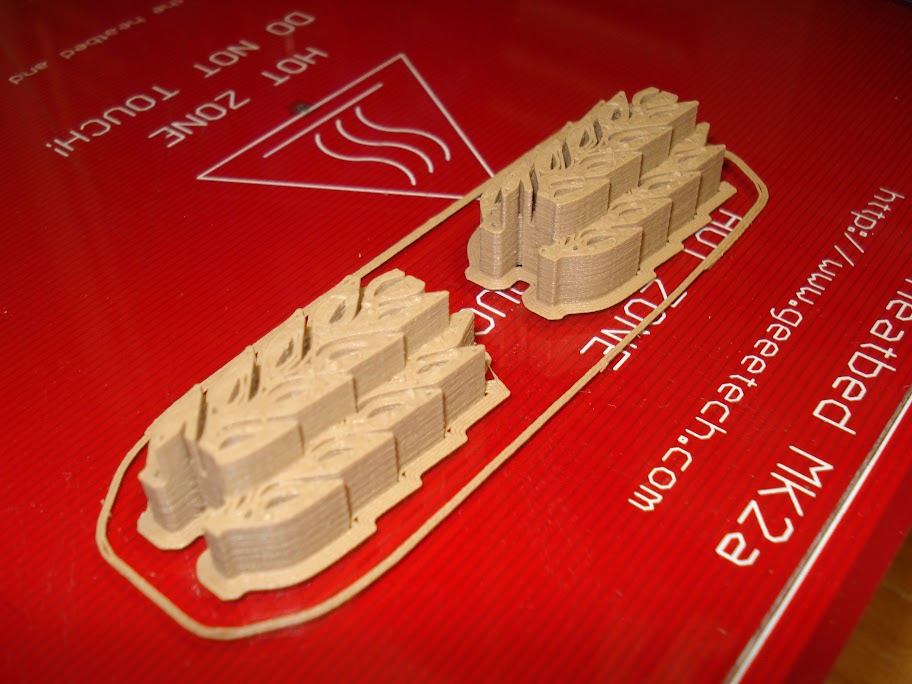
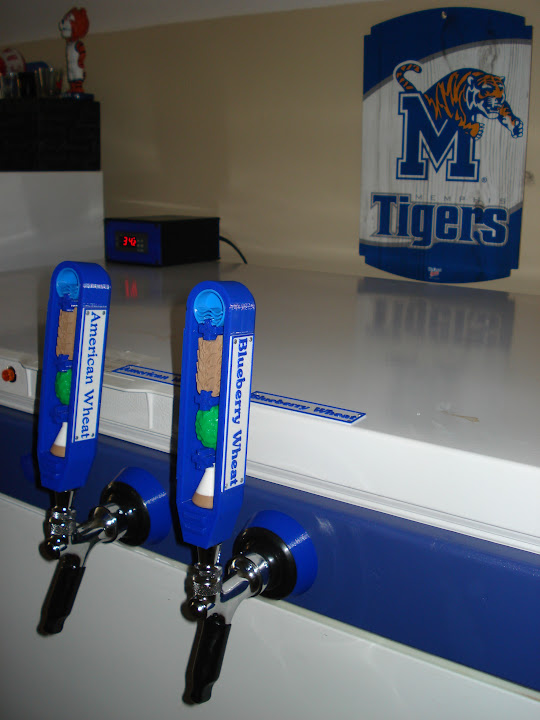
I obviously had to print some tap handles. I looked and looked, and all the handles I found were just not designed well, and were kinda boring. Then I found this: http://fermware.com/3d-printed-tap-handles/
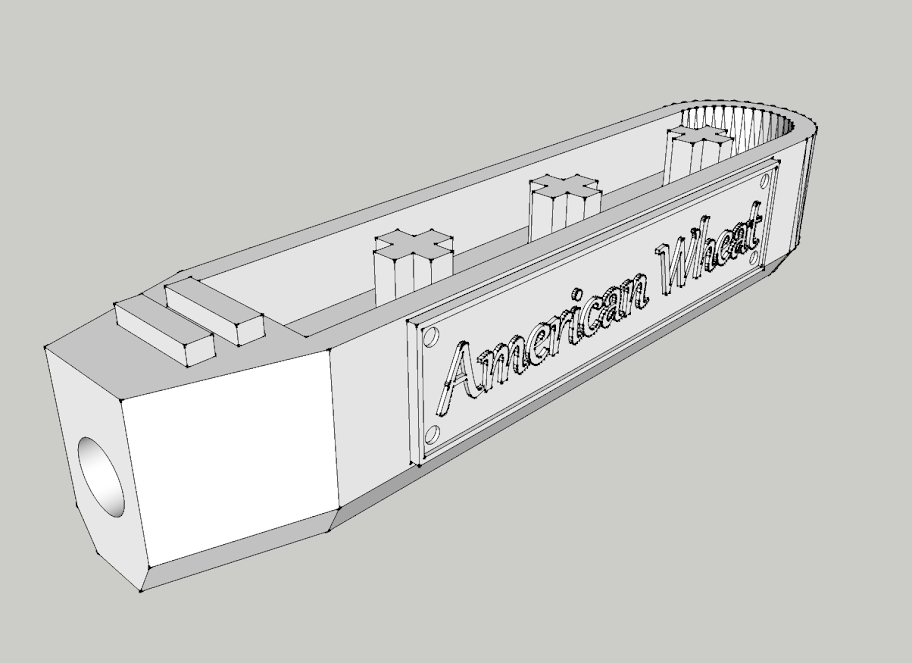
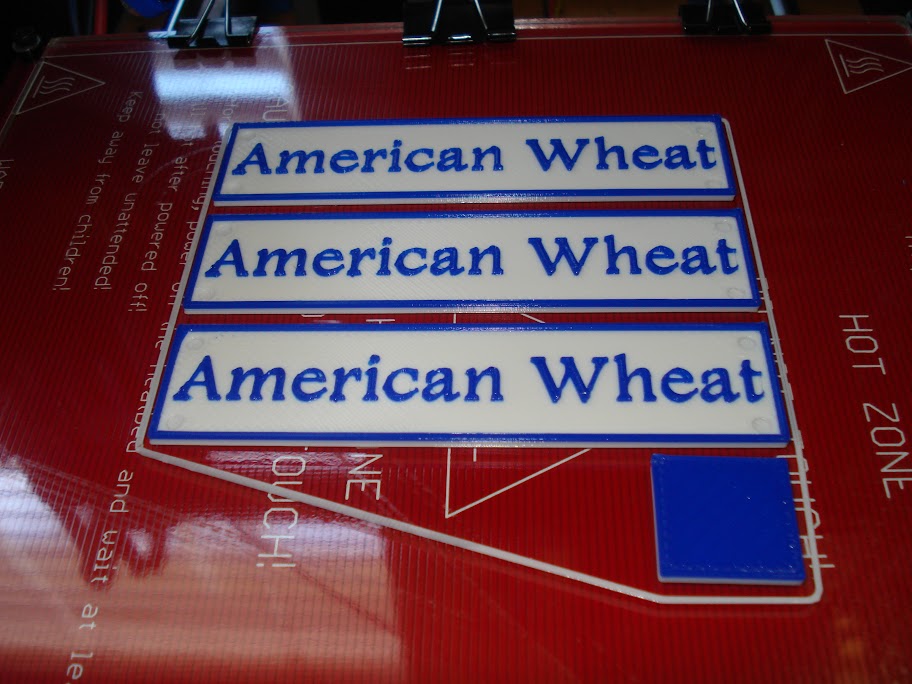
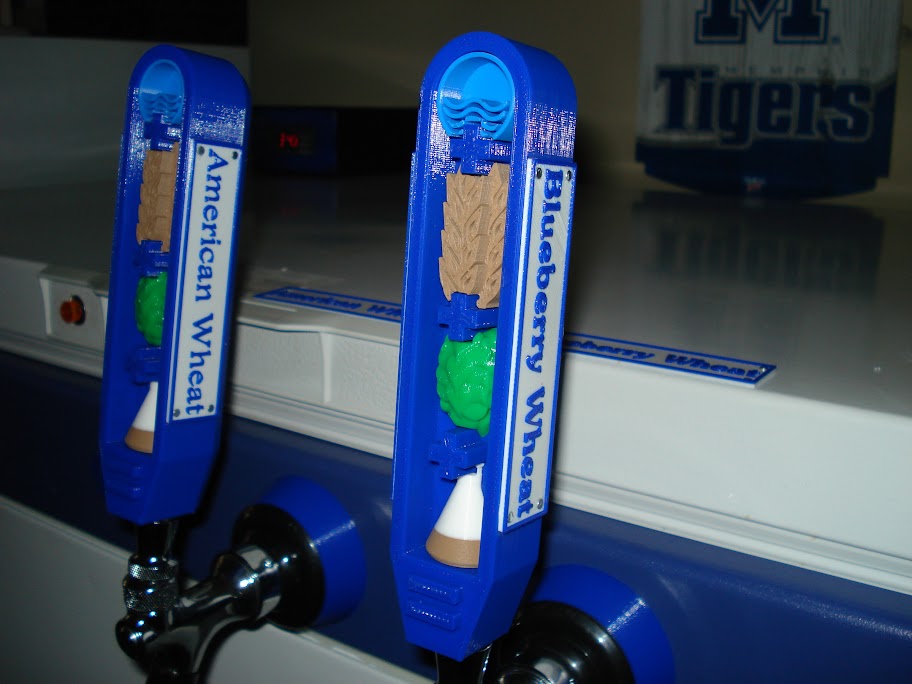
I loved the handles, but I couldnt leave it unmodified, right? The files that the guy put on thingiverse just had his website on the side. I had seen some of his own handles that he made, had placards for different types of beer. Most of them he made specially for local breweries and pubs and such, and his placards were permanently glued on. Since these handles take some work to print and construct, I didnt want to print a new handle for every type of brew I would be brewing in the future, so I decided to remix his design by removing his website, and adding magnetic placards. Basically i put some holes for magnets in the handle, and holes for thinner magnets for the placard, and I just superglued them in.
Bare tap handle, with recessed rectangle for placard, and magnet holes:
Base tap handle, with placard added.
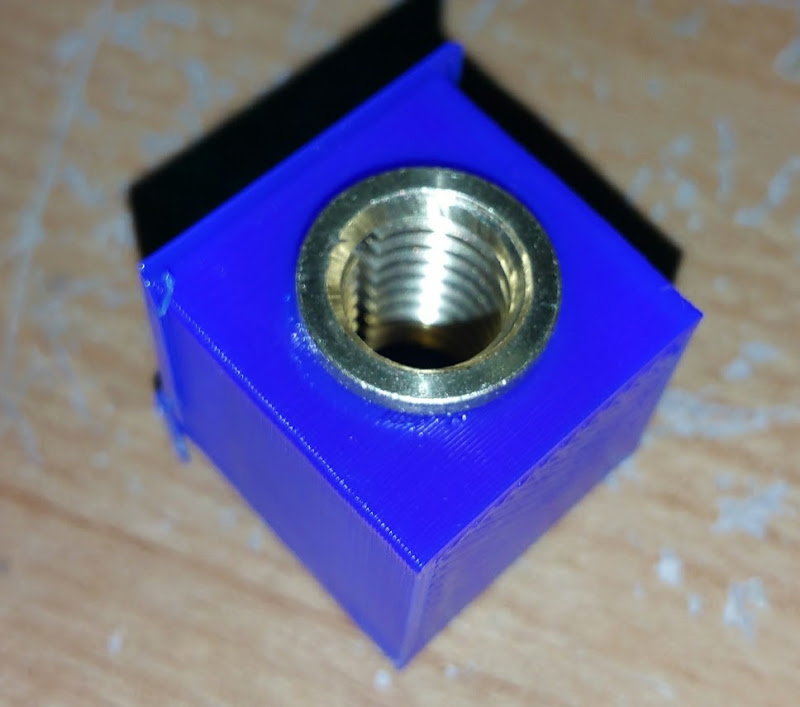
I also needed to adjust his design to fit the brass thread inserts I bought from grainger. I nailed the fitment in 2 tries, using little test cubes.
The fun begins
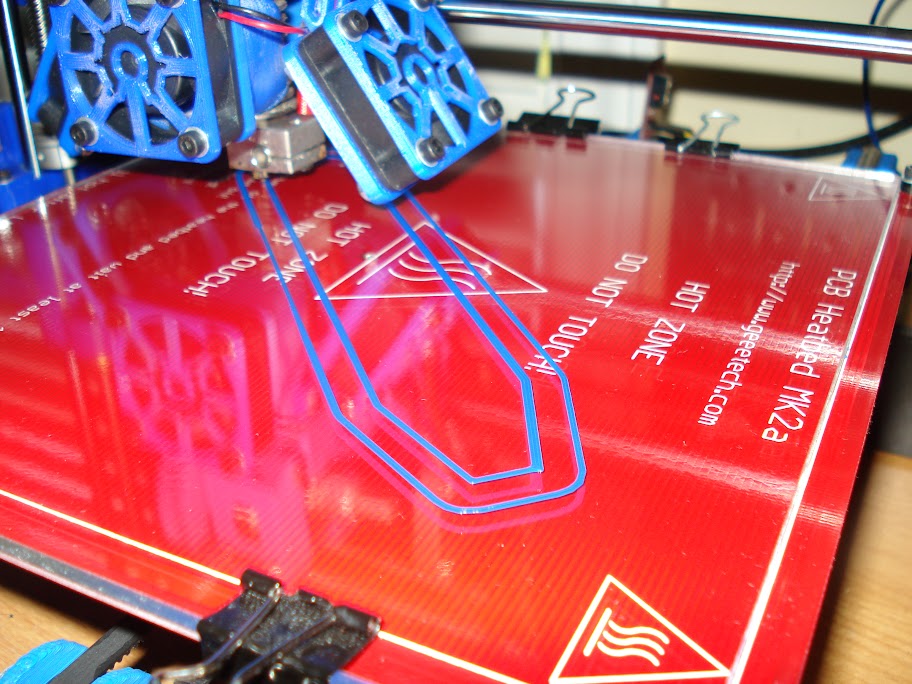
First layer complete
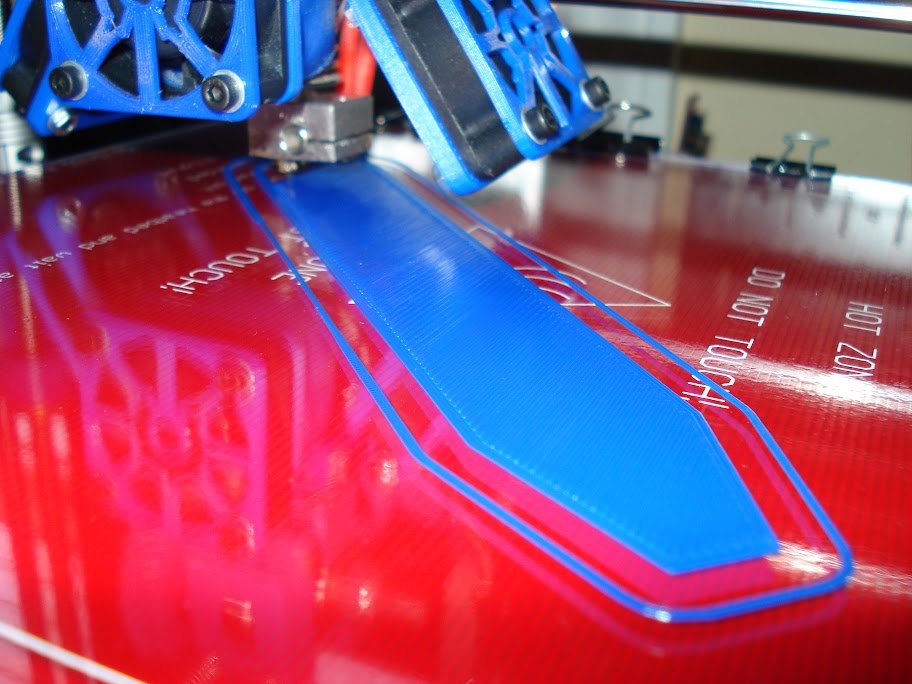
Almost done
I loved the handles, but I couldnt leave it unmodified, right? The files that the guy put on thingiverse just had his website on the side. I had seen some of his own handles that he made, had placards for different types of beer. Most of them he made specially for local breweries and pubs and such, and his placards were permanently glued on. Since these handles take some work to print and construct, I didnt want to print a new handle for every type of brew I would be brewing in the future, so I decided to remix his design by removing his website, and adding magnetic placards. Basically i put some holes for magnets in the handle, and holes for thinner magnets for the placard, and I just superglued them in.
Bare tap handle, with recessed rectangle for placard, and magnet holes:
Base tap handle, with placard added.
I also needed to adjust his design to fit the brass thread inserts I bought from grainger. I nailed the fitment in 2 tries, using little test cubes.
The fun begins
First layer complete
Almost done


$176.97
1pc Commercial Keg Manifold 2" Tri Clamp,Ball Lock Tapping Head,Pressure Gauge/Adjustable PRV for Kegging,Fermentation Control
hanhanbaihuoxiaoshoudian

$44.99
$49.95
Craft A Brew - Mead Making Kit – Reusable Make Your Own Mead Kit – Yields 1 Gallon of Mead
Craft a Brew


$7.79 ($7.79 / Count)
Craft A Brew - LalBrew Voss™ - Kveik Ale Yeast - For Craft Lagers - Ingredients for Home Brewing - Beer Making Supplies - (1 Pack)
Craft a Brew


$22.00 ($623.23 / Ounce)
AMZLMPKNTW Ball Lock Sample Faucet 30cm Reinforced Silicone Hose Secondary Fermentation Homebrew Kegging joyful
无为中南商贸有限公司

$479.00
$559.00
EdgeStar KC1000SS Craft Brew Kegerator for 1/6 Barrel and Cornelius Kegs
Amazon.com

![Craft A Brew - Safale S-04 Dry Yeast - Fermentis - English Ale Dry Yeast - For English and American Ales and Hard Apple Ciders - Ingredients for Home Brewing - Beer Making Supplies - [1 Pack]](https://m.media-amazon.com/images/I/41fVGNh6JfL._SL500_.jpg)
$6.95 ($17.38 / Ounce)
$7.47 ($18.68 / Ounce)
Craft A Brew - Safale S-04 Dry Yeast - Fermentis - English Ale Dry Yeast - For English and American Ales and Hard Apple Ciders - Ingredients for Home Brewing - Beer Making Supplies - [1 Pack]
Hobby Homebrew

$10.99 ($31.16 / Ounce)
Hornindal Kveik Yeast for Homebrewing - Mead, Cider, Wine, Beer - 10g Packet - Saccharomyces Cerevisiae - Sold by Shadowhive.com
Shadowhive

$28.98
Five Star - 6022b_ - Star San - 32 Ounce - High Foaming Sanitizer
Great Fermentations of Indiana


$53.24
1pc Hose Barb/MFL 1.5" Tri Clamp to Ball Lock Post Liquid Gas Homebrew Kegging Fermentation Parts Brewer Hardware SUS304(Gas MFL)
Guangshui Weilu You Trading Co., Ltd


$58.16
HUIZHUGS Brewing Equipment Keg Ball Lock Faucet 30cm Reinforced Silicone Hose Secondary Fermentation Homebrew Kegging Brewing Equipment
xiangshuizhenzhanglingfengshop


$159.99 ($26.66 / Count)
3M High Flow Series System BREW120-MS, 5616001, For Brewed Coffee and Hot Tea, Valve-in-Head Design
SpaceCityProviders


$53.24
1pc Hose Barb/MFL 1.5" Tri Clamp to Ball Lock Post Liquid Gas Homebrew Kegging Fermentation Parts Brewer Hardware SUS304(Liquid Hose Barb)
yunchengshiyanhuqucuichendianzishangwuyouxiangongsi


$719.00
$799.00
EdgeStar KC2000TWIN Full Size Dual Tap Kegerator & Draft Beer Dispenser - Black
Amazon.com


$76.92 ($2,179.04 / Ounce)
Brewing accessories 1.5" Tri Clamp to Ball Lock Post Liquid Gas Homebrew Kegging Fermentation Parts Brewer Hardware SUS304 Brewing accessories(Gas Hose Barb)
chuhanhandianzishangwu


$33.99 ($17.00 / Count)
$41.99 ($21.00 / Count)
2 Pack 1 Gallon Large Fermentation Jars with 3 Airlocks and 2 SCREW Lids(100% Airtight Heavy Duty Lid w Silicone) - Wide Mouth Glass Jars w Scale Mark - Pickle Jars for Sauerkraut, Sourdough Starter
Qianfenie Direct


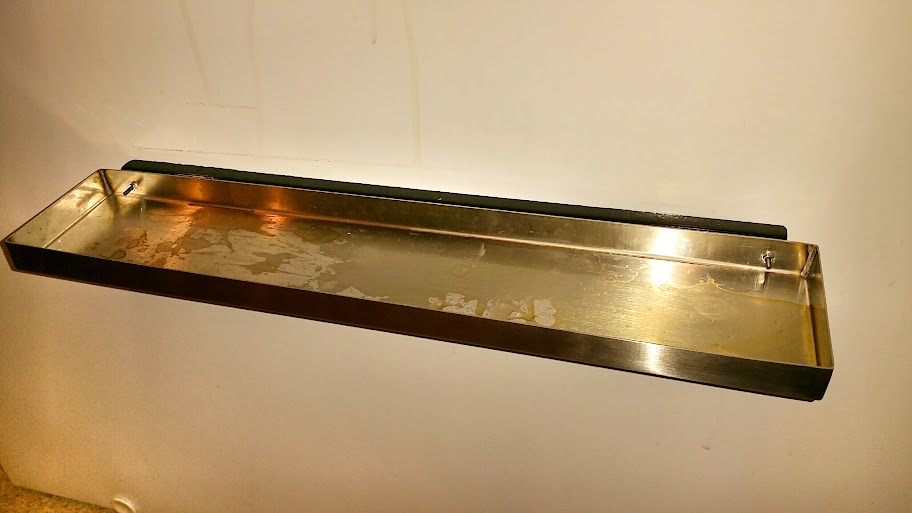
I had been eyeing this 19" drip tray on ebay for a while: http://www.ebay.com/itm/360855293520
I actually designed my whole faucet placement on it, so that theres about an inch on each side of my outside faucets.
Anywho... I thought for a while on how I could mount it, because its a surface drip tray. I had my box wrench set upstairs while I was adding faucets, etc... and I noticed the 18" tool magnet I stick them to... so I said why not....
(link to magnet: http://www.amazon.com/gp/product/B003LZTBKQ/?tag=skimlinks_replacement-20 )
The magnet has a hole at each end, so I just marked the holes, and drilled the tray, and used some m3 machine screws, nuts, and washers to mount the magnet to the tray.
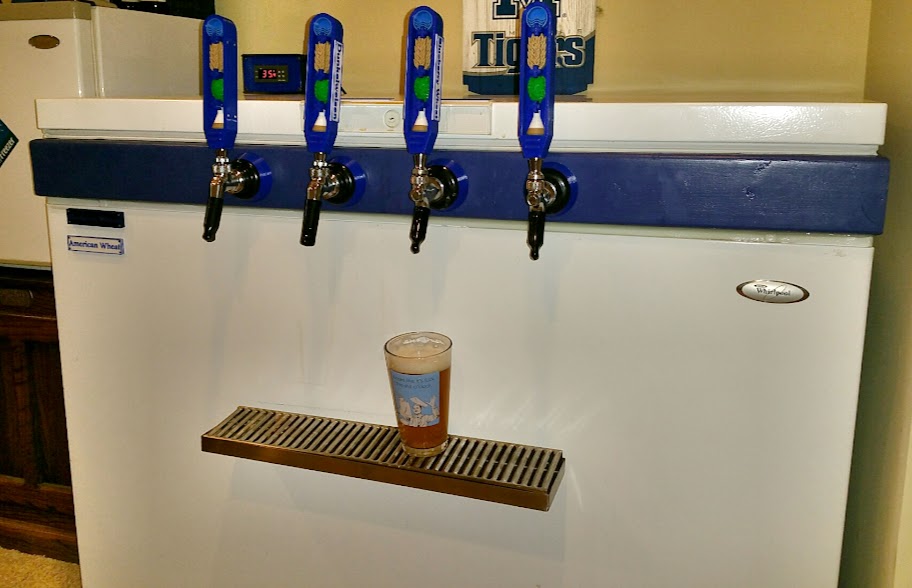
It holds a pint no problem at all, though I dont really use it to set beers on... Its pretty convenient to be able to just unstick it from the side and take it to the sink.
I actually designed my whole faucet placement on it, so that theres about an inch on each side of my outside faucets.
Anywho... I thought for a while on how I could mount it, because its a surface drip tray. I had my box wrench set upstairs while I was adding faucets, etc... and I noticed the 18" tool magnet I stick them to... so I said why not....
(link to magnet: http://www.amazon.com/gp/product/B003LZTBKQ/?tag=skimlinks_replacement-20 )
The magnet has a hole at each end, so I just marked the holes, and drilled the tray, and used some m3 machine screws, nuts, and washers to mount the magnet to the tray.
It holds a pint no problem at all, though I dont really use it to set beers on... Its pretty convenient to be able to just unstick it from the side and take it to the sink.
Last edited by a moderator:
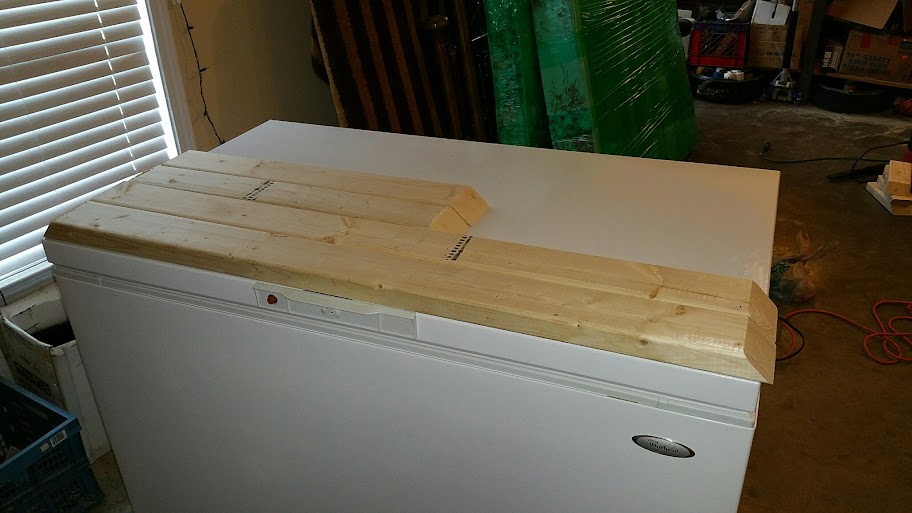
The 2x4 collar looks good. Really clean.
Thanks. It was a bit of a pain in the ass, because 2x4's are usually warped. I got the straightest and cleanest one I could find at home depot. I used some gussets for the corners. It took a little finagling and was still a tad warped in the end, but sealed no problem with silicone, and isnt noticeable
Its done for now. Eventually I will probably slap a big memphis tigers magnet on the lid and the front and mount the stc1000 to the side with magnets. I wasnt wanting anything super fancy, since its just in the man-****-room/SAC(spousal avoidance centre). All in all, it was a really fun project and I am pleased with how it turned out.
But now its time to get going on the next project...
Then the next one is already queued up for spring
But now its time to get going on the next project...
Then the next one is already queued up for spring
TexasDroughtBrewery
Well-Known Member
Added a couple perlicks.
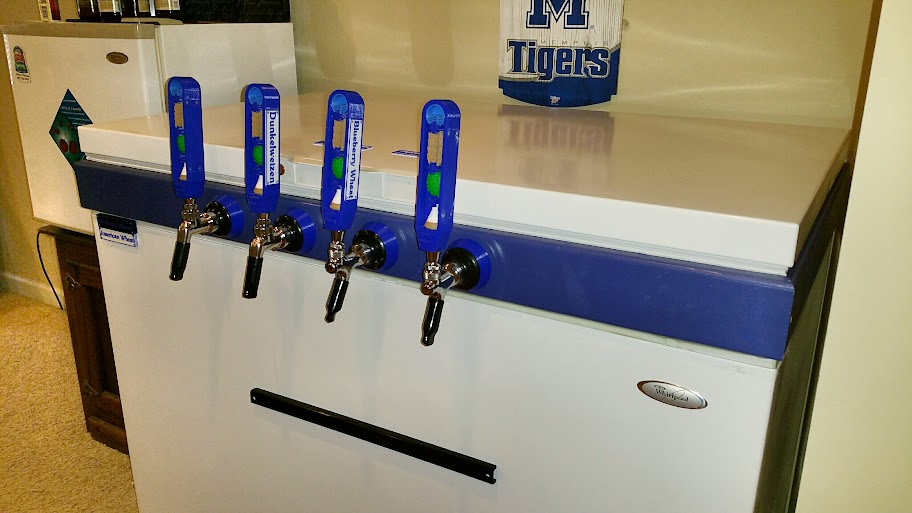
Notice the big bar tool magnet... Stay tuned...
*drool*...looks amazing I love the handles. I've started to collect them.
Jthornburgh
Well-Known Member
- Joined
- Oct 1, 2015
- Messages
- 87
- Reaction score
- 9
good job. I did many of the same parts, except I laser cut the box for the STC-1000.
evchenko
Well-Known Member
Loving teh keezer pr0n
One day!
One day!
fusa
Senior Member
very nice!
Nice build, great use of technology. I just got my 3d printer today at work. Can't wait to see what great things I can do. Would you mind sharing your shank spacer design file?
Sure, I will try to get all the files uploaded to thingiverse tonight
Contradiction
Member
As an Engineer/Product Designer I really love this! Great idea of using the 3D Printer and the aesthetic of the parts it creates. The tap handles are awesome!
Great work!
Wonderful job! Now paint that sucker UT orange and it will be perfect.
Dislike
")
Nice build, great use of technology. I just got my 3d printer today at work. Can't wait to see what great things I can do. Would you mind sharing your shank spacer design file?
Sorry for the delay. Here you go. You should be able to scale the thickness with no adverse effects.
http://www.thingiverse.com/thing:1257446
I will try to get the hole plugs and stc1000 enclosure files uploaded asap. Here are the files for the tap handles:
http://www.thingiverse.com/thing:1150042
http://www.thingiverse.com/thing:1150042
CaptnDelta
Well-Known Member
- Joined
- May 7, 2014
- Messages
- 164
- Reaction score
- 26
Nice handles, would be cool to integrate one of those small SainSmart TFT screens into each
http://www.sainsmart.com/sainsmart-...T3tDGZs11L-dMNKgP0D8y4NSESCH--7uWMaAsRu8P8HAQ
BTW, is that the Geetech Prusa I3? How do you like that printer? Would you buy it again? Just about ready to take the plunge on a Printrbot or similar...
Cheers,
-Th
http://www.sainsmart.com/sainsmart-...T3tDGZs11L-dMNKgP0D8y4NSESCH--7uWMaAsRu8P8HAQ
BTW, is that the Geetech Prusa I3? How do you like that printer? Would you buy it again? Just about ready to take the plunge on a Printrbot or similar...
Cheers,
-Th
Nice handles, would be cool to integrate one of those small SainSmart TFT screens into each
http://www.sainsmart.com/sainsmart-...T3tDGZs11L-dMNKgP0D8y4NSESCH--7uWMaAsRu8P8HAQ
BTW, is that the Geetech Prusa I3? How do you like that printer? Would you buy it again? Just about ready to take the plunge on a Printrbot or similar...
Cheers,
-Th
You could probably rig something like that up for raspberry pints: http://raspberrypints.com/
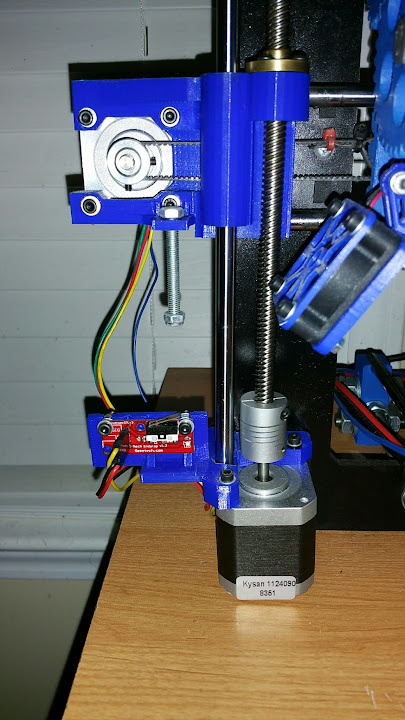
The printer is actually a reprap prusa i3 rework kit I bought on ebay for around $350 http://www.ebay.com/itm/Reprap-Prus...917067?hash=item2ed69a124b:g:WZ0AAOSwQJhUkyeS
The kit is a great starting point. It comes with an excellent hotend, motors, rods, electronics, frame etc...
Im not sure if you are familiar with reprap, but its basically an open hardware philosophy about "self replicating/evolving printers". The kit is somewhat basic, but its everything you need to get printing, and to start "evolving" (modding) your printer to make it better.
I first printed a screw-adjustable z endstop, because the stock z endstop bracket is a pain in the ass: http://www.thingiverse.com/thing:223765
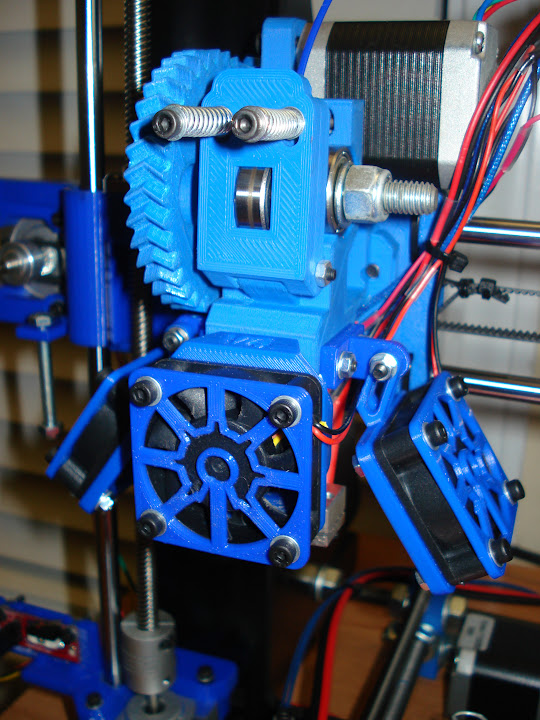
I then designed and printed some little parts fan mounts, and open-hardware-esque 40mm fan covers. My philosophy, at least on PLA, is "print hot, and cool a lot". The parts fans cool the PLA rapidly, allowing me to print hotter, which gives me better layer adhesion, yielding better structural integrity.
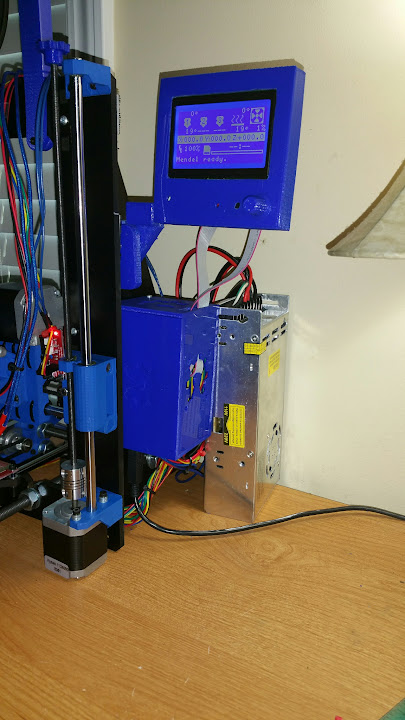
Theres no great cable management for the RAMPS (logic) board, so I designed a little enclosure that I stick to the side of the frame with dual lock velcro: http://www.thingiverse.com/thing:917666 . The kit also doesnt come with an lcd (not that you need one, because I send all my prints, and control the printer over usb), but I bought a $16 lcd controller kit on amazon, and printed a little swivel mount, that is also dual lock velcro'd.
RAMPS and lCD
The kit (as most i3 kits do) came with m5 z-axis rods, which are slightly flimsy and can result in "z wobble" which shows up as slightly wavy surfaces. I replaced the m5 z-axis rods with tr8*8 rods, which are much beefier. I found some files for some X ends (which hold the Z nuts), but the nuts that they were designed for can only be ordered from China. I remixed them to accept some pololu brass nuts which can be found in the US. The x end set also provides an x-axis belt tension, which the stock kit does not have.
Z axis tr8*8 x ends: http://www.thingiverse.com/thing:973846
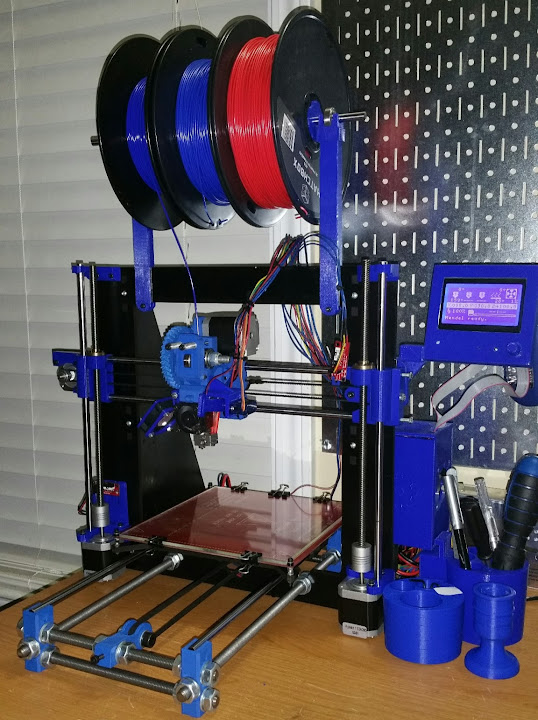
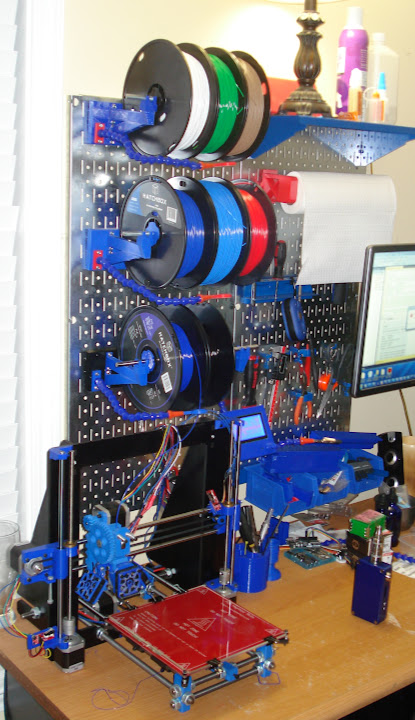
As for non-performance mods, the kit didnt come with a filament spool holder, so I printed a frame mounted one temporarily, then I designed a pegboard mounted system: http://www.thingiverse.com/thing:985046
First spool setup:
Pegboard mounted setup:
That has got to be the sweetest 3D printer workbench I've seen!
The quality of your STC enclosure print is amazing. I have a Maker Farm i3V prusa. It's a great machine, but I am not getting things that look that nice from it. I've generally been keeping the part warm as much as possible to minimize warping. I will have to try it with max cooling and see what happens.
I print most of my stuff with ABS, which might make me a glutton for punishment!
That has got to be the sweetest 3D printer workbench I've seen!
The quality of your STC enclosure print is amazing. I have a Maker Farm i3V prusa. It's a great machine, but I am not getting things that look that nice from it. I've generally been keeping the part warm as much as possible to minimize warping. I will have to try it with max cooling and see what happens.
I print most of my stuff with ABS, which might make me a glutton for punishment!
Yea I avoid using ABS unless I have to (for stuff that needs to withstand more heat, or needs some slight give to it). You dont want to use fans for ABS, only pla. ABS will warp and/or split.
CaptnDelta
Well-Known Member
- Joined
- May 7, 2014
- Messages
- 164
- Reaction score
- 26
Awesome setup!
Guess where I'm coming from https://www.homebrewtalk.com/showthread.php?t=487694&page=139
Would be cool to have the tap handle displays animated when someone walks up to the taps - with little hop faces yelling "Take me, I'm Hoppy", "No take me, I'm Dunkel" and then start argue with each other "The carbonation got to his head" -- something out of a Harry Potter scene...
Multiplexing those displays would be a bit of a challenge, but nothing impossible.
I've been watching the reprap stuff from the sidelines for a few years now, and I just wasn't sure if/when to take the plunge. Seems addictive, and a big time sink
We got a number of really big (and really expensive) SLA printers at work, for prototyping and FFF work. But they're guarded like Fort Knox...
I don't wanna derail your thread with this, but what I need is something that can print fronts or enclosures for electronic stuff. Your STC enclosure (quality, size) is a really nice example of what I'd need to do, but without sinking months of setup time, printed additions, etc into. The tinkering may come later - probably will - but I'd like to have a good baseline 1st. Is there anything sorta ready to go that you'd recommend?
I.e is this any good for my situation? http://www.amazon.com/dp/B00RBABHSQ/?tag=skimlinks_replacement-20
Thank you for your post, good stuff!
Cheers,
-Th
You could probably rig something like that up for raspberry pints: http://raspberrypints.com/
Guess where I'm coming from
https://www.homebrewtalk.com/showthread.php?t=487694&page=139Would be cool to have the tap handle displays animated when someone walks up to the taps - with little hop faces yelling "Take me, I'm Hoppy", "No take me, I'm Dunkel" and then start argue with each other "The carbonation got to his head" -- something out of a Harry Potter scene...
Multiplexing those displays would be a bit of a challenge, but nothing impossible.
The printer is actually a reprap prusa i3 rework kit I bought on ebay for around $350 http://www.ebay.com/itm/Reprap-Prus...917067?hash=item2ed69a124b:g:WZ0AAOSwQJhUkyeS
The kit is a great starting point. It comes with an excellent hotend, motors, rods, electronics, frame etc...
Im not sure if you are familiar with reprap, but its basically an open hardware philosophy about "self replicating/evolving printers". The kit is somewhat basic, but its everything you need to get printing, and to start "evolving" (modding) your printer to make it better.
I've been watching the reprap stuff from the sidelines for a few years now, and I just wasn't sure if/when to take the plunge. Seems addictive, and a big time sink
We got a number of really big (and really expensive) SLA printers at work, for prototyping and FFF work. But they're guarded like Fort Knox...
I don't wanna derail your thread with this, but what I need is something that can print fronts or enclosures for electronic stuff. Your STC enclosure (quality, size) is a really nice example of what I'd need to do, but without sinking months of setup time, printed additions, etc into. The tinkering may come later - probably will - but I'd like to have a good baseline 1st. Is there anything sorta ready to go that you'd recommend?
I.e is this any good for my situation? http://www.amazon.com/dp/B00RBABHSQ/?tag=skimlinks_replacement-20
Thank you for your post, good stuff!
Cheers,
-Th
Last edited by a moderator:
Awesome setup!
Guess where I'm coming from
Would be cool to have the tap handle displays animated when someone walks up to the taps - with little hop faces yelling "Take me, I'm Hoppy", "No take me, I'm Dunkel" and then start argue with each other "The carbonation got to his head" -- something out of a Harry Potter scene...
Multiplexing those displays would be a bit of a challenge, but nothing impossible.
I've been watching the reprap stuff from the sidelines for a few years now, and I just wasn't sure if/when to take the plunge. Seems addictive, and a big time sink
We got a number of really big (and really expensive) SLA printers at work, for prototyping and FFF work. But they're guarded like Fort Knox...
I don't wanna derail your thread with this, but what I need is something that can print fronts or enclosures for electronic stuff. Your STC enclosure (quality, size) is a really nice example of what I'd need to do, but without sinking months of setup time, printed additions, etc into. The tinkering may come later - probably will - but I'd like to have a good baseline 1st. Is there anything sorta ready to go that you'd recommend?
I.e is this any good for my situation? http://www.amazon.com/dp/B00RBABHSQ/?tag=skimlinks_replacement-20
Thank you for your post, good stuff!
Cheers,
-Th
The hephestos is nice, but not worth that much in my opinion. It is, afterall, just an i3. I would recommend the duplicator i3
http://wanhaousa.com/products/duplicator-i3-steel-frame
Its the same design as mine, but pre built, steel frame, and hardly costs more than mine, especially after you consider it already has tr8*8 z axis screws, and an lcd.
Last edited by a moderator:
Really nice.
Would love to get into the 3D printing stuff. Out of curiosity, how much material (off the roll) does the average part take? like you're tap handles... I realize this would be different for each part made but wondering how long a roll lasts, looks like a roll of material varies in price with the price around 30-40? not sure really.
Just some thoughts as to the cost effectiveness of printing parts really. I can think of lots of parts I could use a 3D printer for, most not related to brewing.
how about the time aspect, how long did it take to print the tap handle or the keezer collars you made?
Really nice.
Would love to get into the 3D printing stuff. Out of curiosity, how much material (off the roll) does the average part take? like you're tap handles... I realize this would be different for each part made but wondering how long a roll lasts, looks like a roll of material varies in price with the price around 30-40? not sure really.
Just some thoughts as to the cost effectiveness of printing parts really. I can think of lots of parts I could use a 3D printer for, most not related to brewing.
how about the time aspect, how long did it take to print the tap handle or the keezer collars you made?
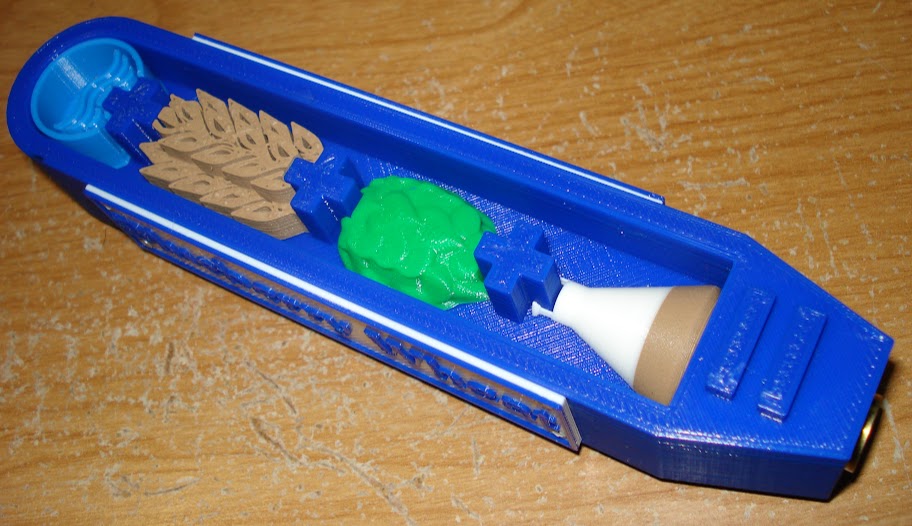
Good questions. The tap handle bodies (without the hops/barley/yeast/water pieces) take about 5 to 6 hours each to print, and are about 75 to 90 grams each, depending on a lot of variables (how many solid bottom and top layers, how many perimeters, and what % infill I use). Each spool is 1000 grams, so I can get about 11 to 13 tap handle bodies per spool. Each spool is about $22 shipped on amazon. (I mostly use "hatchbox pla".) This means that at 80 grams, each tap handle is around $1.75.
The hops, water, and flasks take about 7 to 15 minutes each and are about 3 grams each. The barley takes a little longer at 30 minutes (because it has a lot of perimeters), and weighs 6 grams. At an average weight of 3.75 grams, thats about 32 cents for a full set.
A full set of 3 placards takes about an hour, and they are a little over 4 grams each, or 13 grams for the full set of 3, which would cost 28 cents for a full set.
The faucet spacers take about 1.5 hours and are about 25 grams each, or 55 cents each.
The 1" hole plugs take about 12 minutes and are 3 grams each, or 7 cents.
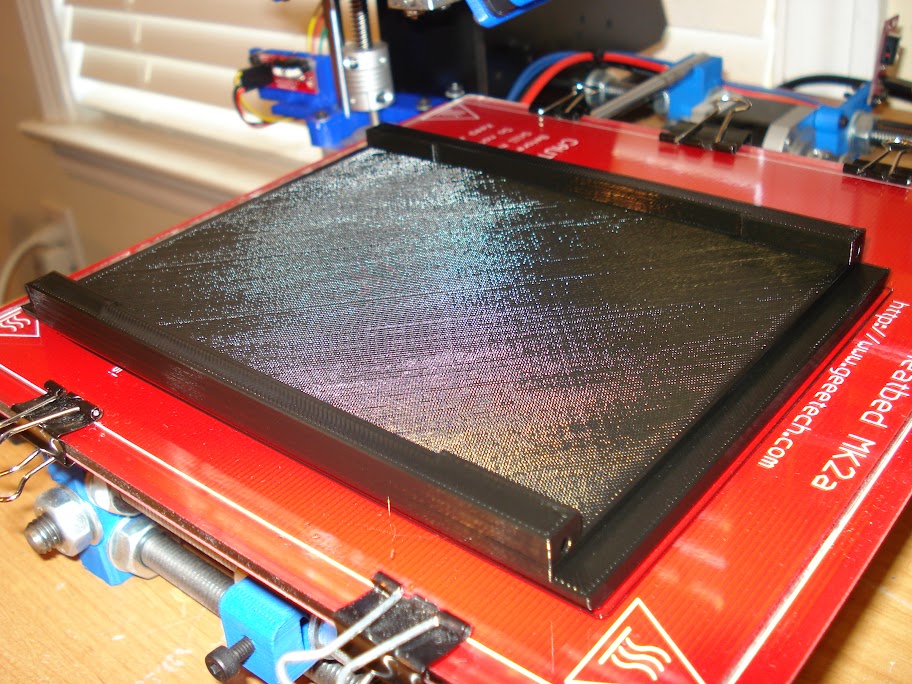
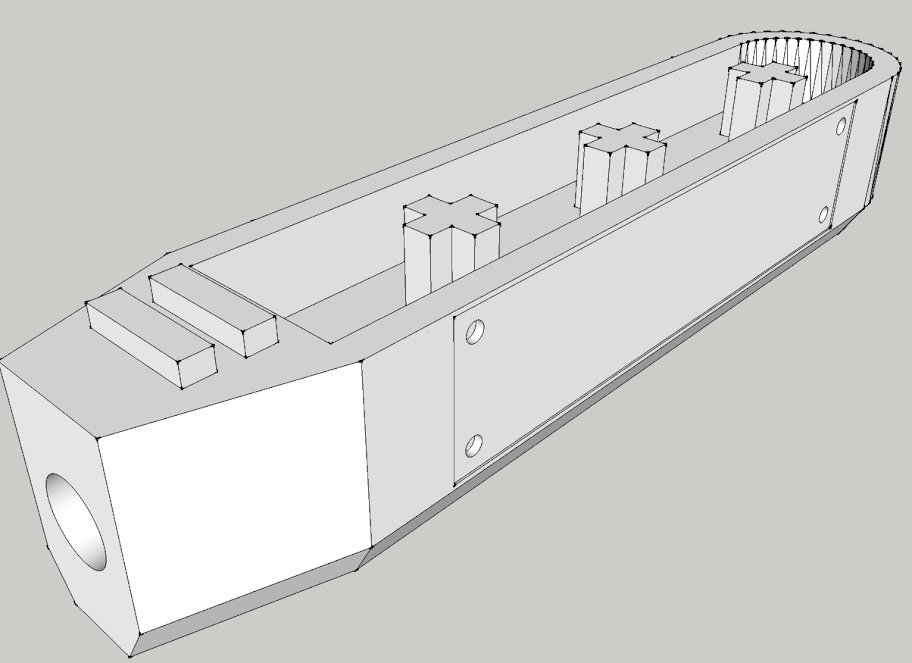
The stc1000 enclosure is really bigger and thicker than it needs to be, but here are the details on that:
-Bottom - 11 hours and 186 grams
-Top - 7 hours and 110 grams
-Front and Back plates - 2.5 hours and 37 grams
The stc1000 enclosure was the largest print I have done, but with all of the parts added together it only used around 250 to 350 grams, which puts a total cost to about 6 or 7 bucks.
One thing to keep in mind also is that all these estimates are for quality prints, which are at pretty high infill, for structural integrity, and at 35mm/s which is pretty slow, for quality. I could probably lower infill and increase to 45mm/s and be fine, and get faster prints, and save a dollar here and there.
I hope this gives you a good idea on time and cost. It does take a good bit of time, but its mostly just starting the print, then going and doing other stuff around the house, like brewing
Cost wise... its super cheap...Are you in Memphis or just a fan of the team(s)?
Good questions....
I really appreciate all the info and I don't mean to highjack the thread, but as you did use 3D printing to do a lot of parts...
I was looking at the printer you recommended and I will assume yours uses the same software, which I'm wondering how you like... depending on what you're using. I don't recognize any of the software listed, or the file type.
I work in AutoCAD (2D and 3D drawings) every day and just finished school on Inventor for 3D, we are supposed to make that switch at some point... but that's another story.
If you're familiar, how does the software you use compare?
You really have me wanting to pull the trigger on an I3 printer!
Are you in Memphis or just a fan of the team(s)?
Born and raised. I grew up in the hickory hood, moved to germantown in middle school, then out to southaven in college and have been out here for about 10 years.
I really appreciate all the info and I don't mean to highjack the thread, but as you did use 3D printing to do a lot of parts...
I was looking at the printer you recommended and I will assume yours uses the same software, which I'm wondering how you like... depending on what you're using. I don't recognize any of the software listed, or the file type.
I work in AutoCAD (2D and 3D drawings) every day and just finished school on Inventor for 3D, we are supposed to make that switch at some point... but that's another story.
If you're familiar, how does the software you use compare?
You really have me wanting to pull the trigger on an I3 printer!
Sure no worries at all. For 3d modeling, I am a google sketchup newb. Pretty much all of the reprap printers, and other printers as well, can use slic3r and pronterface. Slic3r is what you import the .stl file to (standard 3d printing file type), and set the print settings (layer height, speed, peremeters, infill%, etc...). You then export a gcode file which is the file that tells the printer what to do to print the object (essentially a bunch of x,y,z coordinates). You use pronterface to send commands to the printer, so you load the gcode file into there to print it. Its all free.
Odds are you can use inventor, and export an STL file just fine.
Pretty cool... I didn't even know sketchup would do 3D, and you're right about inventor, it will export a .stl file.
I'm going to have to do some reading on all this. I really appreciate the info.
Pretty cool... I didn't even know sketchup would do 3D, and you're right about inventor, it will export a .stl file.
I'm going to have to do some reading on all this. I really appreciate the info.
Yea for some reason there is a misnomer that sketchup doesnt do solids, but not only does it do them, it does them well and is extremely user friendly. I watched like 2 x 10 minute intro tutorials and have been making stuff ever since. I just had to install a plugin to be able to import and export STL's. A lot of other 3d modeling programs will only export, while sketchup can import.
CaptnDelta
Well-Known Member
- Joined
- May 7, 2014
- Messages
- 164
- Reaction score
- 26
The hephestos is nice, but not worth that much in my opinion. It is, afterall, just an i3. I would recommend the duplicator i3
http://wanhaousa.com/products/duplicator-i3-steel-frame
Its the same design as mine, but pre built, steel frame, and hardly costs more than mine, especially after you consider it already has tr8*8 z axis screws, and an lcd.
Just pulled the trigger on that, should be here sometime next week. It's all your fault...
Cheers,
-Th
Just pulled the trigger on that, should be here sometime next week. It's all your fault...
Cheers,
-Th
Haha nice. Have fun man. Let me know if you need any help or files.
Similar threads
- Replies
- 10
- Views
- 514
- Replies
- 8
- Views
- 508
