RIMS System for BIAB Mash Temperature Control

Homebrew Talk - Beer, Wine, Mead, & Cider Brewing Discussion Forum

Help Support Homebrew Talk - Beer, Wine, Mead, & Cider Brewing Discussion Forum:

This site may earn a commission from merchant affiliate links, including eBay, Amazon, and others.

Borgstrom

Well-Known Member
Joined
May 10, 2012
Messages
57
Reaction score
4
I've been brewing BIAB on a propane-fired system for about a year and have just completed a build of a RIMS system to help control mash temperature and free up some brewday time by avoiding kettle babysitting duty during mash/mash-out. Propane would still be used for initial heating and for the boil.

My original goal was to build a programmable PID-controlled, 120V/15A system that could handle both single and multi-step mash profiles. Unattended multi-step profiles ended up not being possible due to capacity of the heating element (more in a later post), but in the end the system does a great job of tightly controlling mash temp at a programmed set point with no active monitoring needed.

One concern was whether or not a 1500W (about the max usable on a 120V/15A circuit) heating element could even maintain temp. I have a 15G brew kettle and want to be able to do 10G batches. I set up an experiment to see how much heat was lost from the kettle when filled with 10G of mash-temperature water -- see diagram below. The kettle/water lost about 0.22C per minute which, if my thermodynamic calculations are correct, corresponds to about 550W. Making up for the kettle's heat loss seemed well-within the capabilities of a 1500W element.

Stout 15G Kettle.jpg
 
After a quick review (perhaps too quick), I selected the Auber SYL-2352P PID temperature controller as the center of the electronics build. It is a ramp/soak controller, often used for controlling kilns in glass and metal work. It seemed like a great choice for controlling both single and multi-step mashes.

Other design considerations that were important to me:
  • Heater must be disabled if pump is not on
  • Both pump and heater must have independent shut-off switches
  • Audible alarm for signalling process events
  • Entire system must be powered from a single 120V/15A circuit

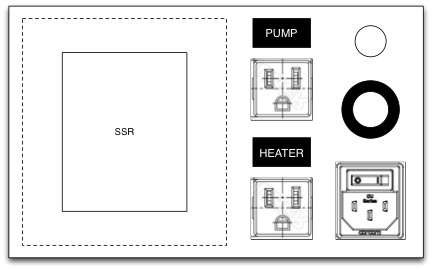
The final circuit and front/rear panel designs are posted below.

Parts List
  • Auber Instruments SYL-2352P PID Temperature Controller
  • Auber Instruments MGR-1 D4825 SSR (25A)
  • Auber Instruments HS25ET External Mount Heat Sink for 25A SSR
  • Auber Instruments PT-100C Tri-Clamp Liquid tight RTD Sensor
  • Auber Instruments OUTS1 120V 15A US Socket, Panel Mount, NEMA 5-15R (2X)
  • Auber Instruments FLBuz-120-16 Flashing Buzzer, 110V, 16 mm
  • TE Connectivity 15CU10BS1 Snap-in Power Entry Module, 15A
  • NTE R58−15A Thermal Circuit Breaker, 15A
  • Amico Red Light DPST ON/OFF Snap in Boat Rocker Switch 20A/125V AC (2X)
  • StarTech PXT101146 6-Feet 14 AWG Computer Power Cord - NEMA5-15P to C13
  • Bud Industries IA-6162 12.93X8.27X4.92" Aluminum Case

RIMS Circuit.jpg


Front Panel.jpg


Rear Panel.jpg


Parts.jpg
 
The next step was to program the Auber SYL-2352P PID controller. It turns out this is quite an involved process, as the programming model is primitive and instructions pretty basic. However, after reading the manual 2-3 times, speaking the Auber support (thanks Suyi!), and doing a few trial runs I ended up with the program below.

Default Profile
  • 60 minute mash @ 153F
  • 10-minute mash-out @ 170F

Program Intent
  • AL1 lamp: temp is more than 200F or less than 135F (process alarm)
  • AL2 lamp: temp is more than +/- 1F from set value (deviation alarm)
  • Both AL1 and AL2 lamps: mashout done
  • Buzzer sounds when mashout done
  • Buzzer sounds if temperature more than 200F or less than 135F
  • “Safety Start” feature starts timer when wort reaches +/- 1.1F of target

Key variables
  • Sn (input type) = 21 (Pt100 RTD)
  • HY-1 (deviation high alarm) = 1F
  • HY-2 (deviation low alarm) = 1F
  • HY (hysteresis band) = 0.1F
  • ALM1 (high limit absolute alarm) = 200F
  • ALM2 (low limit absolute alarm) = 135F
  • AL-P (alarm output definition) = 3 (AL1 w/process alarm; AL2 w/deviation alarm; alarm type displayed when alarm on)
  • COOL = 8 (Heating, no alarm suppression, Fahrenheit)
  • AT = 3 (Inhibit auto-tune; set AT = 2 for first run to enable auto-tune)

Program
StEP1: C01 = 153, t01 = 60 (mash at 153F for 60 minutes w/Safety Start)
StEP2: C02 = 153, t02 = 1 (attempt to ramp to 170F in 1 min)
StEP3: C03 = 170, t03 = 10 (mashout at 170F for 10 minutes w/Safety Start)
StEP4: C04 = 170, t04 = -95 (turn on AL1 and AL2; buzzer sounds)
StEP5: C05 = 170, t05 = 0 (hold until “^” key pressed for 2 sec.)
StEP6: C06 = 170, t06 = -217 (turn off AL1 and AL2; buzzer stops)
StEP7: C07 = 170, t07 = -121 (stop)
 
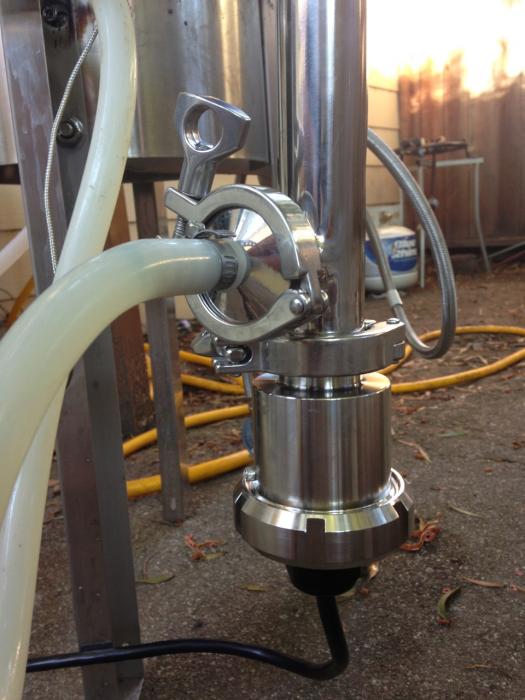
For the "wet" part of the system, I chose the RIMS tube from Brewer's Hardware together with a Chugger pump and Camco heating element.

In testing the system, I learned that you don't want to plug in a heating element without it being in water. After about 10 seconds it goes "pop" and you have to buy another heating element. The one listed below (my second one) is a "Lime Life" element, which supposedly doesn't burn out if dry fired. I don't plan on finding out if the claim is true...

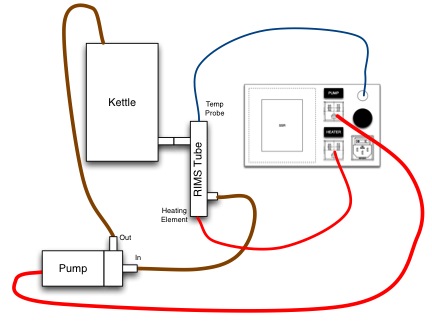
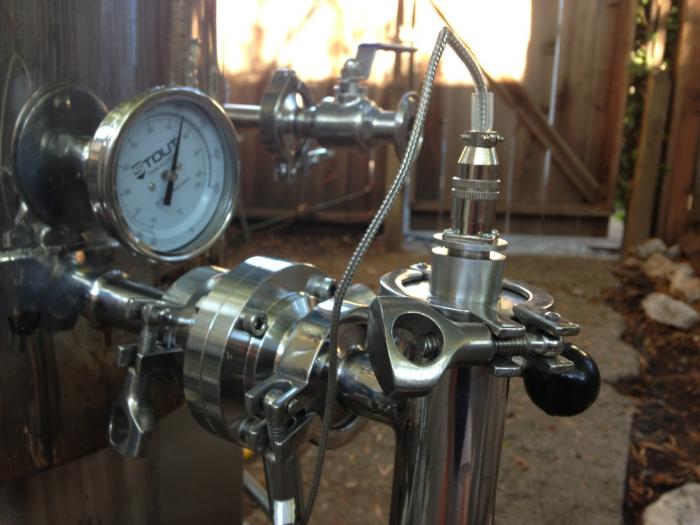
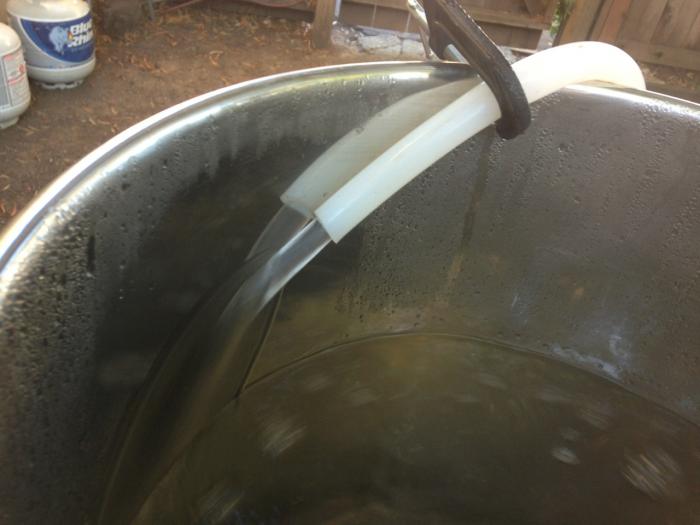
I debated with my brewing partner whether the wort should flow from heating element to temperature sensor in the RIMS tube, or vice-versa. The first trial had the water flow past the heater directly to the sensor. This seemed to result in very erratic temperature control. We settled on the diagram shown below, where the wort flows out of the kettle, past the sensor, to the heating element and then down to the pump. This seems to smooth out the temperature swings. Another benefit of this approach is that you can attach the RIMS tube directly to the kettle output, eliminating one hose from the setup. Less stuff to clean is good!

Hardware
  • Camco 02852 1500W 120V Screw-In Lime Life Foldback Water Heater Element
  • Chugger Stainless Steel Center Inlet Pump
  • Brewers Hardware RIMS15 1.5" Tri Clover Compatible RIMS Tube
  • Brewers Hardware TC15EEA 1.5" Tri Clover Compatible X 1" NPS Element Adapter
  • Brewers Hardware TFBV123P 1/2" Full Port 3-Piece Ball Valve
  • Brewers Hardware TC15M12 1"/1.5" Tri Clover Compatible X 1/2" Male NPT
  • Brewers Hardware TC15F34 1"/1.5" Tri Clover Compatible X 3/4" Female NPT

Brew-Day Instructions
1. Bring water in kettle up to strike temperature with propane burner then turn off burner
2. Set up RIMS tube, pump (position lower than kettle), controller (all switches in OFF position)
3. Dough in; place tubing from RIMS output into grain bag
4. Power-on controller, power-on pump; check and adjust flow
5. Enable (power-on) heater; press PID “∨” key for 2 seconds to start processing
6. When mash is finished, start propane burner to assist in ramp to mash-out temperature
7. Turn off propane burner when mash-out temperature reached.
a. PID program will start mash-out timer when target temp reached
8. When buzzer sounds, press “^” for 2 seconds to stop processing
9. Turn off all switches; remove RIMS tube and tubing
10. Begin boil with propane burner

System Diagram.jpg


Pump.jpg


Heating.jpg


Sensor.jpg


Flow.jpg
 
Interesting and informative posts. I have been using the 4352 for a couple of brews and would be interested if you can get it to do what your goal is here...I think it will be difficult based on my experiences. To get my mash temps up 8-10 degrees F took quite a lot of time with the 4352. Perhaps I need to look at my setup further, but I found it struggled if trying to ramp more than a couple of degrees. It got there, but just took a lot longer than expected. I am wishing I had sprung for the ramp soak option on my 4352 now. Maybe I will contact Suyi and see if she can add it on...subscribed.

Cheers!
 
The first thing I needed to check was if everything worked as expected -- system design, PID programming, heating element capacity, ...

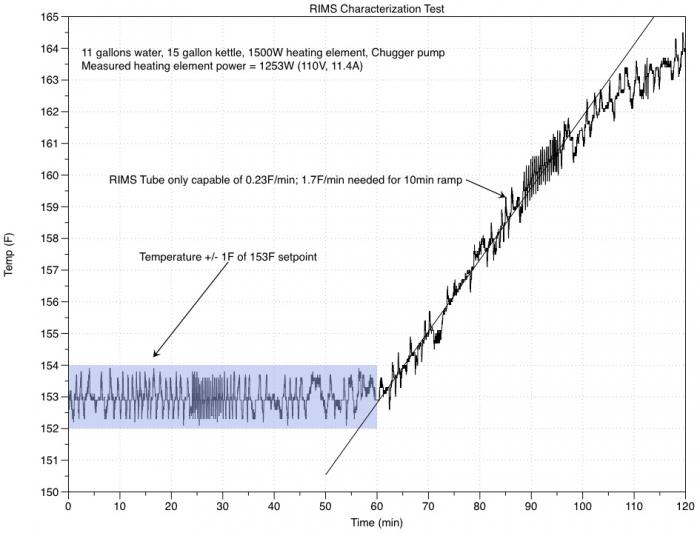
The PID and heating element were able to keep the water within +/- 1F of the programmed set-point. However, with 11 gallons water in the kettle the heating element was only able to increase the temperature at a rate of about 0.23F per minute -- see chart below. This meant that going from mash temp to mash-out temp would take over an hour with the 1500W heating element. :(

I double-checked the output of the heating element at this point with a Kill-a-Watt: 1253W (110V,11.4A). The line voltage actually dropped from 120V to 110V when the heater came on, likely due to the long extension cord I was using. While I could have gotten a shorter or thicker extension cord, I don't think it would have helped much. You can hear the pump slow down when the heater turns on because of this voltage drop in the videos below.

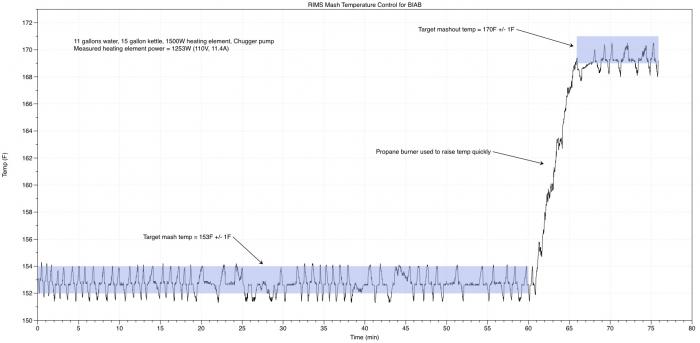
Plan B was to use the propane burner to raise the temperature for mash-out. This worked out well, raising the temp from 153F to 170F in 5 min. Once I hit 170F I turned the propane off and the PID program took over automatically. See chart below.

Once the mash-out time was over, the program activated the buzzer to remind me to fire up the propane again for the boil.

[ame="http://youtu.be/RvcT__uBRM0"]http://youtu.be/RvcT__uBRM0[/ame] [ame="http://youtu.be/pV4CYSmPoAY"]http://youtu.be/pV4CYSmPoAY[/ame]

Electric Heat.jpg


Propane Heat.jpg
 
One of my original goals was to use the programmable PID to control step-mash and mash-out temperature ramps with a 1500W heating element. It turns out that this heating element doesn’t have the capacity to ramp fast enough for my 15-gallon kettle with an 11-gallon batch. It holds temperature fine, but needs the propane burner to make large changes in temperature in a reasonable time.

If I were to do this project over, I would use the non-programmable version PID (SYL-2352) instead of the programmable version (SYL-2352P). The hassle of dealing with the programming isn't really worth it given how easy it is to change set-points on a non-programmable PID. At some point I may re-do the front/back panels as the stock aluminum provided was a bit thin.

In any event, the system does the main job I wanted it to do -- unattended mash temp control for my BIAB system so I can free up time during my brew day.

I'll post back here after I use the system on an actual brew day.
 
Interesting and informative posts. I have been using the 4352 for a couple of brews and would be interested if you can get it to do what your goal is here...I think it will be difficult based on my experiences. To get my mash temps up 8-10 degrees F took quite a lot of time with the 4352. Perhaps I need to look at my setup further, but I found it struggled if trying to ramp more than a couple of degrees. It got there, but just took a lot longer than expected. I am wishing I had sprung for the ramp soak option on my 4352 now. Maybe I will contact Suyi and see if she can add it on...subscribed.
Cheers!

I got my main goal (maintain mash temp), but not my stretch goal of enabling automated multi-step mashes and fast ramp to mashout temps.

I think the ramp/soak programmable version of the PID (the one I used) would be perfect if you had something more than a 1500W heating element; this would require a 240V circuit which I didn't want to deal with; you'd also need to get a higher-rated SSR. 1500W might also work for step mashes / mashout ramp with a smaller kettle/batch size, but I haven't tried.
 
One tool you might have found useful is the Excel spreadsheet electricheat.xlsx or xls. This will give you a good indication of how much time it will get water from temp to temp for a specified volume of water.

Though the testing is part of the fun, it might have saved you some time and dollars to find out what many on this forum have discovered. 1500w/120v elements will hold and slowly raise 11G of wort to a desired temp, but the time it takes is quite long. If you're going to make 11 gallon batches, use at least a 4500W element and 240v power source. Unless you have all day to brew.

Good luck!
Paul

That would have been a great spreadsheet to have! Is it available online somewhere - I don't see it on a google search.

The design/build/test was absolutely part of the fun. 240V is not an option for me at this point, so I'm happy with having unattended single-step mash temp control added to my otherwise manual, propane-fired system.
 
How did you capture the temp data to get those graphs?

Also curious about why you went with the the rtd before the heater vs the heater then the rtd? Shouldnt the pid be measuring the processed temp rather than the incoming temp? This got kicked around a lot on the rims for dummies thread....

Awesome build and great job documenting the process. Hopefully my build will take shape soon, I'm running out of homebrew!!!

Thanks!

I captured the temps with an old version of a Vernier data logger and a thermometer probe suspended in the center of the kettle. Made plots with DataGraph, an awesome plotting tool.

We tried both flow directions and having sensor before the heater seemed to result in smoother control. At the end of the day I think either way could work as long as you autotune the PID so it picks up on the response time of the system. What tipped the scale for me was being able to connect the RIMS tube directly to the kettle, eliminating one hose. Less to clean!
 
What kind of flow are you getting through your RIMS tube? I have a fairly slow flow through there and I am able to raise my mash temp from 153 to 170 in about 15-20 min. Is your MLT insulated?
 
What kind of flow are you getting through your RIMS tube? I have a fairly slow flow through there and I am able to raise my mash temp from 153 to 170 in about 15-20 min. Is your MLT insulated?

I haven't measured the flow rate, but you can get an idea from one of the photos in a previous post. My kettle isn't insulated, but that could be another way of speeding RIMS-only ramp time.

What size batch / heating element do you have? I could live with a 15 min ramp from 153 to 170.
 
I have a 5500w running on 120, my MLT is insulated. My usual batches are 8 gallons but I have done 12 gallons as well with the ramp time around 20 min. I do have a slow flow rate though 1g/mi which is essentially wide open for my pump.
 
I debated with my brewing partner whether the wort should flow from heating element to temperature sensor in the RIMS tube, or vice-versa. The first trial had the water flow past the heater directly to the sensor. This seemed to result in very erratic temperature control. We settled on the diagram shown below, where the wort flows out of the kettle, past the sensor, to the heating element and then down to the pump. This seems to smooth out the temperature swings.
[/QUOTE]

I went with pumping out of the MLT into the RIMS past the Element (first) then past the Themocouple back to the MLT works perfectly, the reason I mention this is almost every thing I have read on the subject supports this method. Im not knocking it just pointing it out. Also my thermocouple it on top like yours but I pump up from the bottom. Just different but whatever works.
Like the Stout tanks, I have the 1BBL system myself.
 
Brewing porn, here. This is exactly what I'm wanting to do. Could you give a rough guess on total cost of everything included?
 
I have a 5500w running on 120, my MLT is insulated. My usual batches are 8 gallons but I have done 12 gallons as well with the ramp time around 20 min. I do have a slow flow rate though 1g/mi which is essentially wide open for my pump.

Have you measured how much power/current you are actually using? You would need a lot of current to get 5500w at 120v.
 
I went with pumping out of the MLT into the RIMS past the Element (first) then past the Themocouple back to the MLT works perfectly, the reason I mention this is almost every thing I have read on the subject supports this method. Im not knocking it just pointing it out. Also my thermocouple it on top like yours but I pump up from the bottom. Just different but whatever works.
Like the Stout tanks, I have the 1BBL system myself.

Yeah, I could make an argument either way. I'm happy with the temperature stability from the tests I ran and would need some evidence to switch and add another hose to the system. If I got really motivated I could re-run last weekend's final test, switching the flow to see if I can measure any difference. That's going to be a while, because the next time I haul my gear out it will be for making beer, not data! :)
 
Brewing porn, here. This is exactly what I'm wanting to do. Could you give a rough guess on total cost of everything included?

I really don't want to add it up...probably more than is reasonably justified by the time savings...
 
Borgstrom said:
I really don't want to add it up...probably more than is reasonably justified by the time savings...

Understandable. Still this will serve as hugely inspirational to my new system. SWMBO and I just bought a house with a medium sized room in an unfinished (finishing it now) basement. I'm wanting to avoid gas as ill have to run specific lines for it, and she has given me the okay-go to get pretty crazy with the setup I employ.
 
Yeah, I could make an argument either way. I'm happy with the temperature stability from the tests I ran and would need some evidence to switch and add another hose to the system. If I got really motivated I could re-run last weekend's final test, switching the flow to see if I can measure any difference. That's going to be a while, because the next time I haul my gear out it will be for making beer, not data! :)

What is the cycle period the PID is set at? sounds like it is set for a long period meaning when the element is cyling you could be getting slugs of heated/unheated wort which shows up as erractic readout. I think most have the probe after the heater to avoid the potential for overheating the wort, but this should not be an issue with a decent flowrate unless if you got a stuck sparge (does this ever happen with BIAB recirc?) slowing down the flow your controller would deal with it "automatically".
 
How big is your system, I see its from Stout Tanks

I've got a 15G kettle; just upgraded from their 9.2G kettle. Hopefully this will keep me going for a while as 10-11G batches is about all I can imagine for BIAB. Howerver, if gear lust really kicks in (and I find the space), there are some really cool 3-vessel systems options with loads of opportunity to build more DIY automation! Must...resist...the...temptation...to...upgrade...
 
What is the cycle period the PID is set at? sounds like it is set for a long period meaning when the element is cyling you could be getting slugs of heated/unheated wort which shows up as erractic readout. I think most have the probe after the heater to avoid the potential for overheating the wort, but this should not be an issue with a decent flowrate unless if you got a stuck sparge (does this ever happen with BIAB recirc?) slowing down the flow your controller would deal with it "automatically".

I didn't copy down the PID parameters after running autotune, so I'm not sure what the cycle period is. The video in a previous post shows the heating element turning on/off pretty frequently - up to a couple times per second. I haven't had any "stuck sparge" issues in my BIAB sessions, although I've only used my pump for one brew session so far. I'm sure I'll learn a lot more after a couple more full RIMS-based brew days. I'd kind of like to run the data logger with the temp probe in the bag while mashing, but I'm not sure if the plastic casing/cord of the temp probe is food-safe and I don't want to risk a batch of precious wort...
 
Have you measured how much power/current you are actually using? You would need a lot of current to get 5500w at 120v.

If you run a 240v element on 120 you are using about 1/4 the wattage/amps. So am using about 1375w, I have measured the amps but I don't remember them. They are less than 15A :drunk: I achieve my temp rise mostly by flow rate.
 
I've got a 15G kettle; just upgraded from their 9.2G kettle. Hopefully this will keep me going for a while as 10-11G batches is about all I can imagine for BIAB. Howerver, if gear lust really kicks in (and I find the space), there are some really cool 3-vessel systems options with loads of opportunity to build more DIY automation! Must...resist...the...temptation...to...upgrade...

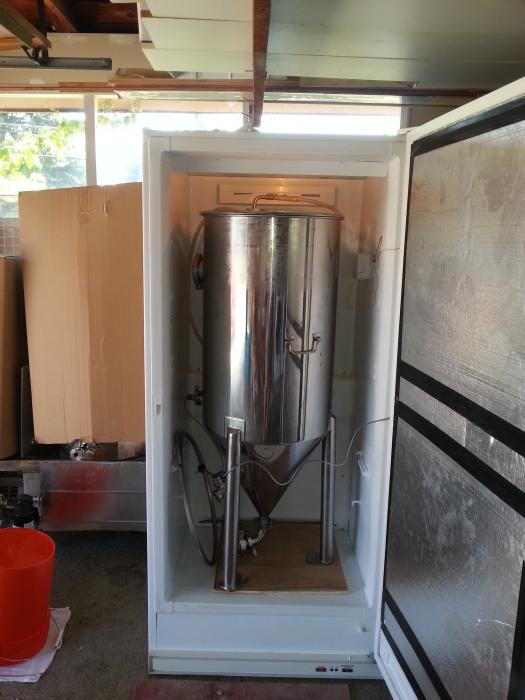
Ah go for it if you can fund it and it suits your brewing needs (wants). I am using their 1BBL system and Conical. It cost on an average 125.00 to brew a batch but you get 2 full 15.5 gal kegs of beer and then i just start giving it away. It does require a lot more than just the pots, like a freezer etc, etc, etc.

20130330_072928.jpg


429.jpg
 
Understandable. Still this will serve as hugely inspirational to my new system. SWMBO and I just bought a house with a medium sized room in an unfinished (finishing it now) basement. I'm wanting to avoid gas as ill have to run specific lines for it, and she has given me the okay-go to get pretty crazy with the setup I employ.

Awesome to have a dedicated brew room & SWMBO to bless it!

My system uses propane for the main burner, so perhaps not ideal for your basement. All-in, I'm probably at around $800 for my RIMS add-on -- $200 for RIMS tube, $150 for PID/sensor, $200 for pump/fittings, $100 for case, plus hoses and misc other parts. Of course I'll also be using the pump/hoses/fittings for whirlpooling, etc.
 
Ah go for it if you can fund it and it suits your brewing needs (wants). I am using their 1BBL system and Conical. It cost on an average 125.00 to brew a batch but you get 2 full 15.5 gal kegs of beer and then i just start giving it away. It does require a lot more than just the pots, like a freezer etc, etc, etc.

Nice! Talk about brew porn!:mug:

I can see doing something like that once I move into a bigger place with more space, or better yet dedicated space. Most time on a brew day is spent setting up, tearing down and cleaning so it makes sense to brew as much as you can each time. Someday...
 
Nice! Talk about brew porn!:mug:

I can see doing something like that once I move into a bigger place with more space, or better yet dedicated space. Most time on a brew day is spent setting up, tearing down and cleaning so it makes sense to brew as much as you can each time. Someday...

Yes cleaning :drunk: biggest part of the brew day, and this system takes 2 people minimum, (some times thats hard to come by). First brew day took 12 hours, we did a Partygyle and made 10 gallons of session beer from the 30 gallon batch so it took 2 extra hours. The second time took 7 hours total, hope to get it to 6.
Cheers
 
I'm going to give this a go sometime this year. Going for the non-programmable PID for sure. I want to keep it as simple as possible. Just want something that keeps me from babysitting the temp with my KAB6...which does the trick and does it fast, but the constant firing with my wide kettle really sucks.
 
How did you achieve this goal? "Heater must be disabled if pump is not on". Seems like you'd need another SSR in there somewhere, or did I miss something clever?
 
Back
Top