Internal Fermentation Chiller

Homebrew Talk - Beer, Wine, Mead, & Cider Brewing Discussion Forum

Help Support Homebrew Talk - Beer, Wine, Mead, & Cider Brewing Discussion Forum:

This site may earn a commission from merchant affiliate links, including eBay, Amazon, and others.

mdboulier

Active Member
Joined
Mar 1, 2011
Messages
41
Reaction score
8
Location
Wilmington
Any thoughts on this? Similar to SOFC in that it uses ice for cooling. I'm working on this for an engineering school project. This is our crude, stripped down prototype so far. (forgive the poor insulation)

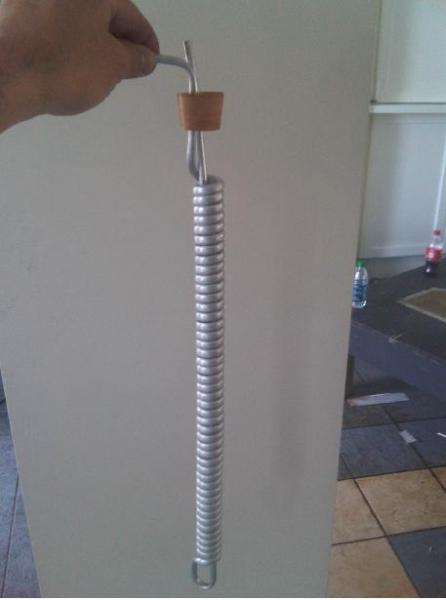
Pumps ice-cooled water through the coiled aluminum heat exchanger.
Extended thermistor on digital thermostat regulates temp
12VDC brushless water pump is compatible with the thermostat (no additional relays necessary). Depending on your choice of digital thermostat, you may be able to select temps as low as 45...or build your own control circuit....

I'm working on this with a few other engineering students. We plan to build this into a single unit with the ice water reservoir on top of the fermentation chamber and make our own control rather than use a thermostat. Thermostat should work fine for most folks though.

My buddy did a trial today, 100F to 50F in 2 hours. For perspective, a carboy submerged in an ice bath took 1.75 hours over the same temp range.

Any suggestions/comments/questions?
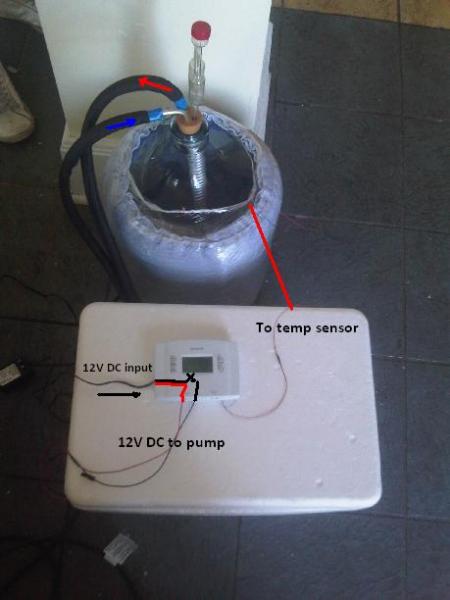
Thermostat.jpg


Fits in Carboy.jpg


Aluminum Heat Exchanger.jpg


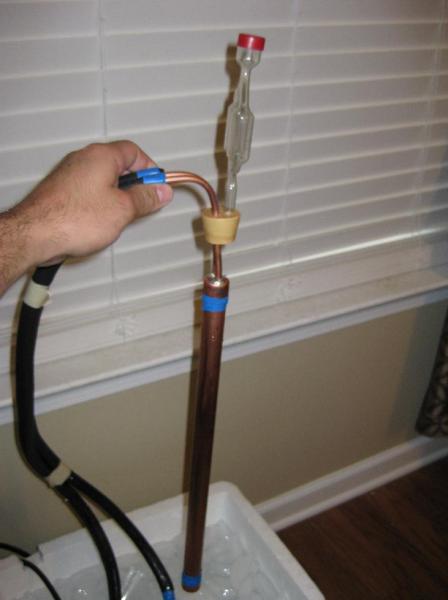
With Hoses and Airlock.JPG
 
Very cool.

If you can make your custom sensor easy to keep clean, you might want to think about putting it inside the fermentor instead of in the insulation. I'd try to put it between 1/3 and 1/2 of the way from the chiller to the edge of the fermentor. That way you reduce the risk of the center getting too cold.

Of course, this being an engineering project, you could fully instrument a test unit with probes every inch or so along the radius and use that data to find the optimum location. That's how we would do it in the real world.
 
gswartley: we bent the 1/4" aluminum tubing around a 5/8"OD piece of copper. Its much easier to work than copper. Also, copper is reduced in an acidic environment so its not great for long term contact with brew.

Ravenshead: We've done some data collection at about 1" off the coil and 3" off the coil, or approximately at the halfway point. We've compared those numbers with the temp of the outer wall of the glass to understand the temperature gradient. Virtually none inside the fermenter. I guess the large vessel allows for plenty of convection. Even the temp on the outside of the glass is within a degree or two of the fermentation temp. So for highest accuracy, of course you want the temp sensor inside the fluid. The easier place is definitely on the outside of the vessel which, in steady-state and insulated, will essentially be the same as the temp of the wort/beer.

When this is all said and done, perhaps my partners and I will "publish" our data and figures.

If anyone has any data they would be willing to share regarding the heat generation from fermentation, we could really use it! Its not the easiest thing to determine.
 
Excellent.

Were your measurements based on water or an actual fermentation? If you run the experiment using an actual fermentation you would likely end some debate here about inside/outside temp measurement.

If you can show that outside measurement is good enough, I'll give you an "A". I'll even talk to your professors if you need it.;)

Is this your senior cornerstone project? If it is, that's way better than mine was.:mug:

Edit: If outside measurement comes out as inaccurate and you show it, you win too. I have to respect the scientific method.
 
Capstone we call it, but yes indeed. We decided to pass on the corporate projects because they're A little too "guided." Typically companies just want to hire some free labor. Beer brewing won as the groups most interesting hobby so we got started.

Measurements were done on water, not an active fermentation. But wouldn't the turbulence created during fermentation promote even MORE mixing, thus less gradient? We'd be swimming in beer if we made a batch every time we tested this thing. If you're telling me that an actual fermentation will have a larger temperature difference internally (in the radial direction) then we've got some brewing and testing to do!

Just looked into the data acquired today, internally we're seeing zero gradient, radially. Granted this is with only water. Typical dT inside the carboy is 0.1 degree C. I'll even email you the data if you want to see for yourself.

The outside wall of the glass shows about a 10-14 minute lag time behind the water inside @ mid radius. Considering, we're cooling at 1 deg C per ~20 minutes at the lower temps, I think measuring outside works well enough. Certainly debatable though.

I appreciate the input, by the way!
 
If you're telling me that an actual fermentation will have a larger temperature difference internally (in the radial direction) then we've got some brewing and testing to do!

Lots of sciencing going on, but in reply to that question: Yes, fermentation will raise the temperature and with large enough volume it can raise it quite significantly.
 
Aluminum post fermentation shouldn't be a problem. I'm willing to bet you've got a few 12 oz aluminum cans full of beer (or soda or V8). Even a small percentage of kegs are made of aluminum.

We're very aware that fermentation is exothermic and produces heat. We did a test to try and capture this data. For a 70F ale fermentation with a gravity of 1.050, we estimated the heat loss to the environment by measuring the temp of the vessel wall. Assuming that glass offered no resistance (not true at all, but conservative here because it led to a higher estimation of heat) and all heat lost was modeled at 1-D radial convection to the air, we got an estimate for the heat production at 13-30 Watts (depending on your convection coefficient for air). 13-30 Watts is easily counteracted by the heat exchanger. That data certainly isn't perfect and plenty of assumptions were made in the heat transfer model, but they were all on the conservative side. This is also almost useless for beers fermenting at lower temps because 1) the fermentation metabolism is lower and 2) because the temperature difference of the coolant and the beer will be less, the heat exchanger has less cooling power at low temps. Obviously more testing needs to be done. There are many problems in trying to measure the heat generation accurately but I think a general figure will be fine.

I did another calculation to find heat per gravity point per gallon. You should be able to scale this to any size/style to find out how much heat your fermentation will produce (just won't know when that heat will come). 5.12 kJ/gravity point/gallon. Example: 5.5 gallons of 1.041 > will likely produce (5.5*5.12*41) = 1154 kJ of heat over the course of fermentation. Why is that number important? Well in this case, you can say that you would need 4.9 kg of ice to provide 29.3 kJ of cooling power. If anyone has and data showing their fermentation temp over time, we would love to check over the numbers to see if they match our results.

I know heat will be generated and I know the heat exchanger is capable of removing heat almost 10 times faster than a fermentation will produce it. Thats not an issue. The main concern was for internal temperature gradients, or locations inside the carboy that are at significantly different temperatures. Is there any reason there would be a bigger gradient for active fermentation? With all the swirling and mixing I would expect to see a smaller gradient and pretty uniform temperature inside the vessel. Right?
 
More info:

stevespanglerscience said:
he History of the Liner - Technicians at the American Can Company, even before Prohibition, began toying with the idea of putting beer in a can. As early as 1929, Anheuser-Busch and Pabst experimented with the canning process. Schlitzeven proposed a can design that looked like a small barrel.

The major problem the early researchers were confronted with, however, was not strength, but the can's liner. Several years and most of the early research funds were spent to solve this perplexing problem. Beer has a strong affinity for metal, causing precipitated salts and a foul taste. The brewers called the condition "metal turbidity".

The American Can Company produced the flat or punch top can in 1934. The lining was made from a Union Carbide product called "Vinylite", a plastic product which was trademarked "keglined" on September 25, 1934.

From here: http://www.stevespanglerscience.com/experiment/00000100

Figure out a cost effective way to get stainless bent and you could commercialize the product.
 
If the coil can remove heat ten times greater than created by active fermentation then it seems they could use a much smaller length of stainless tubing so as to keep the cost low. Also the part of the coil close to the stopper isn't likely to be in the fermenting beer so probably save a few inches there as well. Could then spread out the coils to facilitate cleaning after fermentation. In fact, you could probably just do four straight up and down runs, which would get you to three tight bends... do they make SS 180 degree elbows that could be silver soldiered?

Look at the "ebay aquarium temp controller" thread for a controller with a wider temp range.

Care to share details on the 12v pump?
 
With 4 straight runs you could likely do it with a tubing bender? Can they do 180 deg? They run a couple hundred $$.
 
An additional bit of feedback, beyond not wanting to use aluminum:

As tight as you have that coiled right now, it is going to be a pain to clean and sanitize properly.
 
If the coil can remove heat ten times greater than created by active fermentation then it seems they could use a much smaller length of stainless tubing so as to keep the cost low.

The more surface area in contact, the greater the cooling power. In steady state, surface area is not a big deal. When attempting to get from say 70F to 40F, a larger surface area really helps.

Look at the "ebay aquarium temp controller" thread for a controller with a wider temp range.

Thats awesome. This works in 110VAC, which means you could use a simpler submersible pond pump.

Care to share details on the 12v pump?

Here's the link to the one we bought http://www.amazon.com/dp/B002PEBTVS/?tag=skimlinks_replacement-20
 
Last edited by a moderator:
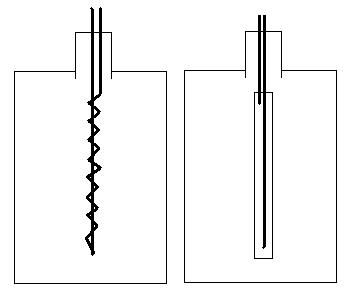
Also notable, its not necessary to use a coil. It definitely offers the best surface area per volume which increases power.

Here's a picture of the pipe HXer we used. The cooling power is less than half that of the aluminum coil but the steady state performance won't change.

This would be very easy to replicate using a thin stainless pipe.

pipe hxer.jpg
 
Aluminium cans are usually coated on the inside.

would be interesting to see this in stainless steel - for sure, that won't react like copper or other metals.

Why not the opposite direction? Instead of putting the cooling inside fermentation, wrap the coils around a keg (and even have an embedding liquid for better temp transfer)
 
Back to the question about using a real ferment to test vs. water--You're probably right about the turbulence helping your mixing but that's not the only variable in the system. You have gases mixing on the liquid, the exo-thermic reaction of the yeast and others that you may not have thougt of. That's why at one point you should take measurements of a real fermentation just to validate that your water tests are accurate. If you can afford it, always "test like you fly and fly like you test".

I don't really think there will much difference between your water test and a real fermentation. This advice is more about getting a good grade on your project.
 
So have you decided that Al is ok for contact with beer for weeks on end?

Someone posted a pretty useful article.

There is no junction or connection in this design so I think that could help. The aluminum we're using is 3003-O which is rated for use in water, oil, and alcohol (though I don't know if that specifically means ethanol).

Obviously from the article, stainless steel is the best choice, however, a stainless steel coil will never reach a bend that tight. You might have luck if you used really small diameter tubing (if you can find some), but the frictional losses in such a small diameter tube are going to ruin your flow rate. It would be possible to make a stainless steel pipe-style heat exchanger (see pics from the copper pipe heat exchanger) but I would expect at best 1/3 the cooling power.

I'm no chemist, so I'm not going to tell you that its totally safe to use aluminum. I will say that I think it will work fine and I'm going to try it soon. I'll post my results. I think I'll boil the tubing and try to develop a nice aluminum oxide layer on the outside first.
 
Also, for what its worth, copper appears to be safe for a while. It also seems that its quite harmful after fermentation is complete so I don't think its worth using.

from Anchor Brewing <[email protected]>
to [email protected]
date Fri, Apr 1, 2011 at 11:36 AM
subject Re: Copper and Beer - chemical reactions?
signed-by yahoo.com
hide details Apr 1 (3 days ago)
Dear Mr. Boulier:

Thank you for your e-mail. Copper is safe to immerse into beer both up to and including fermentation, but not afterward.

Best regards from San Francisco,
Anchor Brewing Company
 
What would really be cool, (literally!) would be to scavenge the guts out of a small refrigerator and make a cooling unit out of that. Of course someone would have to have the proper licensing to deal with the freon piping and all. But then you would not have to worry about monkeying around with ice.
 
That's nearly exactly the same design I was thinking up, as far as the cooling loop. I had planned on using a Peltier unit for cooling the water, and a very small container for the water.

I had also thought about winding a larger coil. My ferments are usually in a bucket, so I never got around to bending a loop that you could twist into a carboy to spread the chilling out. But I don't think it's all that necessary either.

I was going to make mine out of Stainless and simply solder it into a stainless heat exchange block with the peltier mounted right on the side, and a very small pump attached to the side.

A 1-wire network could monitor ambient temp, internal temp, and also trigger the pump and peltier to start. It could also feed a web server the temps and cooling cycles to the internet for review...
 
I think it's important to note that aluminum may not be good in an acid alcoholic liquid for a length of time. I'm no chemist, but aluminum cans are coated for a reason. And if you've seen aluminum foil after sitting on acidic food for a while you'll get a bad feeling about it too.
 
I think it's important to note that aluminum may not be good in an acid alcoholic liquid for a length of time. I'm no chemist, but aluminum cans are coated for a reason. And if you've seen aluminum foil after sitting on acidic food for a while you'll get a bad feeling about it too.
That's my #1 concern right now. No one has a straight up answer as far as I've seen though. I agree with the can coating. I'd love to use something like that but I imagine its not readily available. The description of the tubing on McMaster does mention compatibility with alcohol and water for what its worth.

The decision to cool inside the carboy (rather than fit a bucket) was to enable lagering, which is not recommended in plastic containers b/c of O2 permeating. It sounds like you were going to cool the beer outside the vessel and return it back to the main container. Is that right?

If necessary, a coating could be applied...but what?

We're going to give the aluminum a try soon and we'll note any effects. Maybe I'll test a small piece in some beer for a few days and note any effects.
 
You could try putting the chiller into enough water to fully cover, and boil the water for 30+ minutes. That should build up a decent aluminum oxide layer on it. If anything will protect the brew, without getting some extensive/expensive synthetic coating, that should/could. If you can let it boil for a solid hour, that might not be a bad idea.
 
You could try putting the chiller into enough water to fully cover, and boil the water for 30+ minutes. That should build up a decent aluminum oxide layer on it. If anything will protect the brew, without getting some extensive/expensive synthetic coating, that should/could. If you can let it boil for a solid hour, that might not be a bad idea.

I had planned on boiling the aluminum, hopefully a full hour or more. Will I be able to see the oxide layer?
 
This is a great idea. Would you mind sharing what thermostat you used, also how much aluminum tubing is in the coil? I could see myself building one of these, except with ss tubing.
 
The one we've got is a Honeywell. The ebay Mini Aquarium temp controller ($17-25) looks like it would work better (its on the way). A regular thermostat only allows for cooling to 50F typically.

Any digital home thermostat (open it up and extend the thermistor) + 12VDC water pump
or
Aquarium thermostat + 120VAC water pump (can't use 120VAC pump with thermostat without additonal relays).

I could see myself building one of these, except with ss tubing.
Mind sharing your ss tubing plan?
We used about 10' in the one in the picture. I'd space it out a little more mext time. 7' or 8' should be plenty
 
Last edited by a moderator:
I know bend radius is a function of material hardness (not just the tools you're using). Harder materials, like steel are not going to stretch as well, making it harder to do tight bends.

Try this if you want to be able to fit a U inside the carboy. Try (2.5*OD) for the bend radius
(Dia + 2*Bend Radius) < 1.125" (Carboy neck width)

or

go with the pipe style heat exchanger. No bending necessary

coil vs pipe.JPG
 
Back
Top