
brewmastercontrols
Well-Known Member
- Joined
- Dec 2, 2008
- Messages
- 121
- Reaction score
- 12
Part one of building my Kegerator is posted here.
Where we left off I had just completed the CO2 system and roughed it into the fridge. Next I started on the liquid side of the system. The first decisions that have to be made are faucet location and spacing.
I did some research on spacing and chose to go on a spacing that just allows one to remove the faucet head without clashing into the two faucets it is beside. I left about an extra 3/8 inch to spin the faucets off. This turned out to be a good looking spacing as well in my opinion.
Next was to pick the height of the faucets. The only gotcha I saw here with my fridge was the fact that if you mount them nice and high on the door the tap handle clashes with the freezer door. I liked the tap handles higher on the door but the clash worried me. I picked a medium solution and put the taps at a height that the small stock black handles clear the freezer door, but an ornate decorated handle will not. Thus I can have the best of both worlds depending on how I decide to install tap handles.
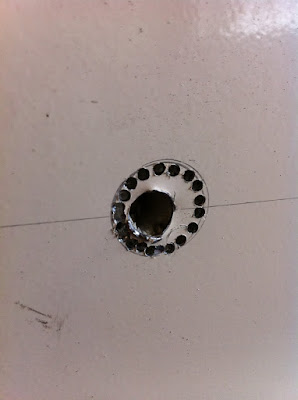
After picking the location of the faucets the real hacking got started. Having no chassis punch or drill large enough I traced out the hole in the door and started cutting it out with a small drill bit. I drilled multiple holes then one large hole in the middle. After this I broke from the large hole to a small hole and then pulled out the center part via working the metal between the holes. After this I cleaned up the hole back out to my trace line with a dremel sanding drum in an electric drill.
Before pulling out the center and cleaning it up:
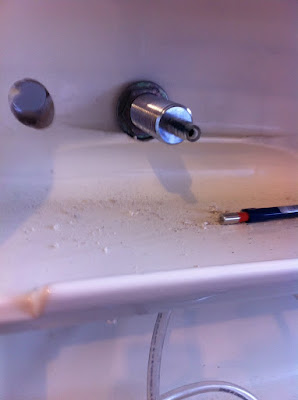
After the hole in the door I used a longer drill bit to mark the hole in the door plastic liner. Working here I cleaned up both holes and fitted the faucet shanks.
Here you can see on shank fitted and the left hole cleaned up ready for the shank. If you look close you can see the cleaned up hole in the metal external skin of the door also:
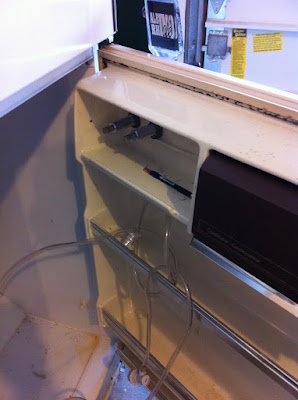
From here I went on to install the other shank and further cleanup the plastic on the inside of the door. This fridge seems to have pretty hard foam in the core between the internal and external door skins. In the past i have had to add an extra skin support on the door inside or out to keep the faucets from wobbling to much. It appears this fridge is a bit heavier stock construction.
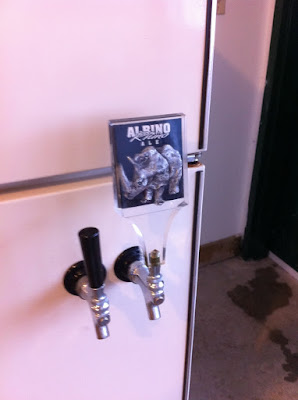
With the shanks in it was time to mount the faucets and see how everything lined up. Here is a look with the faucets installed. The picture also shows my choice of having the option of using the short black handle (left) and being able to open the freezer, or having the problem of ornate handles blocking the freezer. I will install a latch on the freezer to prevent a double pour onto the floor.... and yes it will happen....
I think this post has gone long enough, I will continue with the liquid system and final trim and fit in part 3.
Where we left off I had just completed the CO2 system and roughed it into the fridge. Next I started on the liquid side of the system. The first decisions that have to be made are faucet location and spacing.
I did some research on spacing and chose to go on a spacing that just allows one to remove the faucet head without clashing into the two faucets it is beside. I left about an extra 3/8 inch to spin the faucets off. This turned out to be a good looking spacing as well in my opinion.
Next was to pick the height of the faucets. The only gotcha I saw here with my fridge was the fact that if you mount them nice and high on the door the tap handle clashes with the freezer door. I liked the tap handles higher on the door but the clash worried me. I picked a medium solution and put the taps at a height that the small stock black handles clear the freezer door, but an ornate decorated handle will not. Thus I can have the best of both worlds depending on how I decide to install tap handles.
After picking the location of the faucets the real hacking got started. Having no chassis punch or drill large enough I traced out the hole in the door and started cutting it out with a small drill bit. I drilled multiple holes then one large hole in the middle. After this I broke from the large hole to a small hole and then pulled out the center part via working the metal between the holes. After this I cleaned up the hole back out to my trace line with a dremel sanding drum in an electric drill.
Before pulling out the center and cleaning it up:
After the hole in the door I used a longer drill bit to mark the hole in the door plastic liner. Working here I cleaned up both holes and fitted the faucet shanks.
Here you can see on shank fitted and the left hole cleaned up ready for the shank. If you look close you can see the cleaned up hole in the metal external skin of the door also:
From here I went on to install the other shank and further cleanup the plastic on the inside of the door. This fridge seems to have pretty hard foam in the core between the internal and external door skins. In the past i have had to add an extra skin support on the door inside or out to keep the faucets from wobbling to much. It appears this fridge is a bit heavier stock construction.
With the shanks in it was time to mount the faucets and see how everything lined up. Here is a look with the faucets installed. The picture also shows my choice of having the option of using the short black handle (left) and being able to open the freezer, or having the problem of ornate handles blocking the freezer. I will install a latch on the freezer to prevent a double pour onto the floor.... and yes it will happen....
I think this post has gone long enough, I will continue with the liquid system and final trim and fit in part 3.
