Another HERMS Designed on the Clock

Homebrew Talk - Beer, Wine, Mead, & Cider Brewing Discussion Forum

Help Support Homebrew Talk - Beer, Wine, Mead, & Cider Brewing Discussion Forum:

This site may earn a commission from merchant affiliate links, including eBay, Amazon, and others.

GearBeer

Well-Known Member
Joined
Mar 4, 2008
Messages
727
Reaction score
4
Location
Clarkston, MI
Harley03 and I were spurred into discussion by blackheart's thread. We thought we could develop a design that used fewer valves. I sketched something up and after going back and forth several times and getting additional input from PunchDrunk we managed to trim two valves (which I proceeded to add back for additional capabilities). :rolleyes:

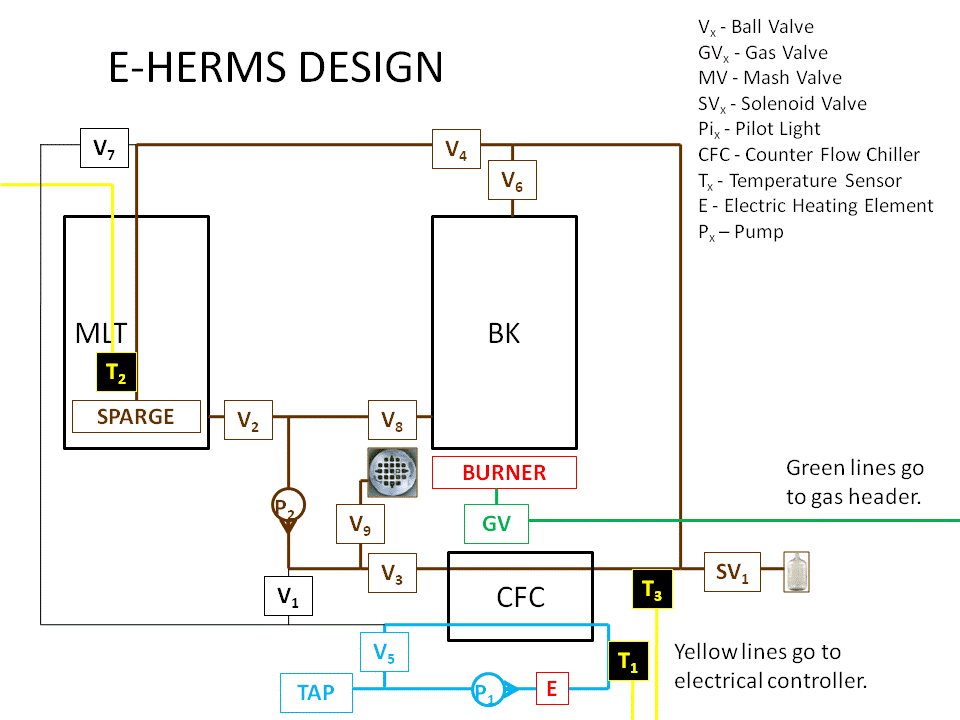
Notable design features:
  • Separte HERMS tank
    • Faster temperature response
    • Control temperature independent of sparge water temperature
  • MLT made from inverted keg
    • Central drain location
    • Easy cleaning
  • Escape valve
    • Exit point for hop matter and hot break dislodged during cleaning before CFC
    • Exit point for second runnings
  • Sparge Arm with vertical copper piping and silicone flex hose
    • Hard copper piping permits adjustability without separate support
    • Vertical adjustability allows sparge arm to double for recirculation

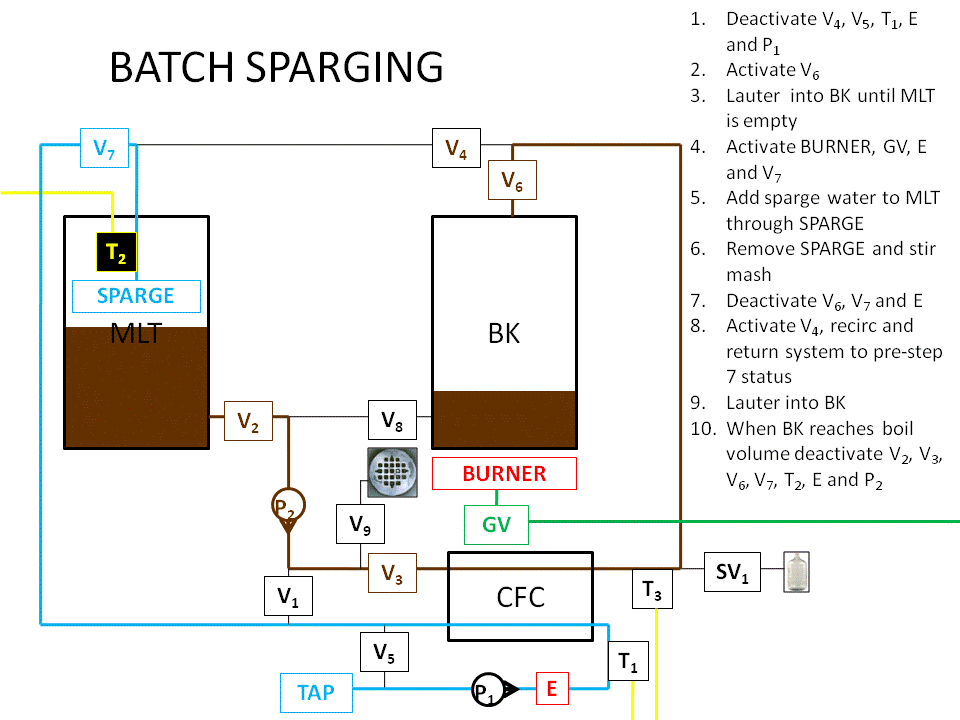
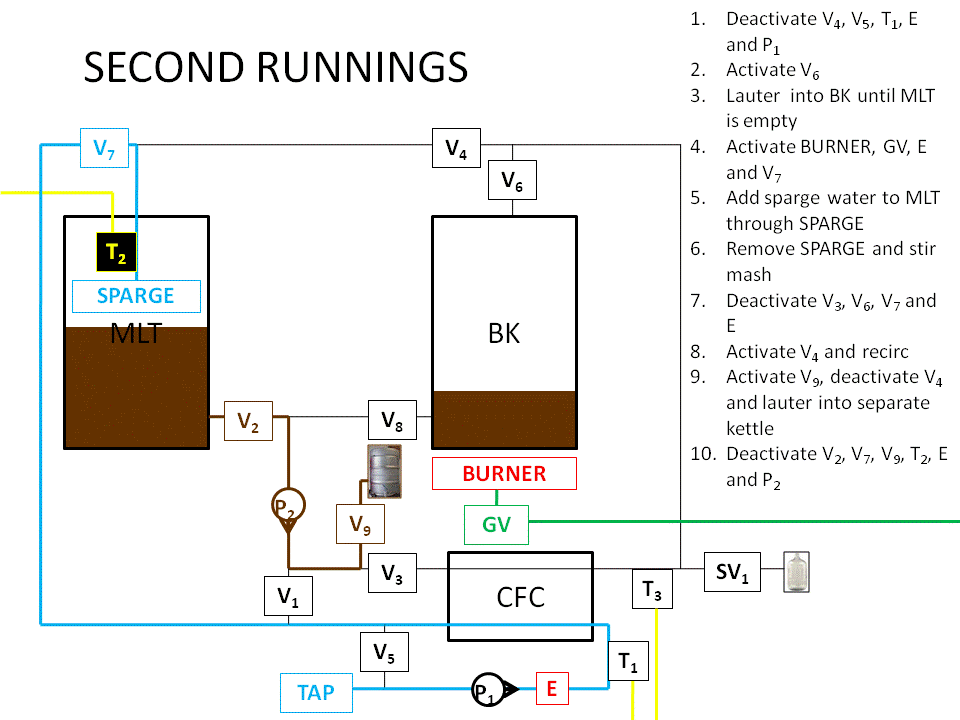
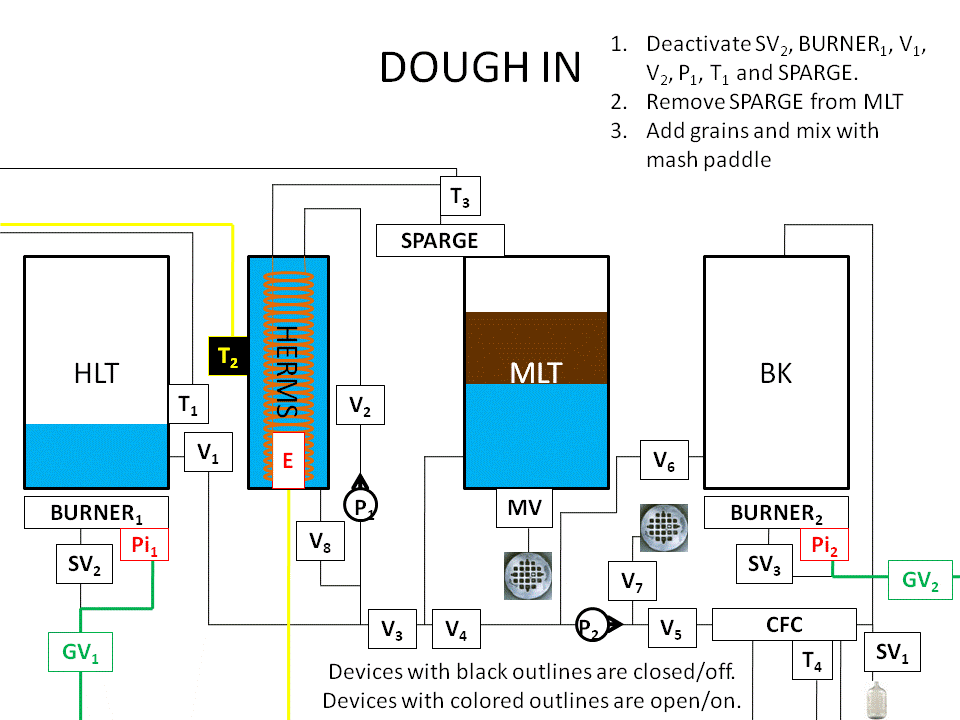
I sketched out every function the system would experience, including fly sparging, batch sparging, capturing second runnings, sanitization and cleaning. If you want to see everything I've done, you may prefer to look through my HERMS Photobucket album.

Note: I am omitting some slides, so some of the directions in the upper right corner will not be continuous. Yes, I realize this.

Slide1.gif


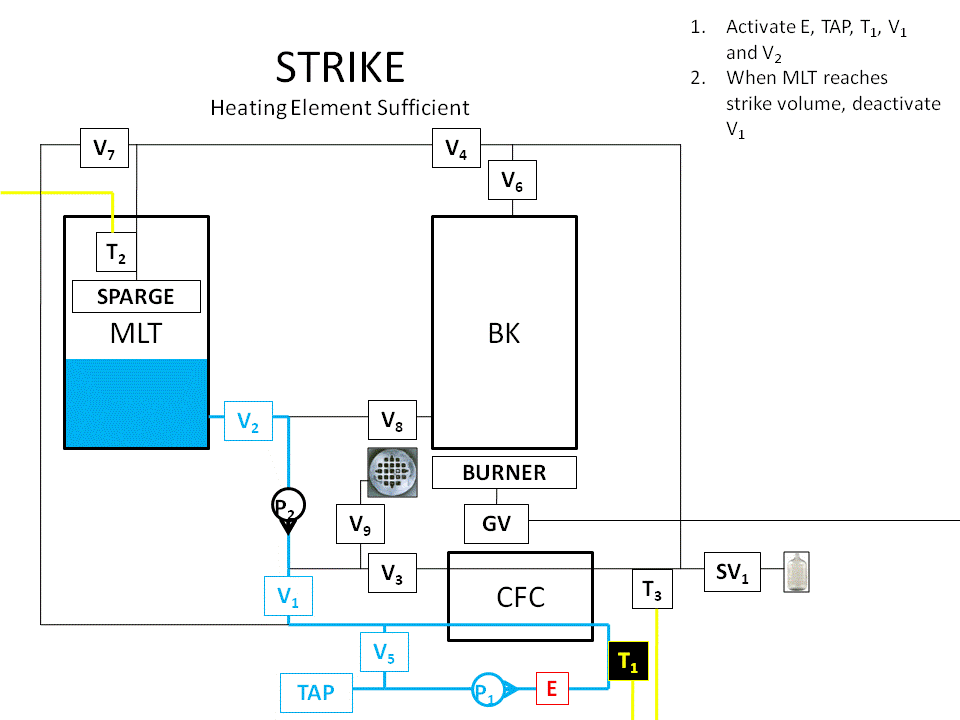
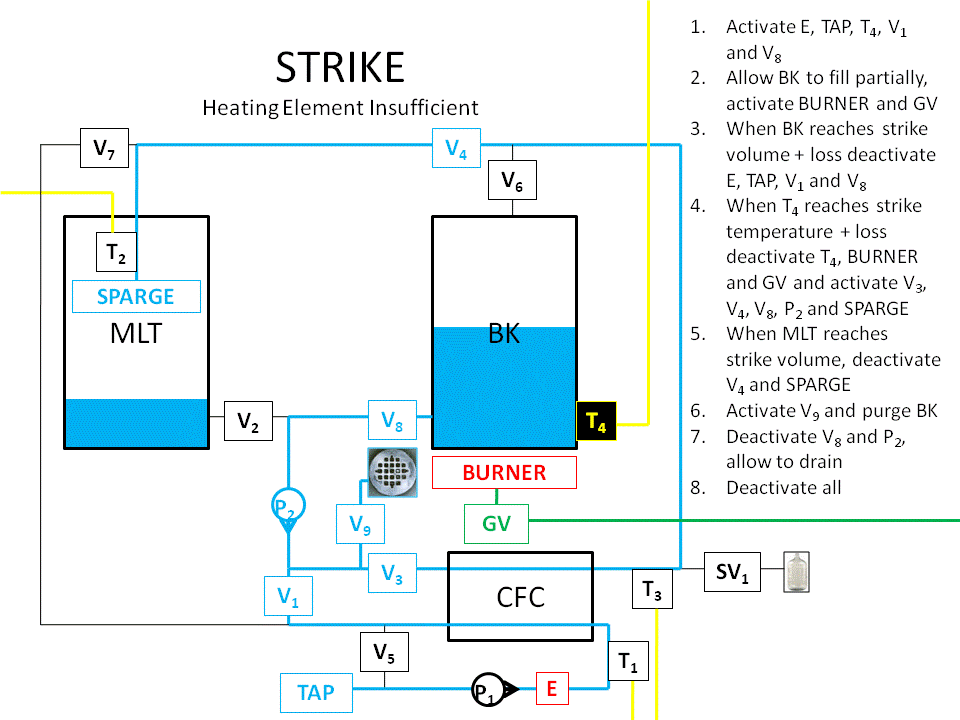
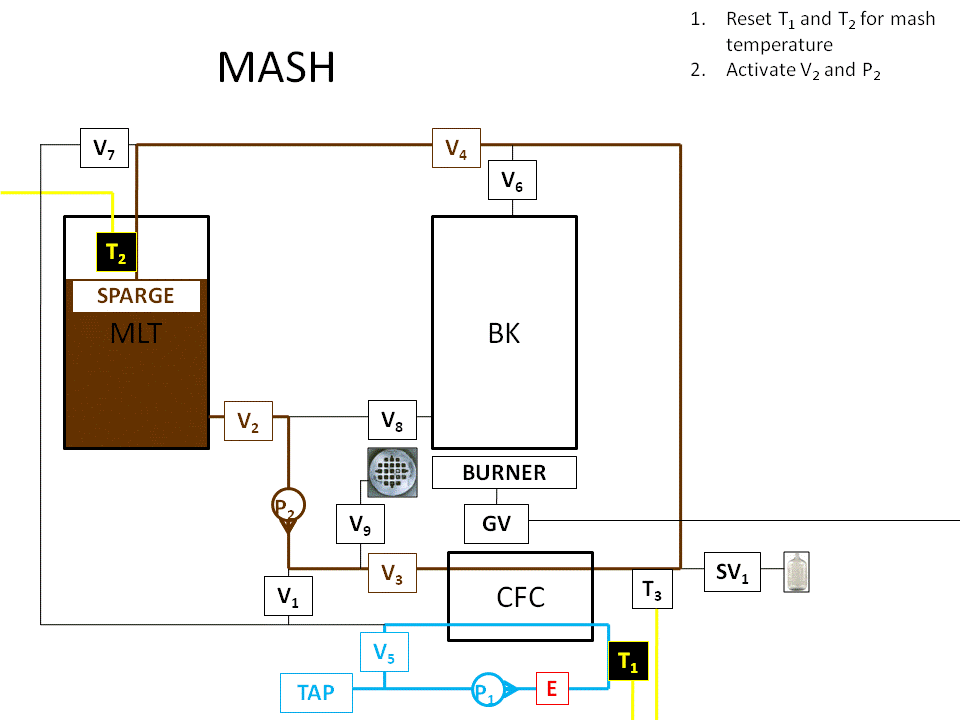
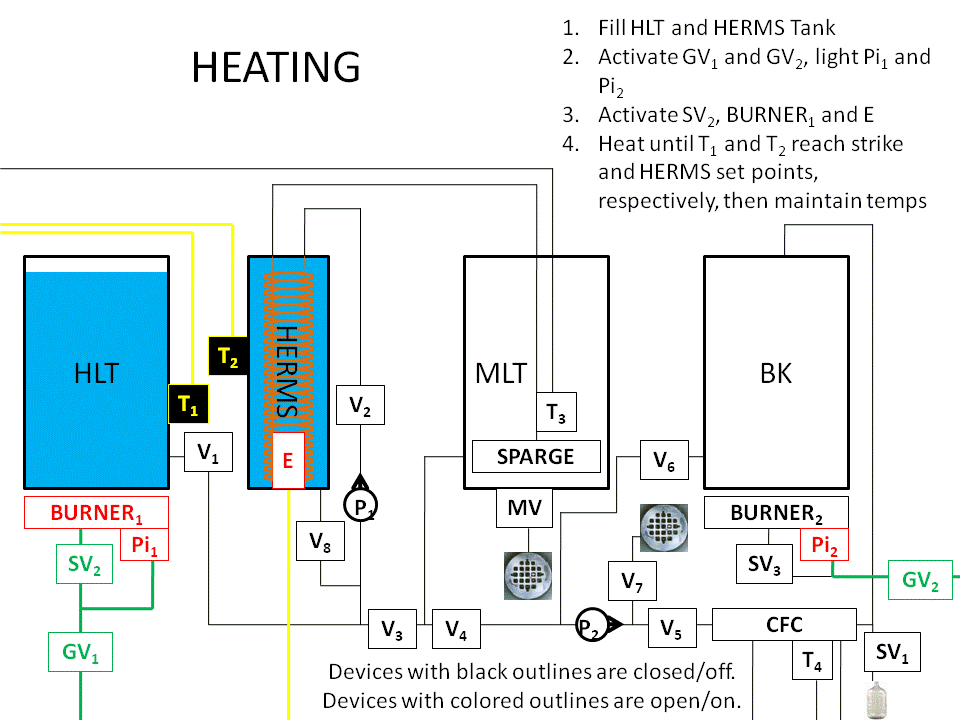
Water in the HLT and HERMS Tank are heated to strike and control (several degrees above the mash)temperatures, respectively. When both reach their set points the strike water is pumped into the MLT.
Slide2.gif


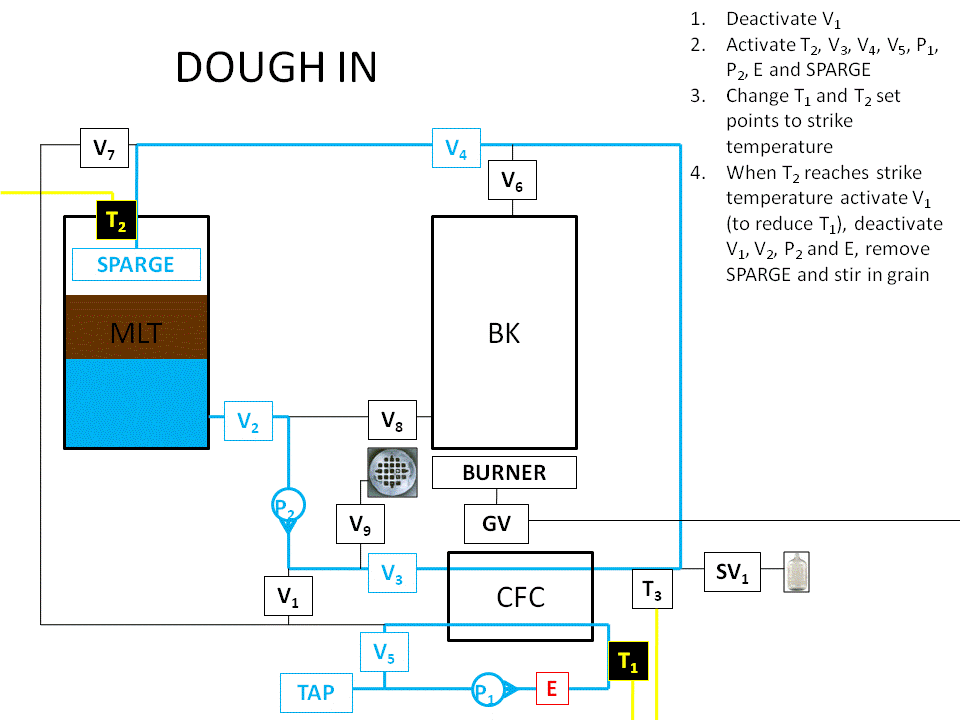
The sparge assembly is removed and the grain is added and mixed.
Slide4.gif


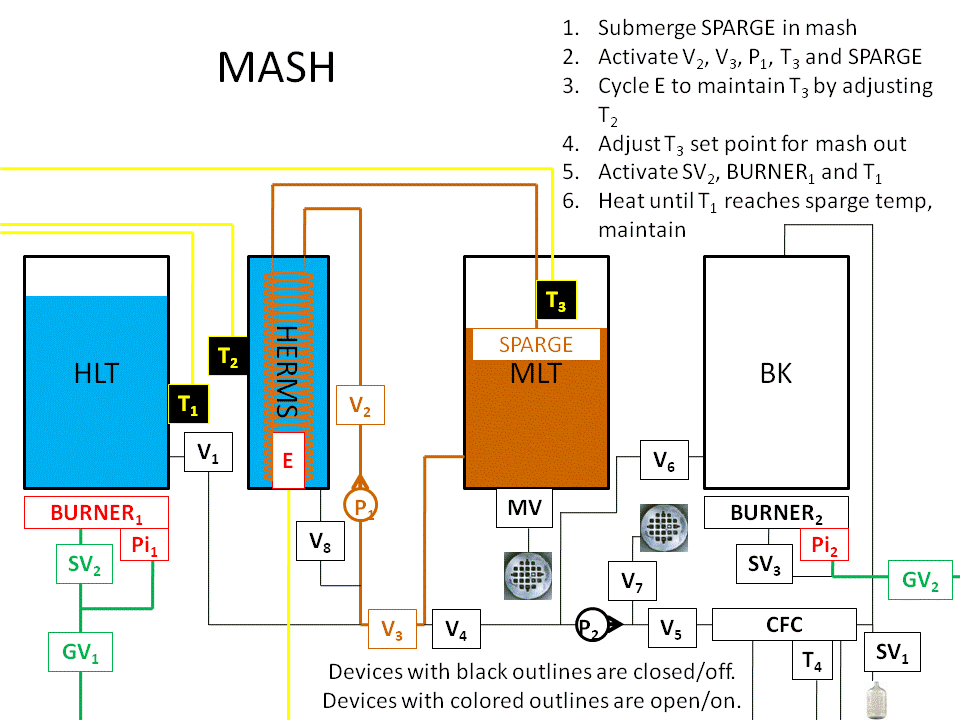
The sparge assembly is replaced and partially submerged, then the valves are reconfigured to recirculate the mash. The recirculation will be used to perform a mash out.
Slide5.gif


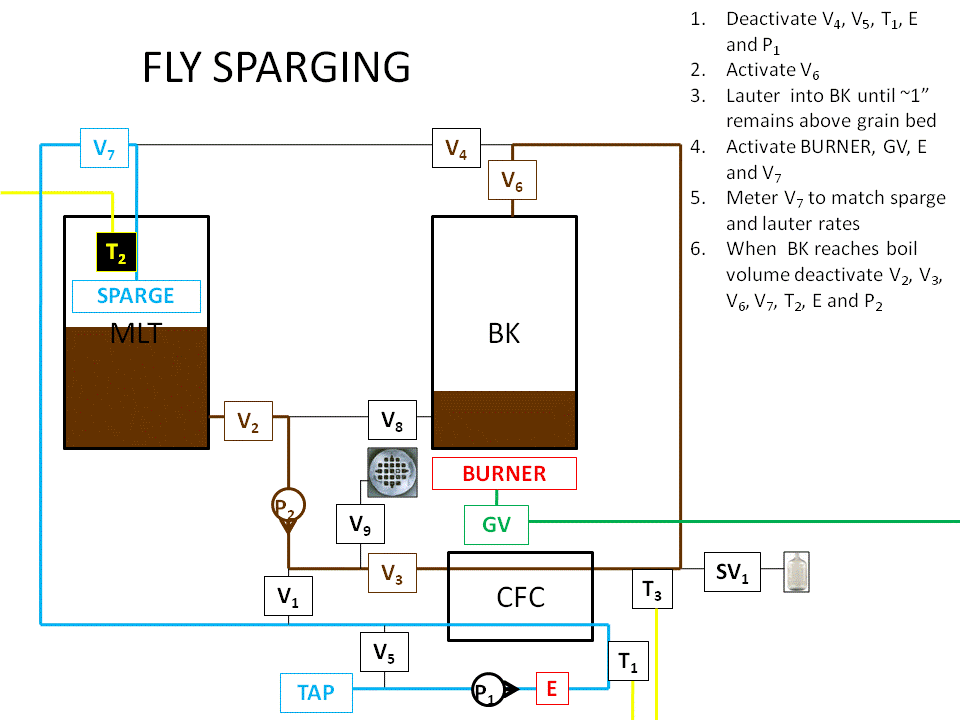
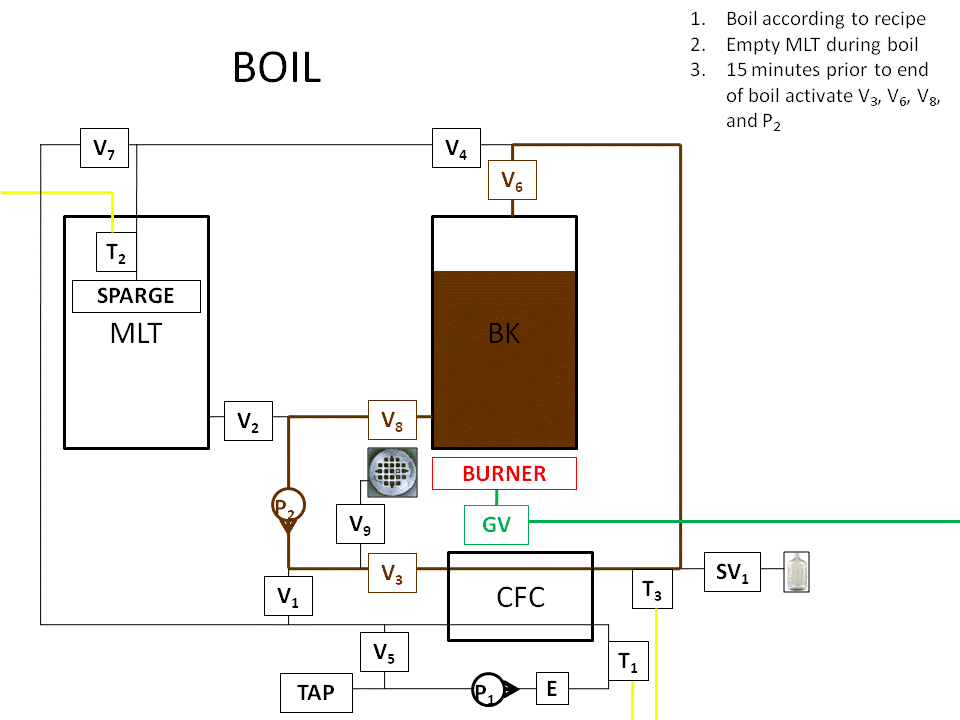
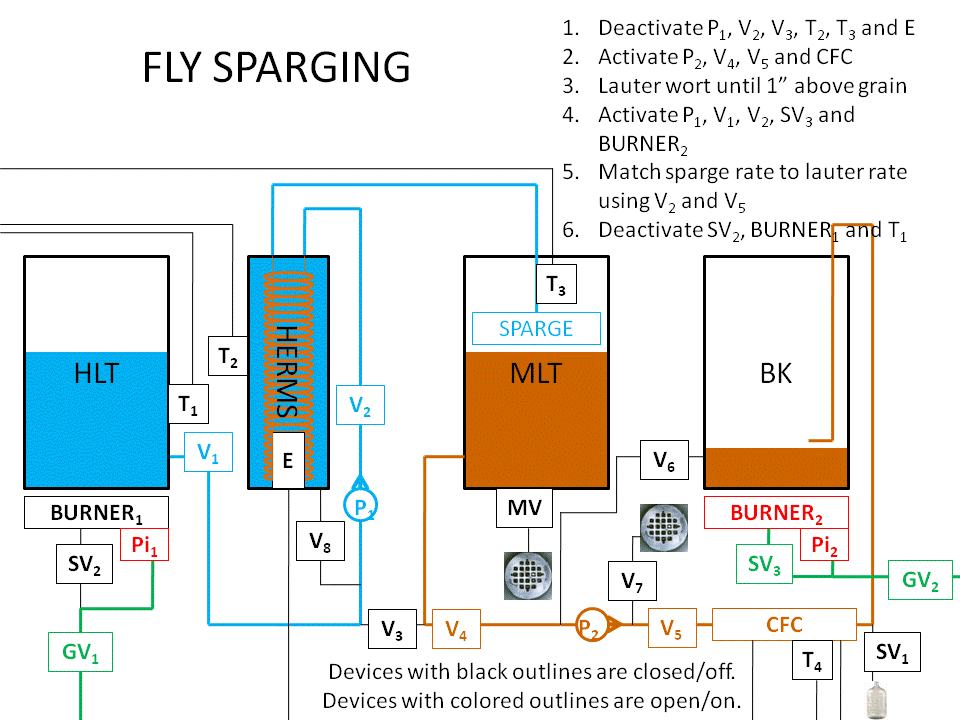
The fully converted mash is pumped into the boil kettle. When the wort in the MLT is approximately one inch above the grain bed the first pump resumes and the grain bed is fly sparged until the desired volume is reached.
Slide6.gif


Slide10.gif


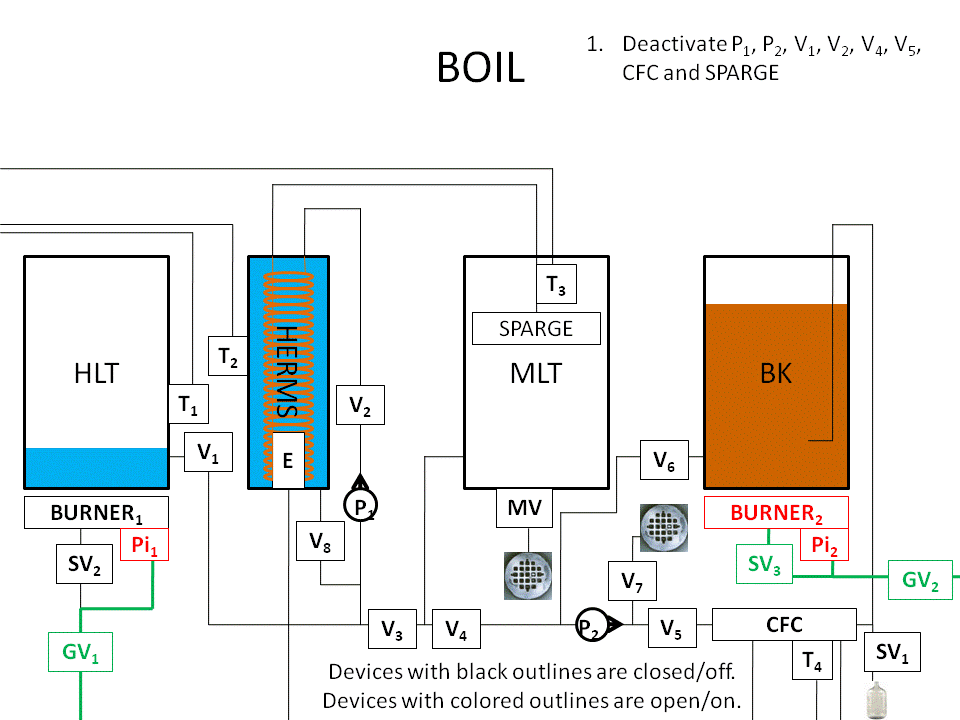
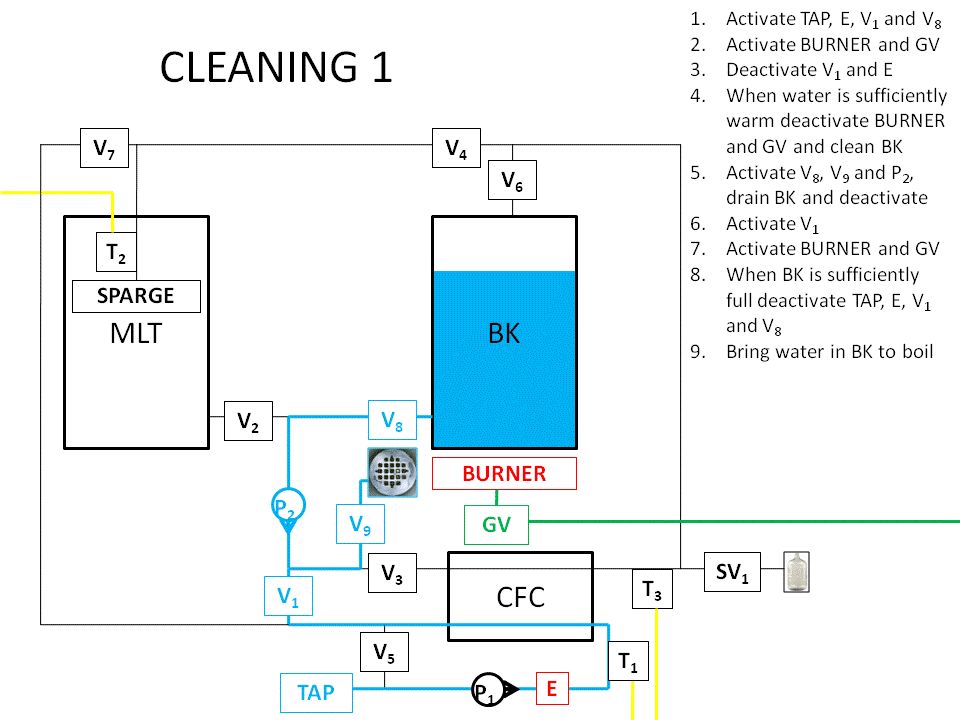
The omitted slide runs boiling water through the system from the HLT.

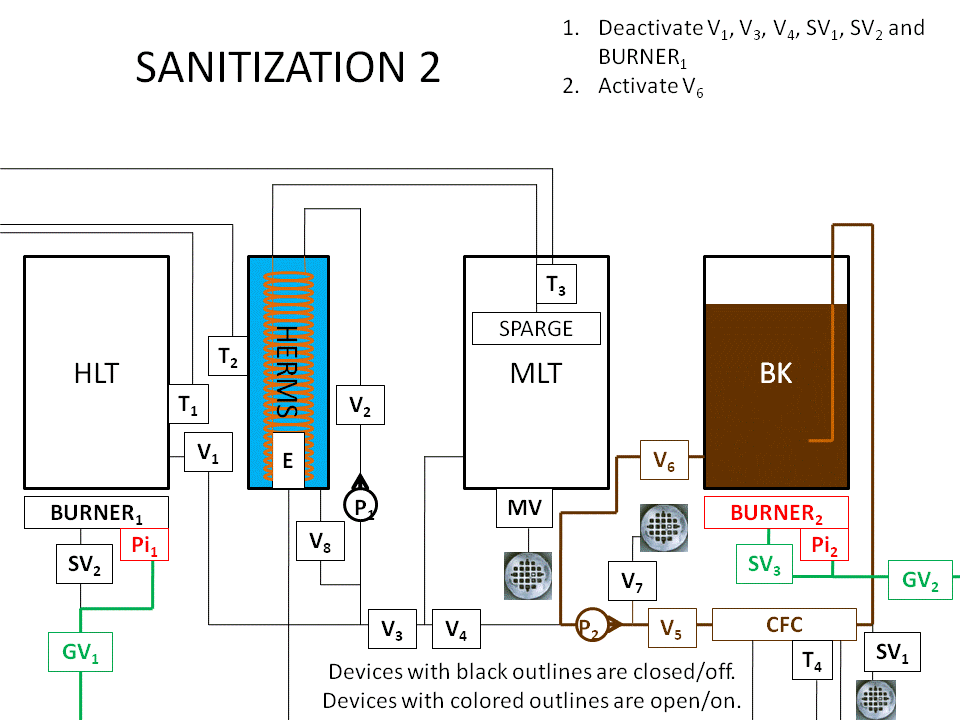
Boiling wort is recirculated to sanitize the CFC and piping that will carry the wort to the fermenter.
Slide12.gif


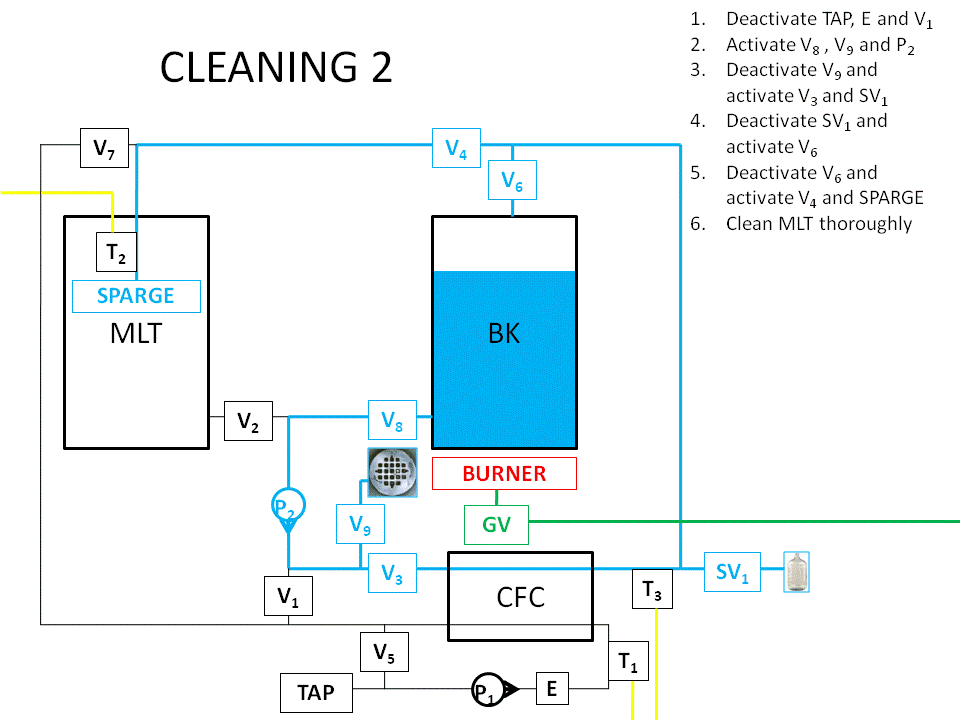
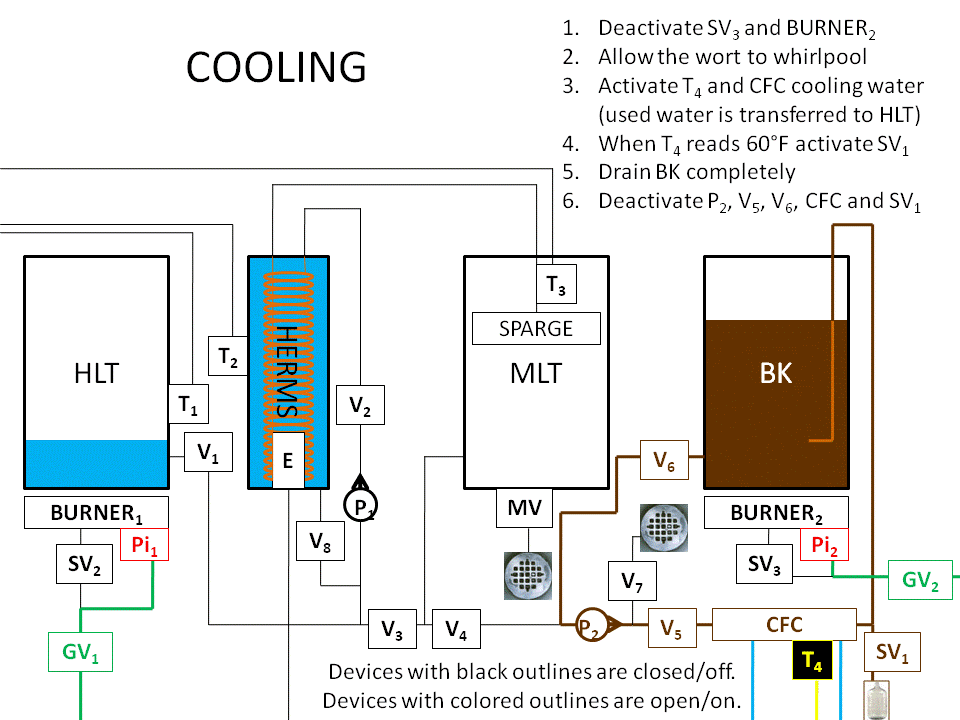
The wort recirculation continues and whirlpools the hot break and hop material away from the pickup tube. As whirlpooling ends cold water begins to flow through the counterflow. The hot exhaust water from the counterflow is captured in the HLT for cleaning. A temperature sensor controls the solenoid valve, which routes cooled wort into the fermenter.
Slide13.gif


The omitted slides push hot water through the system.

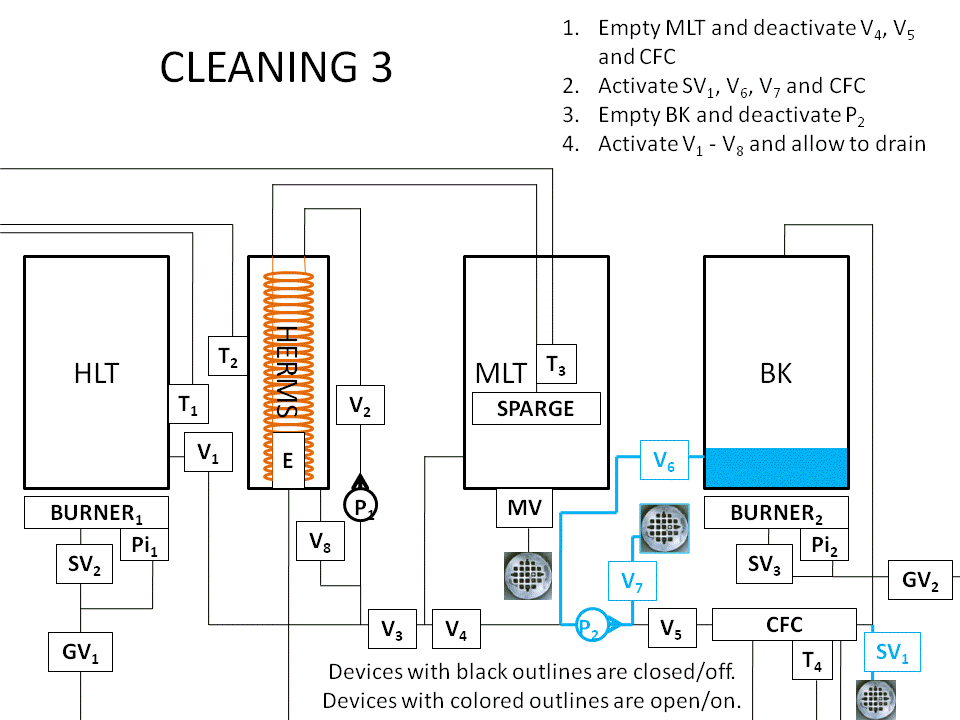
Hot water from the HLT and HERMS Tank is pumped through the system to expel any captured sugars. When all of the water has been expelled, the system is left open to dry.
Slide16.gif
 
Wow, very nice design and drawings! I like the separate HERMS tank. I am in the process of designing a HERMS with someone and that was one of the elements of our design as well. The two reasons you mentioned were our main motivation. Although, rather than a coil in the HERMS tank, we are using our plate chiller for double duty. The mash will recirc through it along with the water from the HERMS tank to keep it at temp.

This design is sweet!
 
I have a seperate HERMS tank and I really like it. Makes it very easy to step mash. Looks like you have this under conrol, get building!
 
We're both currently looking at using the BCS-460 for temperature and valve control. Our tentative decision was mostly based on its expandability and plug-and-play qualities (without having to be an EE to set it up).

aj,

Thanks! Definitely let us know how the plate chiller works. I'm categorically suspicious of plate chillers for the reasons that BK mentioned but you really can't beat them for surface area.

drez,

Harley03's up first. He already has his keggles and I'm still in the midst of garage construction. Although, he didn't make his mash tun upside down, so either he's going to have to come up with a different solution or make another (I'm sure we can come up with someone to take it off his hands ;)).
 
Well I have had this bug for a long time to build a single tier HERMS system. Therefore within the last week or so GEARBEER and I have worked this design for some time trying to find the right combination of valves, line, controls and such. To effectively make a system that would basically give you the opportunity to brew anything you wanted to.
I have started to build this system and have the stand complete, the three kegs have been converted except for the false bottom in the mash tun and some pickup tubes and returns for the other kettles.
I managed to get in on the group buy for the pumps which was a great deal so those are covered.
Now before you all get excited and start looking for pictures which will come (I promise) I am building this system on a budget so it will probably take several months to complete. What you see in the above drawings is what I am going to try and accomplish.
We are really looking forward to some constructive feedback on our system because I feel we have a solid design and can pull this off without too much investment.
The BCS-460 will be the last pricey item to buy but will be able to give us total control which I am totally stoked about!
Anyway please have a look at the system and feel free to ask questions. Like I said I have started the build and am trying to not waste time or money on components that are not beneficial.
Also what got me going again on this build is blackheart's design which seems to be a very thought out one as well.:mug:
 
Just a comment. Can the gas control solenoids SV2 and SV3 and use Honeywell Intermittent Pilot Valves (S8610U Kit). It is a whole lot safer because you don't have to worry about pilots blowing out. The gas valve will not open until it detects pilot lit and if the pilot goes out it will re-lite itself.
 
Good point about the clogging with the plate chiller. Guess it would probably be worth it to pony up the few dollars for a dedicated coil.
 
Wow, very nice design and drawings! I like the separate HERMS tank. I am in the process of designing a HERMS with someone and that was one of the elements of our design as well. The two reasons you mentioned were our main motivation. Although, rather than a coil in the HERMS tank, we are using our plate chiller for double duty. The mash will recirc through it along with the water from the HERMS tank to keep it at temp.

This design is sweet!

If you use the plate chiller, concider recirculating the mash through where you normaly run water, not wort, that way, there is no chance of grain husks getting caught in the wort side of your chiller and contaminating your wort as it cools.
 
Well I thought I would throw this out there as a general question. Right my plan is to possibly use a converted Cornelius keg as the HERMS. Now we do not need very large tank to do this just something that will cover the coil which will be inside.
Does anybody else have any ideas or pictures of a HERMS unit that is constructed from something else such a small pot? I know there is the heatstick type that people seem to be constructing, and now that I think of it I wonder if that would another alternative?
My plan is to mount this HERMS below the kegs on a single tier stand so space is somewhat of a hot commodity.
:mug:
 
You could probably go with the standing pilot furnace valves off of Ebay for about as much as the solenoids them selves, you just have to manualy light up pilots at start of brewday is all. As to the burners, conversion to low pressure is a $3-$4 drill bit away for drilling out orifice to size needed for low pressure.
 
Just stumbled into this thread... been so busy with building our system we havent been reading many other threads. Nice drawings, glad some of our designs are helping other people build similar systems. Like the idea of using a seperate coil but it feels more like a RIMS systems, if you didnt tell me what was inside and just showed me the connections thats what I would assume it was. Basically you are protecting the liquid from direct contact with the heating element by using the tubing and water as a buffer.

We did not want to use any electric heating elements and put a strain on our electric system if we could avoid it. we also wanted to make things as compact and efficient/reusable as possible. We tried to see if we could get away with a 2 kettle system but we just really didnt like the compromises. I think your system will be able to work well for what you planned it for. We look forward to seeing how it will turn out.
 
Blackheart,

Thanks for chiming in.

The heat source is really up for negotiation, the choice of an electrical element is primarily for flexibility. The real estate taken by the HERMS Tank is a significant hurdle. Harley03 has already built his stand and there isn't a very good place for him to put the tank. He's working on some shorter prospects (above) but it's still a work in progress.

I'm fortunate that I have a 200A service directly to my garage, so I'm unlikely to overtax my electrical.

As far as the system's form factor, I am, true to form (see my title) investigating the possibility of re-engineering the design to use a heating element and heat exchanger, similar to JVD_X's plan.

I'm still sweating pipes in the garage so I've got some time to ponder.
 
Subscribed... i like the design so far and am also considering an external herms tank.
 
Ok, here's option number two. It's a two tank system that relies on a 5500W low density heating element. I haven't tested the element's output yet, so I don't know whether it will be sufficient to heat the strike water (I was optimistic about that at first, but I'm getting less so lately).

Slide1.gif

Slide2.gif

Slide3.gif

Slide4.gif

Slide5.gif

Slide6.gif

Slide7.gif

Slide8.gif

Slide9.gif

Slide10.gif
 
Well I guess the big question now is the heating element going to be efficient enough to do what you want it to do? Hopefully some people who have experience using electric elements can chime in and give input.
 
Well guys I told GEARBEER early today that I would post some pictures of how the E-HERMS build is coming along so this is what I have so far.

This is the bare stand for the entire system made from unistrut and has an aluminum shelf

157_5729.jpg


This is a closup of the stand showing the gas plumbing. I realize that I am only going to use one burner for the boil kettle but since I had a few extra burners and a additional keg I decided to incorporate it into the system just in case I wanted to use it as a regular HERMS or for something else. Eventually the gas will be automated but I just want to get it up and running.
157_5737.jpg


This image shows how the stand will look with kegs in position and pumps. The pumps will probably end up in this orientation and location.
157_5740.jpg


This pic shows the heater which is made up of 2 inch stainless pipe and utilizes a 5500Watt 240Volt heater. This will be mounted in a verticle position close to the input and output of the heater/chiller.
157_5744.jpg


Another pic of the heater
157_5747.jpg


This pic is the next important piece of the system this is the counterflow heater/cooling device. It is made up of 20 feet of 1 inch pipe for the outside and 1/2 pipe on the inside. The end of the device will be conected with silicone hose. This will be mounted on the backside of the stand in a horizontal configuration. The beer will enter at the top and flow to the bottom in the 1/2 inch line while the water will flow from the bottom to top inside the 1 inch line.
157_5748.jpg


Another pic of the heater/chiller
157_5750.jpg


The next thing I need to do is mount all the components on the stand being careful to not trap any air in the system when being used. If anybody has any suggestions or tips on mounting just let me know thanks.
Anyway there will be more to come once the build continues. Once these components are mounted I will finish up the plumbing and ball valve assembly. I still need to design and fabricate the sparge manifold, electrical system, control panel and a few miscellanous items.

Stay tuned!!
 
Looks good man, glad to see you got some photos up.

There are two options that I see for preventing air from getting caught in the HEX, either bend the connectors so the wort flows downhill or try the two row design we talked about earlier (each leg wrapping around and downhill, like a staircase).
 
Looks good man, glad to see you got some photos up.

There are two options that I see for preventing air from getting caught in the HEX, either bend the connectors so the wort flows downhill or try the two row design we talked about earlier (each leg wrapping around and downhill, like a staircase).

You are right I will probably mount the HEX in an horizontal position and the heater right below that. Once the heater fills up with water it will go into the HEX and continue to push the air upward to the exit. I might have to incorporate some type of bleed in order to bleed any air since this circuit is essentiall closed.
The pumps will be mounted below the shelf which will keep them the low spot in the system and also the shelf will act as a shield so it should work out OK.
 
Ok here is a progress update on the build.

The mashtun is complete with insulation and false bottom installed.

100_4904.jpg


100_4905.jpg


The next photo show the chiller/heater installed on the back of the frame along with the rear panel. This just needs final plumbing.

100_4907.jpg


The next photo shows the heater installed under the bottom shelf on the frame along with some of the piping.

100_4912.jpg


Well that is it for now. I need to finish up the plumbing which is the next step. Once that is done the electrical portion will be next.
 
You probably want to reconsider the outlet port orientation on the heater. The horizontal outlet port means that it may not fill all the way. Air will become trapped in the heater and you could damage the element.
 
Thanks for the pics, I dig your stand design. Do you happen to have a parts list, or an estimate of the cost? I'm looking to build a brew stand, and don't have the ability to weld one up.
 
TwoHeadsBrewing,

I do not have a parts list made up but what I used was uni-strut. I got all the materials at home depot except the sheet metal.

The cost for the uni-strut was around $150.00 this was on sale at the time and was a driving factor in using it. However this price does not include the brackets or bolts.

What I like about this stand is it is plenty strong and somewhat adjustable and easy to reconfigure if necessary. I have a welder at home but just did not feel like welding a frame together at the time.

More info on the stand can be seen within this thread here. https://www.homebrewtalk.com/f11/some-pics-my-new-brew-stand-90278/
 
Any new news on this build? I was loving the initial concept of the design and am interested in some details regarding functionality if they exist.
 
Hi Thickhead,

Thanks for inquiring about the HERMS progress. Unfortunately I have not had time lately to get the thing finished between baseball and doing some remolding of the house which is just about done I will be able to get back to it.
I am not giving up and I think the system when complete will be a little different in the way it operates and hopefully easy to use. I have done some testing of the burners which were a success all I need to do to those is add some heat shields for extra protection to surrounding components.
The plumbing system and flow schematic were tested and everything seemed to work just fine. The final thing I need to do is finish the control panel and wiring which should not be too bad. I just finished doing some wiring in the garage and I think it just gave me a kick start again to get this thing finished!
Anyway I will post an update here as soon as I have some electrical done and we will go from there. :mug:
 
Oh I almost forgot the schematics of the system at the beginning have changed for the better and I will post them as well. I have eliminated some valves and piping which will make thing easier.
 
I like this design.. is it working well for you?
I'm working on a single burner hybrid brewstand using a CFC for a HEX with a 1500 Watt heating tube (so I can plug into a 110 V household outlet) and pre-heating strike and sparge water in the brew kettle.
I'm wondering why you used silicon tubing instead of copper elbow fittings on the CFC?
 
Back
Top