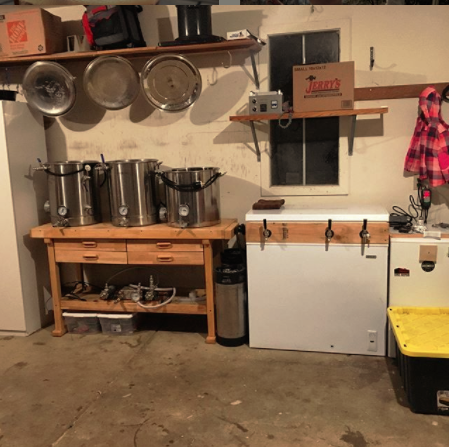
Three vessel HERMS using Auber Cube 2E?

Homebrew Talk - Beer, Wine, Mead, & Cider Brewing Discussion Forum

Help Support Homebrew Talk - Beer, Wine, Mead, & Cider Brewing Discussion Forum:

This site may earn a commission from merchant affiliate links, including eBay, Amazon, and others.

luckybeagle

Making sales and brewing ales.
Joined
Apr 30, 2018
Messages
491
Reaction score
159
Location
Springfield, Oregon
Hi all,

I've gone from eyeing a full eHerms build with 2 elements, 2 pumps,2 PIDs and boil controller (for $$$$) to contemplating the Auber Cube 2e:

https://www.auberins.com/index.php?main_page=product_info&cPath=64_65&products_id=832

I want to run 3x15g kettles with a HERMS coil sitting in my HLT. I'll mash in an uninsulated 15g kettle identical to my HLT, and I'll boil in my perfectly fine 15g Concord kettle.

I'm not looking for a control panel to automatically transfer liquids for me, sparge in my absence, etc. Just a good way to graduate from NG to 240v. I brew a lot of Belgians so step mashing is important--whether I have to adjust the PID manually or set time intervals for each rest period is fine.

I don't mind unplugging the HLT heat element from the panel and plugging in the BK heat element once I'm ready to boil, as I should never need to run multiple heat sources simultaneously. I also have decided against building anything DIY (aside from hooking up a spa panel or installing a 240v GFCI breaker in my panel) as I'm in the middle of a move and would rather spend my limited free time brewing once we get the keys to our new place.

It's throwing me off that all of these controllers are marketed as eBIAB, which I am not doing--but I can't logically figure out why this wouldn't be sufficient for a simple, two pump HERMS setup.

My question is: will this relatively cheap controller cut the mustard?
 
Last edited:
Should work just fine if you are willing to swap the cables around. For the cost savings it would be a minor inconvenience.
 
Thanks, and sounds good.

One last electrical question for now:

I'm eyeing these kettles for my HLT and MLT (just have plastic coolers right now for these):

https://www.amazon.com/gp/product/B07DY5V4B6/ref=ox_sc_act_title_4?smid=A2KBKE1A991P4A&psc=1

I really like these kettles for their volume etchings (I tried to etch my Concord Kettle and would probably not attempt that again).The tri-ply bottom affects how low I can mount the heat element in the HLT (I will use my straight-walled Concord kettle for the BK). Will mounting the heat element above this ridge affect anything negatively, such as the performance of the HERMS coil? Could it lead to wort scorching if the element is close to/touches a small piece of the coil? Or is this a non-issue?
 
They are marketed as single vessel controllers because that's what they do (one vessel at a time) in order to differentiate from something like Auber's Brewbuddy panel that either runs two elements at a time or has the provisions to select element outputs on the front panel. You'll want to install an extra temp probe in your boil kettle also so you can swap power cables as well as probe cables. Someone will likely suggest that you don't need a probe in the boil so I'll preemptively say that the EZboils will be somewhat stunted in function in boil mode if it's not aware of the boil kettle temp.
 
Someone will likely suggest that you don't need a probe in the boil so I'll preemptively say that the EZboils will be somewhat stunted in function in boil mode if it's not aware of the boil kettle temp.

Thanks for clearing that up about the marketing, Bobby!

I have also read about the EZboil running into that issue. Auberins sells this temperature sensor simulator to supposedly get around that, which I was planning to also pick up (and plug in when I switch over to boil):

https://www.auberins.com/index.php?main_page=product_info&cPath=20_15&products_id=885

Any thoughts on that as a workaround?
 
No, you physically want a probe installed in the boil kettle so the EZboil really does know what the wort temperature is. Otherwise you could just leave the HLT probe plugged in and it would still allow output. The EZboil has functions like boil acceleration and boil timers that are both dependent on knowing the wort temp. Just order an extra probe without a cable and you can move the cable over from HLT to BK when you are swapping element cables.
 
No, you physically want a probe installed in the boil kettle so the EZboil really does know what the wort temperature is. Otherwise you could just leave the HLT probe plugged in and it would still allow output. The EZboil has functions like boil acceleration and boil timers that are both dependent on knowing the wort temp. Just order an extra probe without a cable and you can move the cable over from HLT to BK when you are swapping element cables.

Good to know! Thanks so much for the tips--can't wait to get rolling on this project. :D
 
Do you all think the GasOne kettles with the triply false bottom are good candidates for electric heat elements?

It looks like I'd have trouble mounting it any lower than where the triply connects with the standard kettle walls:

610zQtV+7IL._AC_SX522_.jpg


Then again maybe it's ok to come up a few inches off the bottom, and just make sure the herms coil doesn't touch the element? Any tips on that?
 
No, you physically want a probe installed in the boil kettle so the EZboil really does know what the wort temperature is. Otherwise you could just leave the HLT probe plugged in and it would still allow output. The EZboil has functions like boil acceleration and boil timers that are both dependent on knowing the wort temp. Just order an extra probe without a cable and you can move the cable over from HLT to BK when you are swapping element cables.

You can pretty easily adjust the temperature settings for these functions in order to bypass them. I forget exactly what parameters I changed, but I came across this exact problem on my first brew day with my EZ-Boil and a quick setting change fixed it right up.
 
You can pretty easily adjust the temperature settings for these functions in order to bypass them. I forget exactly what parameters I changed, but I came across this exact problem on my first brew day with my EZ-Boil and a quick setting change fixed it right up.

Yeah but those functions are the reason why the EZboil is more functional than all the other PID based controllers. You really shouldn't force a work-around.
 
Yeah but those functions are the reason why the EZboil is more functional than all the other PID based controllers. You really shouldn't force a work-around.

Late to the response on this one, but for the way my system works those functions were more harm than help, in which case the EZboil was actually less functional until I did the over ride. What I like best about the EZ boil is the futureproofing. It can be optimized for either scenario as needed.
 
Late to the response on this one, but for the way my system works those functions were more harm than help, in which case the EZboil was actually less functional until I did the over ride. What I like best about the EZ boil is the futureproofing. It can be optimized for either scenario as needed.

I'm very familiar with how the Ezboil functions and I can't think of a single reason why its functions would be any kind of harm in a 2 vessel system unless you really didn't want to put a probe in the boil kettle. Having it know the temp in the boil kettle is very beneficial.
 
Gah, I like both of your guys' responses. On one hand, using the EZboil's features sounds pretty appealing--being able to scale back the power output automatically once reaching boil temps to curtail a potential boilover. On the other hand, I'm literally using a primitive open/shut valve on a natural gas orifice right now and couldn't imagine leaving my kettle during ramp from lauter temps to boil, and buying/moving one less cable is appealing. Decisions, decisions.

Thank you both for the solid input.
 
I'm very familiar with how the Ezboil functions and I can't think of a single reason why its functions would be any kind of harm in a 2 vessel system unless you really didn't want to put a probe in the boil kettle. Having it know the temp in the boil kettle is very beneficial.

Maybe I'm missing something then. I prefer to disable the boil acceleration because I want 1:1 control over my element output in boil mode. I adjust boil vigor depending on if I'm using my condenser or not, and I always want 100% to be 100% when heating to a boil.

ETA: I also like simplicity, it's one less cable for me to move and one less hole in my kettle which makes cleaning slightly more simple. I'm not saying my way is the best way, it's just what I prefer.
 
Last edited:
Update: I ordered the Auber Cube 2E along with the temperature sensor simulator. I am sure I will prefer it to NG, even if its functionality is a bit hamstringed by not using a temp sensor in the boil kettle. If it turns out to be crappy or too basic, I'll buy a temp probe for the BK and swap cables during the boil. Thanks all!
 
Maybe I'm missing something then. I prefer to disable the boil acceleration because I want 1:1 control over my element output in boil mode. I adjust boil vigor depending on if I'm using my condenser or not, and I always want 100% to be 100% when heating to a boil.

ETA: I also like simplicity, it's one less cable for me to move and one less hole in my kettle which makes cleaning slightly more simple. I'm not saying my way is the best way, it's just what I prefer.


It's just because you haven't tried boil acceleration. It allows you to run up to a boil without having to hover over the pot like a hawk. When it is enabled, it runs the element 100% until it hits your predetermined boil accel temp. I use 208F (this is a temp that I've determined is as close to boiling as I can go while NEVER boiling over). Once it hits 208 it backs down to whatever P setting I have on the display. In an open kettle, that's 60%. In a steam condensed kettle, that's 30% for me.

If you bypass the boil accel. mode, you either have to set it to 100% and stand there watching the kettle to avoid a boilover or you'll have to set it to your known boil power and wait much long for it to come to a boil. So, either you don't understand how it works or you haven't tried it. No one that uses it and understands it would choose to ignore it. It is the one feature the Blichmann Brewcommander doesn't have and one of two reasons I think the Auber cube still has a play in this market.
 
So, either you don't understand how it works or you haven't tried it. No one that uses it and understands it would choose to ignore it.

Well, that's just not true because at the very least there's me. I'm glad it's a useful feature for most people though.
 
So when your wort is now at mash temps and you want to heat to a boil, what power setting do you put on the controller? I'm still baffled.
I am in a similar situation as the OP. I have 2 electric kettles coming from Spike (BK & HLT with HERMs). From everything I've read through this thread and the BrewCommander thread you love the EZboil setup and the timer on the BC scares me.

From what you have said it would be best to buy a secondary probe and plug the other one in when switching from mash to boil (as well as power for elements)? Then the rest is on programming the steps into the EZboil to take over.
 
Last edited:
If you have the budget, the Auber BrewBuddy (30 or 50a depending) would make your life easier since it's a true 3 vessel all inclusive controller. If you have to shave the budget either the cube or brew commander would get it done. In both cases install a spare probe in the other vessel so you can just swap via the jack.
 
If you have the budget, the Auber BrewBuddy (30 or 50a depending) would make your life easier since it's a true 3 vessel all inclusive controller. If you have to shave the budget either the cube or brew commander would get it done. In both cases install a spare probe in the other vessel so you can just swap via the jack.
Ya I saw those. To me its not worth $1000 to not have to unplug and plug in a heating element and a temp probe for a total of 30 seconds extra worth of work.
 
FWIW, I had the exact same concerns as legendary news anchor (and owner of many rich mahogany furnishings) Ron Burgundy, and decided that $$ looked better in my bank account than in a more expensive control panel (which I still feel would be awesome but overkill for my needs). I am satisfied with the Auber Cube 2E after 6 or so batches on it. I use one probe in the HLT--I don't move it, and the temp sensor simulator probe I bought gets plugged into the back of the cube for when I enter boil mode. It's fine. Switching heater cables takes 15 seconds. I'm not doing back-to-back batches (mashing one recipe while boiling another), and I think most hobbyists fall into this camp as well. If you plan to regularly do 2 batches in a day and don't want to lose any time, I could see how a more elaborate panel would be preferred.

I am generally in the garage (where I brew) for all of the ramp-up, which is quick, and on most days for the majority of the boil--handling other tasks such as sanitizing carboys or cleaning the MLT, having a beer, etc, so I'm always close enough to the BK during my ramp up to boil to make adjustments. I've noticed that, once I have the boil going with the vigor I want, I reduce the boil controller to 65% or so. After the hot break, if I need to leave, I feel comfortable going in the house until my next hop addition. On a smooth brew day where I've got everything cleaned and planned in advance, I will watch a show in the house with my wife and only leave periodically to add 60/30/15/5 minute hops additions (depending on what I'm brewing). I saw a point of diminishing returns in time reclaimed on brew day relative to cost, so I stopped at the Auber Cube and put my time/money/energy into other aspects of brewing, fermentation and kegging. That's not to say I don't salivate at theelectricbrewery's setup on the daily :p

Screen Shot 2020-04-10 at 4.37.14 PM.png
 
Last edited:
FWIW, I had the exact same concerns as legendary news anchor (and owner of many rich mahogany furnishings) Ron Burgundy, and decided that $$ looked better in my bank account than in a more expensive control panel (which I still feel would be awesome but overkill for my needs). I am satisfied with the Auber Cube 2E after 6 or so batches on it. I use one probe in the HLT--I don't move it, and the temp sensor simulator probe I bought gets plugged into the back of the cube for when I enter boil mode. It's fine. Switching heater cables takes 15 seconds. I'm not doing back-to-back batches (mashing one recipe while boiling another), and I think most hobbyists fall into this camp as well. If you plan to regularly do 2 batches in a day and don't want to lose any time, I could see how a more elaborate panel would be preferred.

I am generally in the garage (where I brew) for all of the ramp-up, which is quick, and on most days for the majority of the boil--handling other tasks such as sanitizing carboys or cleaning the MLT, having a beer, etc, so I'm always close enough to the BK during my ramp up to boil to make adjustments. I've noticed that, once I have the boil going with the vigor I want, I reduce the boil controller to 65% or so. After the hot break, if I need to leave, I feel comfortable going in the house until my next hop addition. On a smooth brew day where I've got everything cleaned and planned in advance, I will watch a show in the house with my wife and only leave periodically to add 60/30/15/5 minute hops additions (depending on what I'm brewing). I saw a point of diminishing returns in time reclaimed on brew day relative to cost, so I stopped at the Auber Cube and put my time/money/energy into other aspects of brewing, fermentation and kegging. That's not to say I don't salivate at theelectricbrewery's setup on the daily :p

View attachment 675067

Glad to hear you're liking it! I was looking at the cube S vs E and couldn't really find a difference besides the shiny switches. It says the difference is the S has the DSPR320 ezboil model but it also says that the E has that???
 
Glad to hear you're liking it! I was looking at the cube S vs E and couldn't really find a difference besides the shiny switches. It says the difference is the S has the DSPR320 ezboil model but it also says that the E has that???
I believe the 2S has 3-position switches for the pumps (Auto/Off/On). Pretty sure the 2E is just on/off. If I'm not mistaken, the auto setting can be programmed to kick on for whirlpooling during the last "x" minutes in the boil (or after the boil controller shuts off the element). Seems neat, but since I have to manually put in my whirlpool hops, whirlfloc etc I don't see much benefit to automating this part of the process. I suppose it would be cool to setup an auto-sparge to the BK after mashing is complete, but since I need to move hoses around to go from recirulation mashing to fly sparging, and since tweaking the valve openings requires so much trial and error to match flow rates, I don't see this as being very useful for me.

At $380 for the 2E I'm more than happy with the features and functions, even if I'm not using the boil ramp or some of the other cool settings. I still prefer it--and have more fun on brew day--to brewing with an open flame out in the Oregon rain and fiddling with getting the right strike temperature in a water cooler (not that there's anything wrong with using that equipment!)!
 
The 2e used to just have the DSPR120 and the 2S had the DSPR320 with the pump switches being On/Off/Auto where auto means "programmable via DSPR320 alarm points". I have no practical use for pump triggers in my brew day.

Auber made the 320 standard on all cubes to be more competitive with the Blichmann unit.
Didn't know that! I was going to say... I'm almost positive mine has the 320 (bought in Feb,2020). Sweet. So basically the difference is the pump triggers (and the blue switches rather than black). Seems like a pretty big markup to add those features.
 
Didn't know that! I was going to say... I'm almost positive mine has the 320 (bought in Feb,2020). Sweet. So basically the difference is the pump triggers (and the blue switches rather than black). Seems like a pretty big markup to add those features.

Yeah, the price difference was more justified before. Frankly I don't think they want to sell the 2S because it's a bunch of extra wiring so they are pricing it as a premium you know, if you HAVE to have it.
 
I use one probe in the HLT-
Just out of curiosity. Are you just measuring the temp of the water in the HLT or are you reading the Mash temp at some point of the recalculation? If so are you just setting your HLT to be a degree or so above the Mash temp or is your HERMs keeping it right on?
 
Just out of curiosity. Are you just measuring the temp of the water in the HLT or are you reading the Mash temp at some point of the recalculation? If so are you just setting your HLT to be a degree or so above the Mash temp or is your HERMs keeping it right on?

This took a little fiddling, which I later learned that everyone running a setup like this needs to experiment with.

The short answer to your question is that YES I do have to set my HLT 2F higher than anything I'm trying to achieve in my MLT.
I'm fine with that, now that I know it'll never heat properly if I don't make that adjustment!

I can see how having a probe in your mash out can possibly make this a little easier, though I don't know how two PIDs/probes would talk to each other to fire one element. Maybe Bobby or someone else can weigh in on that. For now, here's my setup and process (which took a couple of mediocre batches and brew days to figure out!):

I have a stainless T connected to the OUT valve on my HLT. In that stainless T is my temperature probe. Since I only have one PID and probe, I'm only measuring the temp of the water leaving the bottom of my HLT and going back into the top of my HLT.

It goes HLT OUT > T CONNECTOR W/PROBE > HOSE > PUMP > HOSE > HLT IN (this is all that pump 1 does during the mash).

I use pump 2 for mash recirculation through the herms coil.

That ensures the water leaving my HLT is the temperature I'm shooting for. The recirculation eliminates temperature variance within the HLT.

I do not have a digital probe in the mash tun and instead rely on the manual temperature gauge that came with the kettle. I double check this with my handheld thermometer.

For my setup, there is always a 2F variance between my HLT and my MLT, so I always set the PID on my HLT to 2F higher than what I'm trying to hit in my MLT.

My process is this:
  1. Fill up HLT to top of HERMS coil
  2. Fill up MLT to desired strike volume
  3. Calculate my strike temperature (e.g. 162 to hit a mash temp of 150F, just pulling #s out)
  4. Set PID controller in the HLT to 164F since I lose 2F in transit
  5. Turn on pump 1 (HLT recirculation pump)
  6. Turn on pump 2 (MLT > pump > HERMS coil > MLT return
  7. Go for a bike ride and let the system warm up :D
  8. Make sure strike temp is right. Shut off pump 2 and turn HLT heater down to desired mash temp +2F (152F in this example). I also program my full mash/step mash/mashout schedule so that I can walk away for 1-2 hours)
  9. Dough in and lid the MLT.
  10. Add COLD water to my HLT until my PID reads 152F. Doesn't take long since it's recirculating from bottom to top.
  11. Turn Pump 2 back on to begin recirculating the mash, following my full schedule
  12. Pour a beer and wait for the enzymatic gods to bless my kettles
When I sparge, I heat my HLT up a little higher than usual (174F) since I know it'll drop 2F by the time it gets to my MLT. It will also drop a few degrees over the course of a 1 hour fly sparge.

I'm sure there's a lot more thermal physics that goes into this, but I *think* you can bank on the temperature variance between HLT and MLT after running just water through your system until your MLT is up to temperature and doesn't go any higher. In hindsight, I would've done a "dry" run like this in advance. Mashed my first beer at 146 and could never hit actual mashout temp, whoops!
 
Thanks for the explanation! I am moving to HERMs for the first time. Used RIMs before but had some off flavors probably due to something else but I of course just blame my element being on the wort. I am just re-using all my TC fittings elsewhere in the new setup so it wasn't a total lost cause.
 
Back
Top