

Here at HomeBrewTalk we see to all types of crafts and interest. Far beyond just a brewing community, we have reached the pinnacle of the DIY world and brought together engineers, architects, designers, and nurses to design and implement...Wait... What? Nurses? That's right!
If you've been a member longer than a couple of weeks you were bound to see the "The hopefully not obnoxious wood fired brick oven build thread" pop up into your new post rotation. Truly an obnoxious thread if there ever was one, PaultheNurse has constructed a Brick Oven consuming a corner of his backyard.
Starting with a basic slab, and moving forward in a relatively controlled pace (glacial) Paul is now in the final stages of his build.


He then moved onto pouring the base using 35 80lbs bags of concrete mixed by hand in a wheel barrow. Hasn't this guy ever driven past a place that rents cement mixers?

Then to help with heat retention he added a vermiculite/concrete mix and laid that over the base. Vermiculite is a porous volcanic rock so the air filled concrete helps to insulate the dome from the supporting structure underneath. The goal is to only heat up the dome, not all of the mass surrounding it. Eventually the dome will be covered with a ceramic fiber blanket to insulate the upper portion.

Fast forward a couple of months (Dive season is short in New England and you have to have your priorities straight!) and the bricks start getting added,

using a high temperature refractory mortar to withstand the heat.

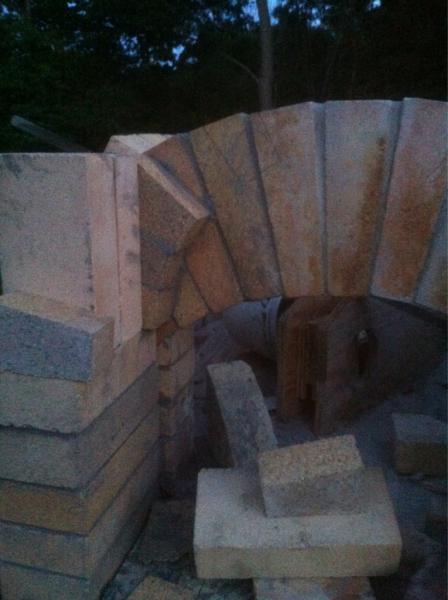
The dome begins.

Inside arch taking shape. As it sits now the opening is 12.5" high by 19" wide.

"There is a steep learning curve for working with mortar. At least it's steep for me. How much to mix, how much water, how long it's plastic and work-able, the dexterity needed to use the trowels, and cleaning the joints. Especially cleaning the joints. I always want to wash them down with the sponge and brush too soon so as not to let the mortar dry and end up schmeering the slop all over the inside. Frustrating. ".

The arch taking shape,

Most of the bricks as he moves upwards are being custom cut, the majority into thirds.
Next up is the flue.

The dome as it nears completion.
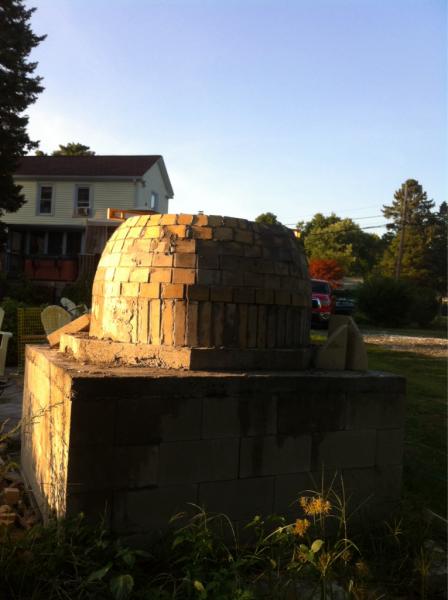
"A tear drop shape appears to be forming"

The progress is gradual, but worth the time and energy.

At some point you're going to have to confirm you don't fit in your own oven right? That's actually Paul's pal Drunken (Do we all have a friend we call Drunken?), but just to be clear about this, Paul does fit inside. It wasn't pretty and considerable amounts of Crisco were involved but he does fit inside. He doesn't have photographic evidence, the lovely Alice was laughing too hard to take pictures. For future ventures into the ovens the Spawns skinny boyfriends will be pressed into service.

The money shot.


The chimney comes next,

Trial by Fire!

And there you have it! A wood fired brick oven. To really understand the build though you must understand, in the words of The Dude Lebowski, "The genius behind the madness."
Austin: Paul, this project was sidelined a lot as you went through some pretty serious life things. All kidding aside we wish you the best with your Dad's recovery from his stroke.
Paul: Thanks Austin. Thanks for the kind thoughts, he is a real gentleman and an inspiration. He's doing much better. He hardly has any physical deficit, just a little memory impairment. I'm hoping he forgets a few of the stupid things I've done in the past 55 years.
Austin: What was your initial inspiration for this project?
Paul: I honestly don't remember, I've wanted one of these for so long it seems like forever. It was always something I never figured would happen but when the patio was finished, it was just lying there screaming out for an oven. So I just kind of kept going. I'm 99% sure that my wife had absolutely no idea what I was talking about when I told her I was going to build an oven next to her nice new patio or how big it was going to be in the end.
Austin: Do you wish you had done anything differently?
Paul: Other than keeping my big mouth shut about it until it was completed? I wish I had made an adjustable tool to hold the bricks in place and keep them in alignment as I went along. By the time I recognized that I really needed one I already had to deal with the consequences of not using one sooner and so the dome isn't a perfect dome. It looks like it was built by a nurse instead of a mason. Go figure.
Austin: Any pointers learned along the way you could share?
Paul: I would STRONGLY recommend keeping your big mouth shut until it's completed. That and decide how much work you want to do. It was a metric ton of work cutting all the bricks and all the rest. It would have been way easier to just buy a preformed dome or hire a mason. But it's like brewing your own beer, you can buy beer down at the corner store. Most of us here on HomeBrewTalk do things like this because we like the doing of the project, the beer, pizza and throngs of MILBW's (Mothers I would love to Brew With) throwing their panties at us at the end are just bonuses. I'm still waiting for that last one to happen, but I'm sure it's just a matter of time.
Austin: You had quite the following cheering you on as the build progressed.
Paul: Ya, my adoring fan club. I've been very lucky and have made some lifelong friends here on HomeBrewTalk. I just consider the source when the kibitzing starts and laugh it off. Jealousy is such an ugly emotion.
Austin: Do you plan to fire roast grains?
Paul: Honestly, probably not. I'm just not that big a fan of smoked beers. However you're welcome to come over any time you want and have at it.
Austin: I love smoked beers so I will. How well does it work? Does it retain heat well?
Paul: I had a small fire in it for three days drying it out, It wasn't just the dome, that vermiculite pad sat outside in the weather all summer long and soaked up a lot of water, it took forever to dry. I started ramping up the fire early in the morning on the day of Masstoberfest and couldn't get the heat over 350*F. Then later in the afternoon I noticed that there was a noticeable difference in the fire, there was less moisture in the smoke and the temp shot up well over 600*F in just a few minutes and stayed there. Best of all the thing didn't collapse.
I didn't intend to cook a pizza that day but I had a ball of grocery store dough in the fridge so we tried it and it went great.
The next part will be to enclose the dome and flue in a structure to keep it dry and insulated. I'm going to cover the dome with 2" of ceramic cloth blanket then fill the space between the dome and the walls with vermiculite. That should insulate the heck out of it and it will retain it's heat, hopefully over several days.
In theory you should be able to fire the oven today and cook high temperature things like pizza, then close an insulated door into the dome and retain the heat for cooking on following days. So pizza today, bread and roasts tomorrow and BBQ the following day. We'll see how that goes. As far as the external finish goes, in my mind I see it looking like a white walled Irish cottage with a slate roof when complete.
I still need to incorporate another arch into the outside wall. That arch will lower down the vent area and make the flue more efficient but I need to build the house first, so in the meantime I used that piece of plywood in the picture for that purpose. It will probably take me another year or so to complete, I'm in grad school and that leaves me very little spare time. But in the meantime I'll have some nice pizza to munch on as I study. I might even invite Cape Brewing over for some. But probably not.

***
I'm constantly surprised by our community and the broad interest we all seem to take. If you would like to see another build profiled here on our front page please contact me. Thanks to Paul for taking the time to explain some of the finer points of his build and answer some questions. If you have any questions for Paul please post them to the comments section and I'll be sure he sees them. On behalf of HomeBrewTalk I would like to wish PaultheNurse the best as he pursues is Nurse Practitioner degree!

