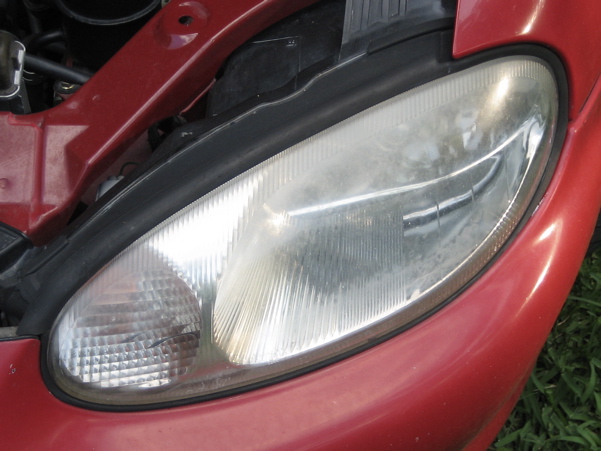
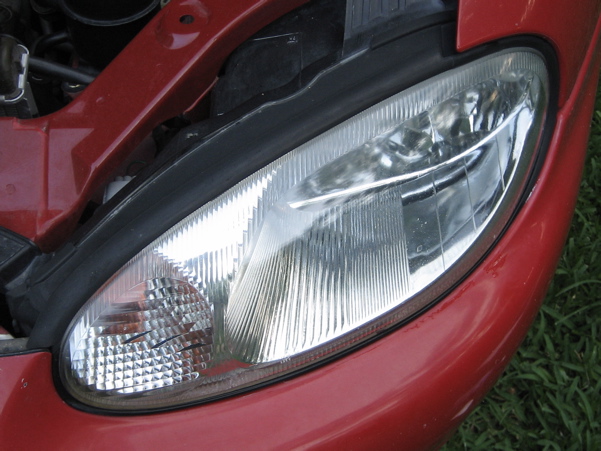
That will buff out, really.

Homebrew Talk - Beer, Wine, Mead, & Cider Brewing Discussion Forum

Help Support Homebrew Talk - Beer, Wine, Mead, & Cider Brewing Discussion Forum:

This site may earn a commission from merchant affiliate links, including eBay, Amazon, and others.

david_42

Well-Known Member
Joined
Oct 8, 2005
Messages
25,581
Reaction score
196
Location
Oak Grove
My wife's car has plastic headlight lenses and they were fogged/fuzzed up badly. This was wrecking the beam pattern and soaking up much of the light. I couldn't tell when the high-beams were on, no distance pattern at all. I had doubts about grinding and polishing the plastic, but the kit I used (3M) did a great job in less than 30 minutes. Probably should have taken a few pictures, but they really looked like the Before and After pictures. Totally fogged to clear, smooth, like new. The high-beams are obvious now, although I'll have to wait to check them in the dark.

About the only mistake I made was on the first lens I wet-sanded with the 500 grit pad. Works faster dry. The final results were the same, it just took longer with the 800 grit. Got enough materials for 2-3 more cars, should I need it.

It's rare for a product to do the designed job so well.
 
how old was her car? Just want to know if there is a certain "age" that the lens will start to "fog" over. In my case I have two vehicles that I will need to perform this function on in the near future. One definitely. Thanks for the info.

Yeah, before and after photos are priceless.
 
The guys on powerblock tv did a special on this. They used a kit and they used toothpaste. The result was so close they were hard to tell the difference. It would seem that toothpaste is a cheaper alternative. I was amazed with the results they got.
 
I've seen this product before and having had experience with toothpaste as a polish, I wondered if it would substitute for this as well.

I have to replace a couple of screws on the headlights of my wife's truck and in that process I may clean up her headlights too. They aren't that bad looking actually, but you can see the difference at night when driving anyway. Just not as bright as they were when we bought it used.

My other question is, does the kit come with any paint to cover the lens? I heard that some kits come with a clearcoat that helps protect the lens from scratches again and from UV rays.
 
Never heard of polishing headlights. Cool. Just watched a vid on youtube. Very cool. I have an old 93 escort beater that I drive for work, Might have to try this out.
 
+1 on mothers polish. Though, now that I know toothpaste works, I will go the cheaper route.
 
1. The car is a 1997 and badly fogged/yellowed. Had a couple deep scratches.

2. Toothpaste would work fine for the polishing step, but I don't think it would have cut through 13 years of yellowing and road rash. The 500 grit first-pass really removed a lot of material. The kit goes: 500 - 800 - 3000, then jeweler's rouge. Plus, I don't own a polisher/buffer of any kind, so I would have had to buy one. Eighteen bucks for the whole kit.

3. No UV finish coat in the kit, but I had some that I use on my motorcycling helmet.

Kellie says the beams are so much better that she was flashing people with her highs because she thought the low-beams were really the high-beams. Makes me feel good, as there are a lot of deer around this time of year and she spotted two on the way to her place that she doesn't think she would have seen before. Being a city girl, she was nervous about driving on "dark" country roads. Turns out it was just the headlights.
 
Before the 3M kits came out, the dealership I worked at would use a fine cut buffing compound and a buffing wheel. If you try this, be careful not to overheat the lens by holding the wheel in one spot too long.
 
Another trick of the trade is clear spray pain. We use a product called "First Kleen" (may only be availble to body shops/mechanics, not sure) to clean the lens of any wax, bugs, etc. You could probably just use some good old soap (without wax) and water and allow to air dry. We use Krylon paint that adheres to plastics. Spray the paint from about 3-4" and in a semi-quick pace. The idea is to get a thick coat but no runs. I did this on my aunts '98 Ford Windstar and she thought I replaced the headlights on it. Another tip, it seems to work really good on some cars and just descent on others. Not sure if there are different plastics used or what the reasoning is behind it.
Tom
 
Toothpaste works great if they're not too far gone.

IMG_5036.jpg


IMG_5038.jpg
 
Another trick of the trade is clear spray pain. We use a product called "First Kleen" (may only be availble to body shops/mechanics, not sure) to clean the lens of any wax, bugs, etc. You could probably just use some good old soap (without wax) and water and allow to air dry. We use Krylon paint that adheres to plastics. Spray the paint from about 3-4" and in a semi-quick pace. The idea is to get a thick coat but no runs. I did this on my aunts '98 Ford Windstar and she thought I replaced the headlights on it. Another tip, it seems to work really good on some cars and just descent on others. Not sure if there are different plastics used or what the reasoning is behind it.
Tom

I had thought of this, but rumour has it if the paint doesn't have UV protection, the lens will start to yellow right away again. I think it would still help protect them from scratches anyway.
 
All clear plastic lens headlamps have what is called "hard coating" applied to the outside surface of the lens. the coating is sprayed on after the lens is molded then heat cured to form what is supposed to be a scratch resistant UV protective coating. The yellowing, fuzzy look begins when the hard coating wears out or breaks dowwn. Typically most clear headlamp lenses as well as the ones with optics are made of polycarbonate, very hard stuff. So essentially what you're doing is polishing away the hard coating down to the polycarb. Eventually, the lenses might get scratched up again.
 
You did this totally by hand?

Did you pull the lights first or do them in place?

Yes, the kit had a little disk for a drill and the grit disks attach to the disk. Then there's a foam disk for the polish.

In place. The instructions advise taping around the lens, but her Neon has a 1" rubber gasket around the lens that gave me plenty of clearance.

As far as future UV protection vs further fogging, I suspect a few minutes of buffing every year will be enough.

944play - that's about what the lenses looked like after the 3000 grit. At the beginning they were a solid white.
 
The Krylon paint we use has UV protection in it. Atleast it says it does on the can., For those of you that used toothpaste, what type of toothpaste did you use?>
tom
 
Oh, and for toothpaste, I'd start with a very fine sandpaper and use the toothpaste for polish. Start with a gritty whitening paste and move to a gel. Maybe do a google for toothpaste polish telescope. I've heard of people polishing telescope mirrors with toothpaste instead of the aluminum oxide and red oxide compounds you can buy in a kit.
 
Toothpaste works great if they're not too far gone.

My headlights were a little worse and came out just as good with Sensodine toothpaste. I put toothpaste on lens, scrubbed with an old cotton washcloth, rinsed and wiped with water and a clean cotton washcloth. Took maybe 30 minutes to do both.
 
I use a 3" pneumatic random orbit sander with a 1500 grit sanding disk, and wet-sand the lens first, then cut the sanding marks out using compound on a wool buff pad on a 3" pneumatic high speed buffer, and finish them off with a foam pad and swirl remover, then a quick UV waxing using aircraft canopy wax. its a more involved process, but I make good money doing it on the side for customers here at the dealership.

My neighbor just picked up one of those kits, I was honestly amazed at how well it worked! you can still see a little haze, but I told him to just spend a little more time on them.
 
Back
Top