Split top coffin keezer with black pipe tap towers-build thread

Homebrew Talk - Beer, Wine, Mead, & Cider Brewing Discussion Forum

Help Support Homebrew Talk - Beer, Wine, Mead, & Cider Brewing Discussion Forum:

This site may earn a commission from merchant affiliate links, including eBay, Amazon, and others.

dlutter

Supporting Member
HBT Supporter
Joined
Jun 7, 2011
Messages
124
Reaction score
35
Location
Wamego, KS
I'm posting my keezer build because I have not seen one designed quite like it and I used so many ideas from so many other threads here to develop my plan that I feel the need to pay it forward.

My plan is to make several posts of the different stages of building along with a parts list at each stage. This is still a project in progress/modification, so suggestions and questions are welcome!

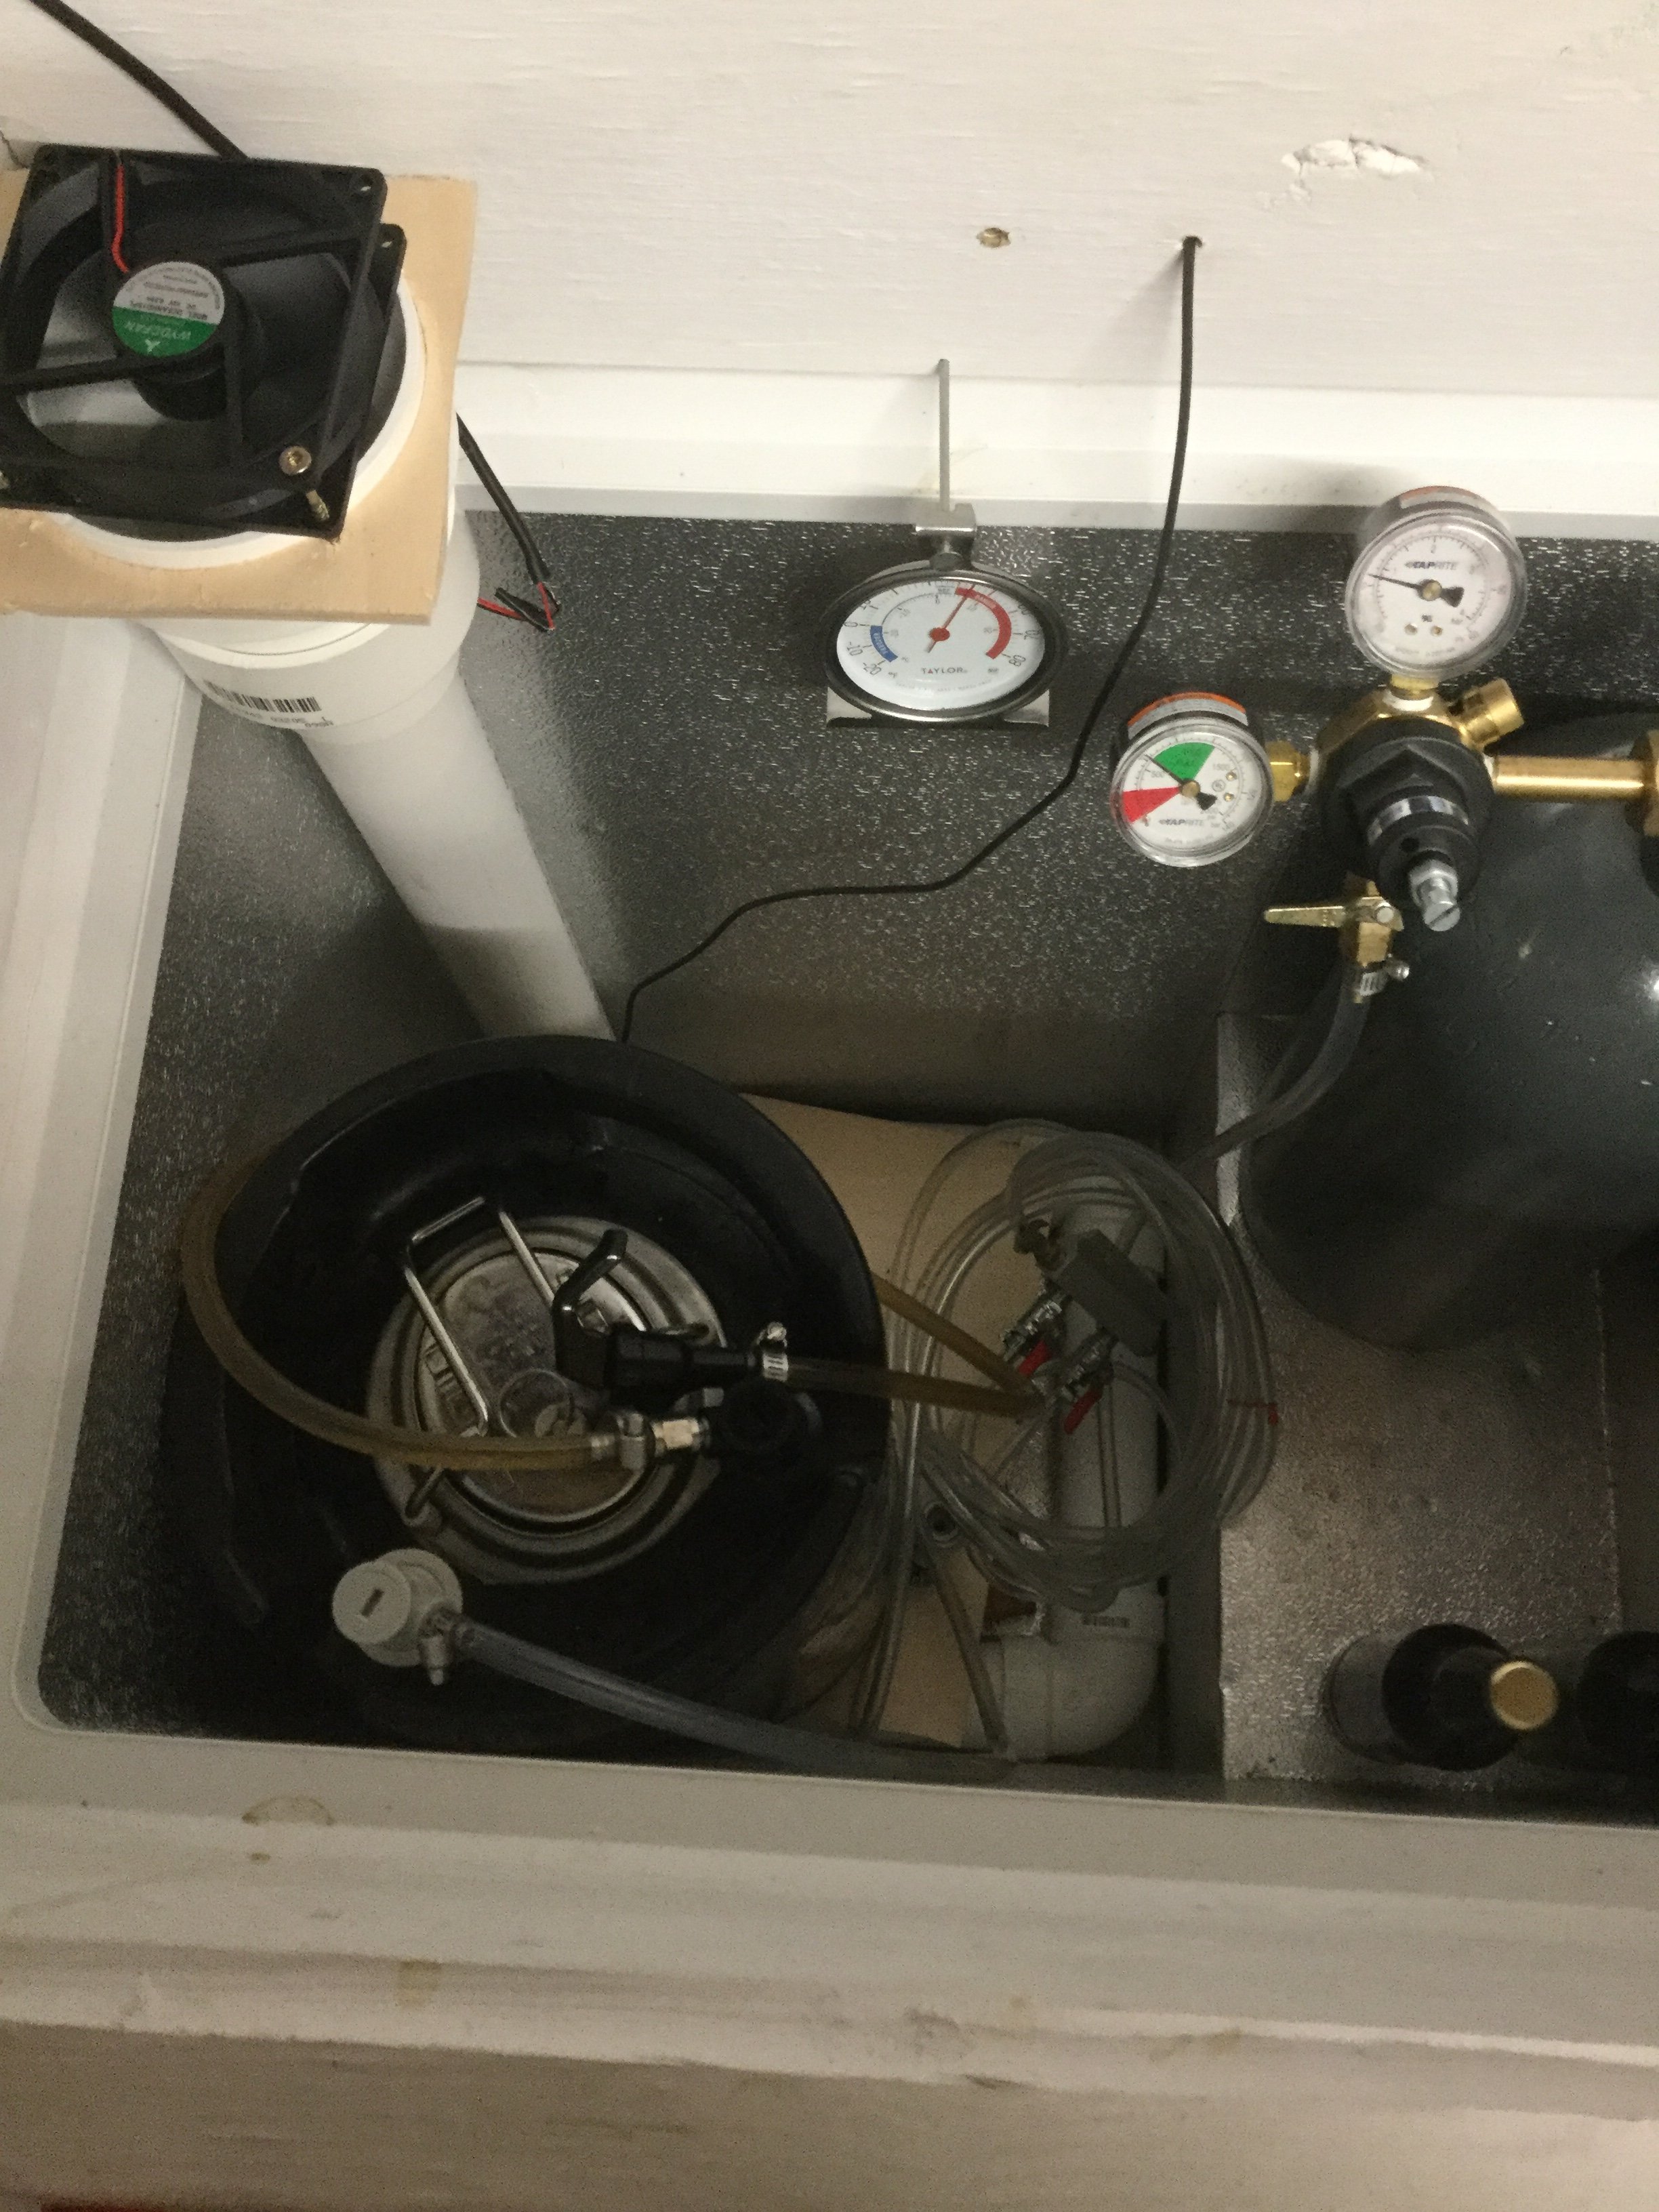
For those just interested in keezer porn, here are a few pictures of its current state. My plan has is to ultimately have external gas with pass throughs to different manifolds for different configurations on 6 total taps. Right now I have a 6 way manifold intended for CO2. I plan to add a 3 way manifold for beer gas, and a 3 way manifold for either argon or plain nitrogen (wine on tap). I want to ultimately be able to serve beer, wine, coffee, and kombucha on tap.

20200214_053726.jpg
20200201_115745.jpg
20200201_115811.jpg
20200201_115846.jpg
20200201_115909.jpg
20200201_115919.jpg
 
Here are pics of the empty space and initial collar/frame build. The collar is 2x6 with a 2x4 collar on top of that in the back for the taps. The rest of the frame is either 2x4 or scrap 2x6.

Here is the freezer I am using:
https://www.kenmore.com/products/kenmore-17992-8-8-cu-ft-chest-freezer-white/

I chose it because I have a very narrow space and this was the most narrow freezer I could find. I made my design like I did because I have small children (rules out a simple collar design) and I do not have the ability to pull out the freezer to open a lid because of carpet/couch placement for a home theater (rules out a tower/coffin design with a full hinged lid). I wanted it to look built in like a piece of furniture, so I did not want a piano hinge style split top.
20191123_094054.jpg
20191227_085824.jpg
20191227_155042.jpg
20191227_155055.jpg
20191227_192344.jpg
20191227_192357.jpg
 
Next came insulation and drilling holes for the tap towers. The second picture is an upside down pic of the insulation inside the 2x4 tap tower. I used 3/4" extruded polystyrene foam board. This had the best compromise between thickness, R value, and messiness. Before I glued it in place, I polyurethane sealed all wood surfaces that would be inside the cold zone or adjacent to it. I attached the foam with special foamboard adhesive.
20200117_143314.jpg
20200117_143332.jpg
20200117_143405.jpg
20200117_164322.jpg
 
Then I attached the final top, which is solid 5/4" pine (actual thickness 1"), as well as the rest of the "skins". For the side skin I used 1/4" red oak plywood and 1/4"x4" aspen boards. I glued and air nailed into place. Retrospectively, I wish I had gone with all red oak instead of aspen but Menards was out of those the day I did my purchase for that stage.

For the front skins I used 1/4" red oak plywood and 1x6" premium pine to cover the front freezer. The rest of the pine is covered with 1/4 x 4 or 6" red oak boards that are ripped to fit. I have 2 sides of the freezer left uncovered. The trickiest part was connecting the front right corner of the skins. I had to choose the correct length air nail (18ga) and angle it just perfectly so it would nail together but not stick out the front.

You'll notice that the inner lid has 4 2x2 boards on top. These serve 2 purposes. The first is I am using the furthest one in the back to lock in my finished top lid and stop it from sliding. The second purpose is that I needed 4 of these 2x2s screwed to the inner lid to stop it from warping in order to get a good seal.

20200201_115745.jpg
20200201_115803.jpg
20200201_115811.jpg
20200201_115846.jpg
20200201_115854.jpg
20200201_115909.jpg
20200201_115919.jpg
20200201_120011.jpg
 
Finally, the tap towers. Since I still have one more tower to build I will probably do a separate build thread for that. Here are the clif notes:

All 2" black pipe & fittings in stock at Menards. Floor flange connects to a 12" pipe, then to a T which connects to street elbows. At each street elbow I have a 2" to 1.5" bushing with a 1.5" to 3/4" bushing connecting to that. The 3/4" fits a faucet shank perfectly with out any need for an external washer and without any extra slop. I had to dremel grind out the inside of the bushing so that the shank nut would fit inside. The shanks are just friction tightened. I wish I had used a lock washer because the shanks loosen slightly when I am attaching the faucets and I can only retighten them without disassembly by twisting the faucet and hoping the nut grabs. Fortunately, I can adjust the straightness by moving the bushings once the shank tightens. So far, so good, no problems.

I am using closed foam pipe insulation in side the pipes/fittings and running 1" copper pipe up through that to keep the beer lines cold. So far I have had no foaming and no condensation problems. Currently I only have 2 ciders on tap on the Intertap faucets.

I have 2 SS Intertap faucets and 2 Perlick 650ss faucets. This is my first keezer and completely new to beer faucets so I wanted to try both styles & forward sealing brands before building my last tap tower.

Beer lines are 4mm Kegland EVA barrier with Duotight fittings. Line length is 7' on the Intertap faucets and 5.5' on the Perlicks. Gas lines in the pics are random stuff but have already been switched over to 5mm EVA barrier. Right now I am working on converting my regulators to accept Duotight fittings.

I am using this fan inside to circulate air. It is pretty loud (audible hum but not too noticable unless you know what to listen for). I don't really like it but haven't had time to look for or rig up alternatives.

https://www.amazon.com/gp/product/B07B42G3QN/ref=ppx_yo_dt_b_asin_title_o09_s00?ie=UTF8&psc=1


20200214_053736.jpg
 
correct me if I am wrong, but it looks like what you are doing for your keezer is instead of having a lid that is on hinges, you will just lift up the top part and set it off to the side to exchange your kegs? How tight of a fit is it(i'm just curious)Do you have plans to add a fan and tubing inside for circulation(starting typing this before you posted, how does just having the fan blowing hold temp, versus having a tube running to the bottom and blowing/or sucking air from)?
The fan I am using on my 5 CF freezer is https://www.amazon.com/URBEST90mm-2...coding=UTF8&psc=1&refRID=15QH4NA5S5KACNMWBC0H . I have it attached to a tube running down, and then have it running around the floor of the freezer (u shape) It is quite and keeps my temp even between top and bottom, however I have noticed ice forming on the very bottom ( my probe from my ink bird 308 is about 6 inches from bottom)

You have a very nice build going. Nicely done.

edit: Pic of my fan set up, kinda hard to really see though
 

Attachments

  • IMG_0598.JPG
    IMG_0598.JPG
    1 MB · Views: 58
Yep, just lift it off. The sides and the back 2x2 are precisely spaced so it is a snug fit. I have to wiggle it off and on.

It was/is on my list to do a tube fan set up but now I'm not sure that it is necessary. I haven't checked for temp stability or stratification and the temp probe is just hanging out in the air but it seems to hold fine. Mine gets ice/water in it too without dehumidifiers in there. I use several rechargeable dehumidifiers in the bottom to take care of that. 20200219_200003.jpg 20200219_202318.jpg 20200219_195815.jpg 20200219_195833.jpg
 
Back
Top