RIMS layout of components

Homebrew Talk - Beer, Wine, Mead, & Cider Brewing Discussion Forum

Help Support Homebrew Talk - Beer, Wine, Mead, & Cider Brewing Discussion Forum:

This site may earn a commission from merchant affiliate links, including eBay, Amazon, and others.

arla

Active Member
Joined
Nov 25, 2015
Messages
44
Reaction score
5
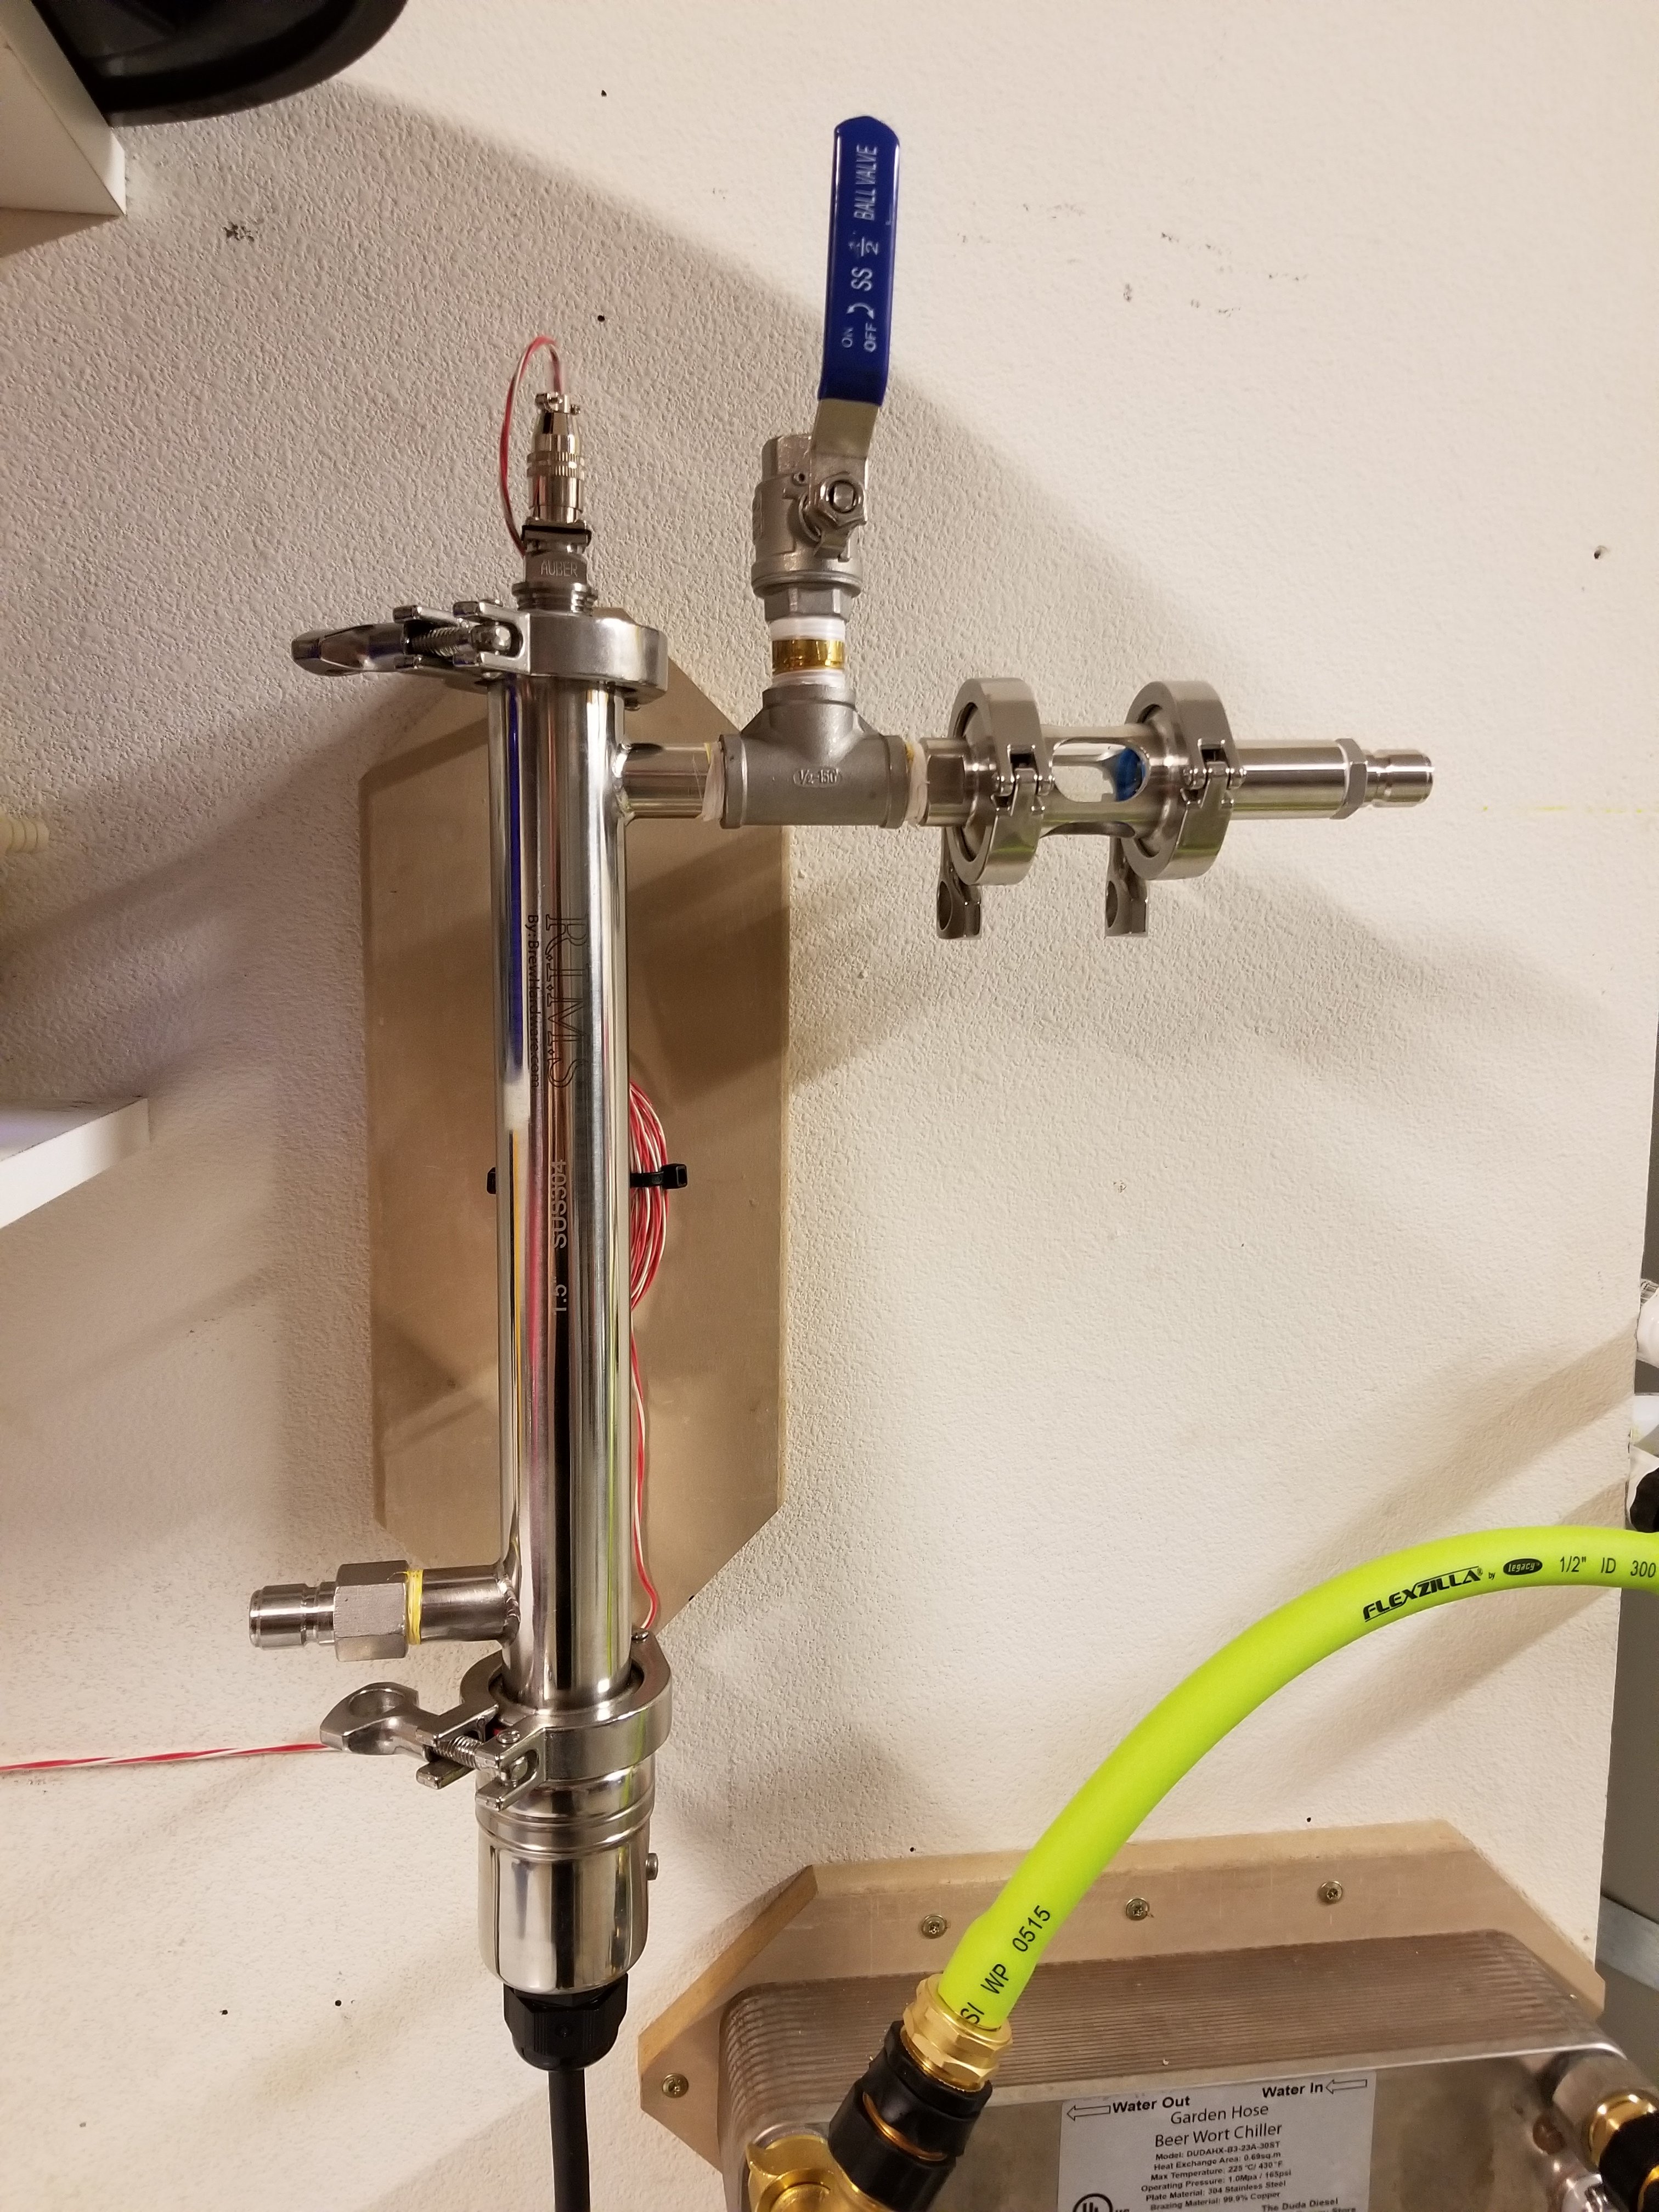
This may be a really silly question, but figure I'll ask, finally I now have all my RIMS components, and I'm putting them all together in a layout, I'm planning to mount them all to a 2x2 sheet of MDF once I determine optimal layout

Option 1 is the following

https://photos.app.goo.gl/eYa3HyXTY77yYrGX2

Which has the RIMS tube horizontal, the only concern, or piece I don't love is that the element power is very long, however I'm thinking of looping it over the back of the MDF (behind the PID) and then coming up into the output socket, which should keep it reasonably out of the way.

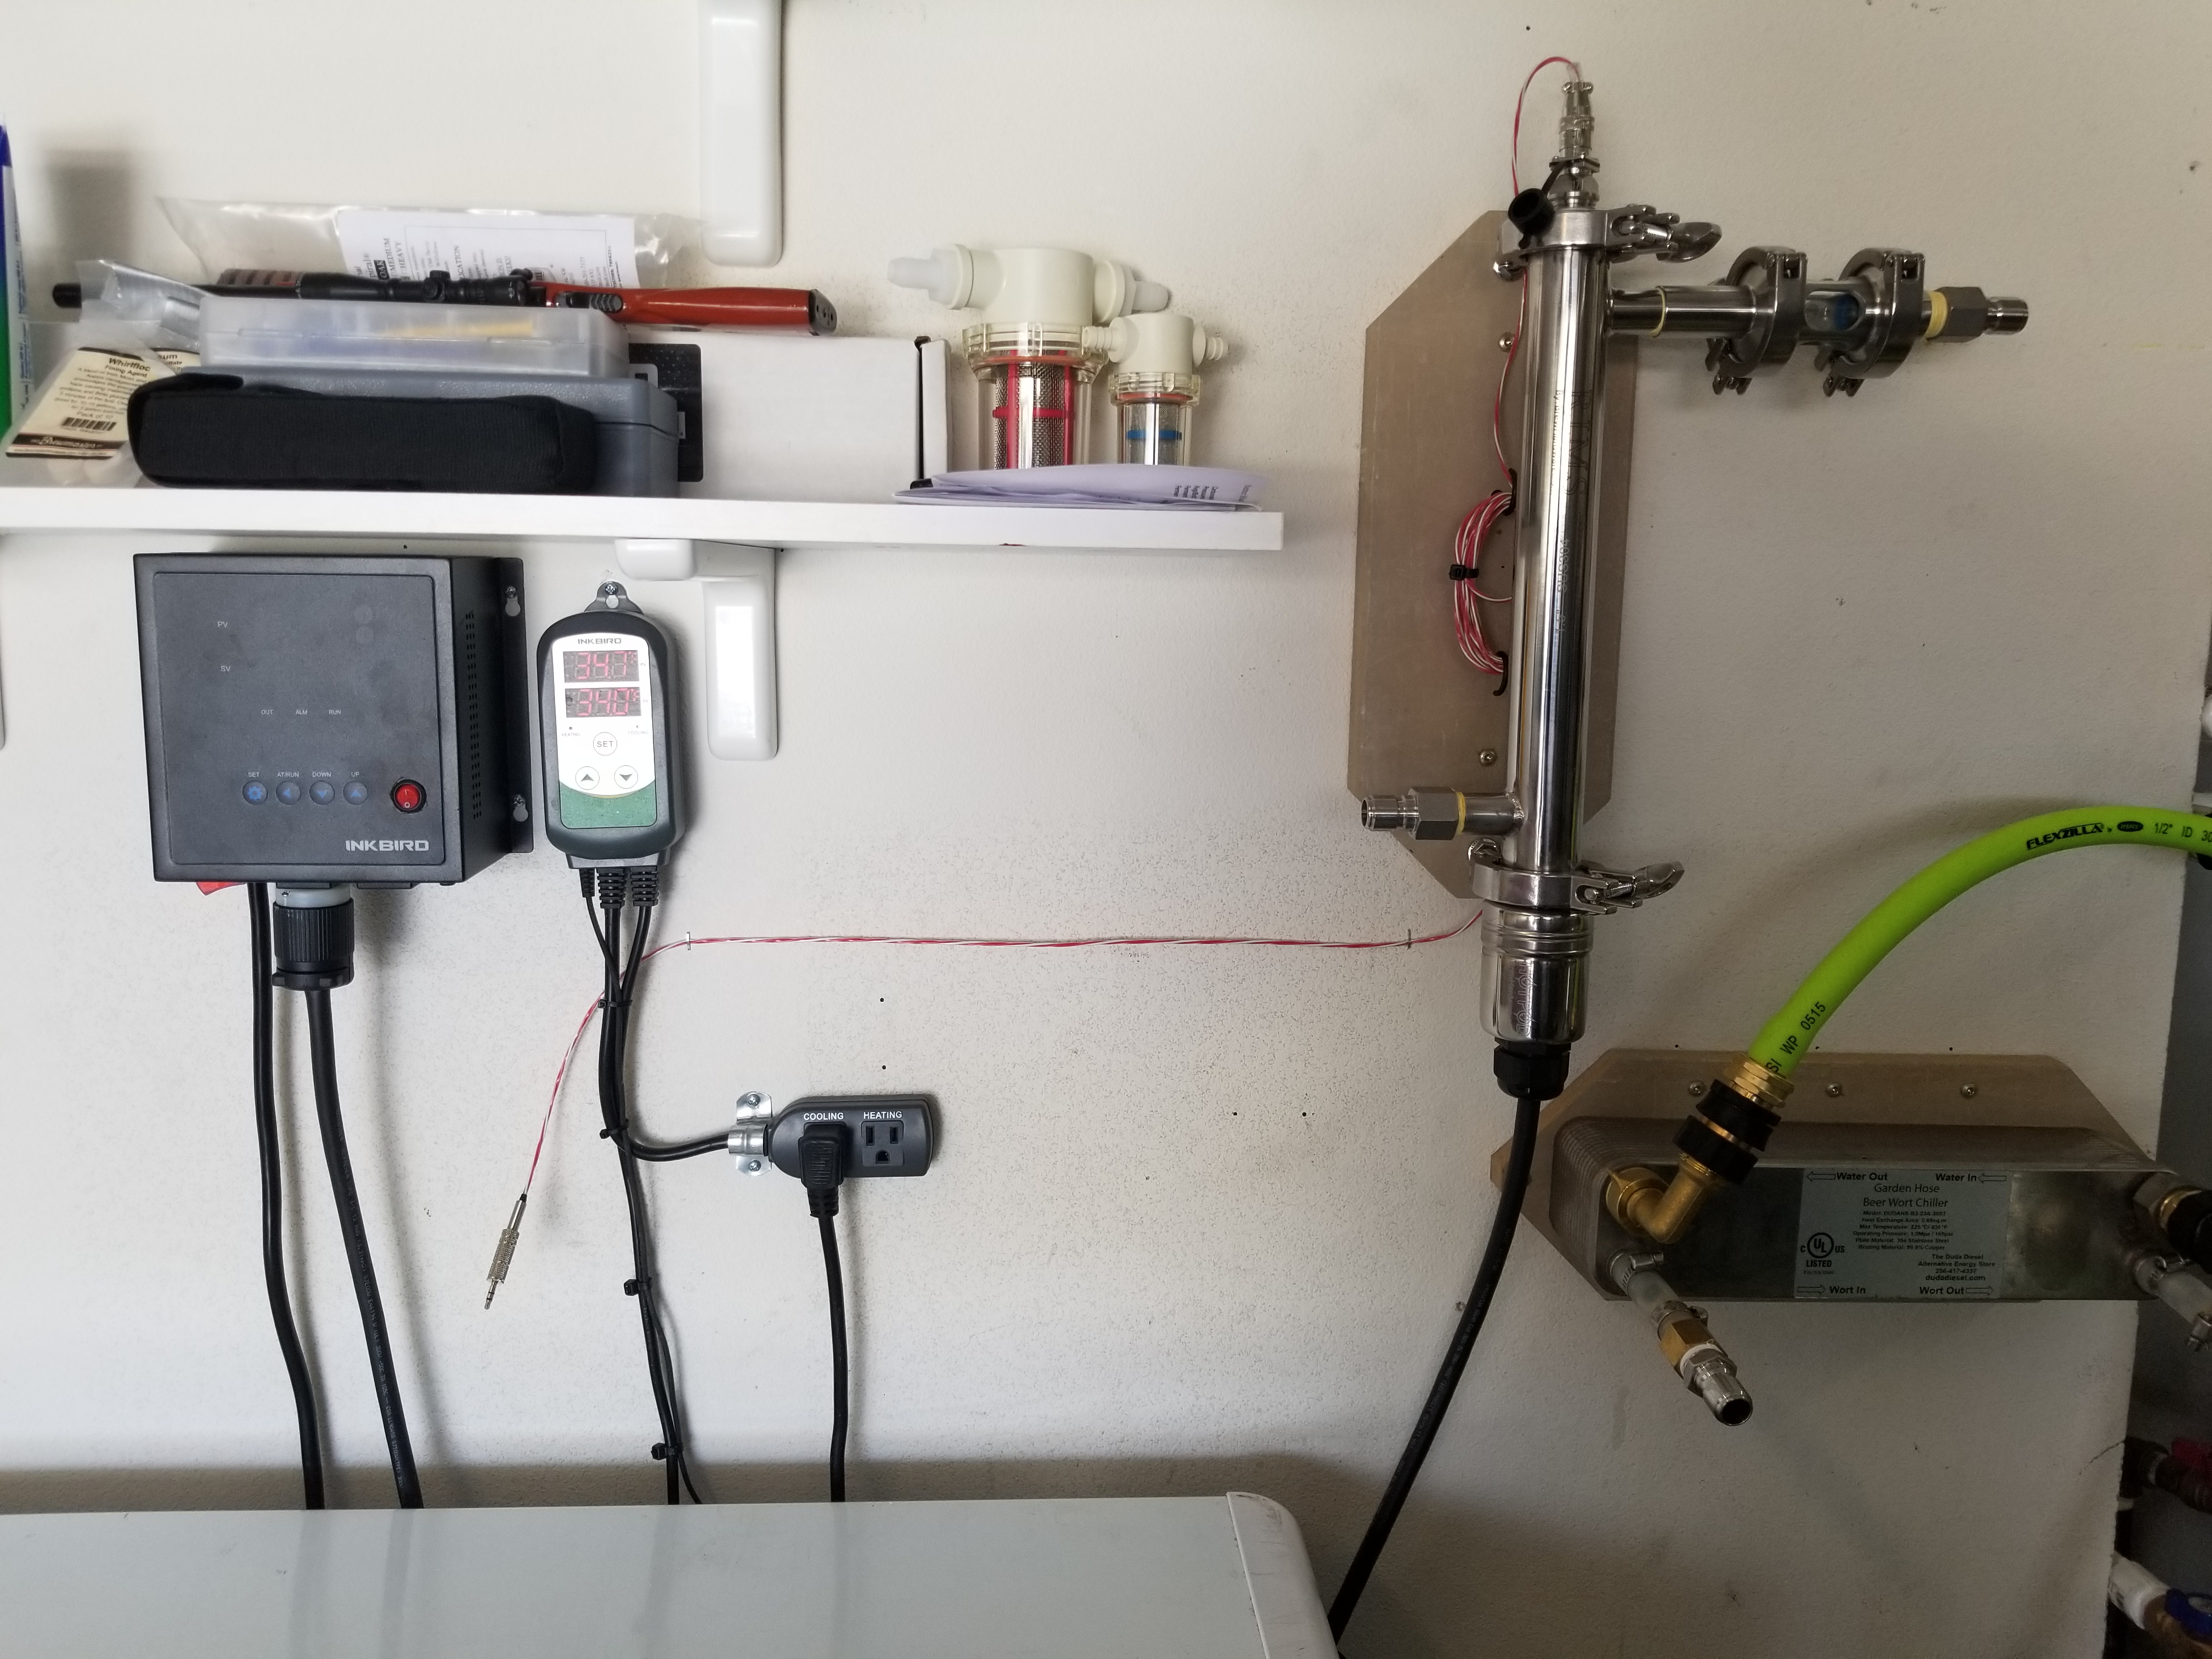
Option 2 is the following

https://photos.app.goo.gl/jDjumPWuLmrcxCsC2

Which is similar, but the RIMS tube is now vertical, similar concept could be used having the power cord go around the back of the MDF and plug into the PID, or something else.

My main concern with Option 2 is that any leaking from the RIMS would go straight down onto the element power, having said that I've been brewing for a number of years with Tri-Clover clamps and never yet had a single drop of leaking.

Does vertical or horizontal have any other advantage/disadvantages? I know that the input should be at the element end, and also want the output to either face up, or out.

The other vague thought I had, was could I have it vertical, but have the Temp probe on the hole at the top, not sure that's good design, but means that there is a guarantee that the tube is full and the temp probe is in liquid, where the current vertical design would potentially mean the temp probe isn't in liquid.
 
I have the same setup and chose to go with the vertical mount. One of the big influences is to have a positive direction for air bubbles to exit the RIMS tube to avoid pockets which MAY cause scorching. I wall mounted my pump but put a 90 degree elbow so both in and out of the pump are oriented the same direction. I also made sure my pump was below kettle height to avoid any priming issues. The picture attached is all I have on me right now, but you can get the idea... the RIMS tube is kinda in the picture. I can take a picture on my lunch break if you want.

If your curious the photo was to show my plate chiller and pre chiller setup, but technically the RIMS tubs is in it too...

EDIT: Oh I also upgraded my Inkbird to a Aubur 1.5 TC RTC probe for faster temp response.
 

Attachments

  • 20180517_195753.jpg
    20180517_195753.jpg
    3.5 MB · Views: 286
Last edited:
MDF and moisture do not make a good combination.
Plywood is better and composites better still.
If you’re going to use the plywood, finish it with something that will reject water.
 
Understood on the MDF and moisture issues, this likely won't be the final solution, but was just "lets play with something that doesn't cost me an arm and a leg" (and I will paint it so that it rejects water as much as possible) once I get this working well I may move to Strut or something else entirely depending on how it plays, but thanks.

Bigdaw if you can take a picture of the RIMS setup might be nice to see, especially how you have the exits, having it horizontal given that my tube has the input/output on different sides seems like it would nicely push all air straight out of the tube. I like the Plate going into the copper chiller, presumably ice cold water in the bucket to have the plate chiller be as cold as possible.
 
Yeah, vertical RIMS tube is the only way to be 100% sure you dont have air pockets. It's also easier to drain and clean up without spilling wort.
 
But does't vertical RIMS at least give a potential for air bubble at the top of the RIMS tube, which then means potentially the temp probe is in an air bubble instead of the wort?

Good call on cleanup, will have to think a bit more about that one, although I guess since it's on a "board" I can just turn the board on it's side (so that the temp end is down) and then open the tube, which means everything left in the tube, comes out the bottom end.
 
The temp probe should ideally be nearly touching the element. Unless you habe a really long element, If the temp probe is at the top, it's probably further away than it should be.
 
And I haven't yet checked on where the element ends in my tube vs what I have as the defacto outlet port.

So looking at my second option (where the tube is vertical) you'd have the temp probe ideally (assuming it doesn't actually touch the element) on the right side top, and have the wort coming out of the very top of the RIMS tube?
 
Here are two photos of my setup sans silicone hoses plugged in.
 

Attachments

  • 20180523_122139.jpg
    20180523_122139.jpg
    3.2 MB · Views: 273
  • 20180523_122132.jpg
    20180523_122132.jpg
    1.4 MB · Views: 232
Okay thanks, that's about the way I planned it, I guess I can just see an air-bubble ending up at the top end of the tube where the temp sensor is, but will play and see.
 
Okay thanks, that's about the way I planned it, I guess I can just see an air-bubble ending up at the top end of the tube where the temp sensor is, but will play and see.

I have the sight glass at the output of mine, which helps. If there appears to be a bubble a simple tap and maybe a quick blip of the pump "throttle" will clear it.
 
Okay thanks, that's about the way I planned it, I guess I can just see an air-bubble ending up at the top end of the tube where the temp sensor is, but will play and see.
The temp sensor tip absolutely needs to be below the level of the wort output on a vertical RIMS tube. That prevents the tip from ever being in an air bubble (unless there is not continuous flow thru the tube.)

Brew on :mug:
 
So what about this configuration? If you can tell I put outlet at the very top, and the temp sensor is where the outlet would typically be, checking inside the temp sensor was nice and close to (but not touching) the element, seems like this would be good.

https://photos.app.goo.gl/UHLBakvmtzGWfqNs1
With that temp probe and wort outlet configuration, you want to have the RIMS tube mounted near vertically in order to prevent any air pockets in the tube.

Brew on :mug:
 
Agreed, but we it vertical would seem like it nicely means no way for air bubbles, and as closer to guarantee that the element is never not in liquid (and temp probe is as close as possible to the heat)
 
So what about this configuration? If you can tell I put outlet at the very top, and the temp sensor is where the outlet would typically be, checking inside the temp sensor was nice and close to (but not touching) the element, seems like this would be good.

https://photos.app.goo.gl/UHLBakvmtzGWfqNs1

That would work well, just ensure the thermowell is long enough to be primarily in the main tube otherwise there could be some temp sensing delays.
 
I need two different types of sensors since I use my RIMS tube for different stuff. The thermowell in the side is about 0.5" from the element end. The PT100 is not for brewing, so it's fine at the output.
 

Attachments

  • 20180527_153242.jpg
    20180527_153242.jpg
    1.4 MB · Views: 83
So I brewed with my RIMS system BIAB for the second time yesterday ... Hardly a perfect brew day.

1. The kettle pickup kept sucking the bag, reducing flow. I didn't get any scorching but that's a problem. I may take the braided stainless jacket from a water hose and clamp it to my pickup so it acts as a bazooka tube preventing slow downs and clogs.

2. Auto tune is great, but when you change parameters such as flow rate, you should rerun the auto tune.

3. The sight glass is nice, also helps with spotting wort slowdowns.

4. Cleanup. I decided to add a T with a valve so I when done mashing I am able to keep the tubes attached, open the bleed valve, then gravity drains the system for me. Less mess when disconnecting hoses on cleanup.

5. I need alot more brews to get it right, as the controller needs to be higher than desired value to account for heat loss... Probably 2-3 degrees since I do not have the joy of insulated kettles.

6. I ran my RIMS tube while direct firing my kettle on initial warm up. It seemed to help to saturate the system with heat before I began mashing. Once I hit strike temp I switched to RIMS only... allowed system to reach equilibrium as the temp will climb a few degrees initally despite burner being off. Mash in once stable temp is reached, then dial in to desired mash temp.
 

Attachments

  • 20180527_144413.jpg
    20180527_144413.jpg
    1.7 MB · Views: 96
Last edited:
Thanks for the update, I intend to brew with mine this weekend, will probably try to test run it tonight and see how it goes. I've got all the pieces attached now and it looks pretty good, looking forward to brewing.
 
Ran it today, got the temp from 70 to 90 in about 10 minutes, so seemed to work as expected (YAY) some leaks that I need to plug (this is why I go tri-clover, any non-tri-clover fitting ends up leaking on me, I HATE PLUMBING)

How do others go about "emptying" the tube once done? Even with just water (what I was playing with) and ignorning the leaks, it was quite a pain to figure out how to get most of the liquid out without making a big wet mess everywhere, is there some trick that others use?

https://photos.app.goo.gl/JFSSvi4orNST76bL2

See my photo on post #19... I added a tee to the outlet port with a ball valve. When I am done I open the valve and the system drains itself.

Also, this is why my pump is below the kettle (to prime) RIMS tube is above kettle height (to drain / clean) . I can drain and clean it in place. I know you put yours on the board for portability, but unless you reconfigure you are going to have to have the board below the mash tun to get the pump going, then keep it above the tun so you can gravity drain the system without making a mess. Maybe put some hooks on the board so you can prime the pump then easily hang the board on the wall wherever your brew space is to get it above the tun.

Oh, and get some hose clamps on those barbed fittings. Nothing will piss you off more than one coming off during mash.

I made a garden hose attachment so I can flush my RIMS tube and pump with fresh water when complete.
 
Last edited:
Ran it today, got the temp from 70 to 90 in about 10 minutes, so seemed to work as expected (YAY) some leaks that I need to plug (this is why I go tri-clover, any non-tri-clover fitting ends up leaking on me, I HATE PLUMBING)

How do others go about "emptying" the tube once done? Even with just water (what I was playing with) and ignorning the leaks, it was quite a pain to figure out how to get most of the liquid out without making a big wet mess everywhere, is there some trick that others use?

https://photos.app.goo.gl/JFSSvi4orNST76bL2
I mounted mine horizontally and so the dump port by the entrance port is facing down... everything fully drains without issue. Also no trapped air pockets this way.
This is an old pic but most things are still the same except I switched to a different flow switch. my plumbing is setup so the only hose I move during brewing it the hose after the chiller which goes to my conicals after a quick recirc to sanitize. bk is on the left and mt is in the middle... I flip the three way valve when mashing is done and turn on the sparge pump which then sparges the mash while wort flow is diverted to the bk... this way no wort is left in any hoses .. at the end the sparge wort also travels through the rims and I can take gravity samples from that port at the bottom of my rims if I like to ensure I havent oversparged (I never really need to do this since Ive been getting 89-92% efficiency) the flowmeter lets me monitor mash flow and the flow switch will turn off the rims if flow drops below .5 gallons per minute. the rims element is 1800w and 36" long and allows a 2 degree per minute rise in adjusting mash temps. Because the element is such low watt density is stays totally clean and heats gently similiar to herms.

when you have the rims in the vertical position with the sensor mounted in a possible trapped air pocket at the top I wonder if it effects readings at all?
 

Attachments

  • IMG_20170303_083117319resize.jpg
    IMG_20170303_083117319resize.jpg
    281.8 KB · Views: 76
Last edited:
This is how mine is setup. I have 0 issues with air pockets or scorching. Hard to see but the temp probe is facing back on the second tube section just over the element tip. The wort exits directly up to a small sight glass so I can see flow. To drain I have a tee with a ball valve at the pump inlet so everything gravity drains. My only complaint is the couple oz of liquid left after draining that gets on my hands when I remove the element. This is a pretty minor issue and not enough problem to do anything about it.
20180519_122015.jpeg
 
Right, I was wondering about that too, that's why I mounted the temperature reader on the side (the end of the temp probe is probably about a centimeter from the tip of the heating element) and then the output at the very top, which guarantee's no air-pockets/hot zones.

I did a run this weekend, all things considered for a first run it went really well, I've not calculated efficiency yet, and with a change in dead-space I've definitely got some dialing in to do.

Cleaning was actually pretty easy with my board setup, just disconnected the pump input hose, and then lifted the board so that the everything flowed back down through the pump, simple and effective and got 95% of everything out, the one space where I still had some liquid was at the bottom of the rims tube by the element, not sure that can really be avoided (and based on the post above, I'm assuming maybe not), maybe turn the rims on it's side after most of the water is out.

Some random questions that did come up

How do you run the mash/sparge? Since I'm in a cooler for mash this time I didn't run the RIMS constantly while it mashed, which may have been a mistake because my thermometer at the end of the mash seemed to read much lower than I'd expected (Mash temp was supposed to be 155, the thermometer read 150 at the end of mash, although the RIMS thermometer when I started it circulating again read 152 so... could be some hot pockets)

I basically still did a batch sparge, I emptied 99% of the wort from the cooler (through the RIMS tube into the boil kettle) and then dumped in the 4 gallons or so of Sparge water that I needed.
 
Drummingguy that looks like a sweet setup, lots of nice shiny stainless.

One question, how are you cleaning it all? I'm still trying to figure out best cleaning practice for all the stainless steel tubes and parts to make sure they are getting cleaned well, do you dump them all in a tub with PBW (or similar) or something else?
Most of mine are c.i.p. I heat water to boil in my hlt and circulate it through all of the lines before and after every brew. (This is a benefit of tri-clamp fittings, they are designed to be cleaned in place) I will periodically break a few lines to verify they are cleaning properly and have never had an issue. Some parts such as the element, oxygenation stone, sparge/vorlauf arm, and kettles are removed and cleaned out of place prior to circulating the boiling water. All of my lines have a low point drain to make sure everything drains and dries after brewing. Sorry not trying to hijack this thread. If you have other questions feel free to PM me or post in my build thread..[emoji482]
 
In my opinion, RIMs tubes should always be mounted vertically to ensure your PID senses heated wort in a stuck mash situation, unless you have some other type of flow monitor.

That said, per above the sensor of course should be long enough to always be submerged. The way to ensure this is look through the outlet port and make sure you can see it extending below the exit. I don’t agree that it should be as close to the element as possible. You aren’t trying to measure a local fluid zone, you are trying to measure the average temp of the total fluid leaving the tube.

As far as air pockets at the top and draining at the bottom of a vertical tube, I haven’t found these to be a problem, but admittedly I would like the RIMs tube manufacturers to start putting the entry/exit ports near the end of the tubes!
Right now, most rims "manufacturers" are just re purposing 2 offset tri clamp tees which were used in the milk and pharma industry. the price of these have gone up dramatically due to the demand because of this use.

also I use a horizontal rims and if its mounted below the kettles I think it would sense a stuck sparge fine since it wont drain back, if its a longer tube with a regular shorter 5500w lwd element and a lot of space between there are often reports of scorching because with no movement, by the time the sensor reaches temp the wort near the element has been heated many times that temp in a short time.

I realize its not the norm but in my rims I am in fact measuring the local fluid zone as the rims element doesn't need to get much hotter if any, than the setpoint with lower flow and the longer contact time due to length it works more like a herms in this regard. This has multiple possible benefits the way I see it Like being safer with no chance of denaturing enzymes or scorching or runaway temps.
 
Last edited:
I agree on the re-purposing. I would like to see a dedicated-built RIMS tube, though I believe BrewHardware's is the best available option right now. It would benefit from the ports being moved closer to the ends. One nice feature of the re-purposed tees you mention is your inlet and outlet ports can be aligned how you like.

I think your situation is a bit different given the long length of the cartridge heater. But in most applications, if the flow stops, a horizontal orientation will cause the heated wort to rise up in the tube and not affect the temp exit sensor. In a vertical setup, this happens, quite quickly, so is a built-in safety. This wont work if the tube runs dry of course, though hot air or steam (from a semi-wet scenario) rising might do the trick.

I do think the regular elements are not really a good option for RIMs... this is why I made a custom one (conceptually based on your cartridge heater method). RIMs setups like these, where the wattage density is really low, should be universally used IMO, and HERMs should go the way of the dinosaur! Again, just my opinion, but its a strong one!
 
I have my RIMS tube mounted diagonally under my Mash Tun. The temp probe is on the top. It fit better on my stand that way and still holds liquid in case of a stuck mash.
If you look at my profile pic you can just make it out on the right hand side.
 
Back
Top