Redneck Bling - RIMS & Control Panel

Homebrew Talk - Beer, Wine, Mead, & Cider Brewing Discussion Forum

Help Support Homebrew Talk - Beer, Wine, Mead, & Cider Brewing Discussion Forum:

This site may earn a commission from merchant affiliate links, including eBay, Amazon, and others.
The idea behind the build was to do it as cheap as possible, spending money where it benefited.

For example, the box is cheap as all get out and cutting the PID holes warped the steel, but it works and I don't care about the aesthetics. I could've spent $120 on a NEMA enclosure, or I could make sure I don't spray my box with the hose while filling up HLT.

The RIMS tube though, I decided that using a lot of adjuncts and wanting to clean protein residue off element was worth spending the $ on the tri-clamp kit. This means I can easily take apart and reassemble without going through cases of Teflon tape and worrying about leaks every time.

Parts:
Creeper Seat for Base
Cheap Toolbox
Master Switches for Each Circuit
MyPIN & Heatsink
Pump Switches
Indicator Lights
HLT Probe
RIMS Probe
RIMS Tube
Element
Power Supply (x2)
Switched Outlets (x3)

Everything else I already had laying around or was an existing part of the brewery.

I did purchase some tools and I will say that the Q-Max punches work great (at least for a few holes, that's all I punched) if you can wait for the shipping from England.

I could've hard wired everything, but figured it was cheaper to do outlets in case I want to sell or reuse anything in the future, I had more than just a paperweight without more work.
 
Last edited by a moderator:
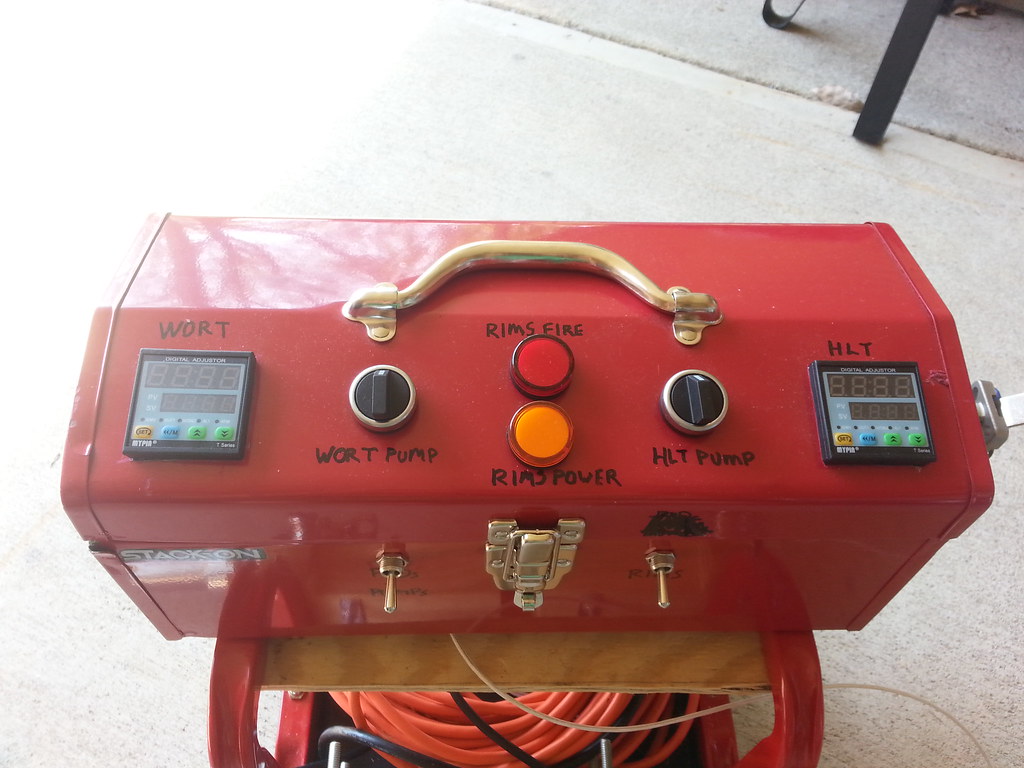
For the PIDs, this was my first time using anything like it. The instructions seem to be translated from Chinese to English by someone not native to either language, but reading a few times helps.

I had no real issues testing and autotuning yesterday.

I will say to make sure you understand what all the gibberish on the PID means before you start going through and changing your settings. Once I knew what I was looking for and wanting to change, it was easy.

It is a little confusing as to whether you are in Manual or Auto mode and knowing if you're setting to 100% power or 100* as your set temp. Getting into autoune also took a few attempts. Be patient and you'll get there.

Once in autotune though, it ramped to 150 and then held within 1.5*. It would overshoot by ~1* and then cool to .5* below set point. I will find out what that translates to in an actual mash on my first beer though as that is measured at the outlet of the RIMS.
 
Thanks everyone!

Very kewl. What was the dolly re-purposed from?

The base was actually purchased. It's a mechanics Creeper Seat from HD (in parts list) that cost $25. Most big box stores had one about this price, but some of them had braces in the bottom space that would've made it impossible to mount pumps or anything below.

If I were doing it again, I'd change how I mounted things slightly and make the box and pump mountings two totally separate parts. The 4 screws that hold the box on go all the way through and serve as one of the posts to mount the pumps as well. The area between box and pump mounting is very small and difficult to get nuts on the machine screws.
 
Somehow I scrolled right past the list. The creeper seat I gotta get before next brew day. I don't have a sculpture yet, so always working near the floor. Also thinking about getting a couple of house plant dollies for fermentor and grant to reduce lifting. All good stuff. Thanks.
 
Back
Top