Portable 5 Gallon Keg Cooler

Homebrew Talk - Beer, Wine, Mead, & Cider Brewing Discussion Forum

Help Support Homebrew Talk - Beer, Wine, Mead, & Cider Brewing Discussion Forum:

This site may earn a commission from merchant affiliate links, including eBay, Amazon, and others.
That right there... makes me want to buy a 3gal keg!

Before today I could have not imagined a reason to buy less than a 5gal keg! ( ;

Well done!
 
Need a solution for the annual beach trip. Normally I load up the kegerator and haul it and the kegs several hundred miles. Getting too old to do that now. This was a perfect compromise. I picked up an old 10gal Home Depot cooler at the flea market for $5. It was faded and beat up, as well as waterlogged.
Made the initial cut just above the drain valve with a handsaw thru the outer skin and down till it just touched the inner liner. Did not cut thru. Removed the valve and used a large flat blade screwdriver to gently separate the bottom complete with foam. This left just the liner, mark the bottom of the liner just at the tangent of the sidewall curve and cut out the center with a utility knife to clear the keg and ice.
Bought a new 10gal cooler from Home Depot ($50 ouch) and removed the new lid so that the old cooler liner can slide down into the new cooler. This works because when they blow old the liner there is a slight taper to help with removal from the mold.
Next step was to cut the center out of the old cooler lid the same diameter as the old liner. Take your time and use a sharp utility knife with heavy gloves. The liner should slide down thru the lid. Do not cut away the flat area just inside the threads that seals against the top lip of the cooler. Finally use a can of foam that sets hard, not the water-based eco friendly stuff, and carefully fill the hollow area in the old lid all around. The foam will expand out, just let it dry then cut it off flush. Slip the old cooler body thru the lid down to the insulation, then insert the liner into the new cooler and screw the old lid onto the new unaltered cooler. Align the handles and silicone the old lid to the bottom of the cut insulation of the old cooler.
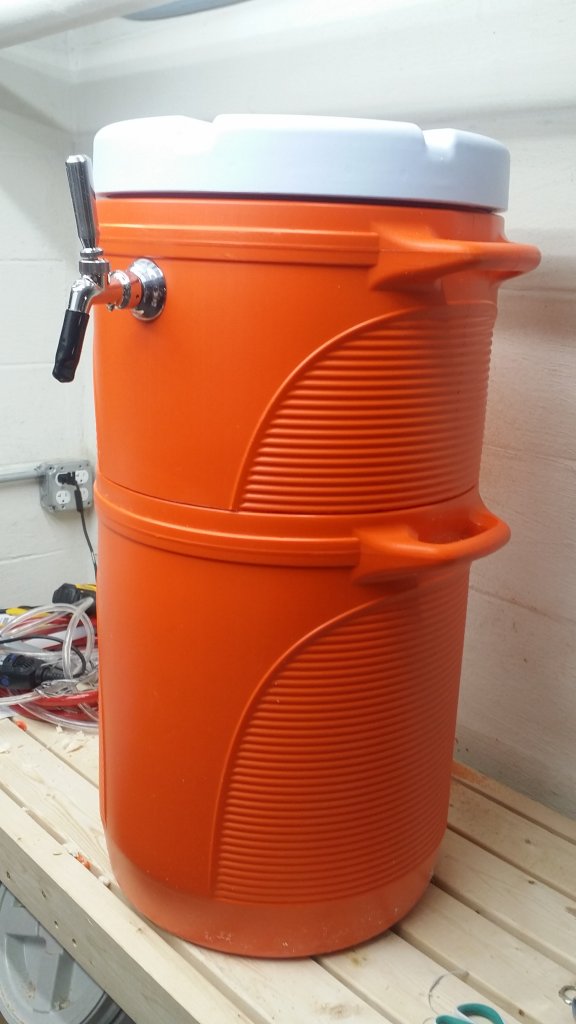
Now you have a 5 gal keg cooler that easily converts back into a 10 gal water cooler just by unscrewing the top section and swapping lids.
I hate painting, but wanted this cooler to look nice, so off to Home Depot for a short roll of reflectix and some tape.
Done, hope all this made sense. Will let you know how the cooler holds up at the beach.
Many thanks to the OP and all the follow ups!

Photos to follow..
View attachment 628451[/IMG]
Cheers
Jbrown57View attachment 628444
ATTACH][IMG]
View attachment 628449View attachment 628450View attachment 628452View attachment 628453
 
Last edited:
Awesome build and definitely one to put on my list. After reading the comments, would it be too much of a hassle to saw off and then grind down the top cooler's handles (to avoid the temptation of trying to lift with those)? I know I would remember to lift using the bottom...but my inebriated friends might go for the path of least resistance.

Or maybe rig up a slight shock strip for when someone goes to lift it using those?

If you cut the handles off I would seal with silicone or epoxy ..
I had considered running a length of small cable with ring connectors crimped on, between two short heavy sheet metal screwed into the sloped area of the upper and lower handle where it blends into the body on both sides to transfer the load.
Maybe a good idea, hadn’t thought about my friends grabbing it while drunk.
Hmm, 40# beer and 40# ice and 10# cooler etc / 4= 22-23# per cable
Some testing is in order, maybe use 2 anchor screws per side to distribute the load.
I’ll get back to u.
Jbrown
Ive had no problems yet lifting mine from the bottom handles, no flexing or warping of the plastic anyway,
 
This is probably the best solution I've seen so far that looks clean as well as functional. Hardware ordered for 2 future builds!
 
Good luck building them! Post a pic when your done.


John
One down, one to go. I decided to flip where the gas and beer lines mount for a different look. Some of the cuts are a little rough but overall I'm happy with how it turned out. Thanks for the guide.


Attachments

  • 20191002_154447.jpg
    20191002_154447.jpg
    559.3 KB · Views: 35
Resurrecting this old beast. Has anybody tried using a commercial sixtel in one of these with a sanky on top? How much head space did you leave for the corny?
 
Resurrecting this old beast. Has anybody tried using a commercial sixtel in one of these with a sanky on top? How much head space did you leave for the corny?

I just measured with a ball lock corny keg inside. There is 2 3/4 inches left over from the top of the corny keg to the top of the cooler edge. The cooler top that screws on is slightly recessed in the middle of the cover, so you may gain a little room there as well. Hope this helps.....

John
 
Back
Top