Opinions Needed On My Electric Brewery Plans

Homebrew Talk - Beer, Wine, Mead, & Cider Brewing Discussion Forum

Help Support Homebrew Talk - Beer, Wine, Mead, & Cider Brewing Discussion Forum:

This site may earn a commission from merchant affiliate links, including eBay, Amazon, and others.

raskal

Well-Known Member
Joined
Jan 31, 2011
Messages
45
Reaction score
4
Location
Princeton
Hello All,

so after doing many stovetop 5 gallon batches, with good response, I thought it would be a great idea to brew all the beer for my upcoming wedding. In retrospect it would most likely be easier/cheaper to buy it but where is the fun in that.

Over the past couple of months I have been planning and acquiring the hardware for the liquid process, now Id like to bounce ideas off of the experts here for the control panel and setup.


What I have is:

A 5ft SS Prep Table
~13 Gallon "Keggle" HLT with Thermometer and sight glass
~55? qt Cooler as a Mashtun
15.5 Gal Keggle BK
1 March Pump
CF Wort Chiller
All of quick disconnects

You can see the components here:

http://www.brewmunity.com/home/75-travis-cozzie/photos/photo?albumid=13#photoid=44

So my plan is to heat in the HLT, Pump to MT, Batch Sparge, Pump to BK, Cool to fermenter.

My questions are:

I can already see how I will benefit from another pump, but is it absolutely necessary? I could lift the runnings into the BK.

My plan was to have 2 5500W elements, one for HLT, one for BK, I would also like to control the pump, an exhaust fan and have a timer in the control box, I'm still researching but off the top of anyones head do they know a diagram that fits that bill?


My plan is to wire in a spa panel, that can be plugged into my dryer outlet. I will also have hard water lines plumbed to the table location, and an exhaust fan overhead. With the ultimate goal of having a quick disconnect for power, and water, and the ability to move the table if needed.

Lastly, being so close to the project, with a new set of eyes am I missing anything?

TIA for all your help!

Travis
 
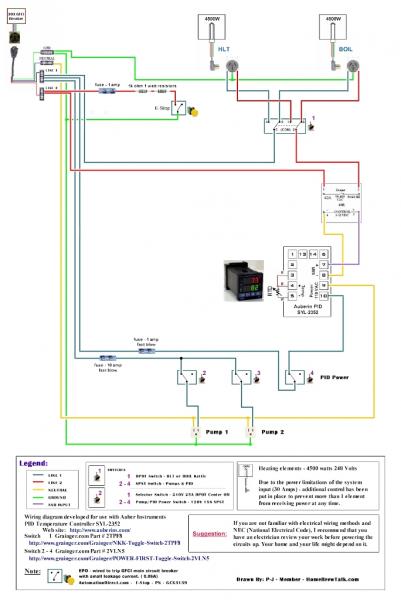
That sounds pretty much like the system I just got done building. I used this diagram from P-J, you would just need to add a timer to it. As for having an extra pump, I only have one right now and it is working out for me but it would be nice to have another one so that I could start fly sparging.

Auberin-wiring1-a4-4500w-30g-e-stop-s.jpg
 
If you plan to batch sparge, you really don't need more than just the one pump. What do you mean by "lift the runnings to the BK"? Pump the sparge water into the MLT, them pump the runnings into the BK. Rinse/repeat if you're doing two sparges.
I'm getting about 80-85% efficiency batch sparging, I'm never going back to fly sparging.
 
The only major advantage to having two pumps, that I can see, is the ability to continuous or fly Sparge. I have a single tier set up similar to yours, only it's not electric, and I only use one March pump. I haven't seen too many reasons to get more than one pump for now, doesn't seem worth the money.
 
. I used this diagram from P-J, you would just need to add a timer to it.

Do you have the full size of that one?

Have you started building it? Any Idea on overall cost?


Regarding the control box, im very novice with electricity. Is is possible to add in a couple 120V outlets for the fan or some other receptacle , in addition to the pump? I would assume its just adding some more connections and fitting it into the project box.


And My mistake on that last part, I would pump from MT to BK. I guess Ill keep an eye out and if I can find a good deal that would be great, if not its not a big deal.
 
I do have the full sized one but I think it is on my computer at home. I just finished building mine this weekend. I'm not sure how much it cost me in total but I tried to keep it pretty cheap.

Here is my build, I'll put up some more pictures and some of the parts I used when I get home from work tonight.

You can add as many 120v outlets to your control panel as you want as long as you keep in mind how much current each additional item will be consuming. i.e. I run a 5500w element so that alone will draw around 23 amps and I am on a 30 amp circuit so everything else plugged into my control box shouldn't pull more than 2-3 amps combined to be safe.

As for the pump issue, I would say that batch sparging has worked just fine for me, and one pump works well for that. Due to my pumps capacity and needing to run my sparge very slowly I think fly sparging would improve my process. Either way works just fine, you will just have to see what you think will work best for you.:mug:

Edit:Here is a bigger version of that diagram without the e-stop circuit
Auberin-wiring1-a4-4500w-30c.jpg
 
/\ Thanks! That does look alot like what im going for. Cant wait to see some additional pictures and thanks in advance for uploading those docs.
 
Subscribed because this sounds exactly like my setup, check out the link in my sig. Just realized I don’t have a wiring diagram on my link, but I am using the same as omockler. 25A DPDT switch to make sure only one element fires at a time.

I originally planned on going with only one pump but I scored a good deal on chugger pumps so I went with 2. I don’t plan on fly sparging but I figure the extra pump will be used for recirculating to optimized heat exchanging: recirc HLT water to agitate water around the HEX, and recirc BK wort to agitate wort around immersion chiller. An extra pump is also good to have around in case you have issues with the first. I plan on leaving the HEX/immersion chiller disconnected so I can use the same coil in the HLT/BK.

I am working on my control panel this week so I should have some significant updates. Plan is to be up and ready to brew the last weekend of April.
 
Does anyone have any opinion on 4500/5500W heaters? How much time difference are we talking vs the extra power usage?
 
I don’t have any personal experience, but I have seen people on here and other places that use 4500 watt elements for 10 gallon brews. With that being said, I would go with 5500 if you are planning on only needing to run one element at a time, especially if you have a 30 or 40 amp circuit. A 30 or 40 amp circuit will allow only one element running at the same time for either 4500 or 5500 watts, and the cost between the two are not very different.

The only time I can see using 4500 watt elements is if you have a 50 amp circuit and want to run them both at the same time (back to back batches or if you want to get a jump on the boil during sparging).
 
Gotcha, didnt know if there was any major power difference in terms of other things hooked into the control panel. Id like to go with the biggest element possible. For my setup, one at a time is sufficient.
 
raskal,

You asked for a diagram with 5500W elements and a timer.

(The fan that you speak of - If it's a window fan, it is not a good idea to run it from the controller. Just plug it into another outlet in the room.)

How about this drawing?

As usual - click on the image for a full scale diagram printable on Tabloid Paper (11" x 17")

 
raskal,

You asked for a diagram with 5500W elements and a timer.

(The fan that you speak of - If it's a window fan, it is not a good idea to run it from the controller. Just plug it into another outlet in the room.)

You are AWESOME.:mug:

I have a good friend who owns a HVAC company. Im thinking of a sheet metal hood with ( knowing him) some sort of overkill ventilation fan. Since it will be in the basement im hoping to keep the moisture down. I plan to plumb that into my dryer vent tube with a flapper to close it off when not in use. That way I can use existing duct work to vent outside the house.

I'd like to keep everything central on a panel, is there a reason why I would not want to add that in there, or is it just a space/wiring issue?
 
Yea, go with 5500W then if you haven’t purchased them yet, I don’t think you’ll be disappointed. Your dryer outlet is 30A I assume? 5500W will pull 25A, and then you will have some room for your 110 items (pumps, PID, etc).

I just found a table, at the bottom of page of this link: http://www.brewmation.com/Panels.html.

10 gallons from 70F to 160F, it says 4500W will take 34 minutes, and 5500W will take 27 minutes. So not a huge difference, but will probably save you 15-20 minutes over the course of Mash/Sparge/Boil heating.

I threw around the idea of possible running my circuit for 50 amps and being able to do two batches at the same time, but decided that the extra costs and hassle to go 50 amps wasn’t really worth it. If I want to do a double batch, I will just pull out my dusty propane burner to heat the second batches mash/sparge water while the first batch is boiling. The second batch will be ‘off the grid’ and there will be no I/O from my PID until the first boil is done. I’ll probably time it so that I wont need temp control, just let the cooler MLT hold the second batch mash/sparge temps for the hour or so during boiling of the first batch. Then temporarily turn off the BK element, drain batch 1 to fermentor, drain batch 2 mash/sparge to BK, and fire the element back up with the same PID settings to finish Batch 2's boil.
 
It is a current draw issue. If you push the 30A limit delivered to the controller, you would need to step up to a 40A or 50A power. With that you cost to build will jump up very fast. You would have to provide a new power source as the dryer outlet will not provide the current needed. Next, once you go to a source over 30A, you need to provide circuit breaker protection within the controller. This part also jumps your cost rapidly.

Hope this makes sense.
 
/\ It does. Perhaps I can do a separate 110 panel on another circuit for misc items like the fan, light, ect. my plan is to have everything contained, and also be able to be moved if/when I sell the house.

Regarding a double batch, I dont see myself doing that so running single 5500's seems like the best bet.

If your control panel is large enough to mount a duplex outlet in it with a second power inlet cord for 120V from a different wall outlet, just treat it within the panel as a totally seperate circuit and control the duplex outlet as 2 seperate outlets with 2 switches.

Problem solved.
 
P-J: I have a question regarding the stepped-down breaker protection within the control panel. If you or a mod feels this is off topic to this thread, please feel free to answer in my build thread (see sig link below).

If I have a 40 amp circuit, would I need to run all 8 gauge wire in the control panel (other than fused runs such as PID/Pumps/E-Stop) if I wanted to avoid putting in separate circuit protection?

And will I be okay if my connections (switches, terminal blocks, etc.) are not rated to 40 amps?

I feel like the answer to the second question is no, and that I should just put in separate protection for this reason as well as ease of wiring, but I just wanted to get your thoughts on 40 amp service since everyone is usually using either 30A or 50A.

What fuses/circuit breakers do you recommend for installing in the control panel? If this is too much of a pain, I may just replace the main breaker with a 30 amp one and be done with it. I didn’t want to limit the amperage since I got a good deal on 6 gauge (albeit aluminum) wiring from the breaker to the garage.
 
kpr121

With a 30A 240V feed, the elements would normally be powered with a 30A circuit. I also illustrate seperate fusing for the low power 120V devices within the controller. For a 40A or 50A feed you must provide circuit protection within your controller. Fuses for 120V devices are A-Ok. IMHO, the 240V devices must be protected with circuit breakers so that both of the 240V lines are interupted together. It is not just about protecting the wire. It is also very much about protecting the devices involved and you.

Automation Direct is a source for 25A - 240V DIN breakers: Double_Pole - WMZS2B25
And 15A - 120V DIN breakers: Single_Pole - WMZS1B15
Here are the rails: Rails - DN-R35S1-2

Hope this makes sense.
 
Now i'm not too familiar with PID's but I assume they control one "set of equipment" So would I use something like this http://www.auberins.com/index.php?main_page=product_info&cPath=1&products_id=14 If I just wanted to know the temp in the MT? ( no control needed)

One one hand, I could just toss a floating thermometer in there, and open to check, if its low, Ill need to open it anyway. If its high, again Ill have to open it.

Do you think the heat loss from checking is enough of an issue to justify another display and wiring in the control box?
 
I believe that there is no need for temp monitoring in the mash tun as you are using an insulated cooler for the mash. When you doe in and vigorously stir the mash, you check the temp to make sure you are at your proper temp. You then close it up and let it sit.
Don't open it until your mash time is complete. That's it.
 
kpr121

With a 30A 240V feed, the elements would normally be powered with a 30A circuit. I also illustrate seperate fusing for the low power 120V devices within the controller. For a 40A or 50A feed you must provide circuit protection within your controller. Fuses for 120V devices are A-Ok. IMHO, the 240V devices must be protected with circuit breakers so that both of the 240V lines are interupted together. It is not just about protecting the wire. It is also very much about protecting the devices involved and you.

Automation Direct is a source for 25A - 240V DIN breakers: Double_Pole - WMZS2B25
And 15A - 120V DIN breakers: Single_Pole - WMZS1B15
Here are the rails: Rails - DN-R35S1-2

Hope this makes sense.

Thanks P-J, it does make sense. I think I will just replace the main breaker. I am going to move any further discussion over to my build thread to avoid any more OT talk here.

Now i'm not too familiar with PID's but I assume they control one "set of equipment" So would I use something like this http://www.auberins.com/index.php?main_page=product_info&cPath=1&products_id=14 If I just wanted to know the temp in the MT? ( no control needed)

One one hand, I could just toss a floating thermometer in there, and open to check, if its low, Ill need to open it anyway. If its high, again Ill have to open it.

Do you think the heat loss from checking is enough of an issue to justify another display and wiring in the control box?

I don’t think the heat loss from checking the temp is a good enough justification, but I also don’t think you need a justification if you want to have digital temp readout. I am adding a temperature readout to my control panel, it will be connected to a RTD in the BK vessel wall to spit out pre-boil/chill temps. The RTD connected to the PID for mash/sparge is going to be in the outlet of my HEX. Pump will always be running to keep a consistent temperature. I dont plan on having a temp readout in the mash tun.
 
So I might as well make this my build thread also.

Started out by finding a SS prep table on Craigs. Did some research and thinking and found that for the price a SS table would fit my needs better than a wood or metal structure. With built in locking casters, lower shelf and back splash this table fit the bill.

After I got it home, it smelled strongly of gyros:drunk: - So a mixture of baking soda and water and a pressure washer was used to remove the gunk.

table1.jpg

table2.jpg


Then I was able to get it assembled into its new basement home.
table3.jpg


You can see the CFC and water filter / valve setup on the bottom shelf, those will be mounted along with the march pump later in the process.


Up next: Plumb the water lines. Im going to run hard lines to a faucet/quick disconnect so only a small amount of hose will be needed to hook water into the system.
 
Well making some progress,

Got some materials together
Picture-039.jpg


First we took down the insulation in the basement
Picture-040.jpg


Something to work with now
Picture-041.jpg


Tapping into a cold line, no turning back now!

Picture-042.jpg


Valve installed
Picture-043.jpg


Support Wall in, This will support the future hard line for water, electrical and i'll mount the control box to it

Picture-044.jpg


I'll hopefully have that buttoned up this weekend and start on the electrical side.
 
So I'm working on how I want to do my elements. Ive obviously seen Kals, but I was thinking about going with a tri-clamp.

I've read this thread

https://www.homebrewtalk.com/f170/triclamp-heater-element-design-217575/#post2574035

And If I understand correctly the steps would be:

Punch hole in keg, weld in 2" TC fitting. Then get another 2" TC with a 1" NPT fitting for the element

http://www.brewershardware.com/2-Tri-Clover-X-1-Female-NPT.html

Then screw it all together and add a junction box. Am I on the right track?


Also any reason I should/ shouldnt use this?
http://www.hillbillystills.com/Heating_Element_plate_p/hecp.htm

Why not just have the long ferrule welded in the kettle:
http://www.brewershardware.com/1.5-Tri-Clover-Ferrule-Long.html

then use this instead of constructing some kind of box.
http://www.brewershardware.com/TC15F10NPSCOV.html

Anyways, that is what I just ordered to install my elements in BK and HLT. Your way just seems like a lot of extra work unless you are trying to save on the cost of the NPS element adapter. The benefit with that adapter is the threads will be correct for any element you use (NPS vs NPT).
 
Why not just have the long ferrule welded in the

Anyways, that is what I just ordered to install my elements in BK and HLT. Your way just seems like a lot of extra work unless you are trying to save on the cost of the NPS element adapter. The benefit with that adapter is the threads will be correct for any element you use (NPS vs NPT).

Yea Ive seen that a couple times, it seems a bit pricy, and I saw one thread that questioned its ability to keep water out.:confused: Id love to see some pictures once you get it, as it seems tailor made for this application. And by time I make everything the cost might be negligible, not sure yet. I haven't seen that adapter in use so I look forward to it

This seems like it may be a decent way to go also
http://www.stilldragon.com/element-guard-kit.html

I already have 1 of them from the RIMS tube. It is HIGH quality and constructed just for this purpose. I don't see how it could possibly leak. It has NPS threads so it fits correct instead of NPT threads. Add a little teflon tape and it will never leak. Can also add high temp food grade silicone to protect the tip and create a seal as well(double protection and rust protection).

I've been going in circles for a month as well until I decided on this. The cost ended up being negligible after all was said and done including time spent.

It will be several weeks before I get the 2 new ones I have on order welded in. I'll be sure to come back and post pictures but I am fairly certain it will work great.
 
Thanks for passing that along, I think you may be correct. So then you just weld in a short 1.5" to the keg and you're good to go? I need to get my hands on that 5500W element to see how it would fit, Im guessing with a little squeeze it would go right through that 1.5" TC.
 
Thanks for passing that along, I think you may be correct. So then you just weld in a short 1.5" to the keg and you're good to go? I need to get my hands on that 5500W element to see how it would fit, Im guessing with a little squeeze it would go right through that 1.5" TC.

I went with the LONG ferrule. I read in some other threads that a short one can be more difficult to weld as you need it far enough away to put on the clamp.

I am using straight folding elements though. this entire thing doesn't necessary work well with the Rippled ones. i don't see a difference between the two really. I just got the fold back version of the ones Kal uses.

You can always go for the 2" TRI CLover Ferrule and 2" Tri Clover element adapter but it is custom build and costs even more. 1.5" seems to work fine for straight elements.

EDIT: thanks for the link Raskal I had not even saw that. Seems like he is VERY happy. From what I have seen of the element adapter on my RIMS tube it is as awesome as he says and should work well and be safe and clean install.

here is the elements i ordered. they make 5500watt versions too. http://www.amazon.com/gp/product/B0002YUDSI/?tag=skimlinks_replacement-20
 
Last edited by a moderator:
Some good into and pictures here

https://www.homebrewtalk.com/f170/long-vs-short-tri-clamp-ferrule-314797/

I tried to use the Camco 02963 (5500W) ripple element with the Brewer's Hardware 1.5" Tri Clover X 1" NPS Element Adapter and it doesn't fit. It's not an issue with the ferrule but the adapter. I have both a long and short ferrule but before I even get to the ferrule, the ripple element gets stuck.

It seems like it's real close and possibly could work with a little bending of the element but I'll probably go with a straight element.
 
Well, the order is in:
1.5" Tri Clover Ferrule - Long
1"/1.5" Tri Clover Clamp
1.5" Tri Clover X 1" NPS Element Adapter
1.5" Tri Clover Gasket Silicone

and 2 of the straight amazon elements.
 
Well, the order is in:
1.5" Tri Clover Ferrule - Long
1"/1.5" Tri Clover Clamp
1.5" Tri Clover X 1" NPS Element Adapter
1.5" Tri Clover Gasket Silicone

and 2 of the straight amazon elements.

Looks like you and I are destined to succeed or fail together on this one. My order was for the exact same. :)
 
Back
Top