New Wort Chiller!!! - What do you think?

Homebrew Talk - Beer, Wine, Mead, & Cider Brewing Discussion Forum

Help Support Homebrew Talk - Beer, Wine, Mead, & Cider Brewing Discussion Forum:

This site may earn a commission from merchant affiliate links, including eBay, Amazon, and others.

abartoe

Member
Joined
Oct 22, 2013
Messages
8
Reaction score
6
I finished a project today and thought I would get some feedback. My new wort chiller:
50' - 1/2"
9 1/2" coil height
11" coil diameter
2 separate coils with flow in opposite directions as well as one being fed from the top and one from the bottom.
In the background is my old 50' - 3/8" double coil wort chiller that is now going to be my pre-chiller!
If you can't see the images. Here are the links:
https://drive.google.com/open?id=0B6tEnFJ-LUqKZG50d2p3VHNMTEk
https://drive.google.com/open?id=0B6tEnFJ-LUqKbWxiZlZpZ2lqLXM
https://drive.google.com/open?id=0B6tEnFJ-LUqKRTRVRC1PdnR5dUk

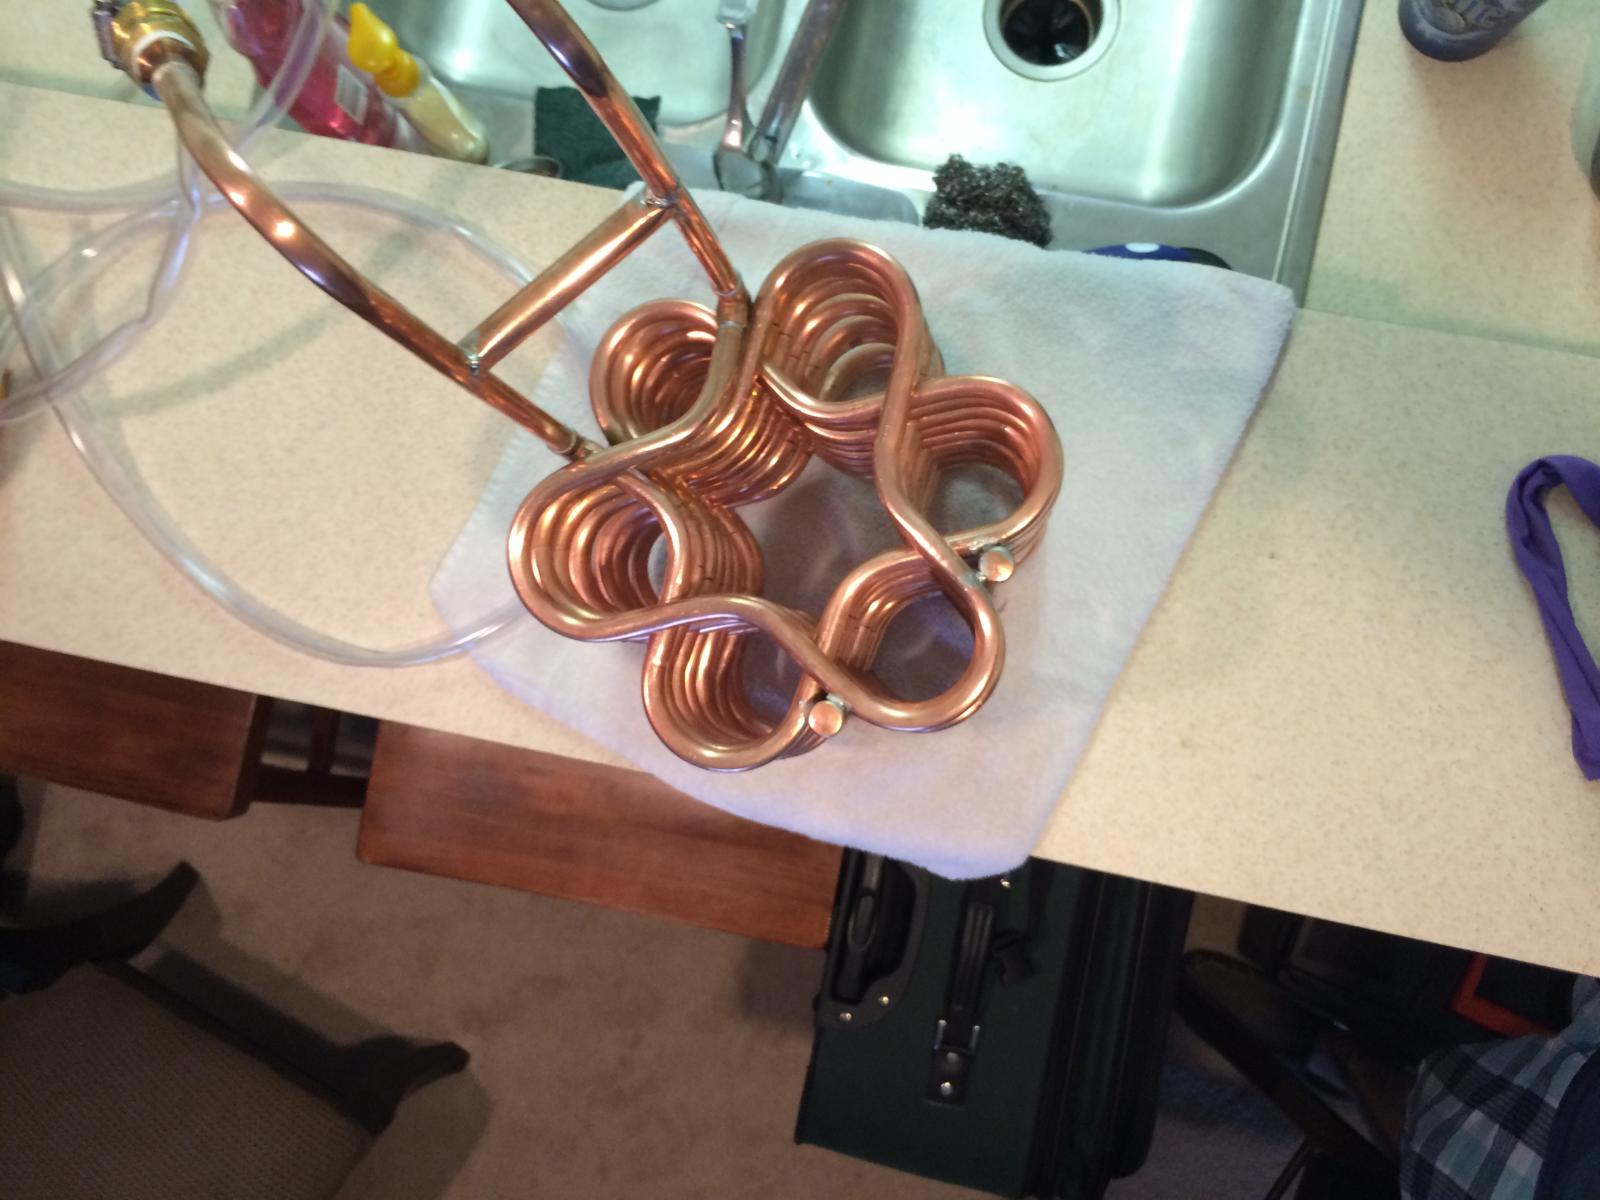
IMG_1274.jpg


IMG_1275.jpg


IMG_1273.jpg
 
I finished a project today and thought I would get some feedback. My new wort chiller:
50' - 1/2"
9 1/2" coil height
11" coil diameter
2 separate coils with flow in opposite directions as well as one being fed from the top and one from the bottom.
In the background is my old 50' - 3/8" double coil wort chiller that is now going to be my pre-chiller!
If you can't see the images. Here are the links:
https://drive.google.com/open?id=0B6tEnFJ-LUqKZG50d2p3VHNMTEk
https://drive.google.com/open?id=0B6tEnFJ-LUqKbWxiZlZpZ2lqLXM
https://drive.google.com/open?id=0B6tEnFJ-LUqKRTRVRC1PdnR5dUk

That is a thing of beauty! You have some serious bending skills! I expect that it will be very effective.

Brew on :mug:
 
I am planning on recording the first run, I hope to get some good times. The main reason I built it the way I did is because I have a nice cool 80-degree tap water, and that doesn't lend itself to making lagers....
 
Wow, I can think of a few other words but the forum software should keep me from posting them. Don't worry they are all good.
Awesome.
 
That is a thing of beauty. I wonder did you have a fixed mandrel with three "pipes" attached? I just built my second wort chiller, 40' of 3/8 I.D. tubing, and I designed it to use in a BK 40 quarts or larger. My first IC I named Frankenchiller as it is a very ugly forty-three feet 1/2" dual pass ribcage design, and the soldering is water tight but not pretty. I failed to plan ahead what I would use for a form, and I ended up with a chunk of sonotube as a mandrel. It didn't occur to me at the time that my 30 qt pot is tall and narrow, and my 40qt is much more squatty, leaving me with a coil sticking up out over the wort with half of the height useless in the air.When cooling the 30qt pot full of wort, temperature changes quickly due to the design I built by accident.Due to the fact the coil is a dual pass with two separate inputs and only one water supply back outshines the versions being split at both the top and bottom, and when it was in first mode; both coils are fed from the bottom to eliminate steam bubbles from being caught below. I don't have the time specs but remarked how fast the wort cooled in the 30qt kettle. With the frankenchiller resting in a 30 qt pot with slow water running through, I remember the temperature dropped very fast even with very little water flow. I am considering using my frankenchiller as a pre chiller w/o a pump.Cool as low as possible with tap water, and then connect the tap water to the pre chiller coil going straight through both units to ready the wort to be pitched.
 
I will be more than happy to share my drawings, measurements, parts list, and tidbits learned...

that would be awesome... looks like I need to make some sort of welded jig to do the bends? Looking forward to seeing the plans.
thanks,
Bob
 
Not sure if that's something out of Walter White's meth lab, or a legit piece of brewing equipment. :confused: Just kidding! :D Looks good. Be sure and give us some feedback on how it works out for you.
 
Here is one of my drawings, it has the parts list written on it, the bender used, and the measurements. Basically it is a repetition of a 180 degree bend, 1.875" of straight tubing, 60 degree bend, 1.875" of straight tubing, etc...The two inputs and output are either just before or just after the 60 degree bend, so that the tubing points to the outside of the chiller. I created 2 seperate coils that were at least 8 complete turns, and then if necessary added bends until the end of the coil was in the proper position. Once the coils are formed they are threaded together (by twisting until the open ends of the tubes were in the appropriate places. I used 6 pieces of 2" SCH40 PVC, slid through the openings, strictly as a guide to help hold form while I compressed the coils. I compressed the coils using parachute chord wrapped around the crossover points (between the PVC guides) and sequentially tightened and tied off until I achieved the coil height I wanted. I then made final adjustments to position and length of open ends of tubing to accommodate the fittings and section of tubing between the T and the elbow. Next I stabilized the coil by measuring coil height, and cutting 1/2" copper pipe to length, capping both ends and soldering to coils on the opposite side of the input and output. Finally, I added the uprights, 120 degree bends, pipe fittings and garden hose adapters. The horizontal brace was made with a left over piece of 1/2" pipe, and soldered in place. Cleanup consisted of soaking in ammonia solution, and scrubbing with steel wool, followed by soaking in vinegar and scrubbing with steel wool, finally rinse with water, dry and test.

Sorry the image is rotated...it is correct on my computer....

IMG_1290.jpg
 
I am planning on recording the first run, I hope to get some good times. The main reason I built it the way I did is because I have a nice cool 80-degree tap water, and that doesn't lend itself to making lagers....

Looks very cool, but I'm it's not going to help you make lagers. It won't get your water cooler than your tap water (80F). Without ice, no chiller can do that.

Chill to 80F, put in whatever you use for temp control, get it down to 50F, then pitch your yeast. That's what I do. I'm drinking a tasty lagered beverage atm.
 
It has been a while now since I have built this chiller, and had a chance to brew. Yesterday, I brewed a red IPA and FINALLY used this chiller. This thing is amazing! Here are the numbers you all asked for!

Tap water temp - 85 degrees.
Chiller - 50' - 1/2" two coils independently feed and interlaced, feed opposite of each other (one from the top, one from the bottom, with flow directions also opposite one clockwise, one counter-clockwise)
Pre-chiller - 50' 3/8" single feed stacked double coil.
Ice - 25-30lbs.
Time - 12 minutes exactly.

I brought 5.5 gallons from a boil to 72 degrees in 12 minutes exactly. I realized after we were a few minutes in that shaking the pre-chiller as well as the primary chiller helps improve the chilling capability. It worked great! I used about 25-30 pounds of ice, therefore, if I am doing a lager, I will need to use more, and I could probably decrease the amount of ice, by using the tap water to pull the temp down initially, then add the ice to the pre-chiller to reach my goal. I also have the idea of a whirlpooler in the future, definitely will save me the hassle of shaking the chiller.

Right, you want both the chilling water AND the hot wort moving. That's what a counterflow chiller (CFC) does. The chillzilla and the plate chiller are both CFC's, in different shapes. CFC's typically use a pump. I use two pumps: one to push cold poolwater for the chilling, the other to circulate the wort.
 
Nice work. That's a lot of ice you're having to throw at it though--25-30 lbs is not insignificant, depending on how much you have to pay for ice. For me it would be over 10 EU. No way I'm doing that.

I use my immersion chiller until the tap water and the wort seem to have stabilized, then transfer to the fermenter and set it inside the large chest freezer to drop down to my desired pitching temp. It takes a few extra minutes, but hey, I get to enjoy a homebrew and write to all of you people while I'm waiting. :mug:

Speaking of the deep freezer, if you have one, they can be invaluable for freezing ice bottles to help offset some of the costs for bagged ice.

Great work on the chiller!

Cheers,
Dan
 
Or find some 1 gallon buckets and freeze two of those. And let the tap water get you down to 100*(f) first. Not much benefit in using ice before that.
 
Back
Top