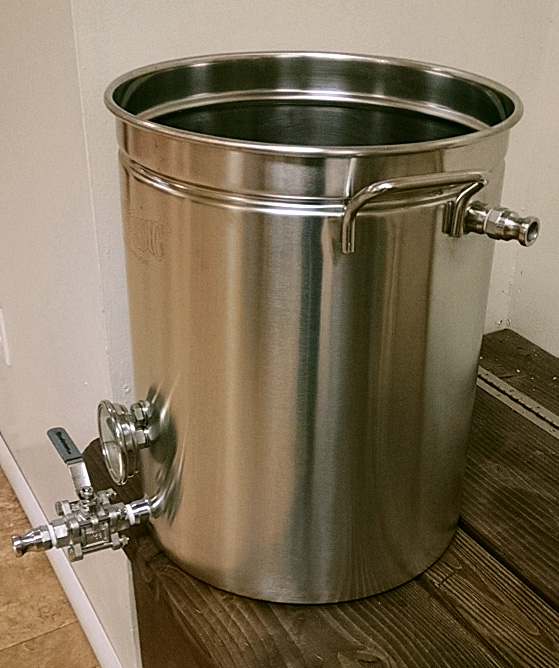
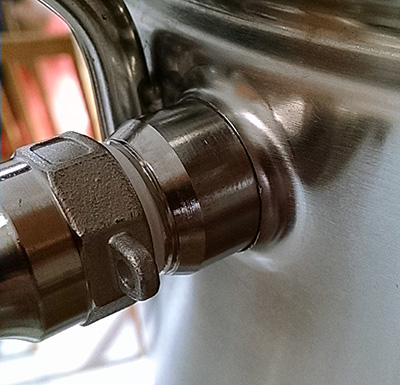
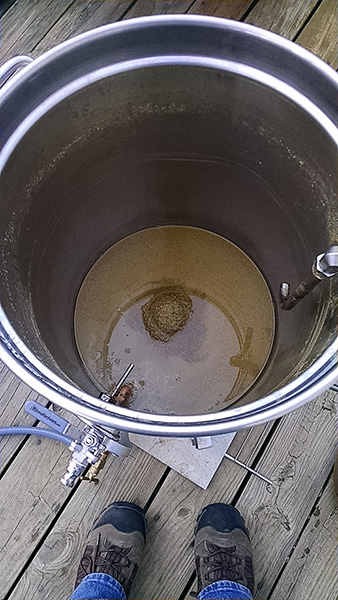
It's difficult to rate how challenging or easy the soldering jobs are due to personal skill levels. In the spectrum of items I've soldered to a kettle, these rate the absolute easiest while the 1.5" TC flange is the trickiest.
You are using an out of date browser. It may not display this or other websites correctly.
You should upgrade or use an alternative browser.
You should upgrade or use an alternative browser.
New take on dimpling, silver solder bulkheads?
- Thread starter Bobby_M
- Start date

Help Support Homebrew Talk - Beer, Wine, Mead, & Cider Brewing Discussion Forum:
This site may earn a commission from merchant affiliate
links, including eBay, Amazon, and others.
USAFSooner
Well-Known Member
Concur with the above. Dimpling and soldering a 1/2 coupling is pretty simple but the Triclover Ferrule took a bit more skill. I had the Mrs heat the fitting with the MAPP torch while I added the solder. Use the technique in Bobby's video to hold the fitting in place and try to secure the pot as well and you'll be fine.
View attachment ImageUploadedByHome Brew1424050870.007668.jpg
View attachment ImageUploadedByHome Brew1424050870.007668.jpg
p40whk
Well-Known Member
- Joined
- Sep 23, 2013
- Messages
- 131
- Reaction score
- 11
Bobby,
If I gave you a diagram of the layout I'm trying to put together would it be possible for you to recommend a fitting setup?
I'm still waiting for the dimpling fitting to show up on the website but wanted to get as much of the supplies I need for my first order.
I'm looking at a HERMS system and using Camlock fittings with 2 chugger pumps.
Thanks
I'm always willing to help when I can squeeze it into my day. Send it over to my email address.
USAFSooner
Well-Known Member
I just got done setting up the same thing. Be prepared to buy a lot of full couplers, ball valves, close nipples, and camlocks. I'd buy two spools of silver solder as well. I had the best luck when I put four coils around each fitting prior to soldering.
Just plan it out one vessel and pump at a time. Draw it out and check and recheck your parts counts.
Make a list of your requirements up front such as:
* Do you want whirlpool ports in the HLT and Boil Kettle?
* What sort of sparge/mash return line do you want? (I recommend Bobby's Loc Line kit)
* How many hoses do you need? (I needed 5. 3x 4' and 2x 6')
* What about temp and level monitoring?
p40whk
Well-Known Member
- Joined
- Sep 23, 2013
- Messages
- 131
- Reaction score
- 11
I just got done setting up the same thing. Be prepared to buy a lot of full couplers, ball valves, close nipples, and camlocks. I'd buy two spools of silver solder as well. I had the best luck when I put four coils around each fitting prior to soldering.
Just plan it out one vessel and pump at a time. Draw it out and check and recheck your parts counts.
Make a list of your requirements up front such as:
* Do you want whirlpool ports in the HLT and Boil Kettle?
* What sort of sparge/mash return line do you want? (I recommend Bobby's Loc Line kit)
* How many hoses do you need? (I needed 5. 3x 4' and 2x 6')
* What about temp and level monitoring?
All good questions. I've drawn it out a couple of times "roughly" but I guess I really need to make a solid attempt at it. I am going from 5 gallon extract brewing right into an all grain 10 Gallon HERMS system so I'm taking my time and researching everything.
Right now I have the 2-80 quart stainless pots to use for an HLT and boil kettle. I have a 72 Quart Coleman Extreme cooler for a mash tun with a long mesh screen in the bottom. I already have three 3-piece ball valves from an older setup and most of the fittings for those but was waiting on these Dimple/solder fittings to be available before I ordered the rest.
I'll start another post to sort out my shopping list so we don't hijack this thread.
The_Bishop
Well-Known Member
- Joined
- Dec 8, 2013
- Messages
- 2,100
- Reaction score
- 676
Any news on the availability of these? I'm looking to use them to replace the weldless kettle valve I have and to add a whirlpool port to my kettle.
The factory machines are humming. Now we wait.
Any news on these? They look awesome.
p40whk
Well-Known Member
- Joined
- Sep 23, 2013
- Messages
- 131
- Reaction score
- 11
Bobby,
Quick question, I couldn't tell from the video and didn't see a post that mentions it but with these be available with both the MPT and FPT thread option?
Edit: I see the first post in the thread shows these with Female Threads near the back but that wouldn't work if you wanted to just screw in a Temp Probe. I'm still drawing up my HERMs setup and trying to configure my pots so this will determine if I buy Type A or Type F Camlock fittings and an adaptor to screw my temp probe in.
The_Bishop
Well-Known Member
- Joined
- Dec 8, 2013
- Messages
- 2,100
- Reaction score
- 676
Having just gotten my shipment in, and discovering that Bobby is a 20-mile-stone's-throw from home, I have a quick review.
These things are incredible. It took longer to tear down the kettle and clean it afterwards than it did to solder these in. Get the install tool. It's worth every penny! It made the install very, very easy.
I soldered these with a mapp gas torch, from the outside and focusing most of the heat on the fitting.
Tested with water, the whirlpool action was perfect. This will be great for chilling and whirlpooling the trub to the center of the kettle.
Bobby, thanks for the great hardware and the great service!


p40whk
Well-Known Member
- Joined
- Sep 23, 2013
- Messages
- 131
- Reaction score
- 11
Having just gotten my shipment in, and discovering that Bobby is a 20-mile-stone's-throw from home, I have a quick review.
These things are incredible. It took longer to tear down the kettle and clean it afterwards than it did to solder these in. Get the install tool. It's worth every penny! It made the install very, very easy.
I soldered these with a mapp gas torch, from the outside and focusing most of the heat on the fitting.
Tested with water, the whirlpool action was perfect. This will be great for chilling and whirlpooling the trub to the center of the kettle.
Bobby, thanks for the great hardware and the great service!
Looks fantastic! I have been waiting for these to become available and was surprised by this post. Went to the website and found them at the bottom of the NPT fitting page.
Just placed my order to upgrade my new pots and set up my HERMs system. Chugger Pumps put a dent in my wallet but I'm looking forward to the clean camlock system.
One thing I had a hard time figuring out from Bobby's website was how to order the Whirlpool setup using these fittings? The Whirlpool kit he sells is for a Weldless setup so I just bought the drop tube and a 90 degree elbow (M/F). After looking at yours I may need a M/M elbow instead? What parts did you order for that?
The_Bishop
Well-Known Member
- Joined
- Dec 8, 2013
- Messages
- 2,100
- Reaction score
- 676
Thanks!
My whirlpool setup was pieced together. It's one of the silver solder bulkhead fittings, a 90 degree 1/2" pipe to 1/2" compression fitting, and a 1/2 o.d. racking cane cut to length. I used the 90* compression fitting to keep the arm as close to the side of my kettle as possible.
My whirlpool setup was pieced together. It's one of the silver solder bulkhead fittings, a 90 degree 1/2" pipe to 1/2" compression fitting, and a 1/2 o.d. racking cane cut to length. I used the 90* compression fitting to keep the arm as close to the side of my kettle as possible.
p40whk
Well-Known Member
- Joined
- Sep 23, 2013
- Messages
- 131
- Reaction score
- 11
Thanks!
My whirlpool setup was pieced together. It's one of the silver solder bulkhead fittings, a 90 degree 1/2" pipe to 1/2" compression fitting, and a 1/2 o.d. racking cane cut to length. I used the 90* compression fitting to keep the arm as close to the side of my kettle as possible.
:smack: Didn't see the 90 degree compression fitting sigh... Well, since he was out of the Big-C camlocks I'll add that to the order once those come in.
Thanks for describing your setup. Makes sense to do it that way.
JKoravos
Well-Known Member
Great product. I don't know what else to say other than you should charge more for it! $7?! You have to be kidding me! 
jdonkey123
New Member
- Joined
- Mar 19, 2015
- Messages
- 1
- Reaction score
- 0
Any advantage to using the new pull though part for a welded bulkhead if I've got a competent welder lined up to do the job or should I just stick with the NPT threaded?
Any advantage to using the new pull though part for a welded bulkhead if I've got a competent welder lined up to do the job or should I just stick with the NPT threaded?
I don't see any reason the fitting couldn't be welded in. I'm not sure the dimpling process would help all that much but the fitting itself saves you from having to use a separate nipple.
I've highlighted the important part of your post. This claim must be vetted.
MX1
Texas Ale Works
The way I'd see it done is to solder these in and then thread compression fittings on inside. Of course, there's always the possibility to make a similar fitting shape directly into the compression fitting.
For a HERMS coil install, could you install these "backwards" with he threads inside the pot and screw the compression fitting onto it?
then I guess a threaded coupler to attache the valves?
Tim
The_Bishop
Well-Known Member
- Joined
- Dec 8, 2013
- Messages
- 2,100
- Reaction score
- 676
You could, but the male end is a bit on the long side. Might intrude into the kettle too far.
The_Bishop
Well-Known Member
- Joined
- Dec 8, 2013
- Messages
- 2,100
- Reaction score
- 676
So, the whirlpool arm works well:


cyberbackpacker
Well-Known Member
How long are these from tip to tip? Thanks!
EJay
Well-Known Member
Bobby - I just installed mine today and I think I am going to be very happy. I heated from the inside (not sure what I was thinking there) but it still worked great. My solder job doesn't look quite as good as some of the other pics, but I've tested with water so far and no leaks.
I started with a 7/8 hole (because that's what was already there) and it was still a nice snug fit. I improvised an install tool from a bolt, washers, and some big impact sockets.
I started with a 7/8 hole (because that's what was already there) and it was still a nice snug fit. I improvised an install tool from a bolt, washers, and some big impact sockets.
Good to know the larger hole isn't an issue. I think 7/8" would be the largest. Otherwise you don't gets as much material dragged through.
- Joined
- Jun 12, 2014
- Messages
- 574
- Reaction score
- 191
Just finished putting together my lid mounted HERMs unit today. Turned out really nice. Had to order another $130 worth of hardware today because I didn't figure right.


That looks really freaking nice. How long did it take you to do all those bends
p40whk
Well-Known Member
- Joined
- Sep 23, 2013
- Messages
- 131
- Reaction score
- 11
That looks really freaking nice. How long did it take you to do all those bends
I wish I could take credit for bending that coil but it's the JaDed HERMs coil they sell. I had them add a little extra length onto the inlet and outlet tubes so that I could bend those upwards toward the lid and maintain the orientation as they are designed to use the standard mount through the side of the kettle.
When the lid is on, the coil sits about a 1/2 to 3/4 inch from the bottom of the kettle and fills up about 3/4 of the space inside so it should be very efficient.
My only concern is that it's made of 3/8 inch tubing rather than 1/2 inch and I'm worried about the flow since these bulkheads are based on 1/2 inch tube.
I can always change the coil if it proves to be too small, that's the beauty of building it yourself with Bobby's bulkheads.
- Joined
- Jun 12, 2014
- Messages
- 574
- Reaction score
- 191
I wish I could take credit for bending that coil but it's the JaDed HERMs coil they sell. I had them add a little extra length onto the inlet and outlet tubes so that I could bend those upwards toward the lid and maintain the orientation as they are designed to use the standard mount through the side of the kettle.
When the lid is on, the coil sits about a 1/2 to 3/4 inch from the bottom of the kettle and fills up about 3/4 of the space inside so it should be very efficient.
My only concern is that it's made of 3/8 inch tubing rather than 1/2 inch and I'm worried about the flow since these bulkheads are based on 1/2 inch tube.
I can always change the coil if it proves to be too small, that's the beauty of building it yourself with Bobby's bulkheads.
Ahh. I stick by my assertion. It looks freaking nice, even if you didn't bend it. Lol.
I built myself a version of their cleanable counterflow cooler using 3/8 copper. Flow is definitely an issue for me. I decided just yesterday to rebuild it with 1/2.
Even if that coil turns out to have flow restrictions, it should still work good for immersion chilling.
Last edited:
Similar threads
- Replies
- 7
- Views
- 2K
- Replies
- 6
- Views
- 851
- Replies
- 3
- Views
- 606
- Replies
- 0
- Views
- 713

