Need To Move My C02 Tank Outside the Fridge

Homebrew Talk - Beer, Wine, Mead, & Cider Brewing Discussion Forum

Help Support Homebrew Talk - Beer, Wine, Mead, & Cider Brewing Discussion Forum:

This site may earn a commission from merchant affiliate links, including eBay, Amazon, and others.

jakecpunut

Well-Known Member
Joined
Nov 29, 2009
Messages
442
Reaction score
8
Location
Mt. Airy "Mayberry", NC
Well the wife was kind enough to get me a high pressure hose for Christmas so now I need to drill a hole in the side of my Fridge.

I have a 10 lb C02 tank and a 3 gauge (soon to be 4) regulator and I struggle getting 3 cornies in there.. I want to be able to get 4 kegs in so the C02 tank has gotsta go!

I'm pretty sure from what I've read that the type refrigerator I have doesn't have any coils or anything in the sides, so that's the route I'll probably take.

Just thought I'd toss it out there for any comments or suggestions?

One thing I'm wondering about is where I should mount my gauges on the inside of the fridge... I'm thinking along the back wall..

anyways.. I did a video just to talk about what I'm doing and some other mess..

 
Last edited by a moderator:
Blindly drilling through a fridge wall can be a great way to create a big useless paperweight. If you're 100% certain there are no return lines in wall, then drill away. However many (if not most in my experience) have return lines on the sides.

One potentially easy solution would be to use the drain plug. There should be a hole inside the fridge that allows condensation to drain out into a drip tray. Sometimes you can remove the plug and have enough room to snake a CO2 line. No mess, no drilling, and a hidden gas line.

Otherwise, I always make a small hole from the inside out. Remove the plug of the plastic liner then chip away the foam insulation. If you make it all the way to the outside wall without finding a coolant line, you're good to go. If you find one while chipping the insulation away with a flat head, at least won't have done any damage and you can maneuver around the line and save yourself a ruined fridge. I have a short piece on making a kegerator that covers this here.

As for the Barley Crusher, don't hesitate - you'll love it. I took the plunge last year and I'm really happy...easy to motorize (I just use an electric drill).

As for the Duke shoes I have to say as an Indiana fan, those the most foul things I've even seen :) Your boys have helluva squad this year though. I'd say good luck, but after watching a few games I'm not sure you'll need it.

Awesome tips! Didn't even think about the drain hole but will chk that out for sure! And I'll be sure to go from the inside out!

Yeah I think tomorrow will be ordering day for the Barley Crusher, I've waited long enough haha..

Well.. At least you have to be a fan of the "General" and there's definitely a connection between Bob Knight and Coach K :)

Btw, I just realized the "high pressure hose" seen HERE is the wrong thing.

As you can see in the pic, it has the big brass nut on one end to screw onto the C02 tank when i take the regulators off, BUT, as you can also see in the pic, the other end of the high pressure hose needs to be female for the gauges to screw back on to the hose :(

Reckon I'll call Keg Connection tomorrow and see if there's an adapter or something?

If anyone has any suggestions on that I'd appreciate it!
 
Jake, You are like me, more idea's than time. The fridge it will have lines in the side. My idea is start from the inside doing your exploring hole once you are safe drill to the outside any mistakes can be fixied on the inside just don't hit the line. As far as the grain mill thats my next purchase also. Our homebrew store in Charlotte has a great deal, you buy our grain in bulk (usually half price than by the pound) they bank it, and you come in pickup your fresh grain as you need it no extra charge. I figure not paying for crushing and buying bulk the mill will pay for itself quickly. U Keepem straight up there in Mayberry.
 
Depending on the regulator you will need a rht or lht 1/4mpt to mfl adapter. I just hooked mine up on my kegerator. I was lucky enough to get a used high pressure line on eBay for $5, I also got 6 used regulators from the same seller for $20!
 
Jake, I made my hose fittings, I didn't have nothing fancy like in the video, works fine no leaks.
 
Jake, You are like me, more idea's than time. The fridge it will have lines in the side. My idea is start from the inside doing your exploring hole once you are safe drill to the outside any mistakes can be fixied on the inside just don't hit the line. As far as the grain mill thats my next purchase also. Our homebrew store in Charlotte has a great deal, you buy our grain in bulk (usually half price than by the pound) they bank it, and you come in pickup your fresh grain as you need it no extra charge. I figure not paying for crushing and buying bulk the mill will pay for itself quickly. U Keepem straight up there in Mayberry.

No doubt on the time!! Yeah I've been reading more since posting this and if I end up going through the side I will definitely start on the inside and take it slow! ha

Dang, wish our LHBS did that! That sounds like the way to go! I guess I'll buy 50 lb bags 2 row and a few pounds of some others and go from there. WHEN i find the time haha
 
Depending on the regulator you will need a rht or lht 1/4mpt to mfl adapter. I just hooked mine up on my kegerator. I was lucky enough to get a used high pressure line on eBay for $5, I also got 6 used regulators from the same seller for $20!

Yeah I figured out last night the hose wouldn't connect up to my existing setup.. I called Keg Connection and they are sending me the nipple I need to swap out on the 1st regulator to be able to hook it to the small side of the hose!

You got a STEAL! Way to go! That HP Hose was like 42 bucks at Keg Connection but.. at least it was a gift to me and I didn't have to pay for it haha
 
Just a couple of thoughts on your drilling a gas line hole in the fridge box using high pressure hoses.

High pressure gas hoses going through thin sheet metal are inherently a safety problem! I suggest there are better ways to do this.

When drilling holes in a fridge wall start very small from from the inside and probe around with a wire into the foam to check for lines in the wall. The smaller and less deep the first hole the less chance of drilling into a coolant line. A good place to think about feeding a line thru is near the compressor because it's hot around there and the fridge mfg's usually don't put chilling lines too close to the hot compressor.

That said I did nearly the same thing to my older Sears Kenmore kegerator. I had a this kegorator for a while set up with a 2 tap tower and 2 corneys with the C02 tank inside. Then I realized that it would hold 4 corneys with tank outside if I used 2 single handle top corneys under the compressor bump in back and 2 full top corneys in front.

This Sears model has a top mounted compressor as opposed to the bottom mounted compressor, like the Sanyo etc., i.e. inside the fridge the compressor bump is in back on the top. Also this model has an evaporator plate that's mounted on offsets inside the fridge intended to wrap around a single half barrel Sankey keg. So, there are no lines inside the walls of this one. Just 2 thru walls where the coolant enters and exits the inside.

So here's what I did.
1. Drill a hole for corney gas line QD post fitting in the side wall top back into the compressor space.
2. From inside the compressor space drill a hole into the fridge that comes out 1/4" below the top inside.
3. Install the gas QD fitting in the outside side wall.
4. Run 3/8 (low pressure) gas line from the back of the QD fitting to the inside of the fridge with rubber grommets on both the outside sheet steel by the compressor and the inside white plastic.
5. Install a 4way gas manifold just in front of the compressor bump on the underside front part inside the fridge.
6. Hook up 4 gas tubes with gas QDs.
7. Add a 2 faucet extension to the 2 tap tower.
8. Enjoy 4 beverages on tap.

I like this setup best because, one the regulator is still on the tank minimizing high pressure equipment to the standard short hard line from the tank valve directly to the regulator and, two the low pressure output line on the regulator still has a corney gas QD on it. I either connect the regulator output QD to the side of the kegorator and turn the maniford valves on/off as needed for 1 to 4 corney kegs or pop it off to do other stuff with the CO2 tank like purge fermentors, take a keg to a party, force carb a new keg, etc. Most importantly there's no high pressure hose to fray on sharp sheet metal or pose any other safety problems.
 
Here's what I did to move my CO2 tank outside of the Kegerator.

Ice box shanks.jpg
 
i did something smilar with a MFL shank and corny post adapter... so i can leave a ball lock connector on the regular line and easily disconnect when necessary.
http://flic.kr/p/96PD9x

Looks kind of similar to what I got. On mine I have the same corney post on the outside of the sheet metal wall and an adapter that's thru the sheet metal hole I drilled from the inside and screws into the back on the post with an MFL that the hose connects to. The hardest part was finding the right o-rings to make it seal up tight.

I'll bet we got the parts at the same place. :)
 
i think i got the parts at chi company...

the bulkhead adapter goes through the collar, fridge wall, etc. on the inside, it's just a simple FFL barbed hose fitting that screws onto the MFL end of the bulkhead adapter. on the outside, it's the FFL --> 19/32"-18 threaded male keg post thread (it comes with it's own o-ring gasket - then a regular coney keg post should thread right onto that adapter to create your gas IN post to accept your grey ball-lock quick-connecter.


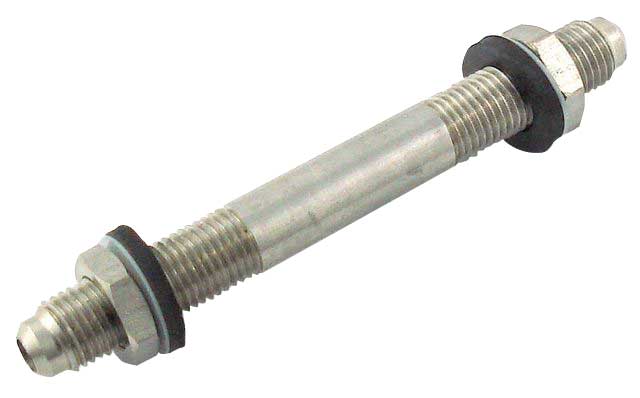
i used one of these MFL bulkhead adapters
04C03286.jpg


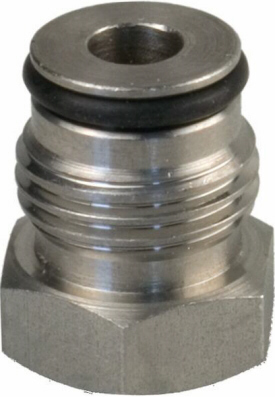
and then a quick-disconnect adapter that mates a FFL to a threaded adapter for a keg post
Plug%20adaptor-short.jpg


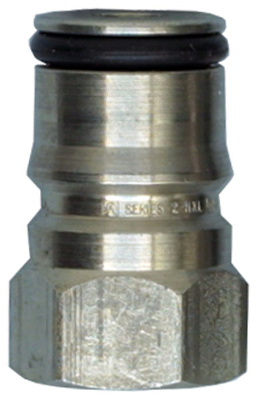
and then the keg post itself
Corneilus.jpg
 
Back
Top