My New 2 Vessel 15 Gallon Gas/Electric Hybrid Brew Rig is (nearly) Finished!!

Homebrew Talk - Beer, Wine, Mead, & Cider Brewing Discussion Forum

Help Support Homebrew Talk - Beer, Wine, Mead, & Cider Brewing Discussion Forum:

This site may earn a commission from merchant affiliate links, including eBay, Amazon, and others.

drgonzo2k2

Really Awesome User
HBT Supporter
Joined
Jan 14, 2015
Messages
1,100
Reaction score
316
Location
Santa Cruz
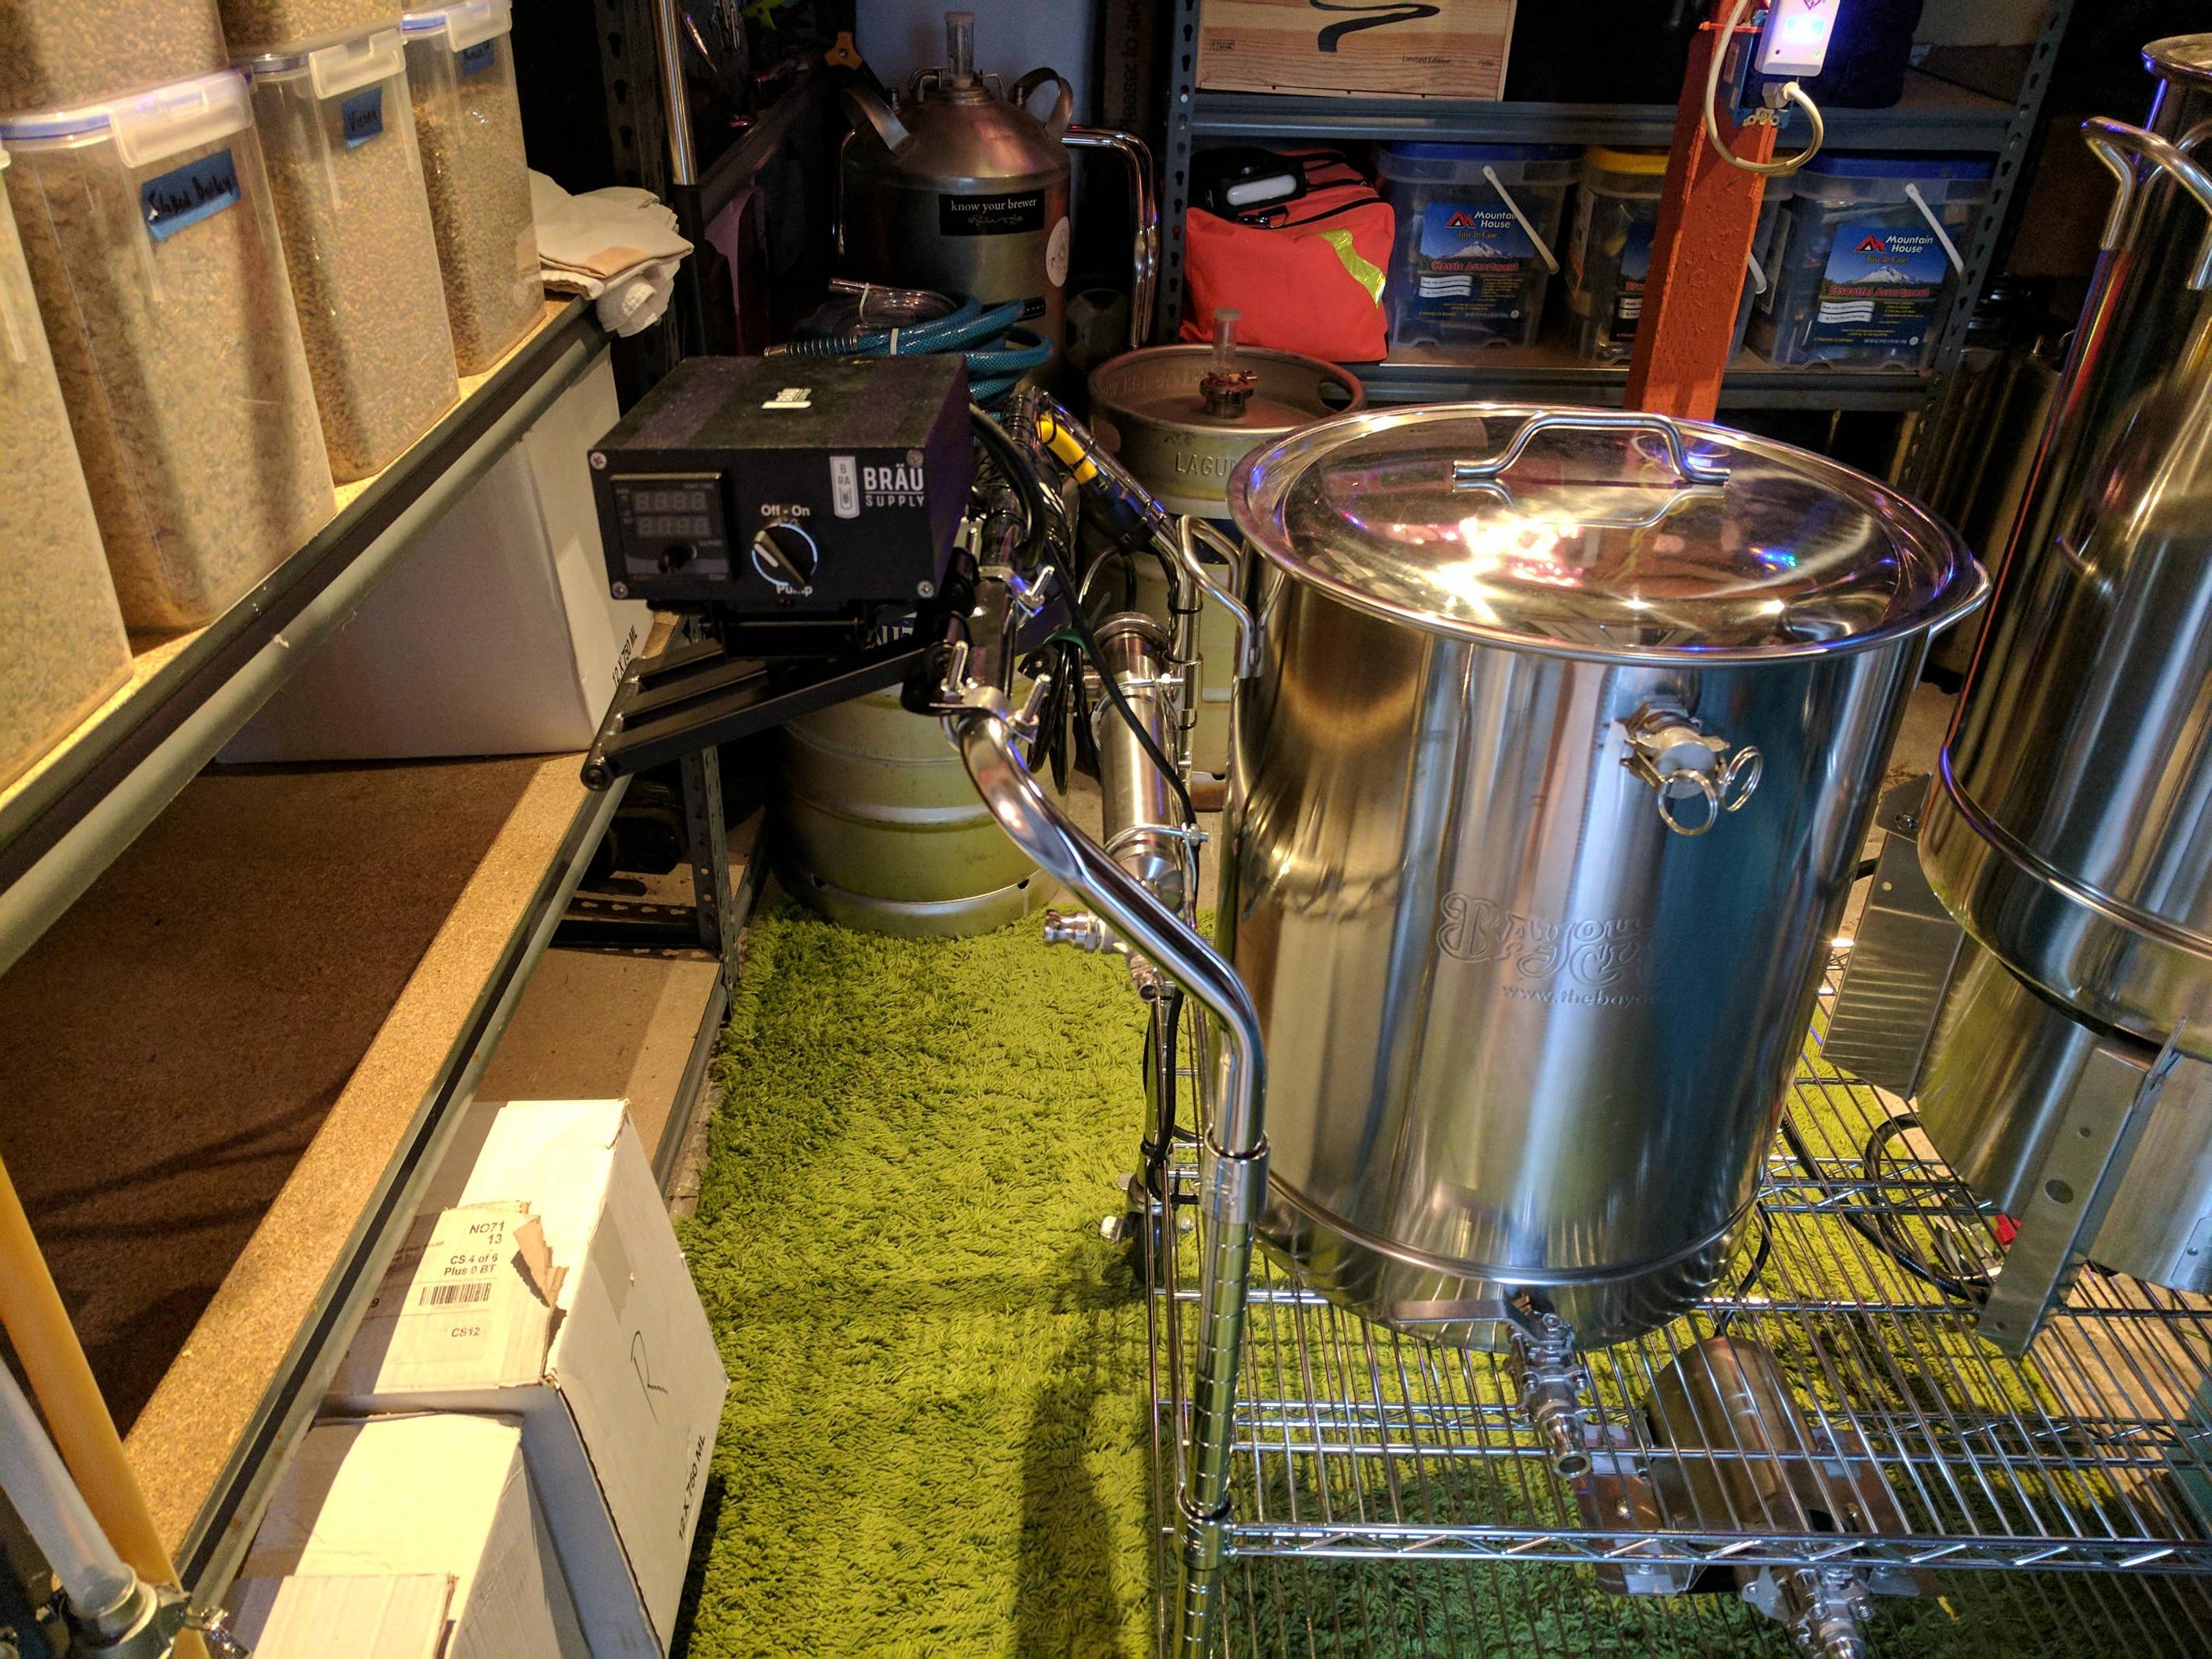
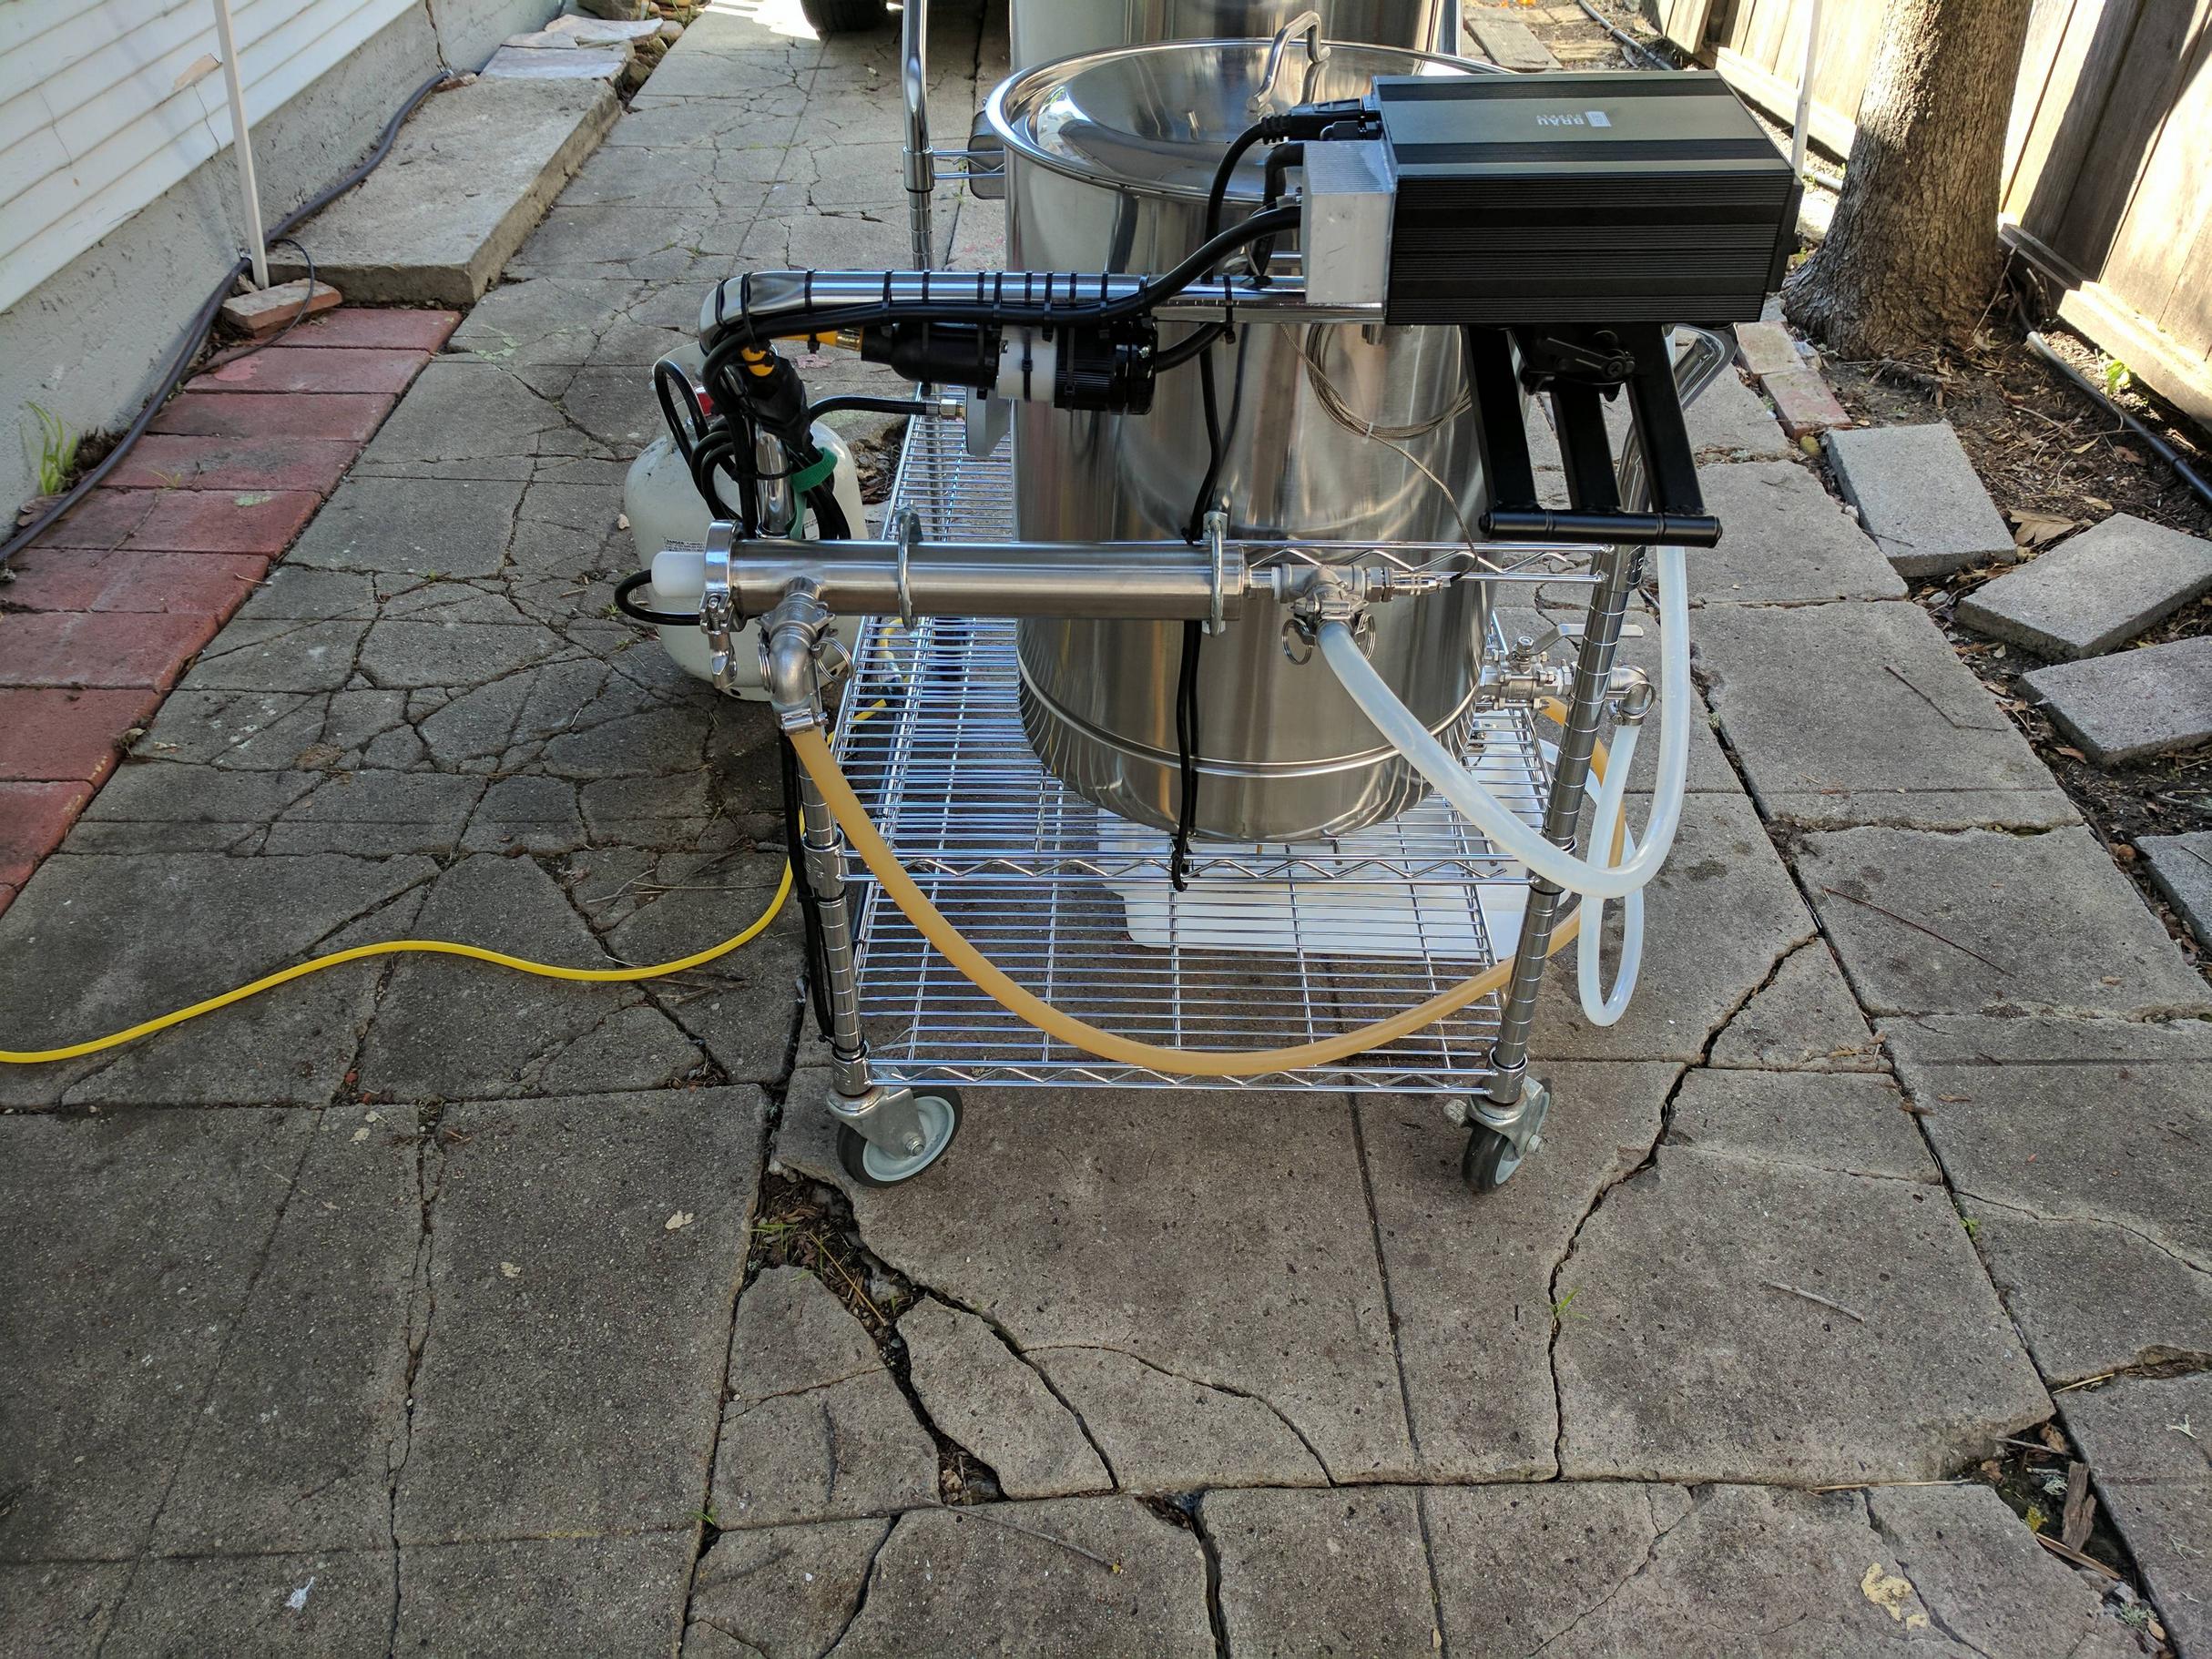
I've been working on this for a couple of months now, so I'm excited to finally be able to show it off. :ban: Here is what everything looks like together:

IaTJJip.jpg


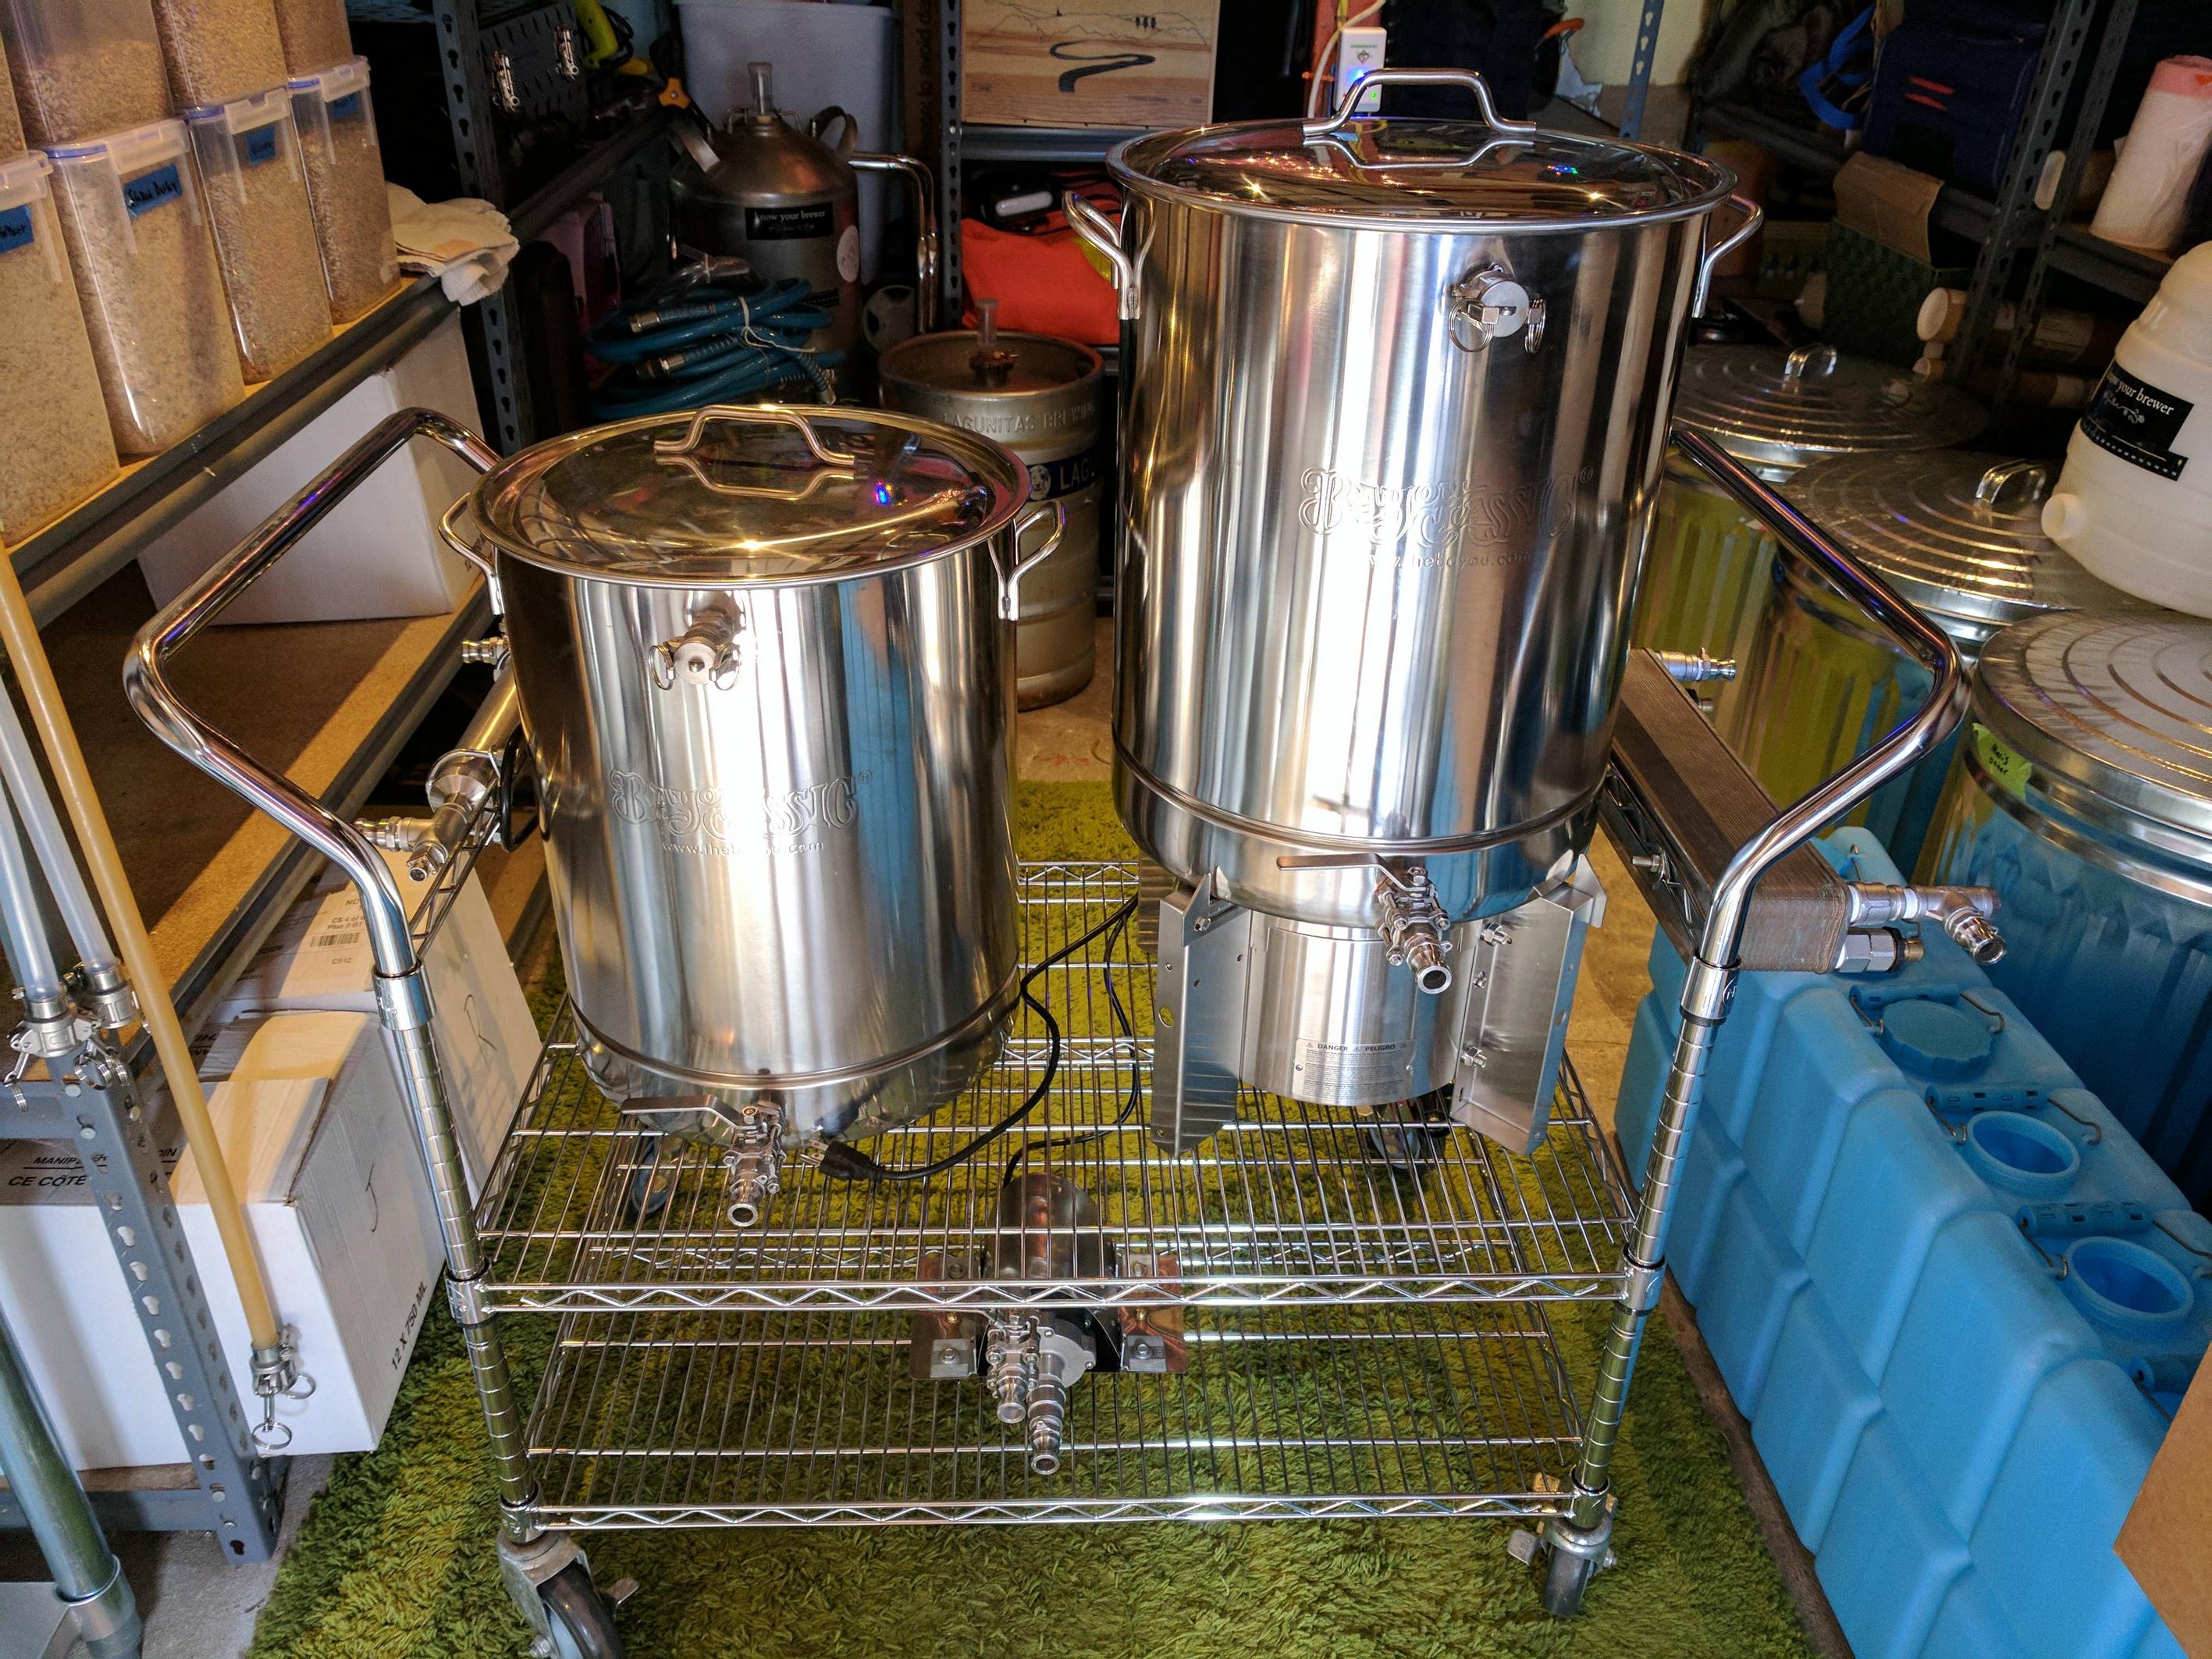
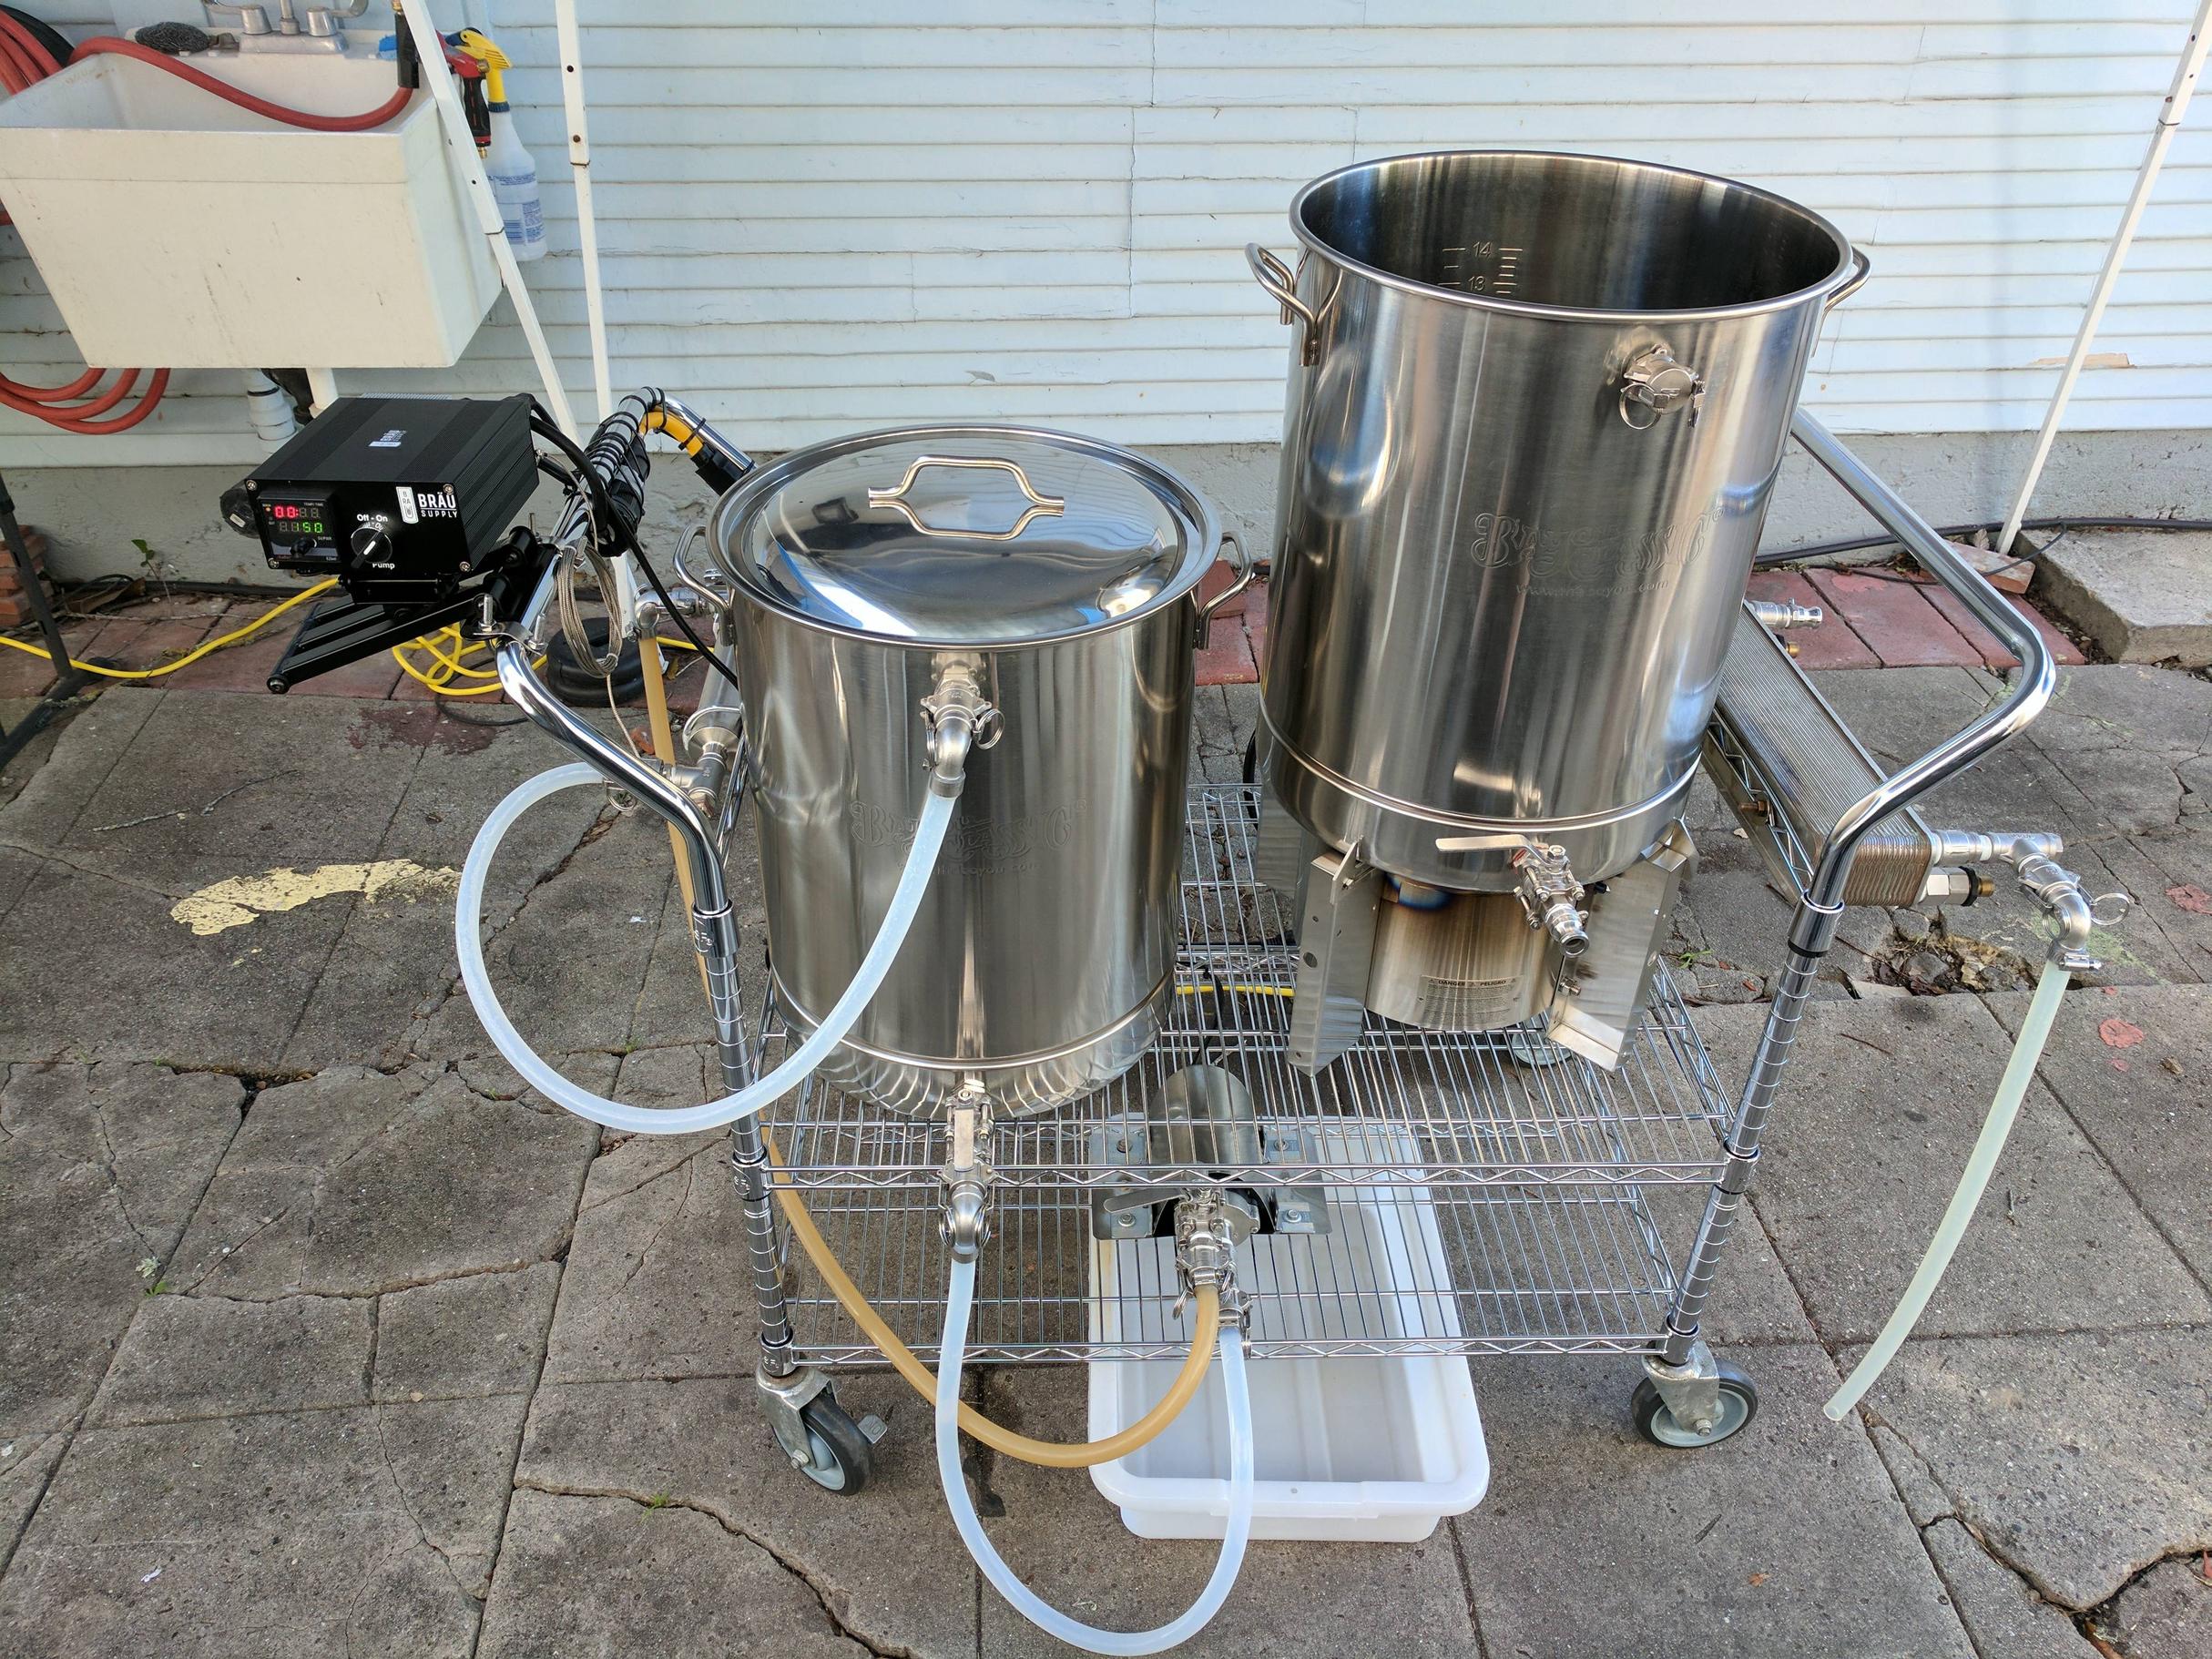
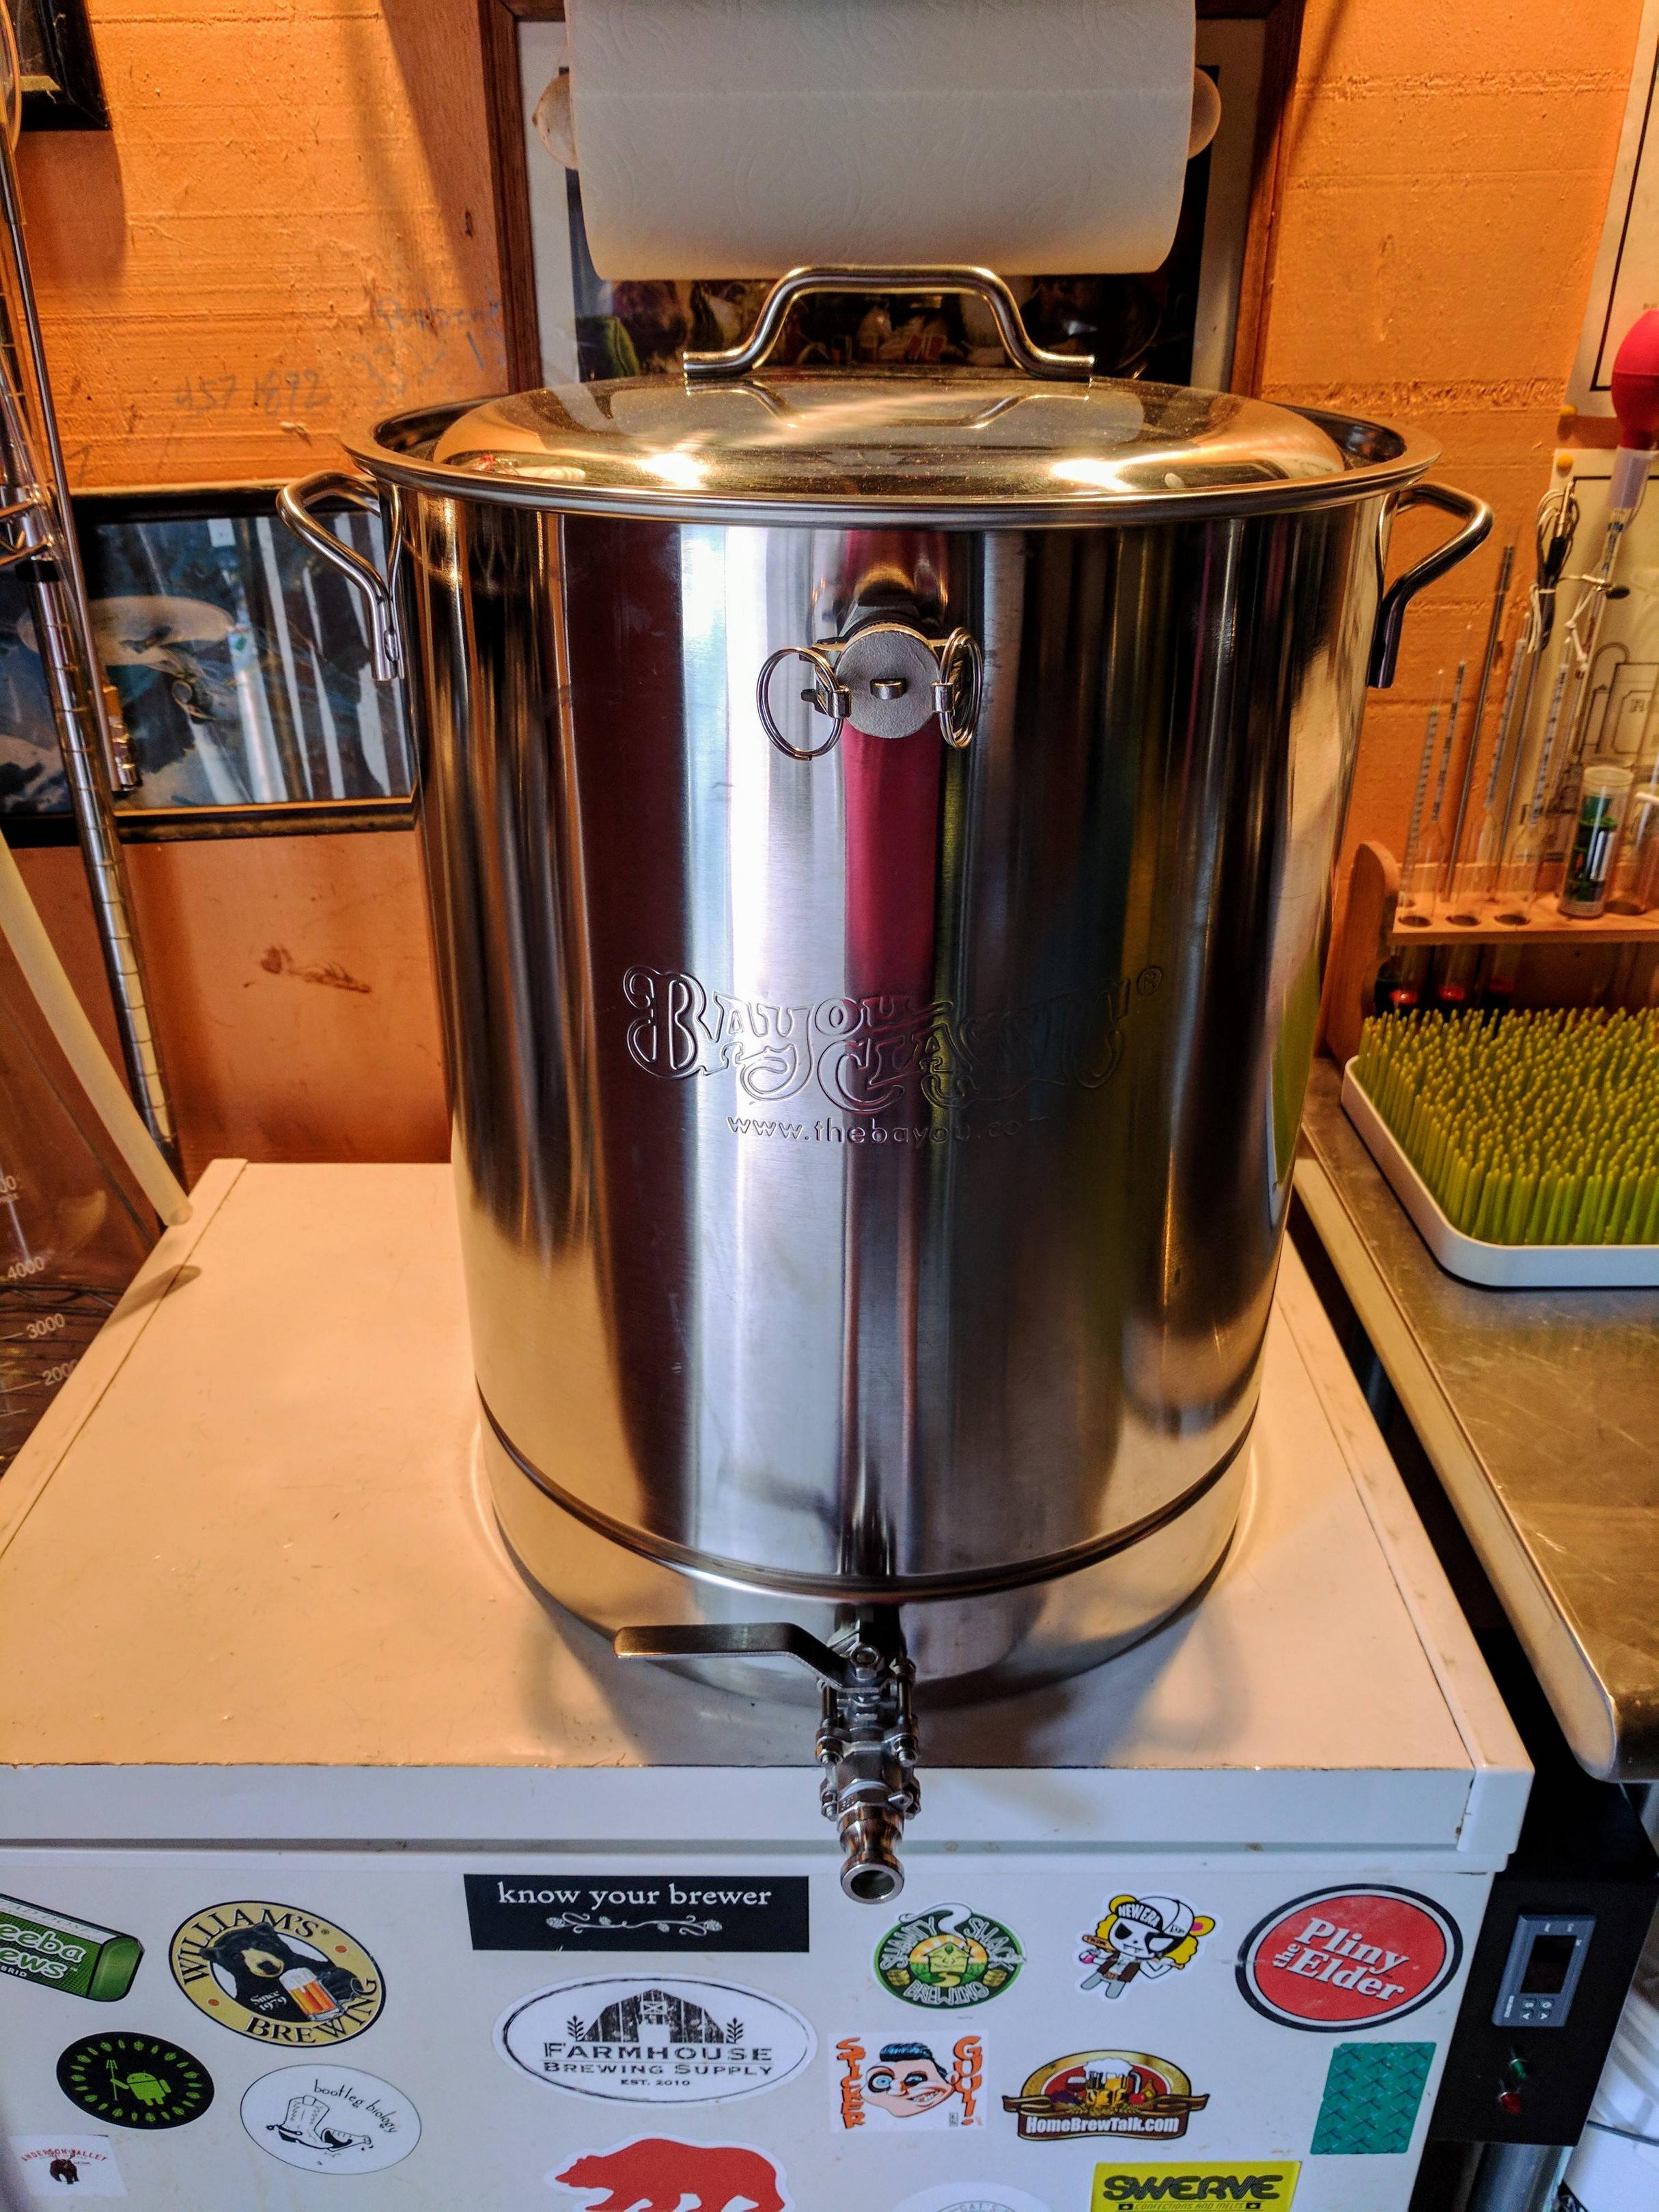
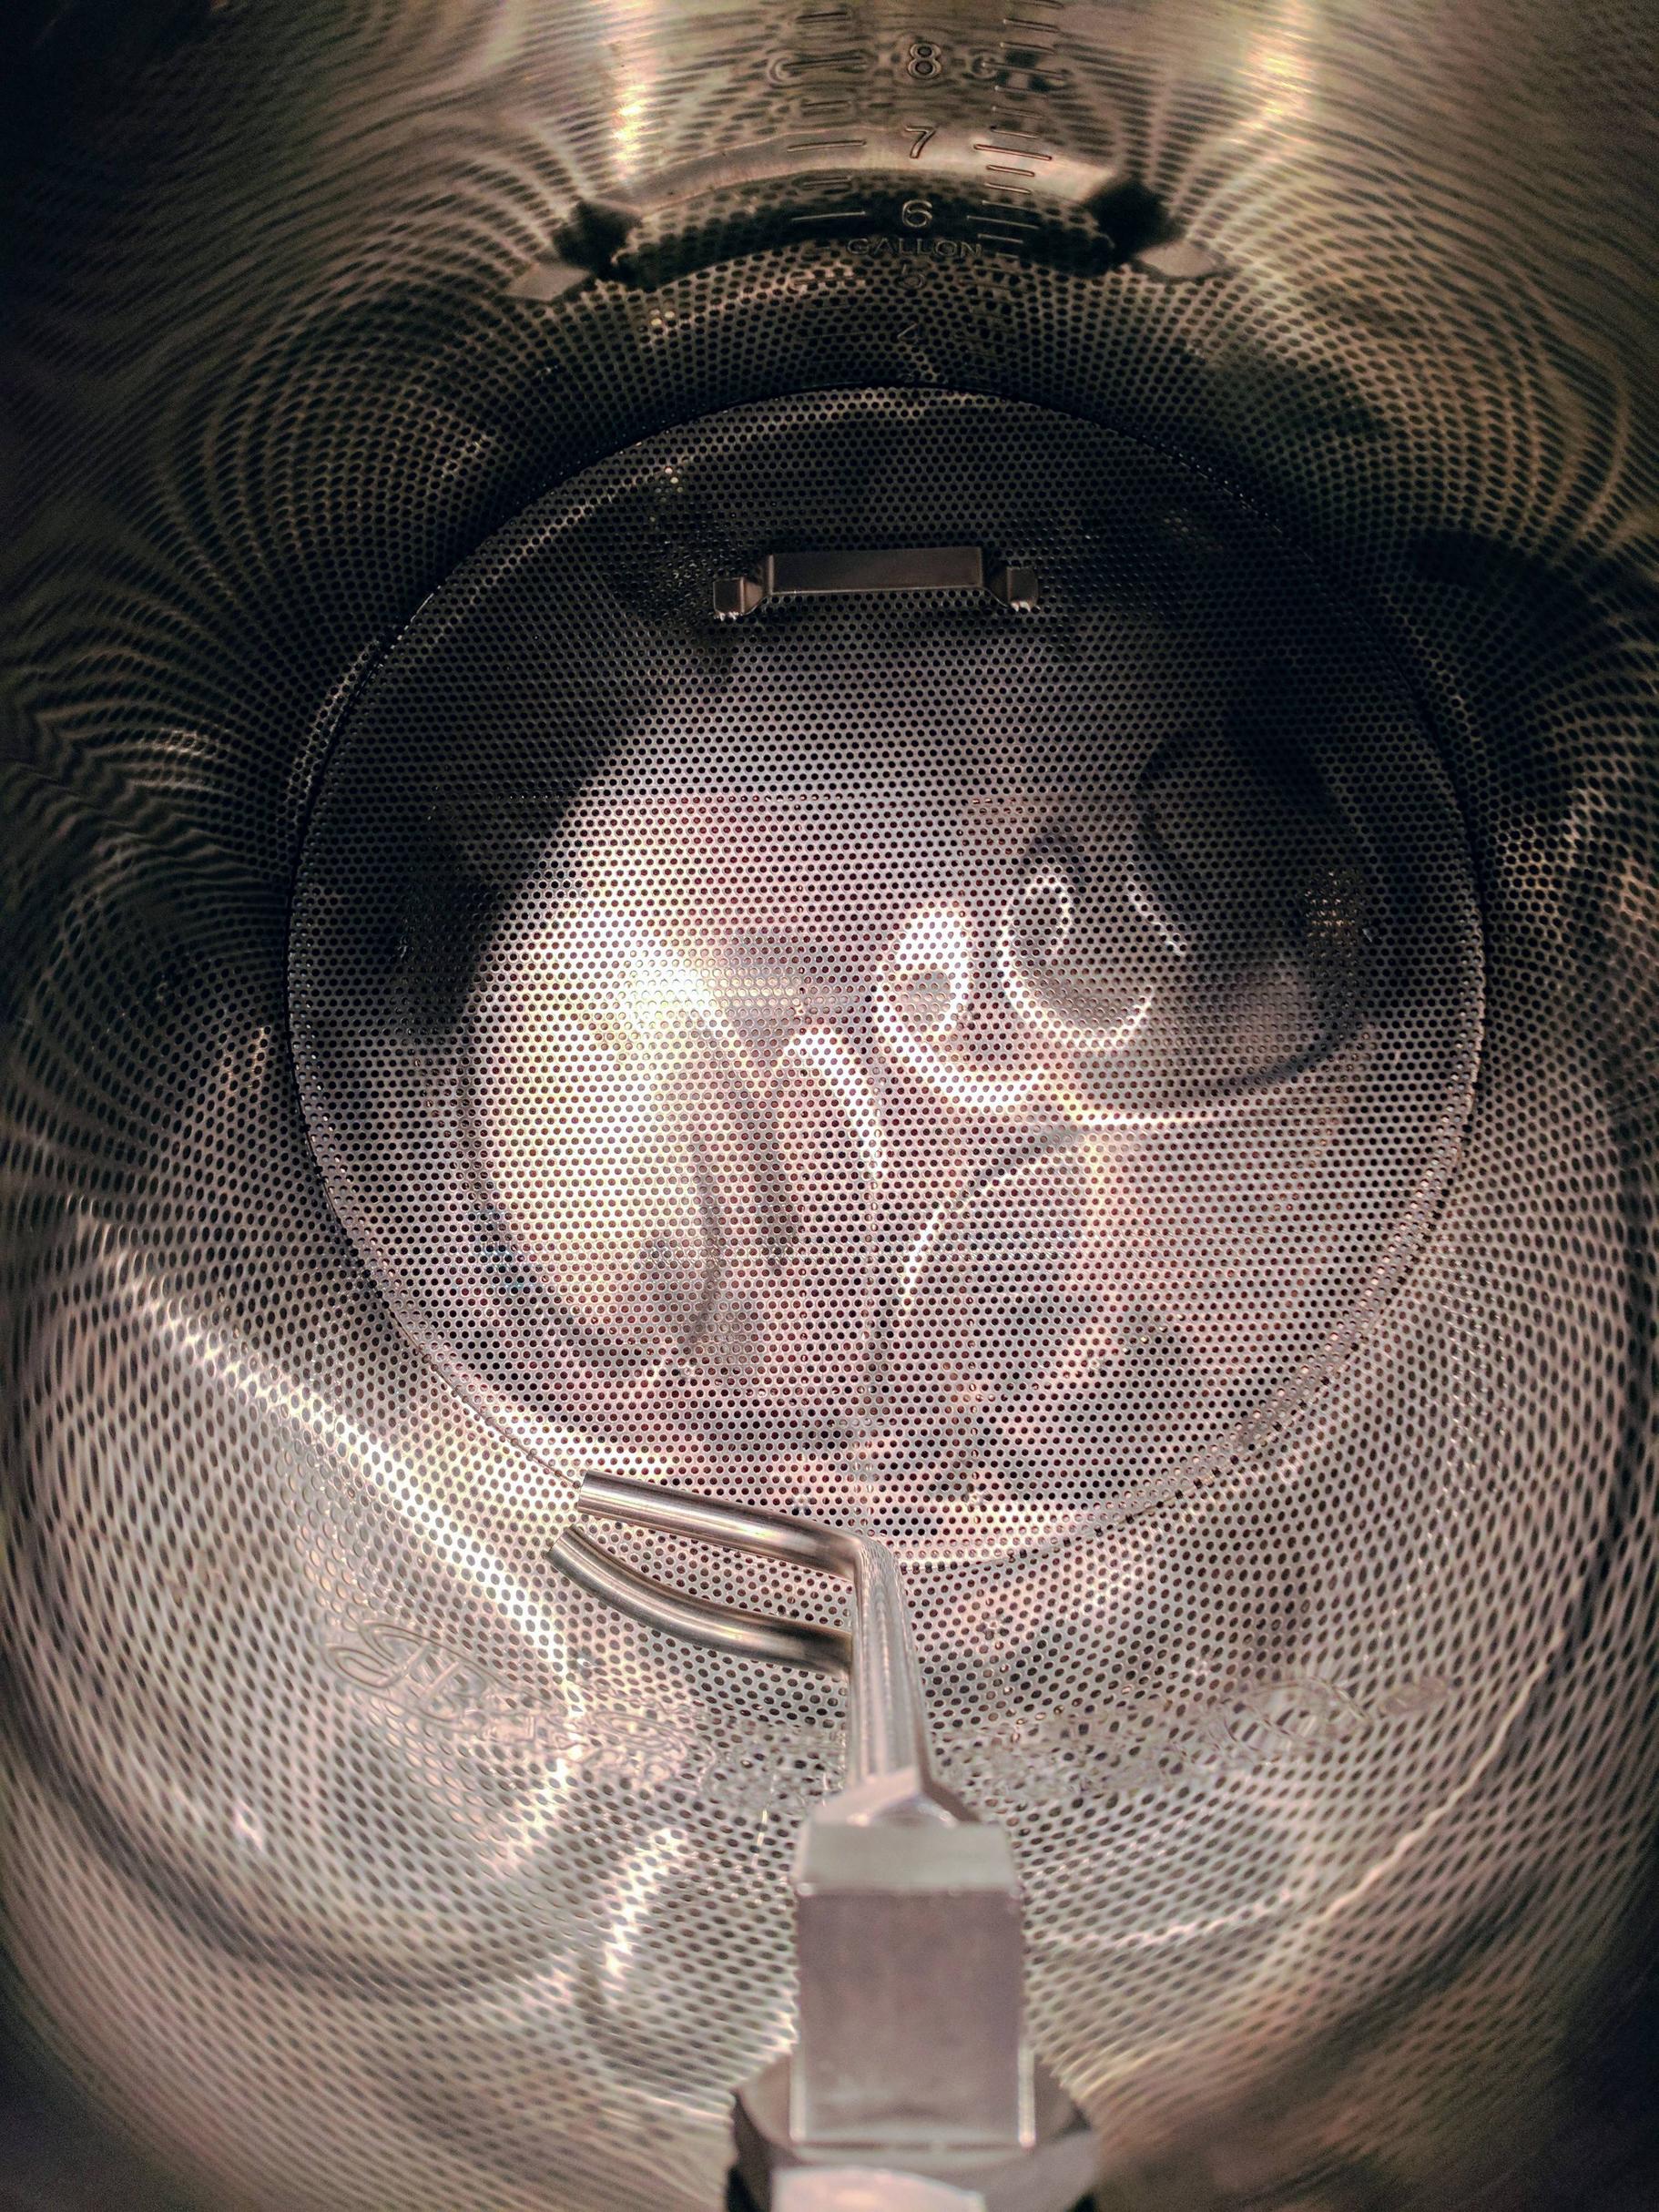
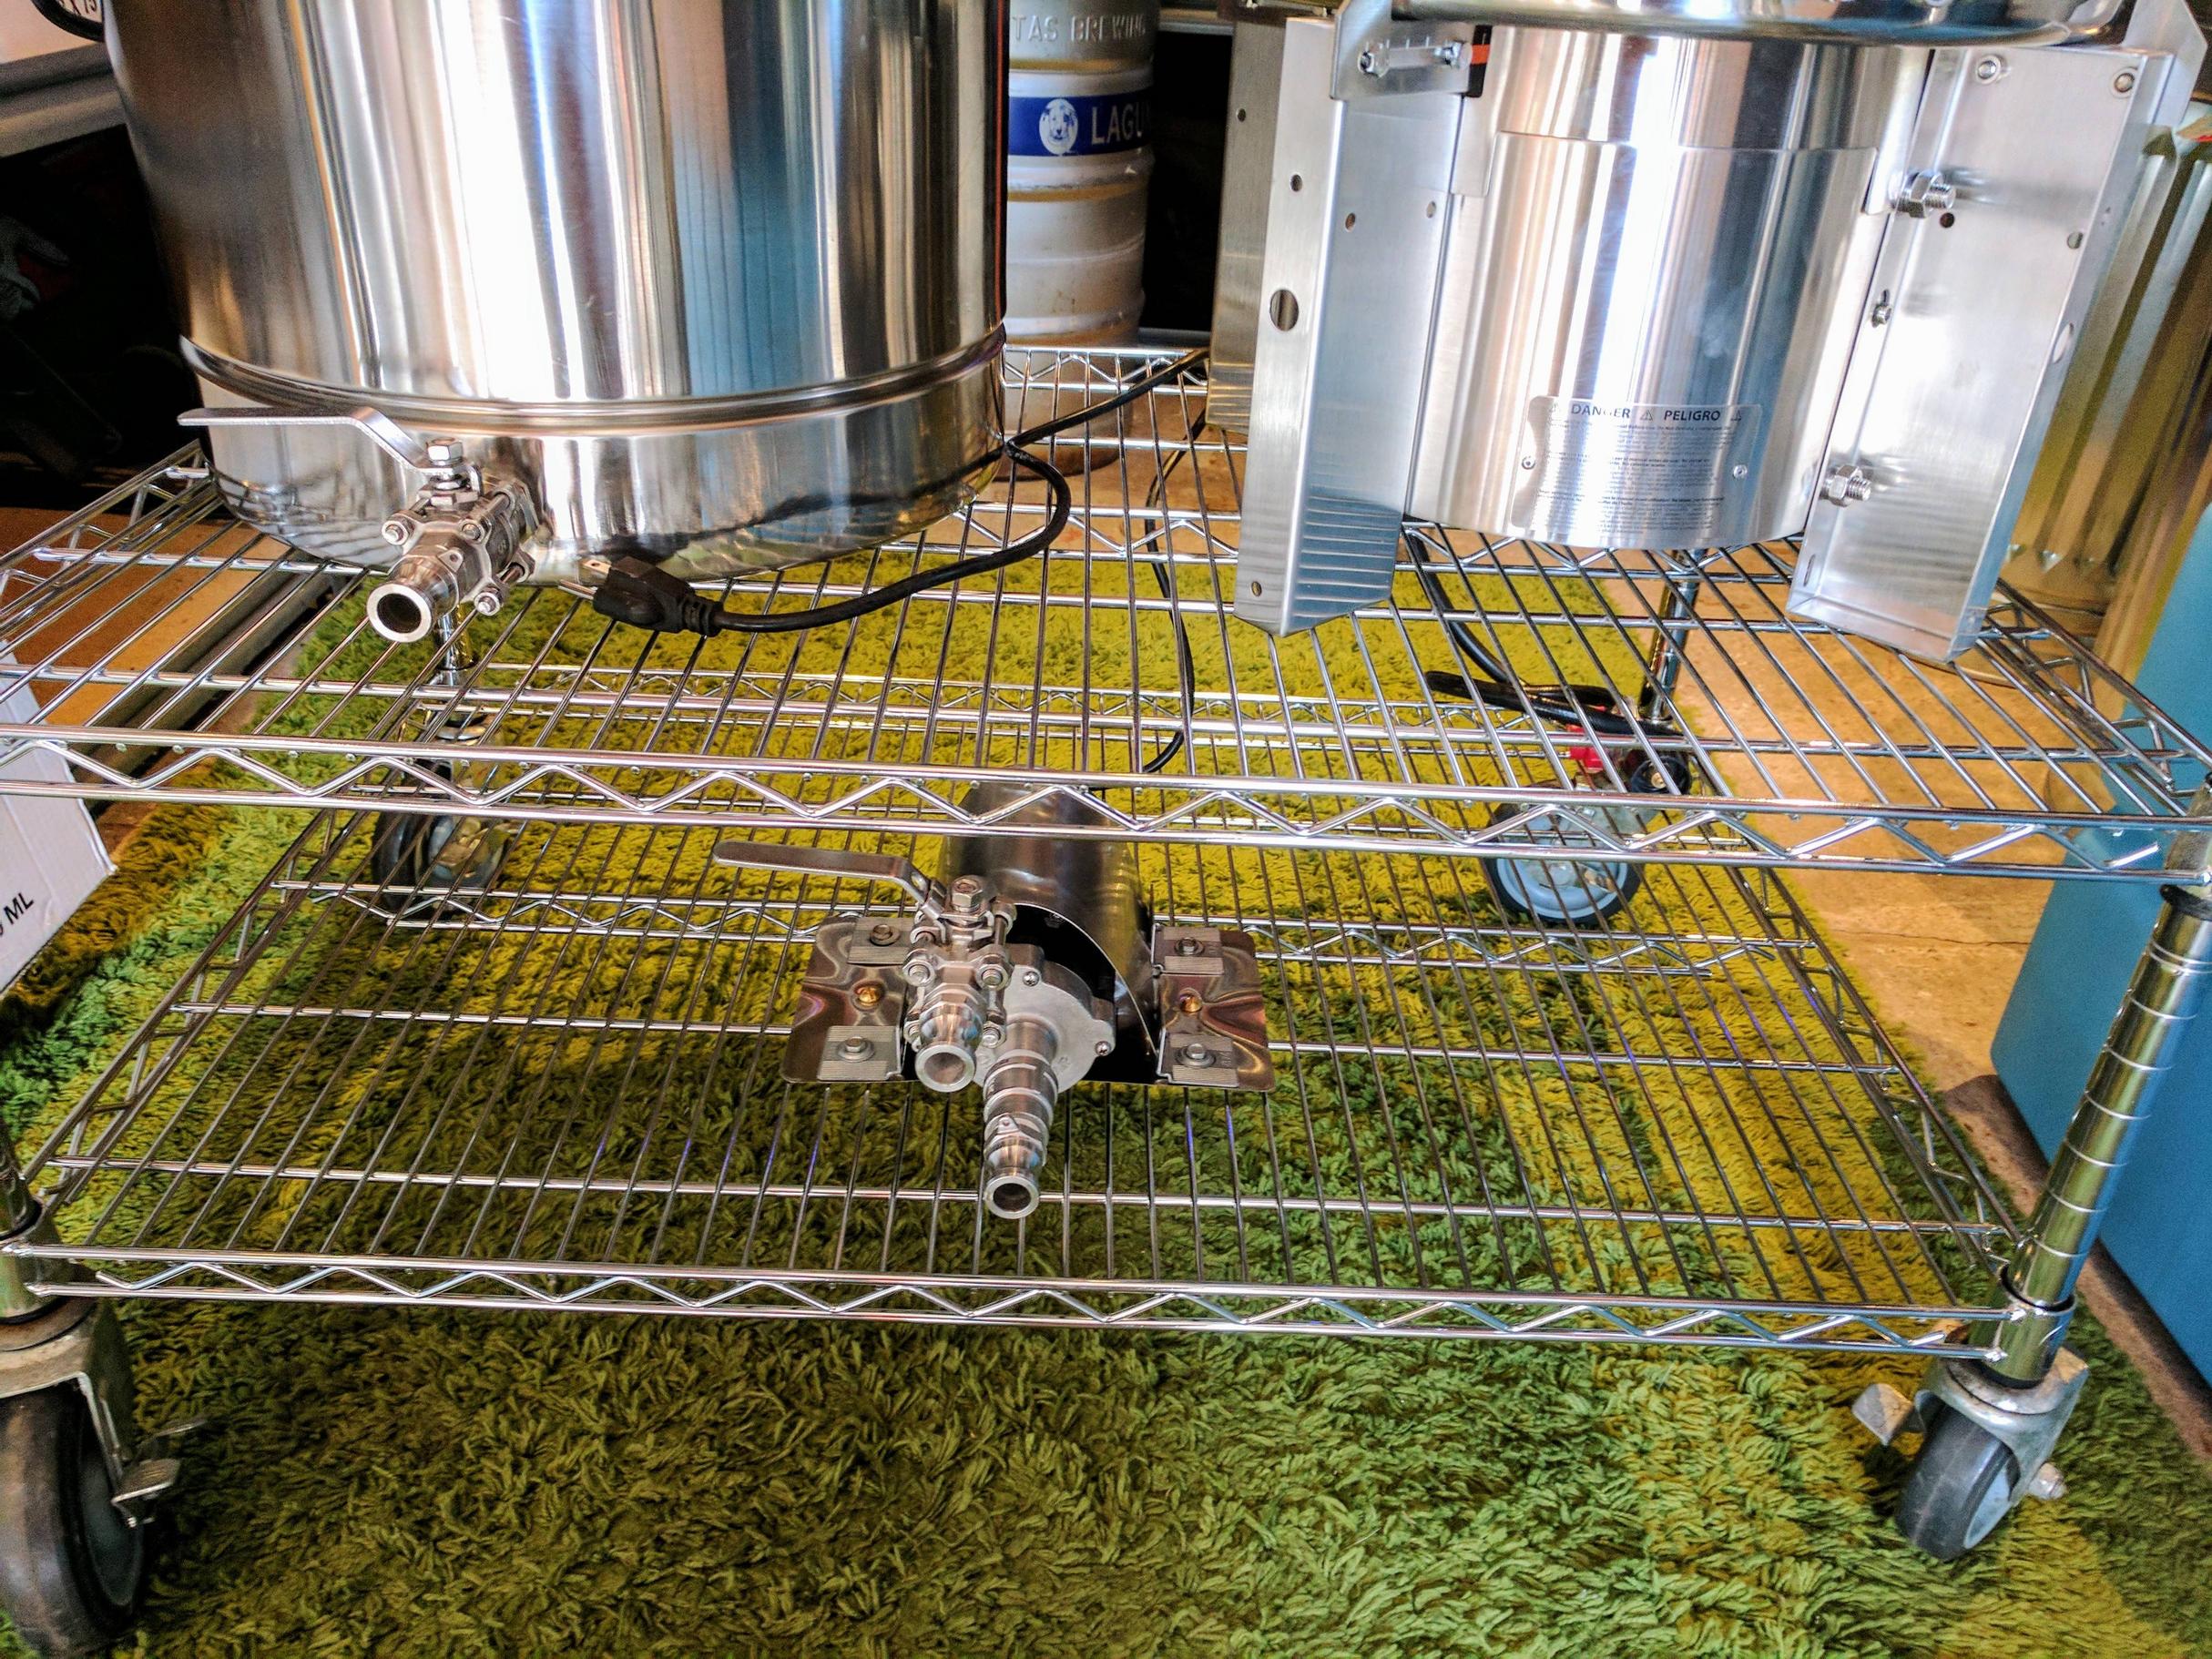
One kettle serves double duty as the HLT & BK while the other is the mash tun. Both are 15 gallon Bayou Classic kettles where I drilled a 2nd hole for the whirlpool and recirculation ports. 3-piece ball valves and camlock fittings all the way around:

fxeCJIe.jpg


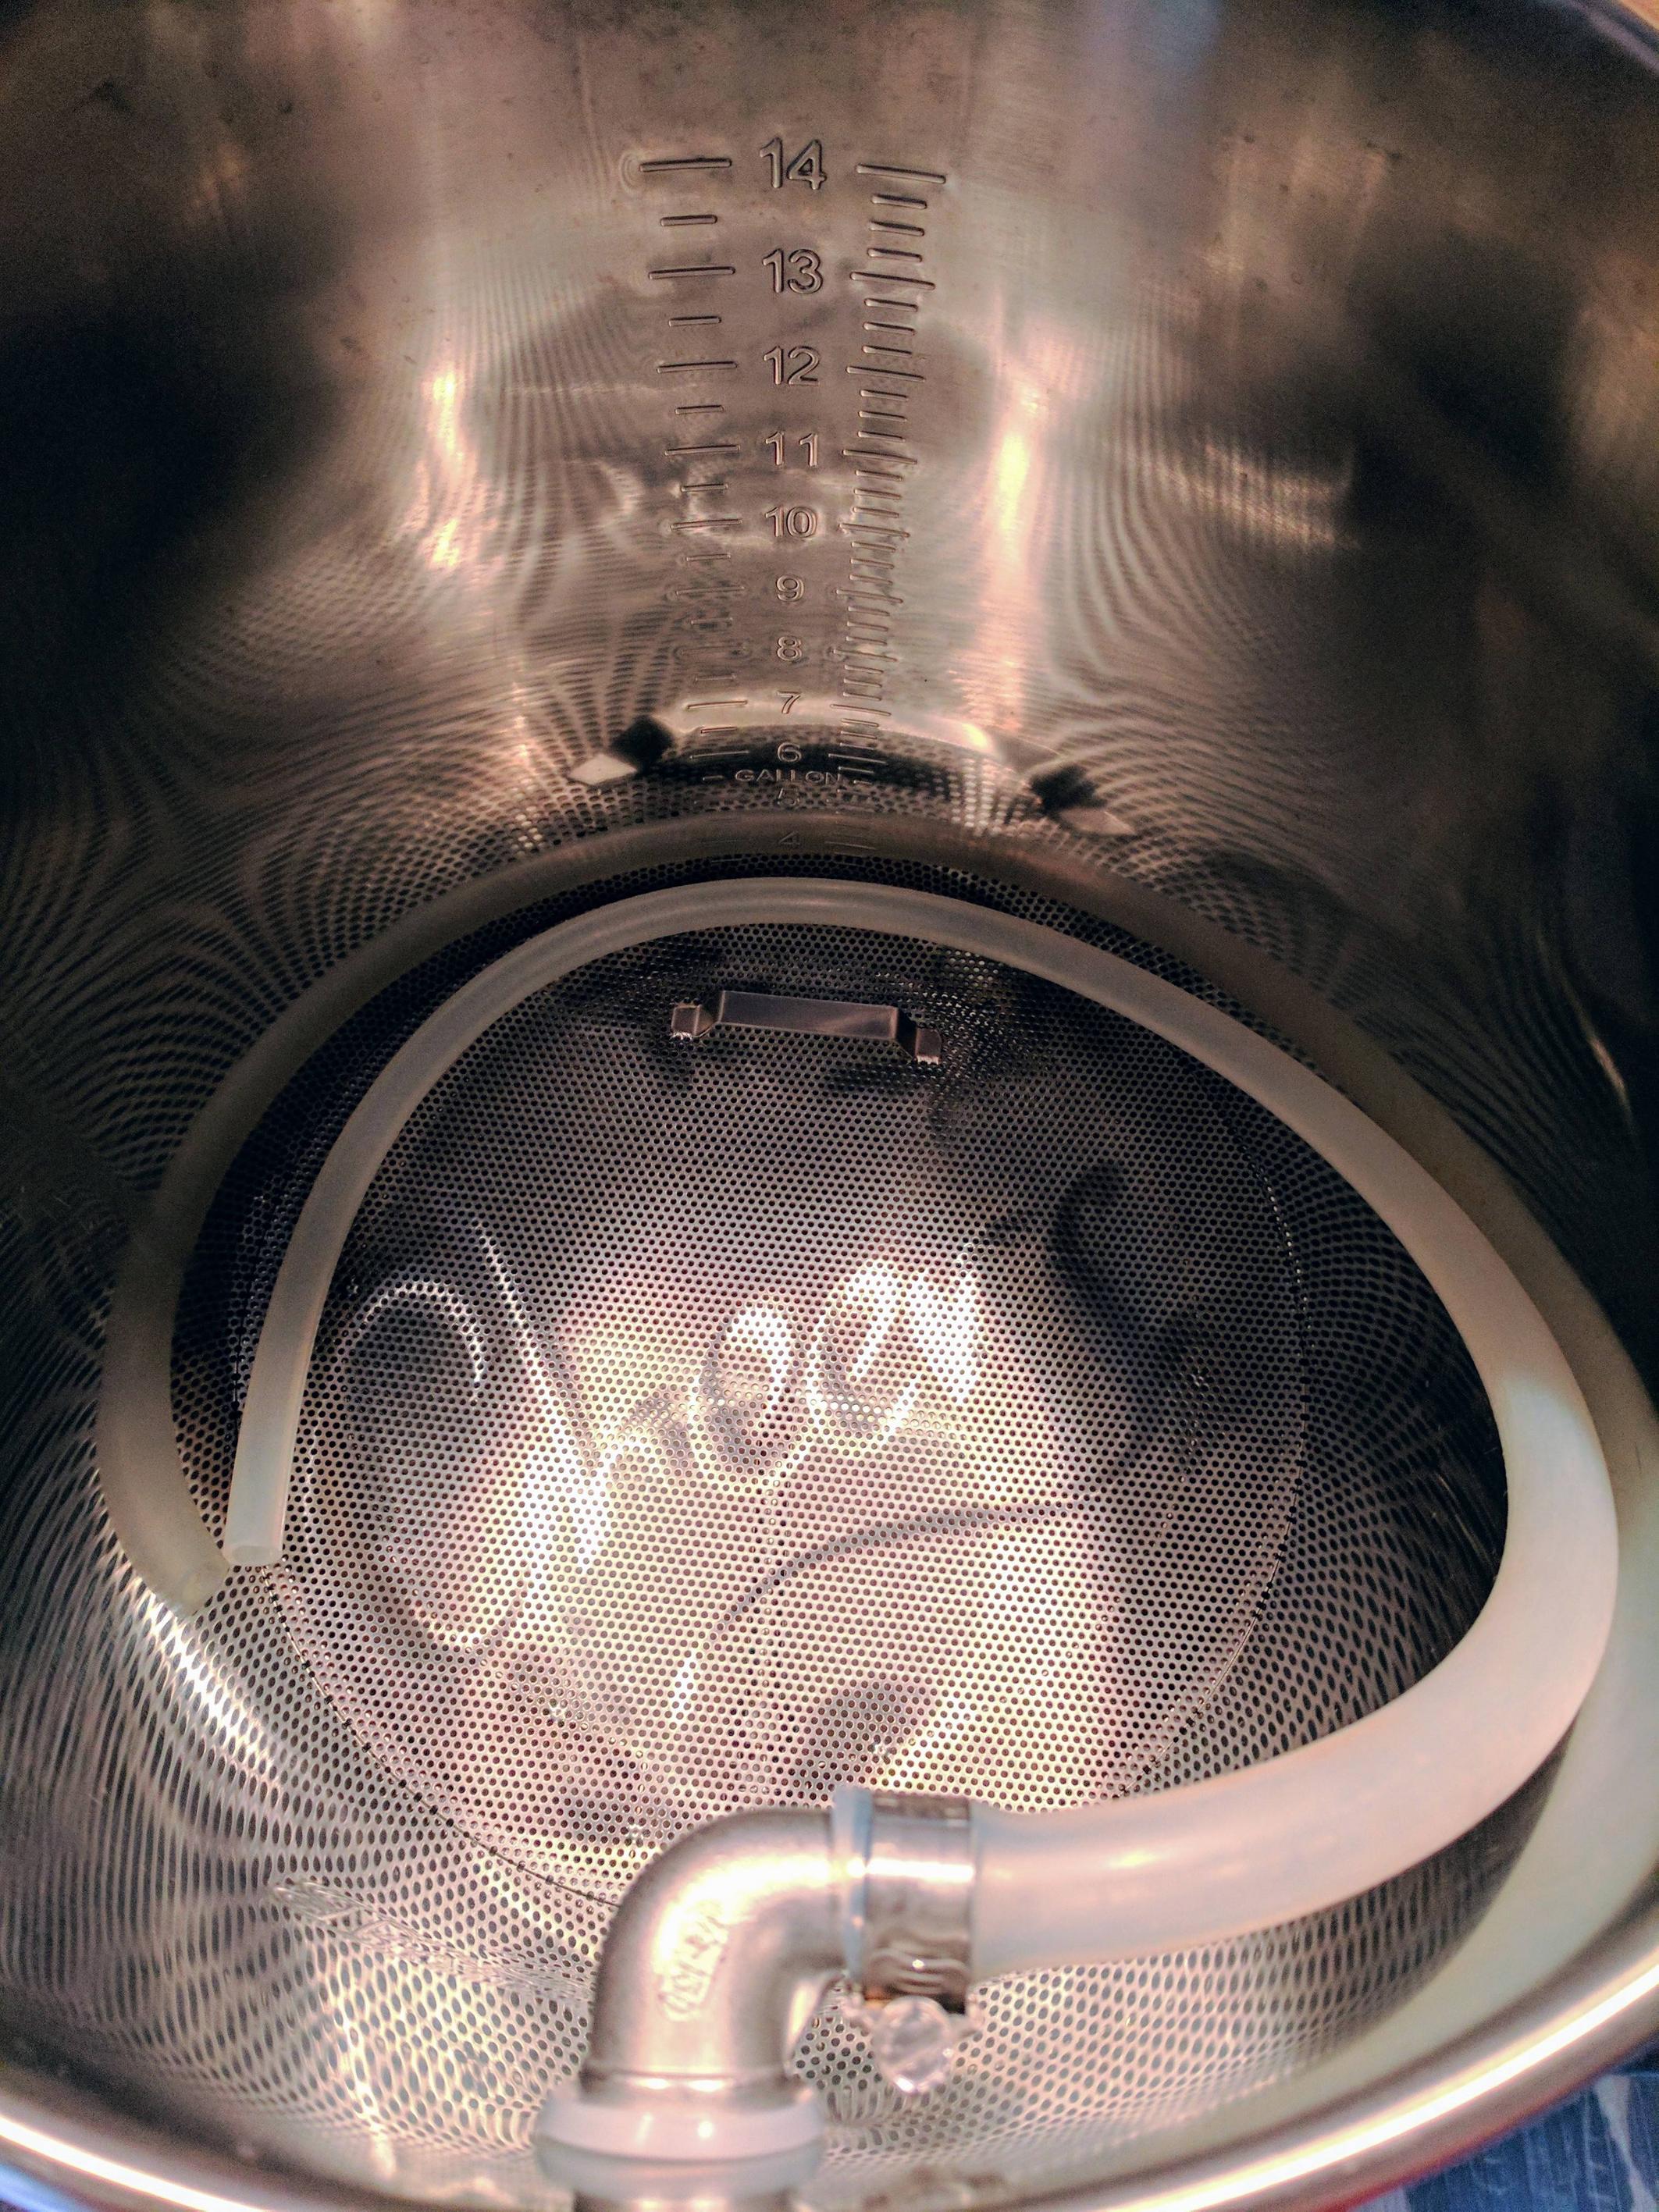
Inside of mash tun with simple recirculation setup and Norcal Brewing Solutions custom false bottom:

xpYL7pb.jpg


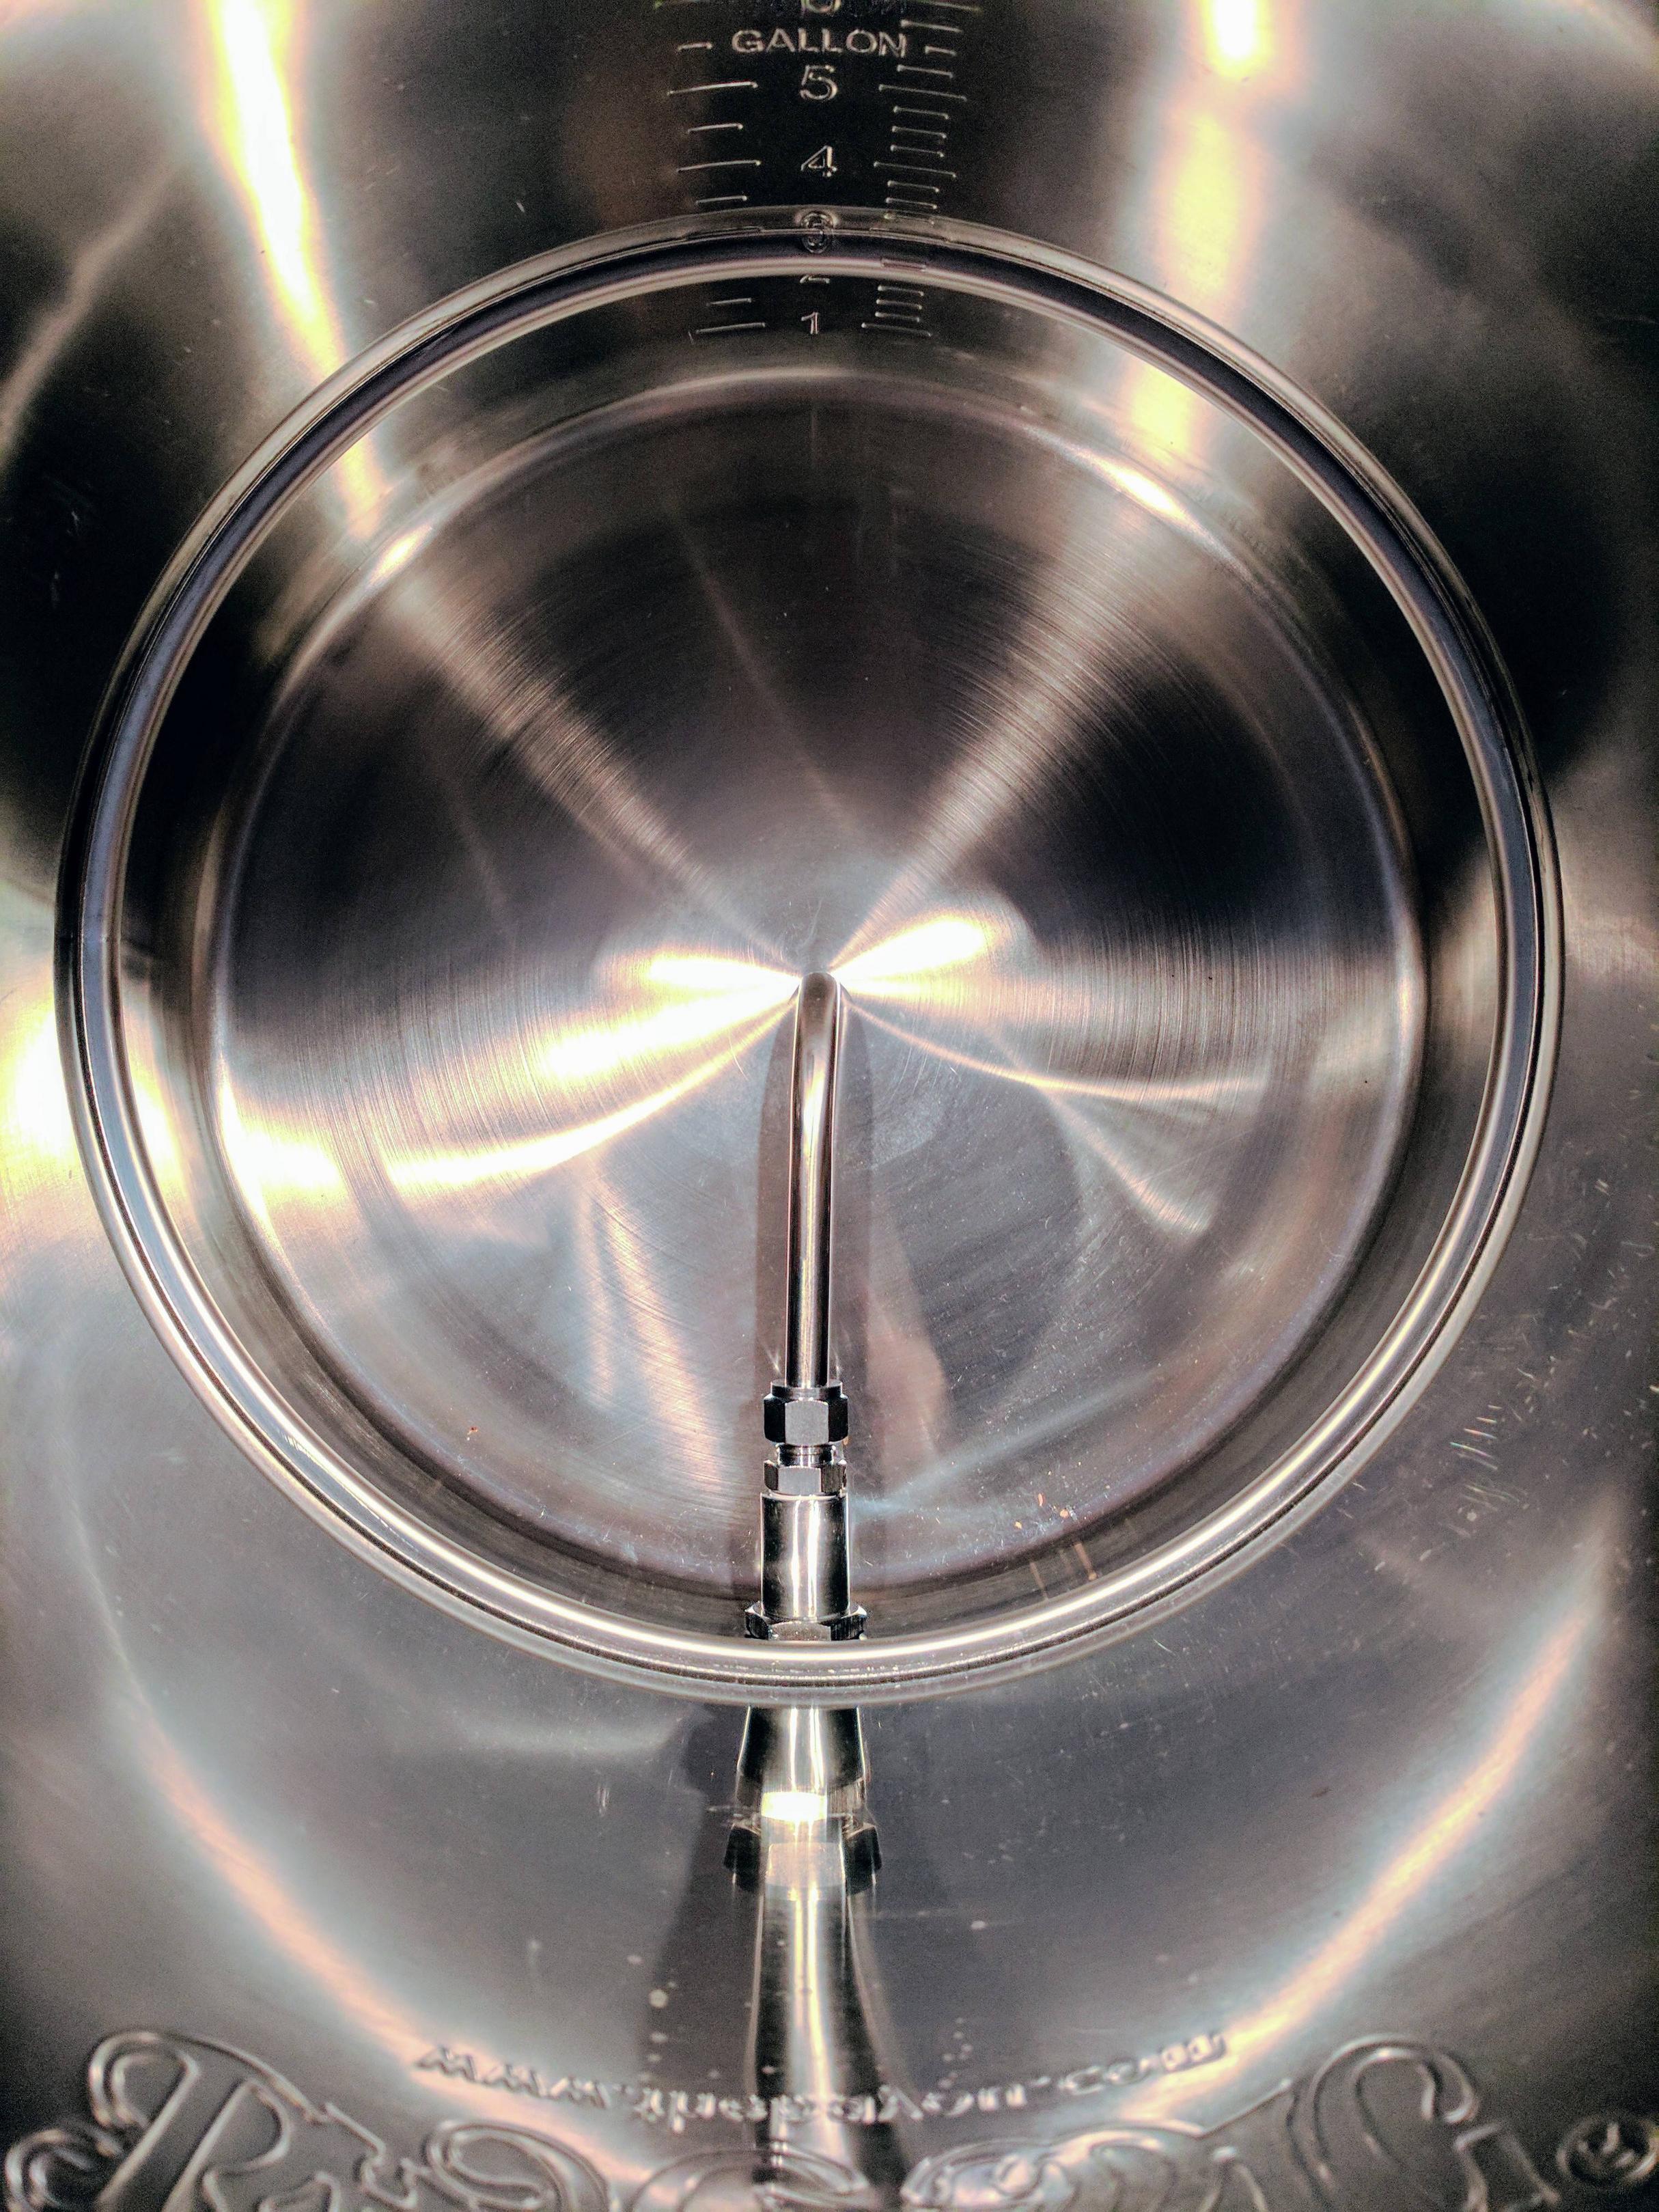
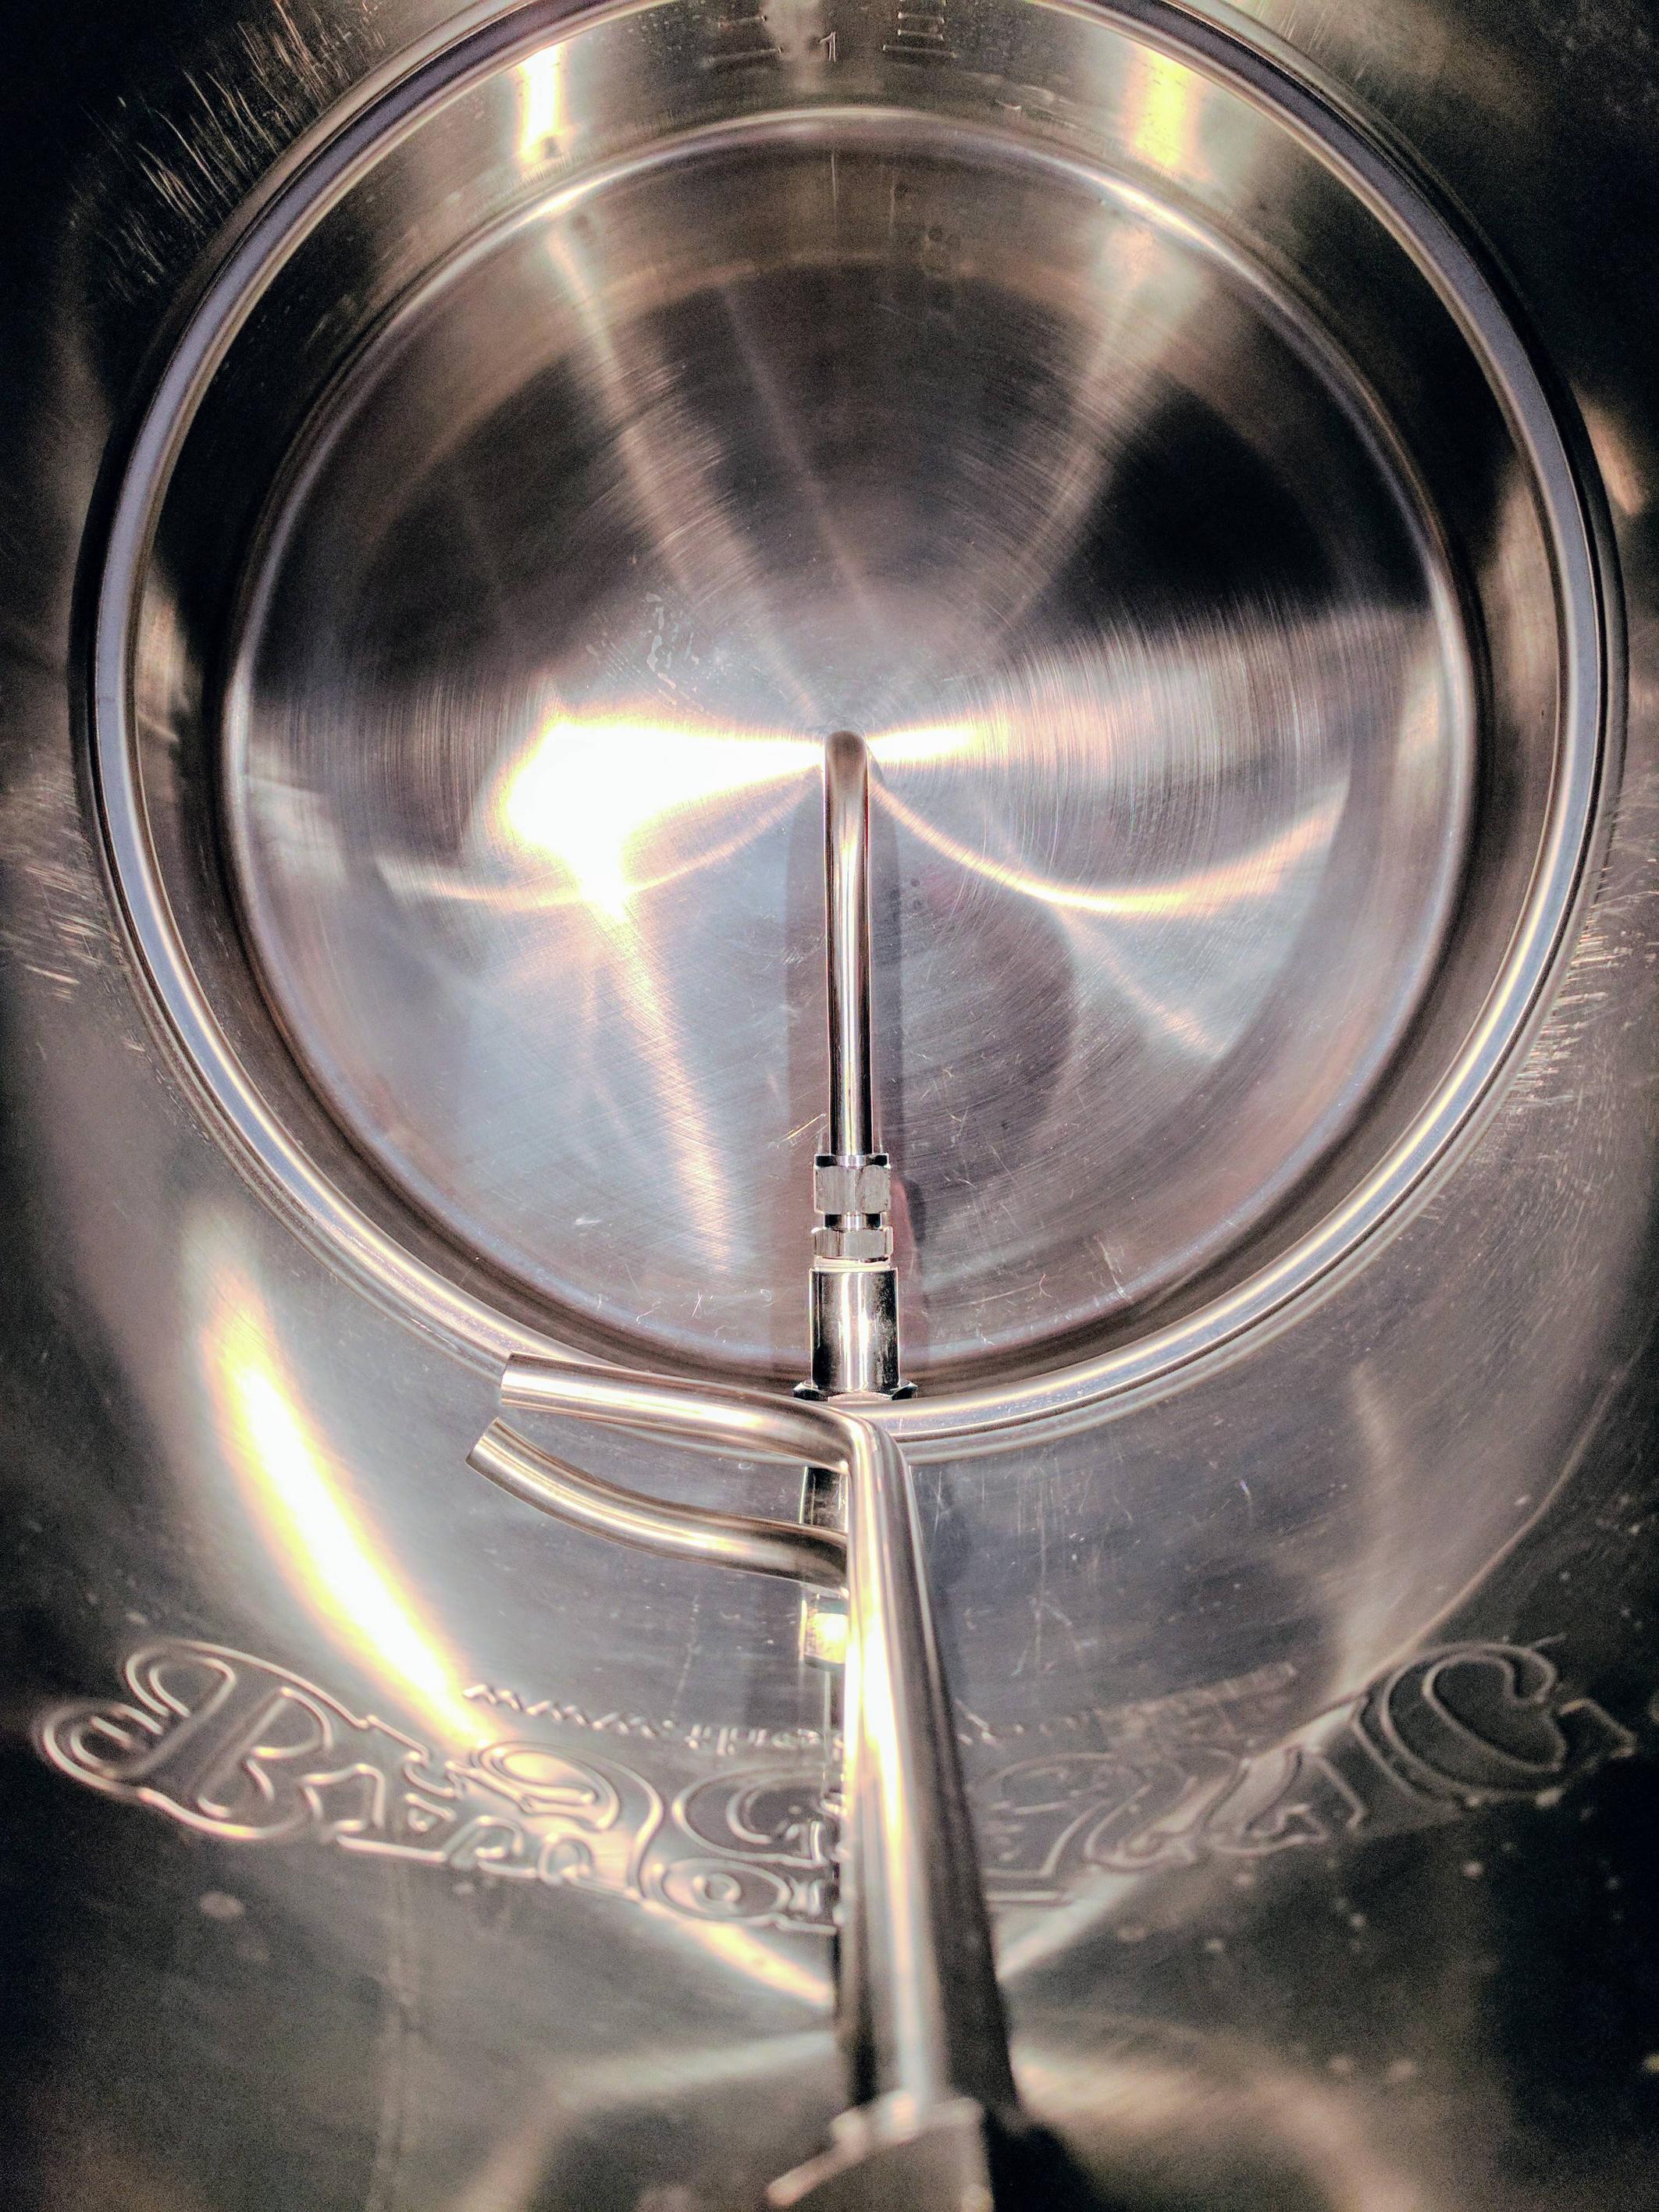
Mash tun false bottom removed to show the Norcal Brewing cut-to-length dip tube:

n1NzCgj.jpg


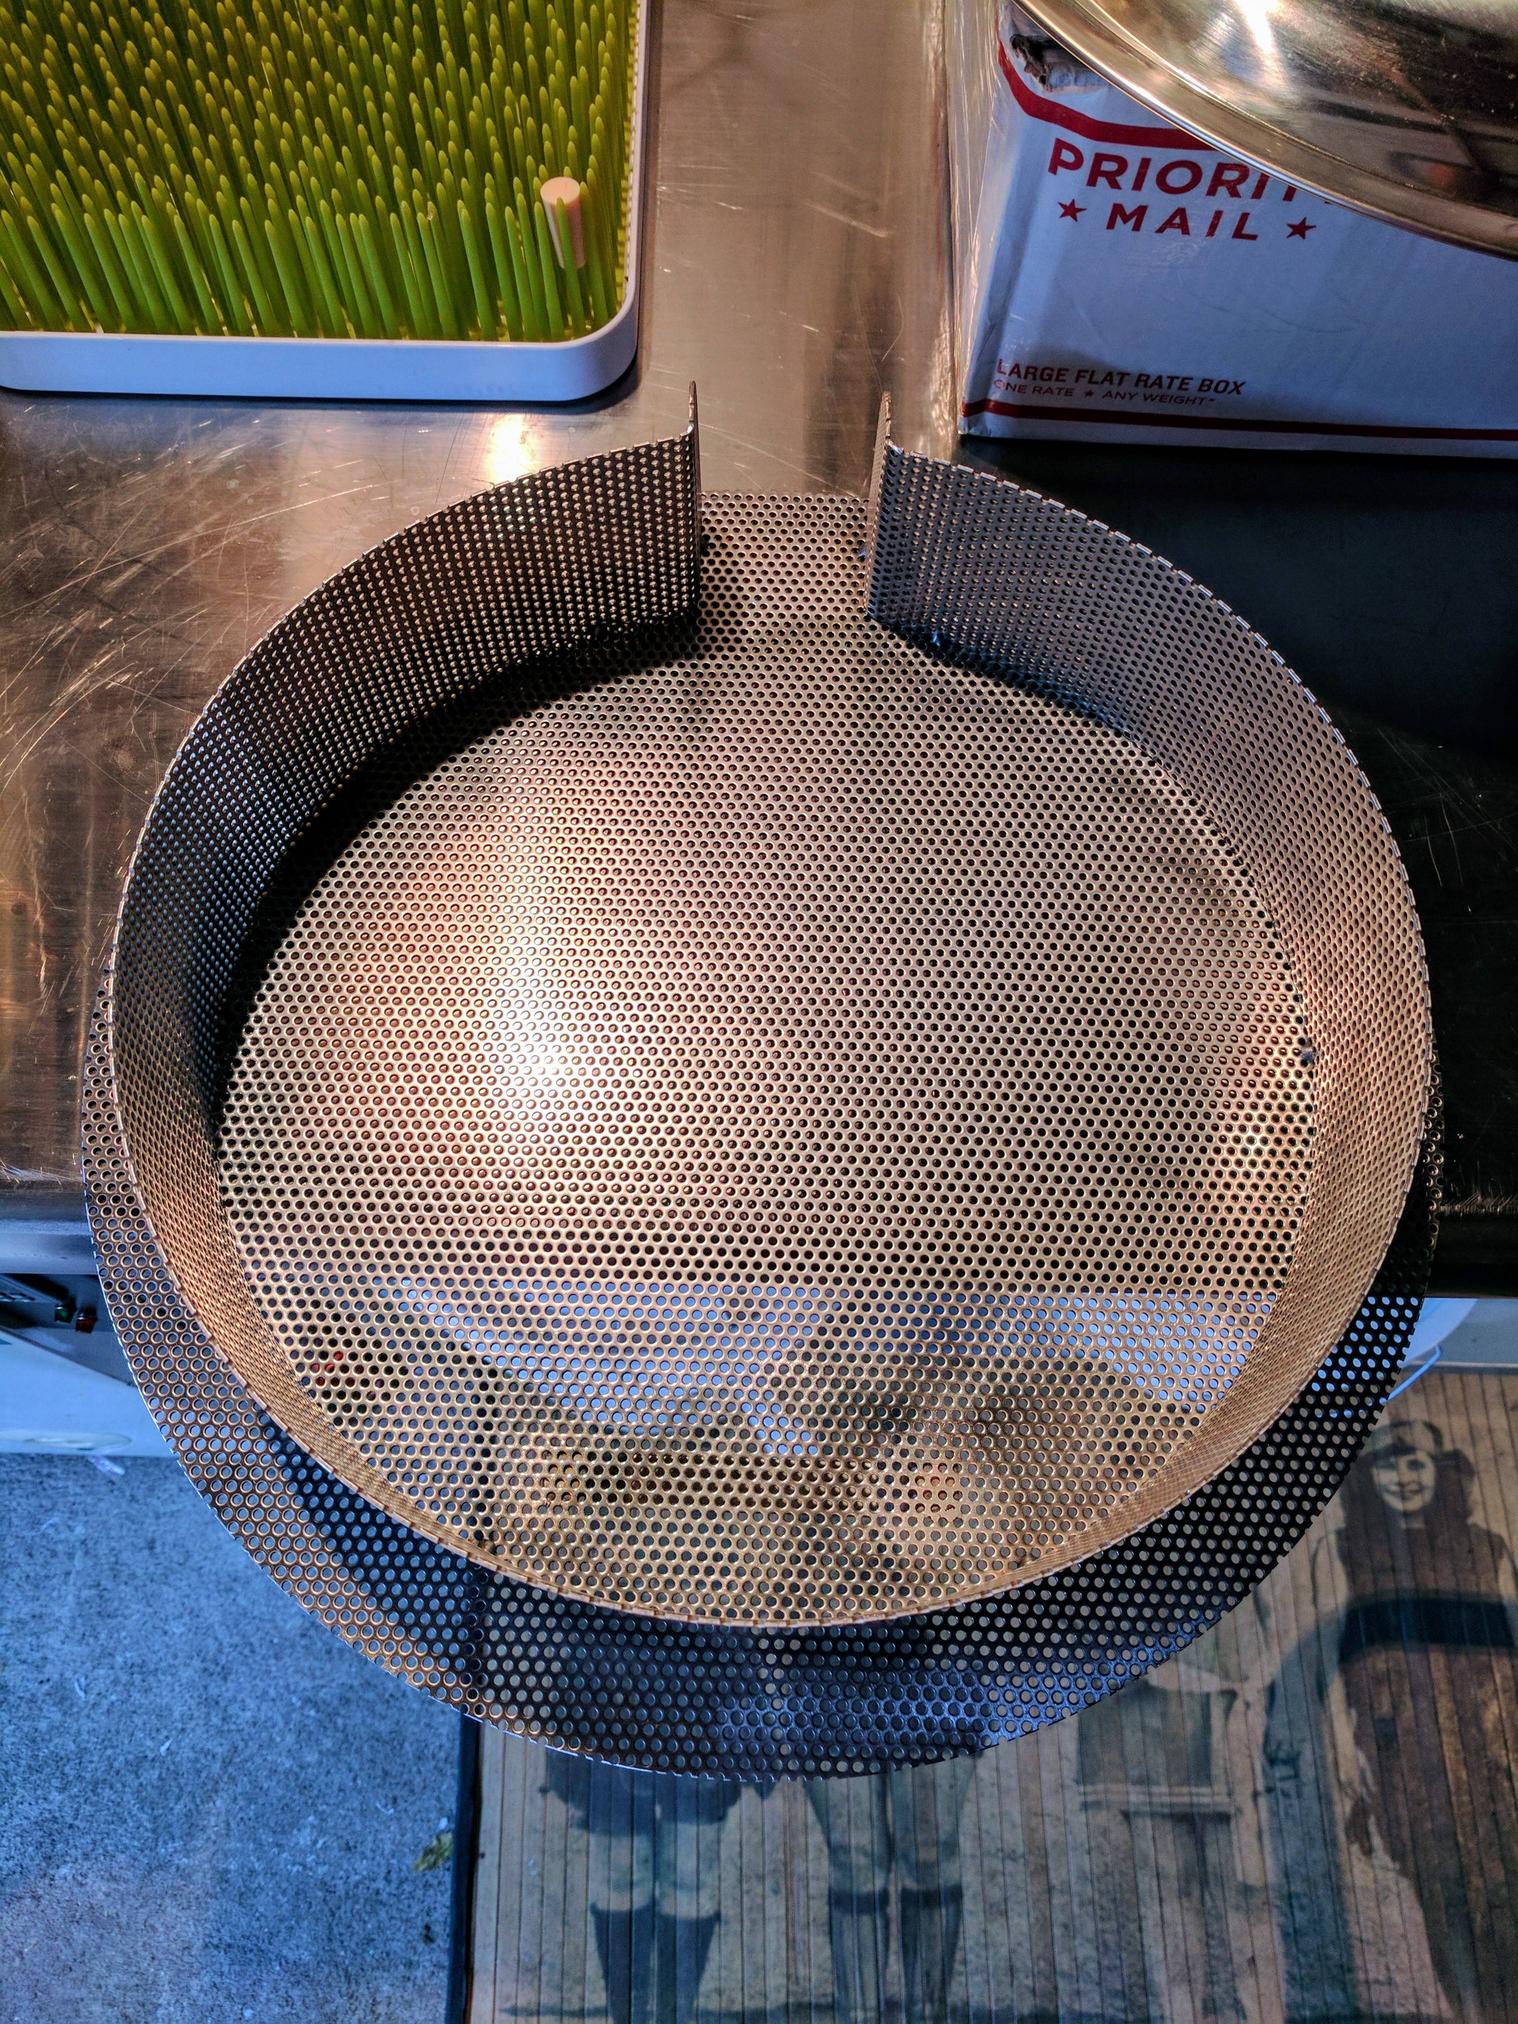
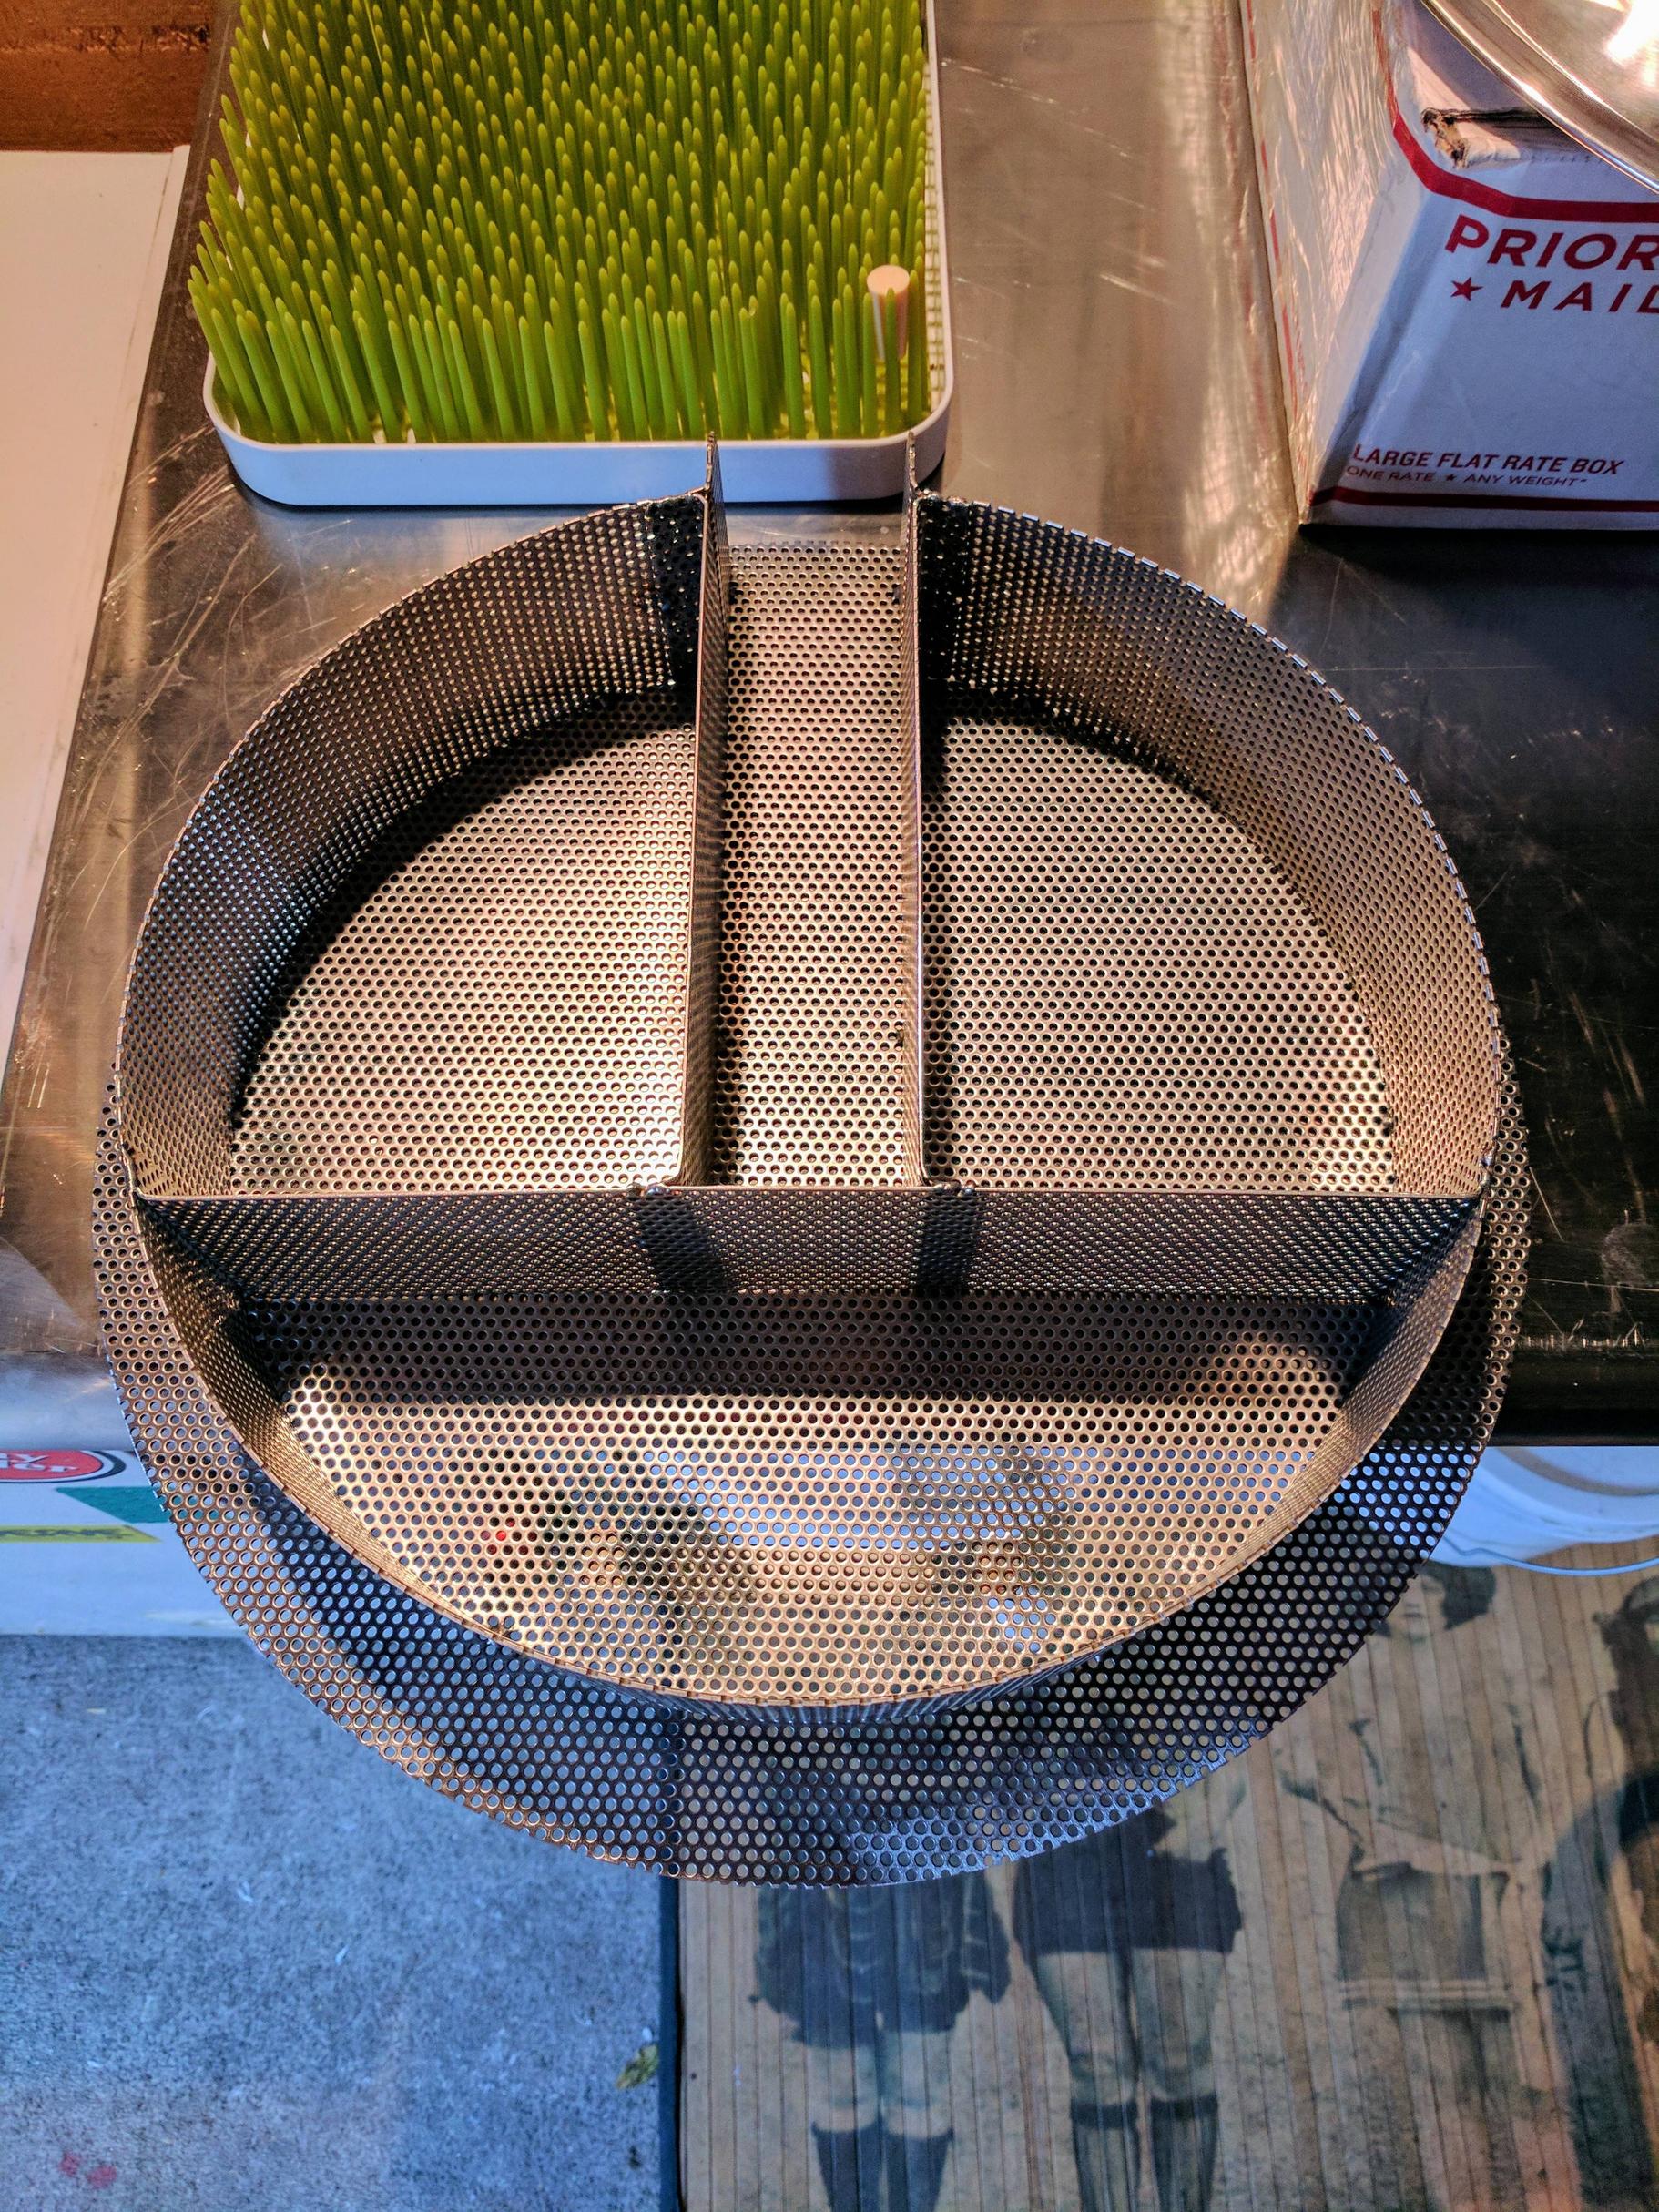
Underside of mash tun false bottom with level 2 filtration:

jFdA8WA.jpg


Inside of boil kettle with Norcal Brewing cut-to-length whirlpool arm and custom false bottom:

Qp2Ahsc.jpg


False bottom removed to show cut-to-length dip tube:

vWIl8r5.jpg


Underside of boil kettle false bottom with level 3 filtration:

ItQQkzs.jpg


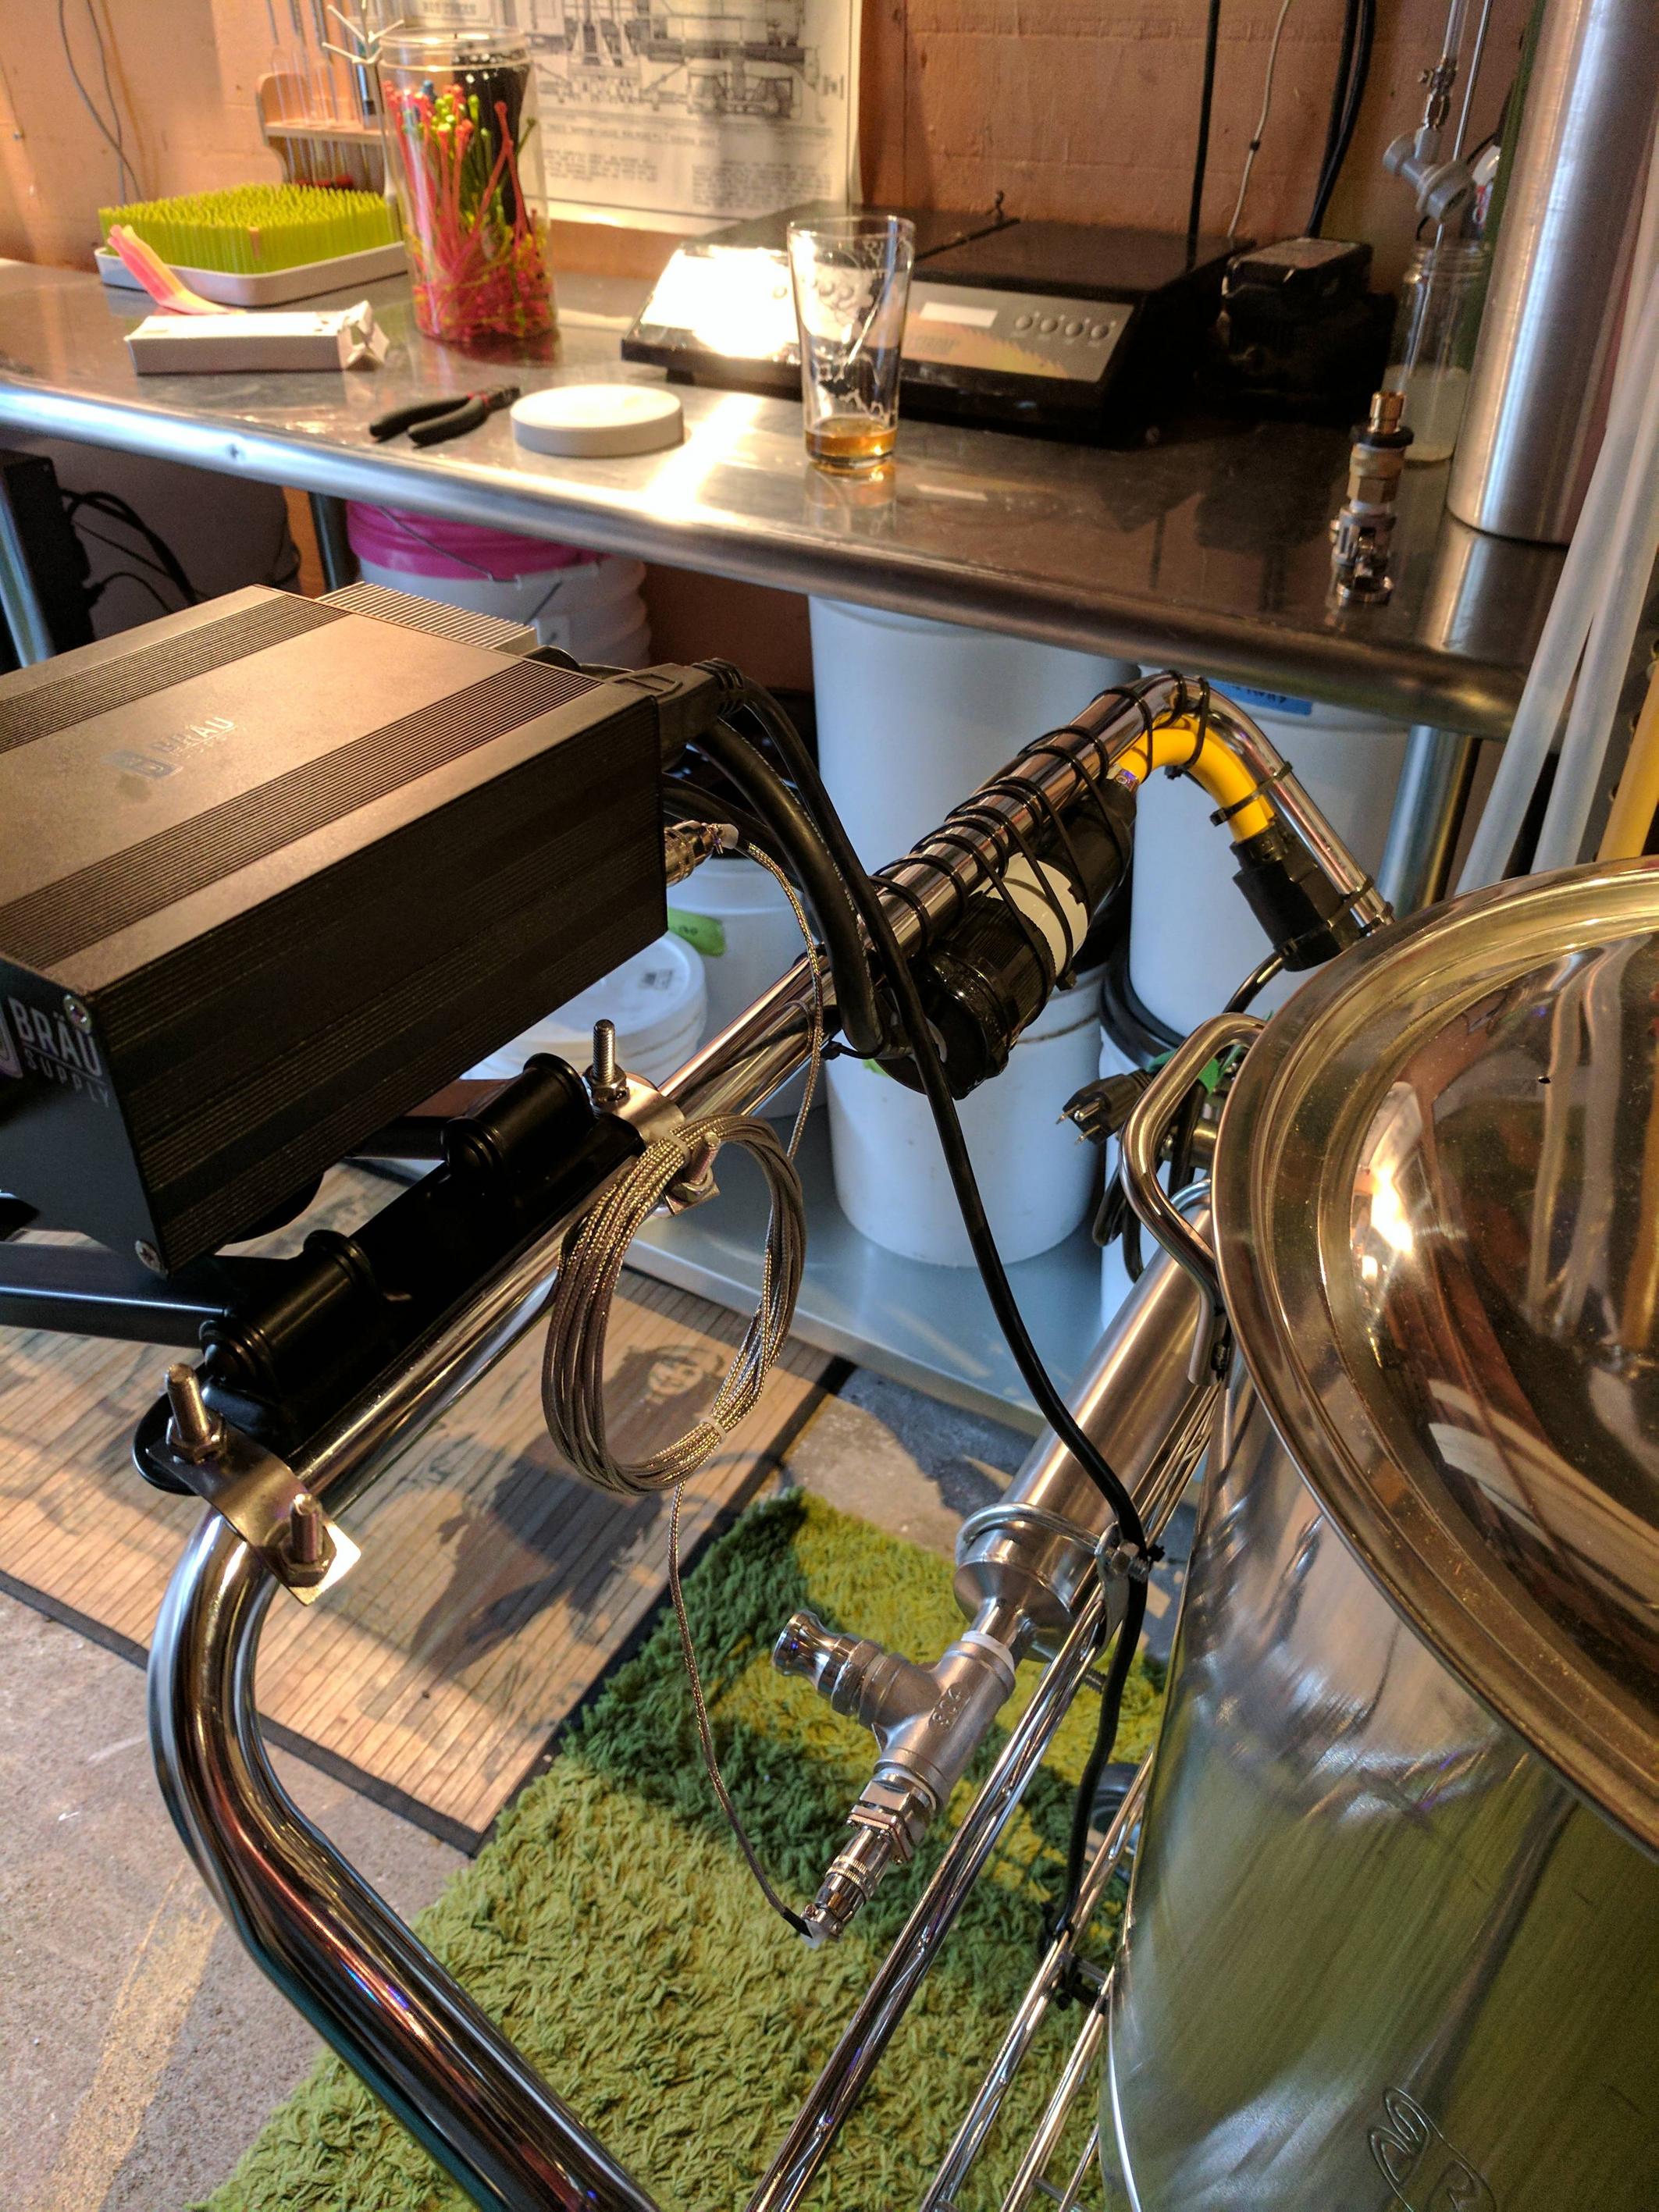
RIMS tube is the Jaybird thrifty RIMS tube with a William's Brewing 1500W 120V stainless steel heating element:

83nK9mX.jpg


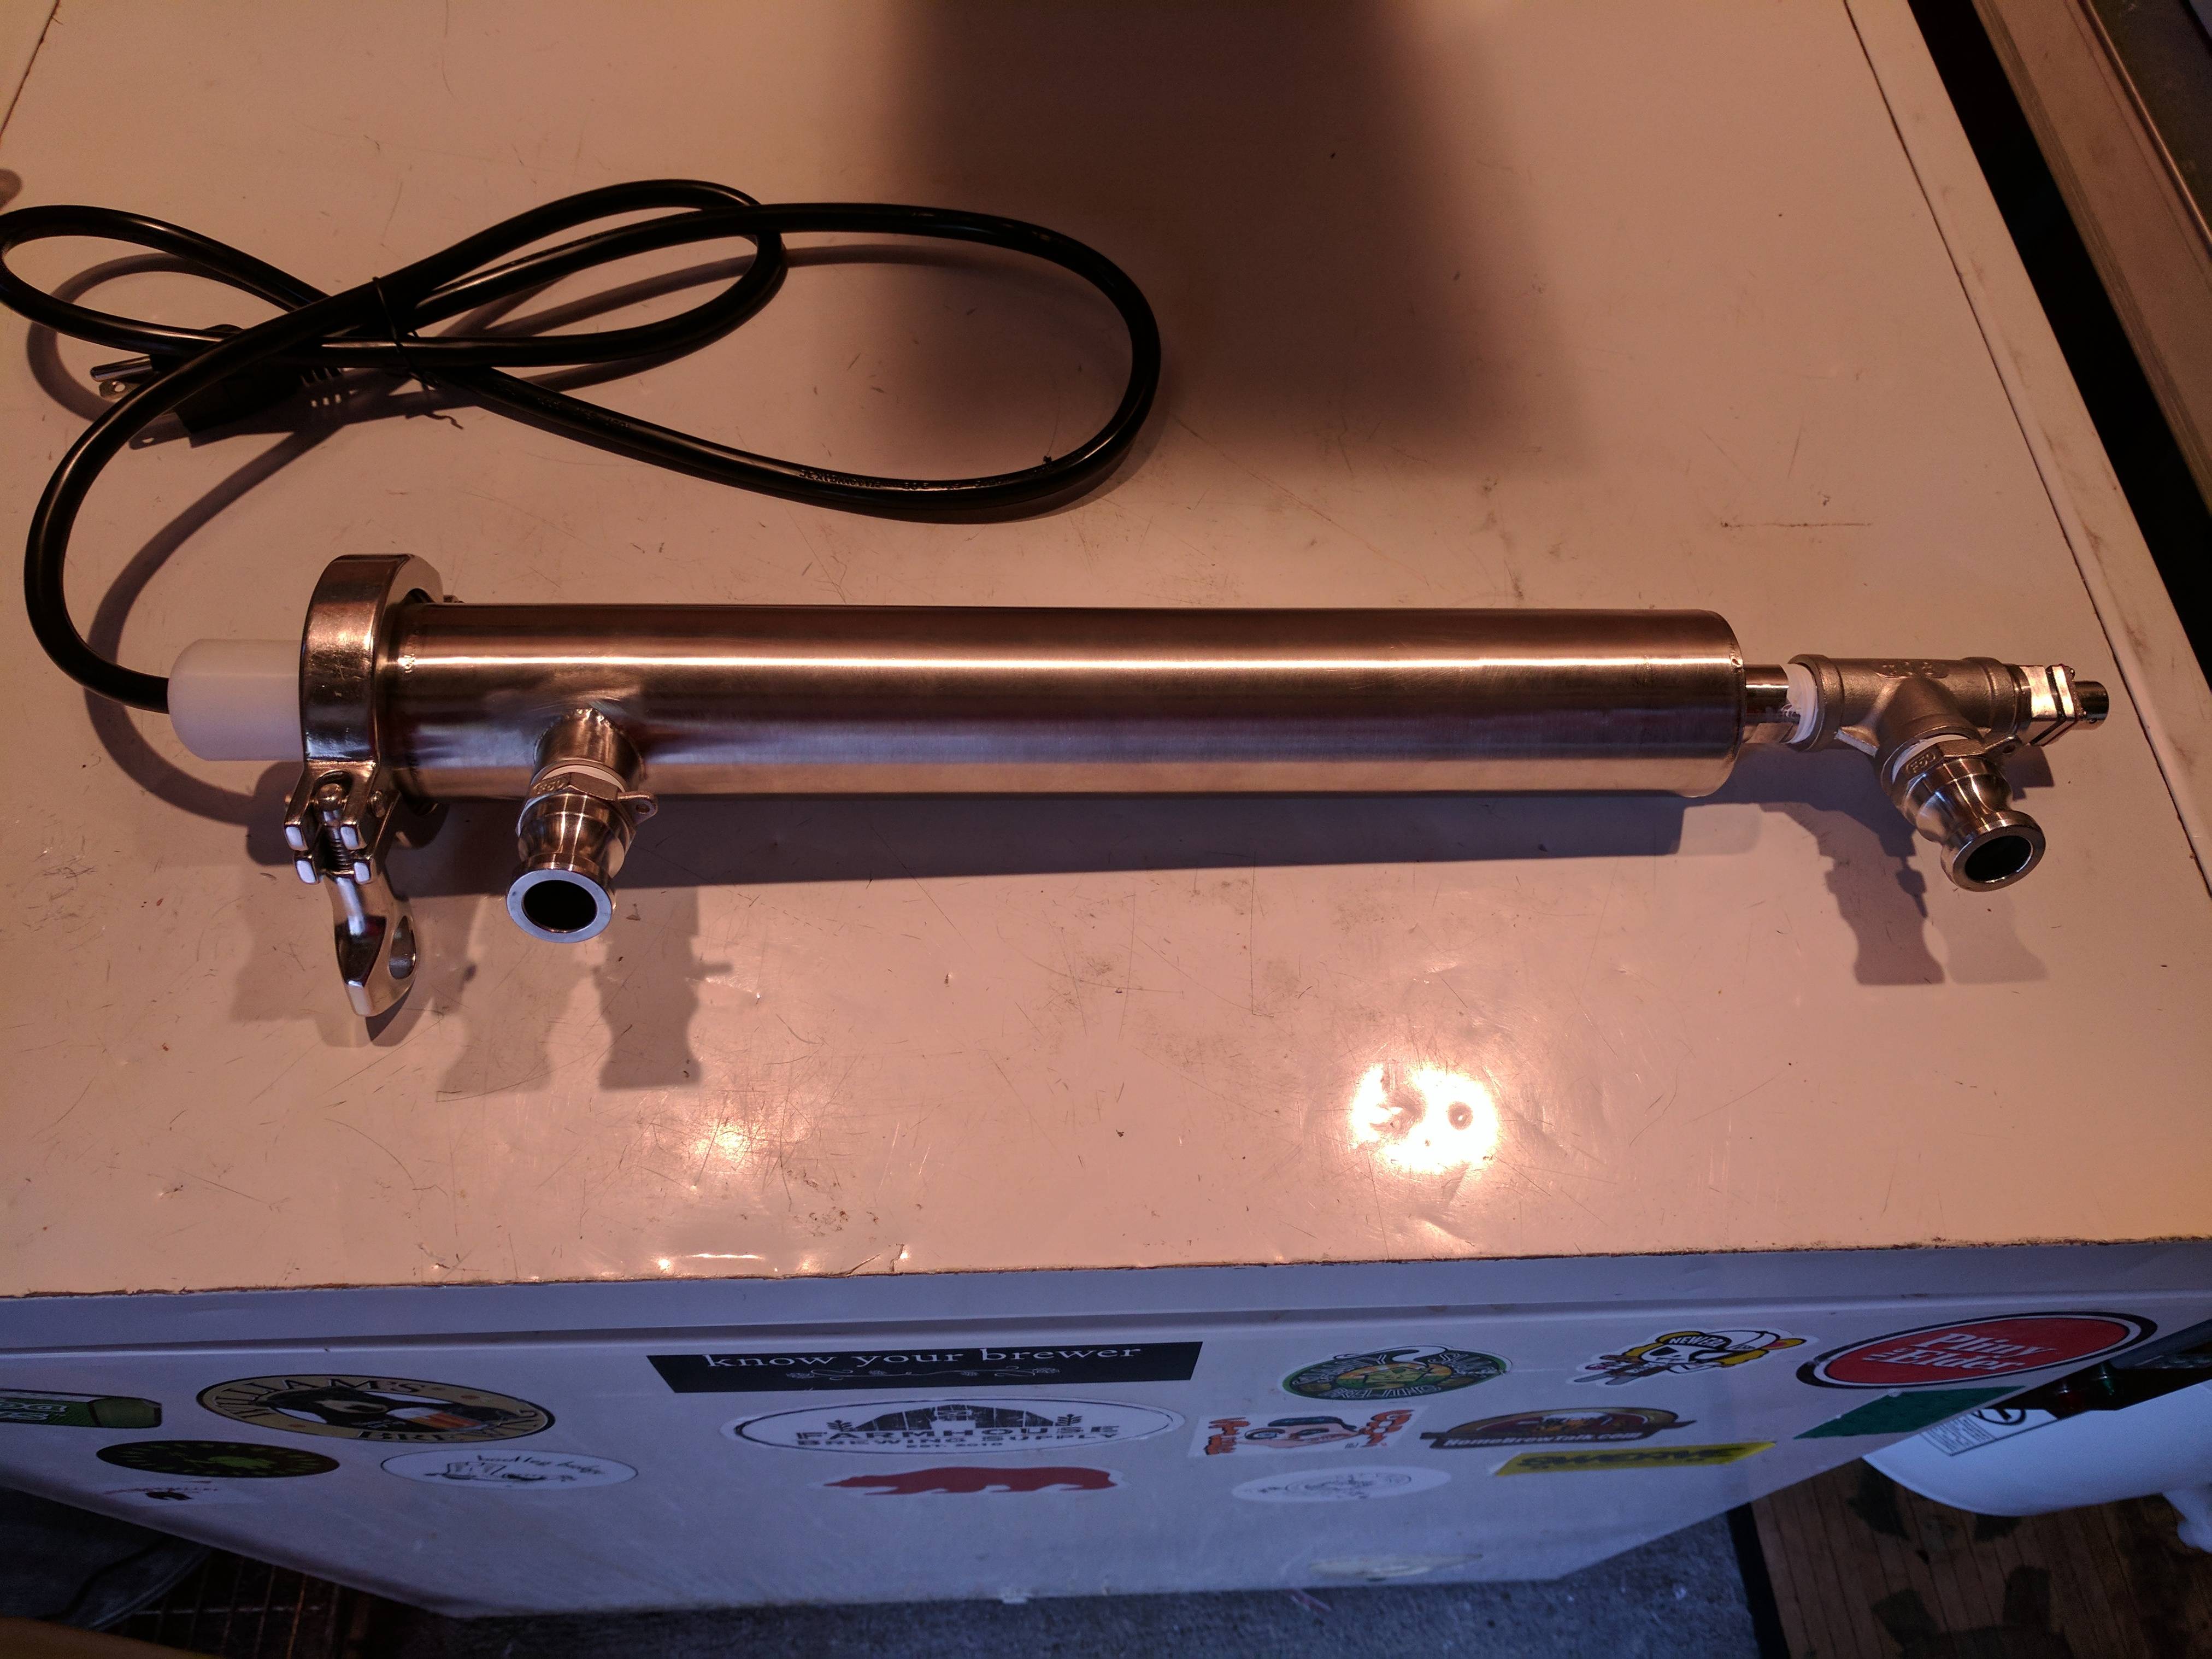
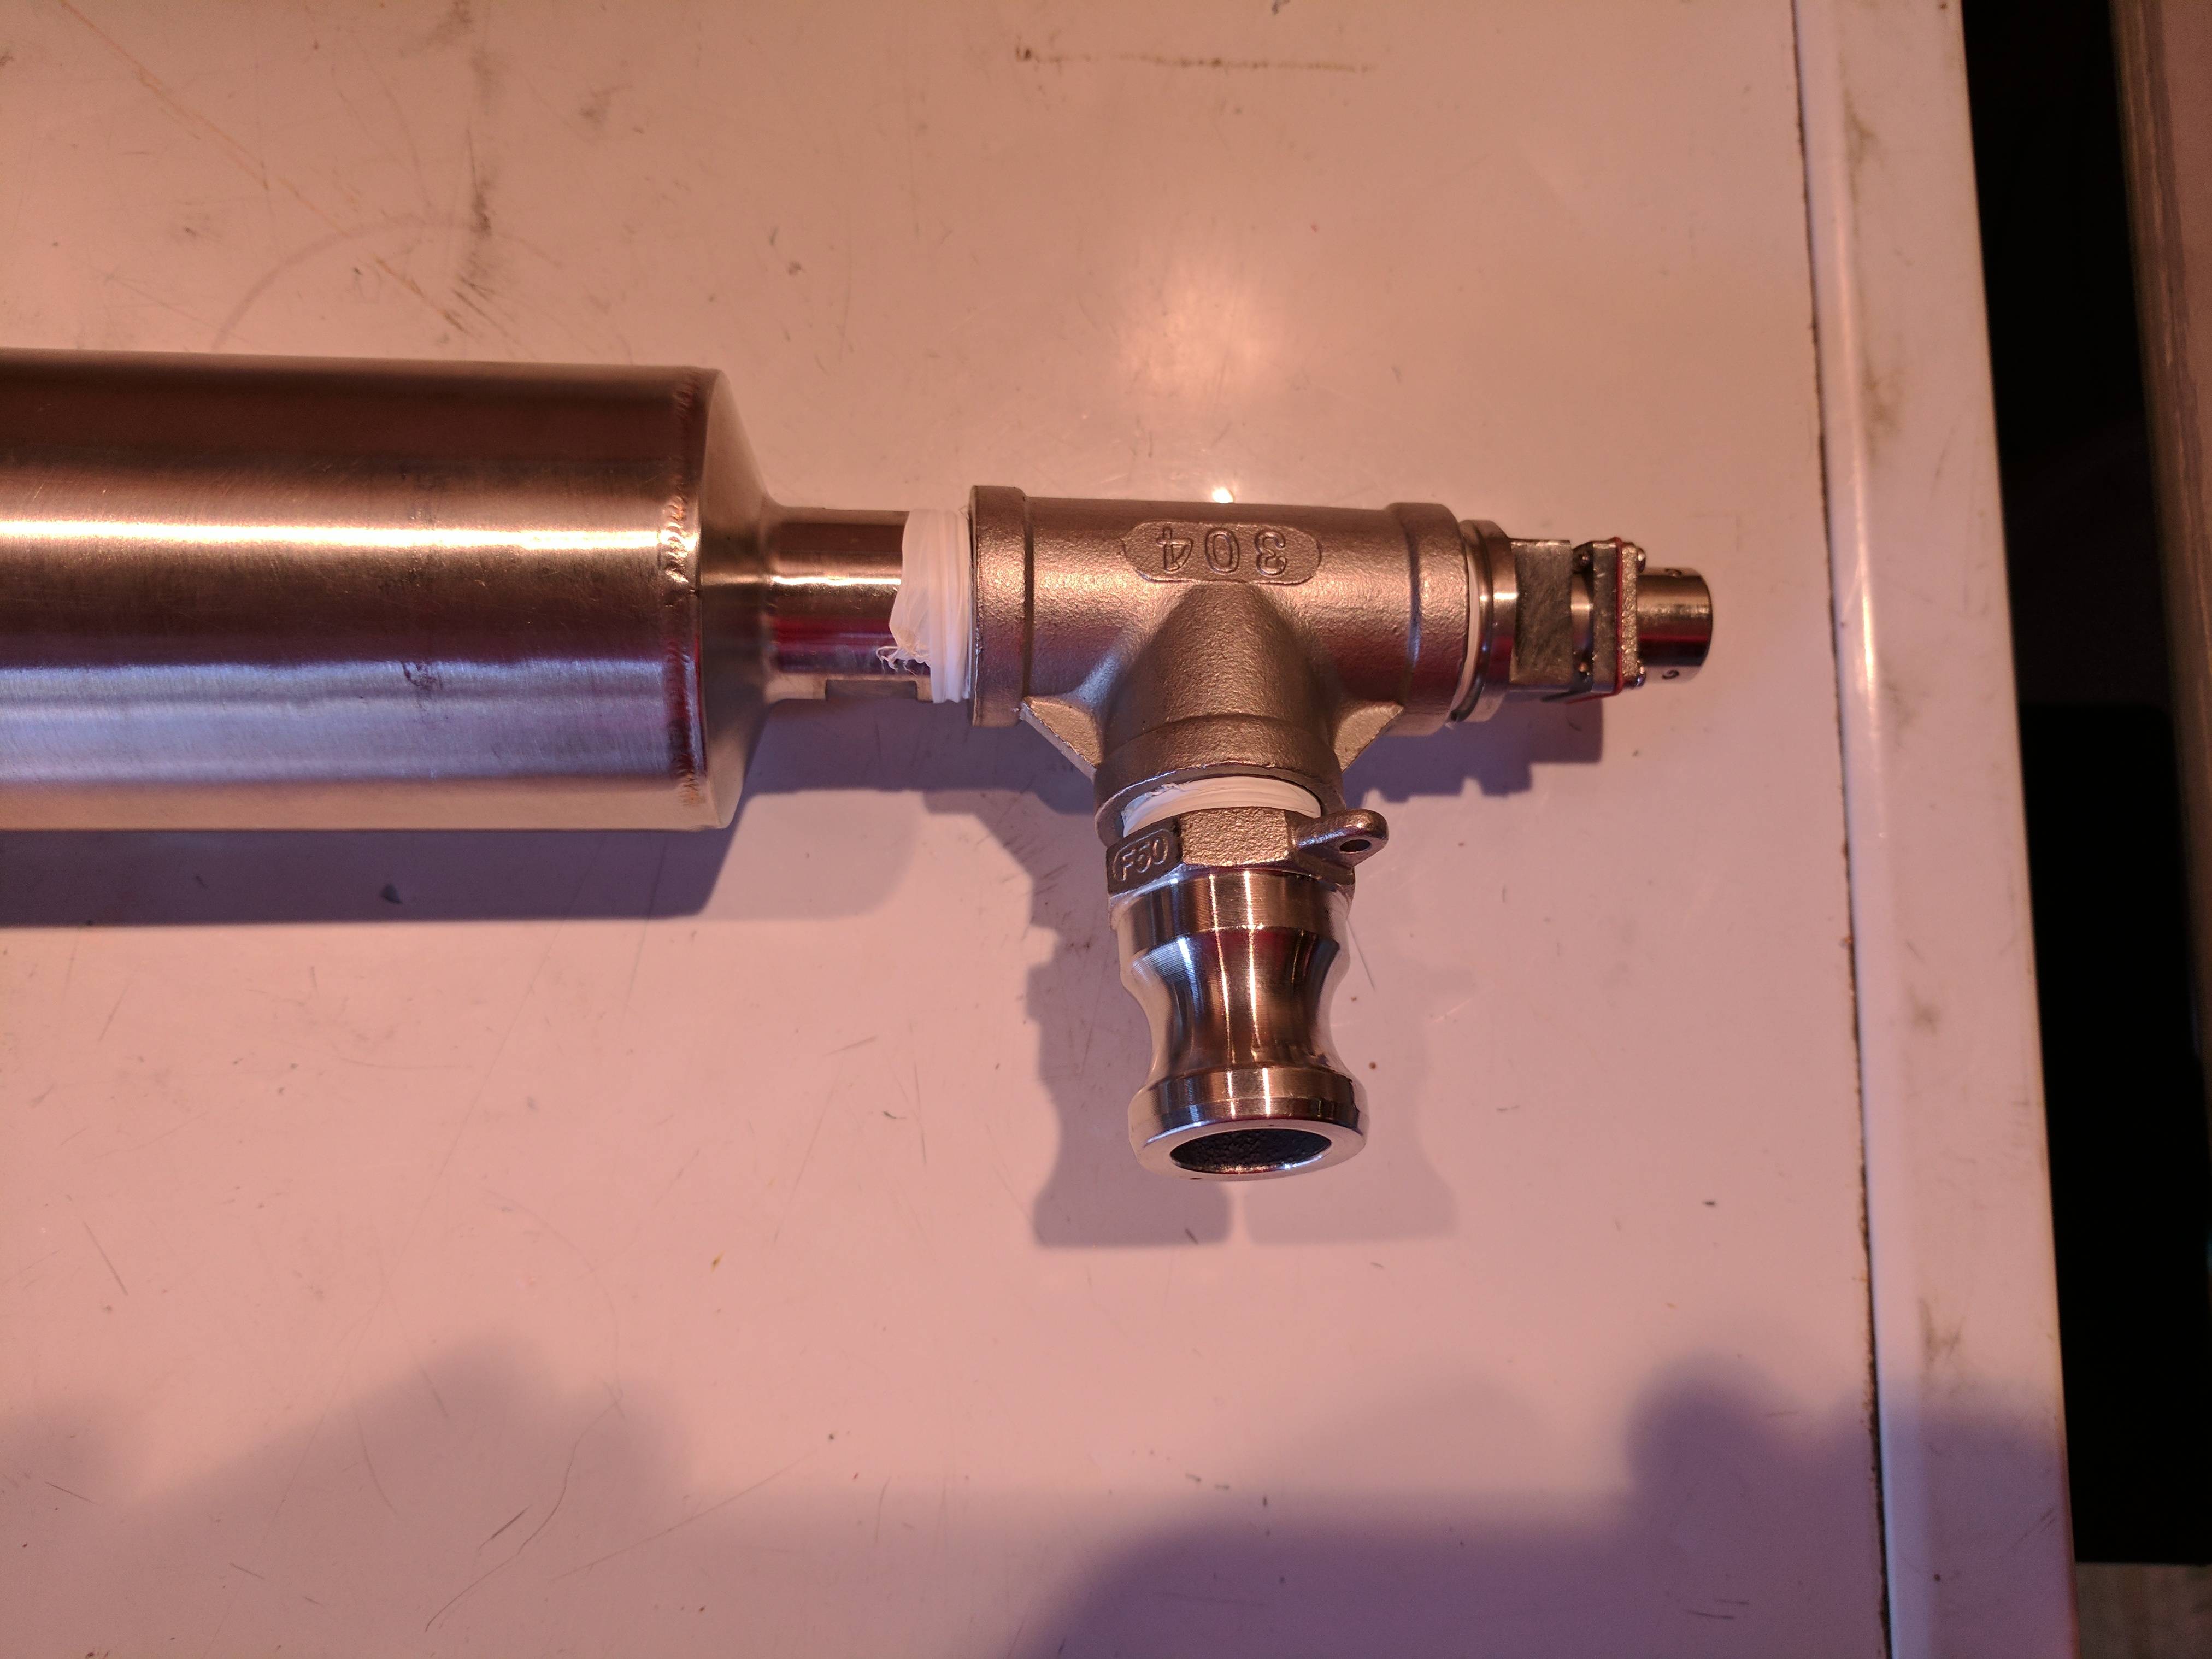
Close up of out side of the RIMS tube, stainless tee to camlock and the other part of the tee has the 1/2" temperature probe for my controller:

tfYxuMm.jpg


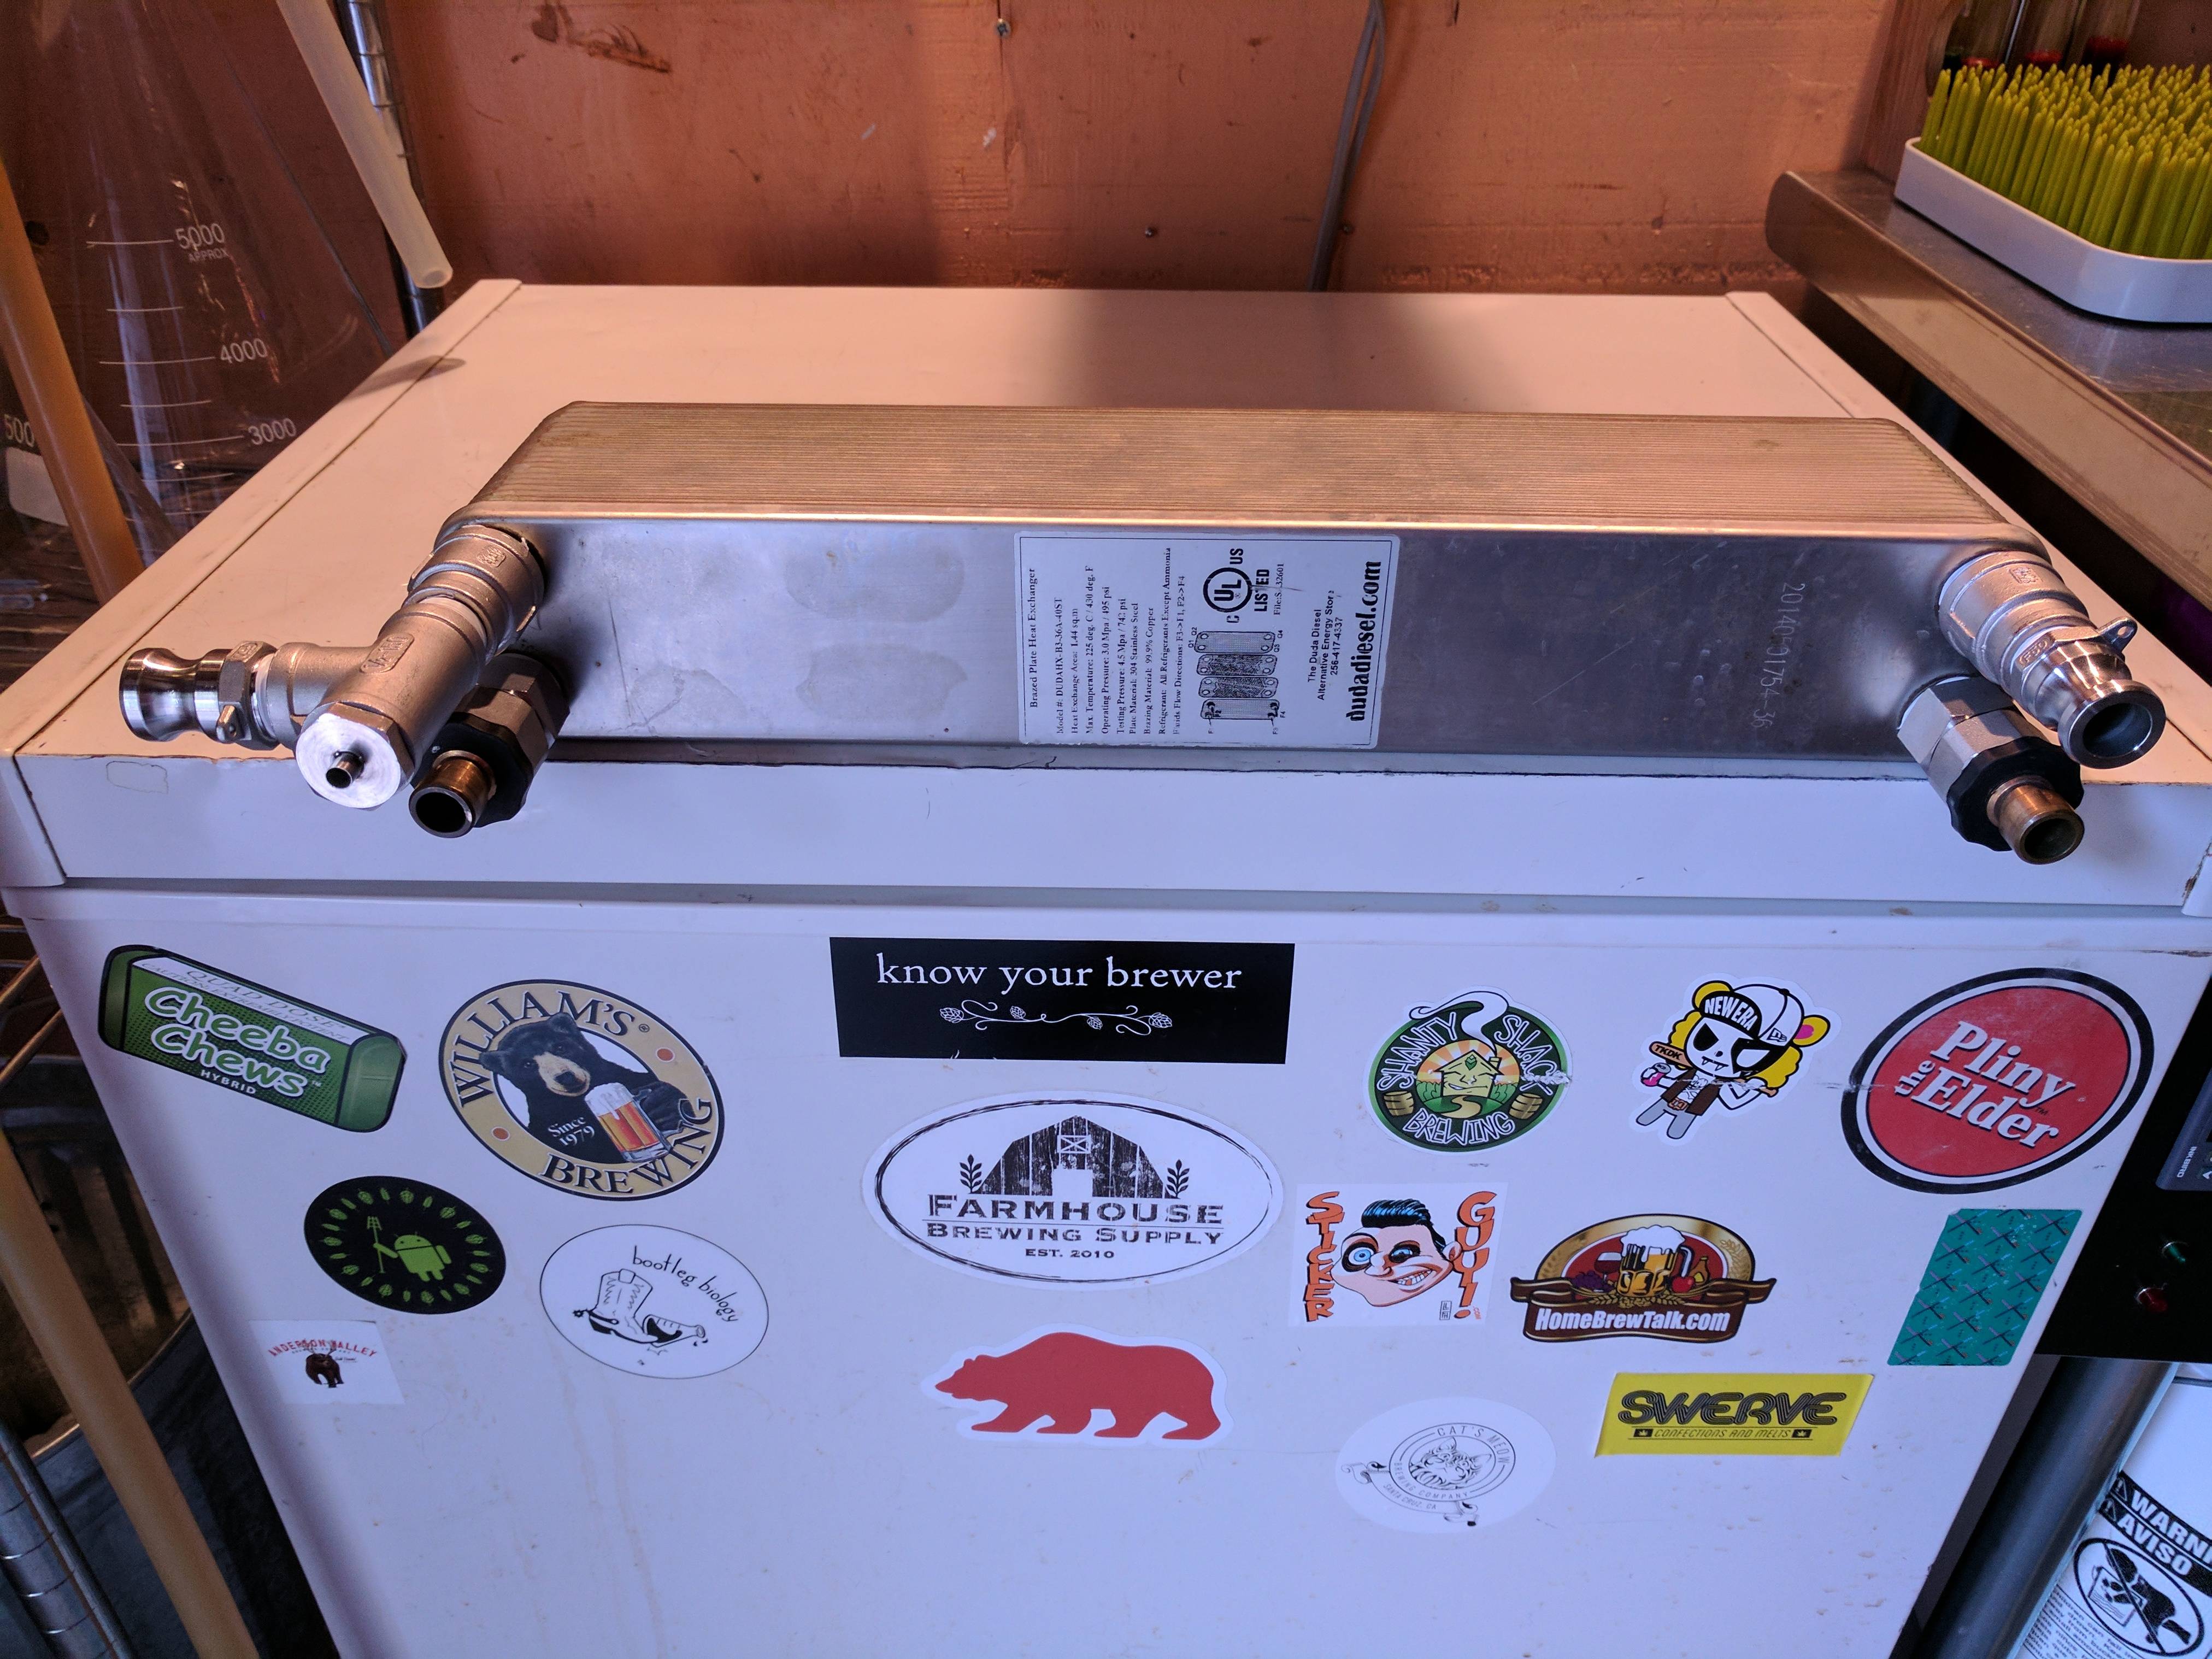
Duda 40-plate chiller with garden hose quick-disconnects for the water, camlocks for the wort. Out side has another tee to a camlock and a thermowell to stick in my Thermapen thermometer:

oyTMdRn.jpg


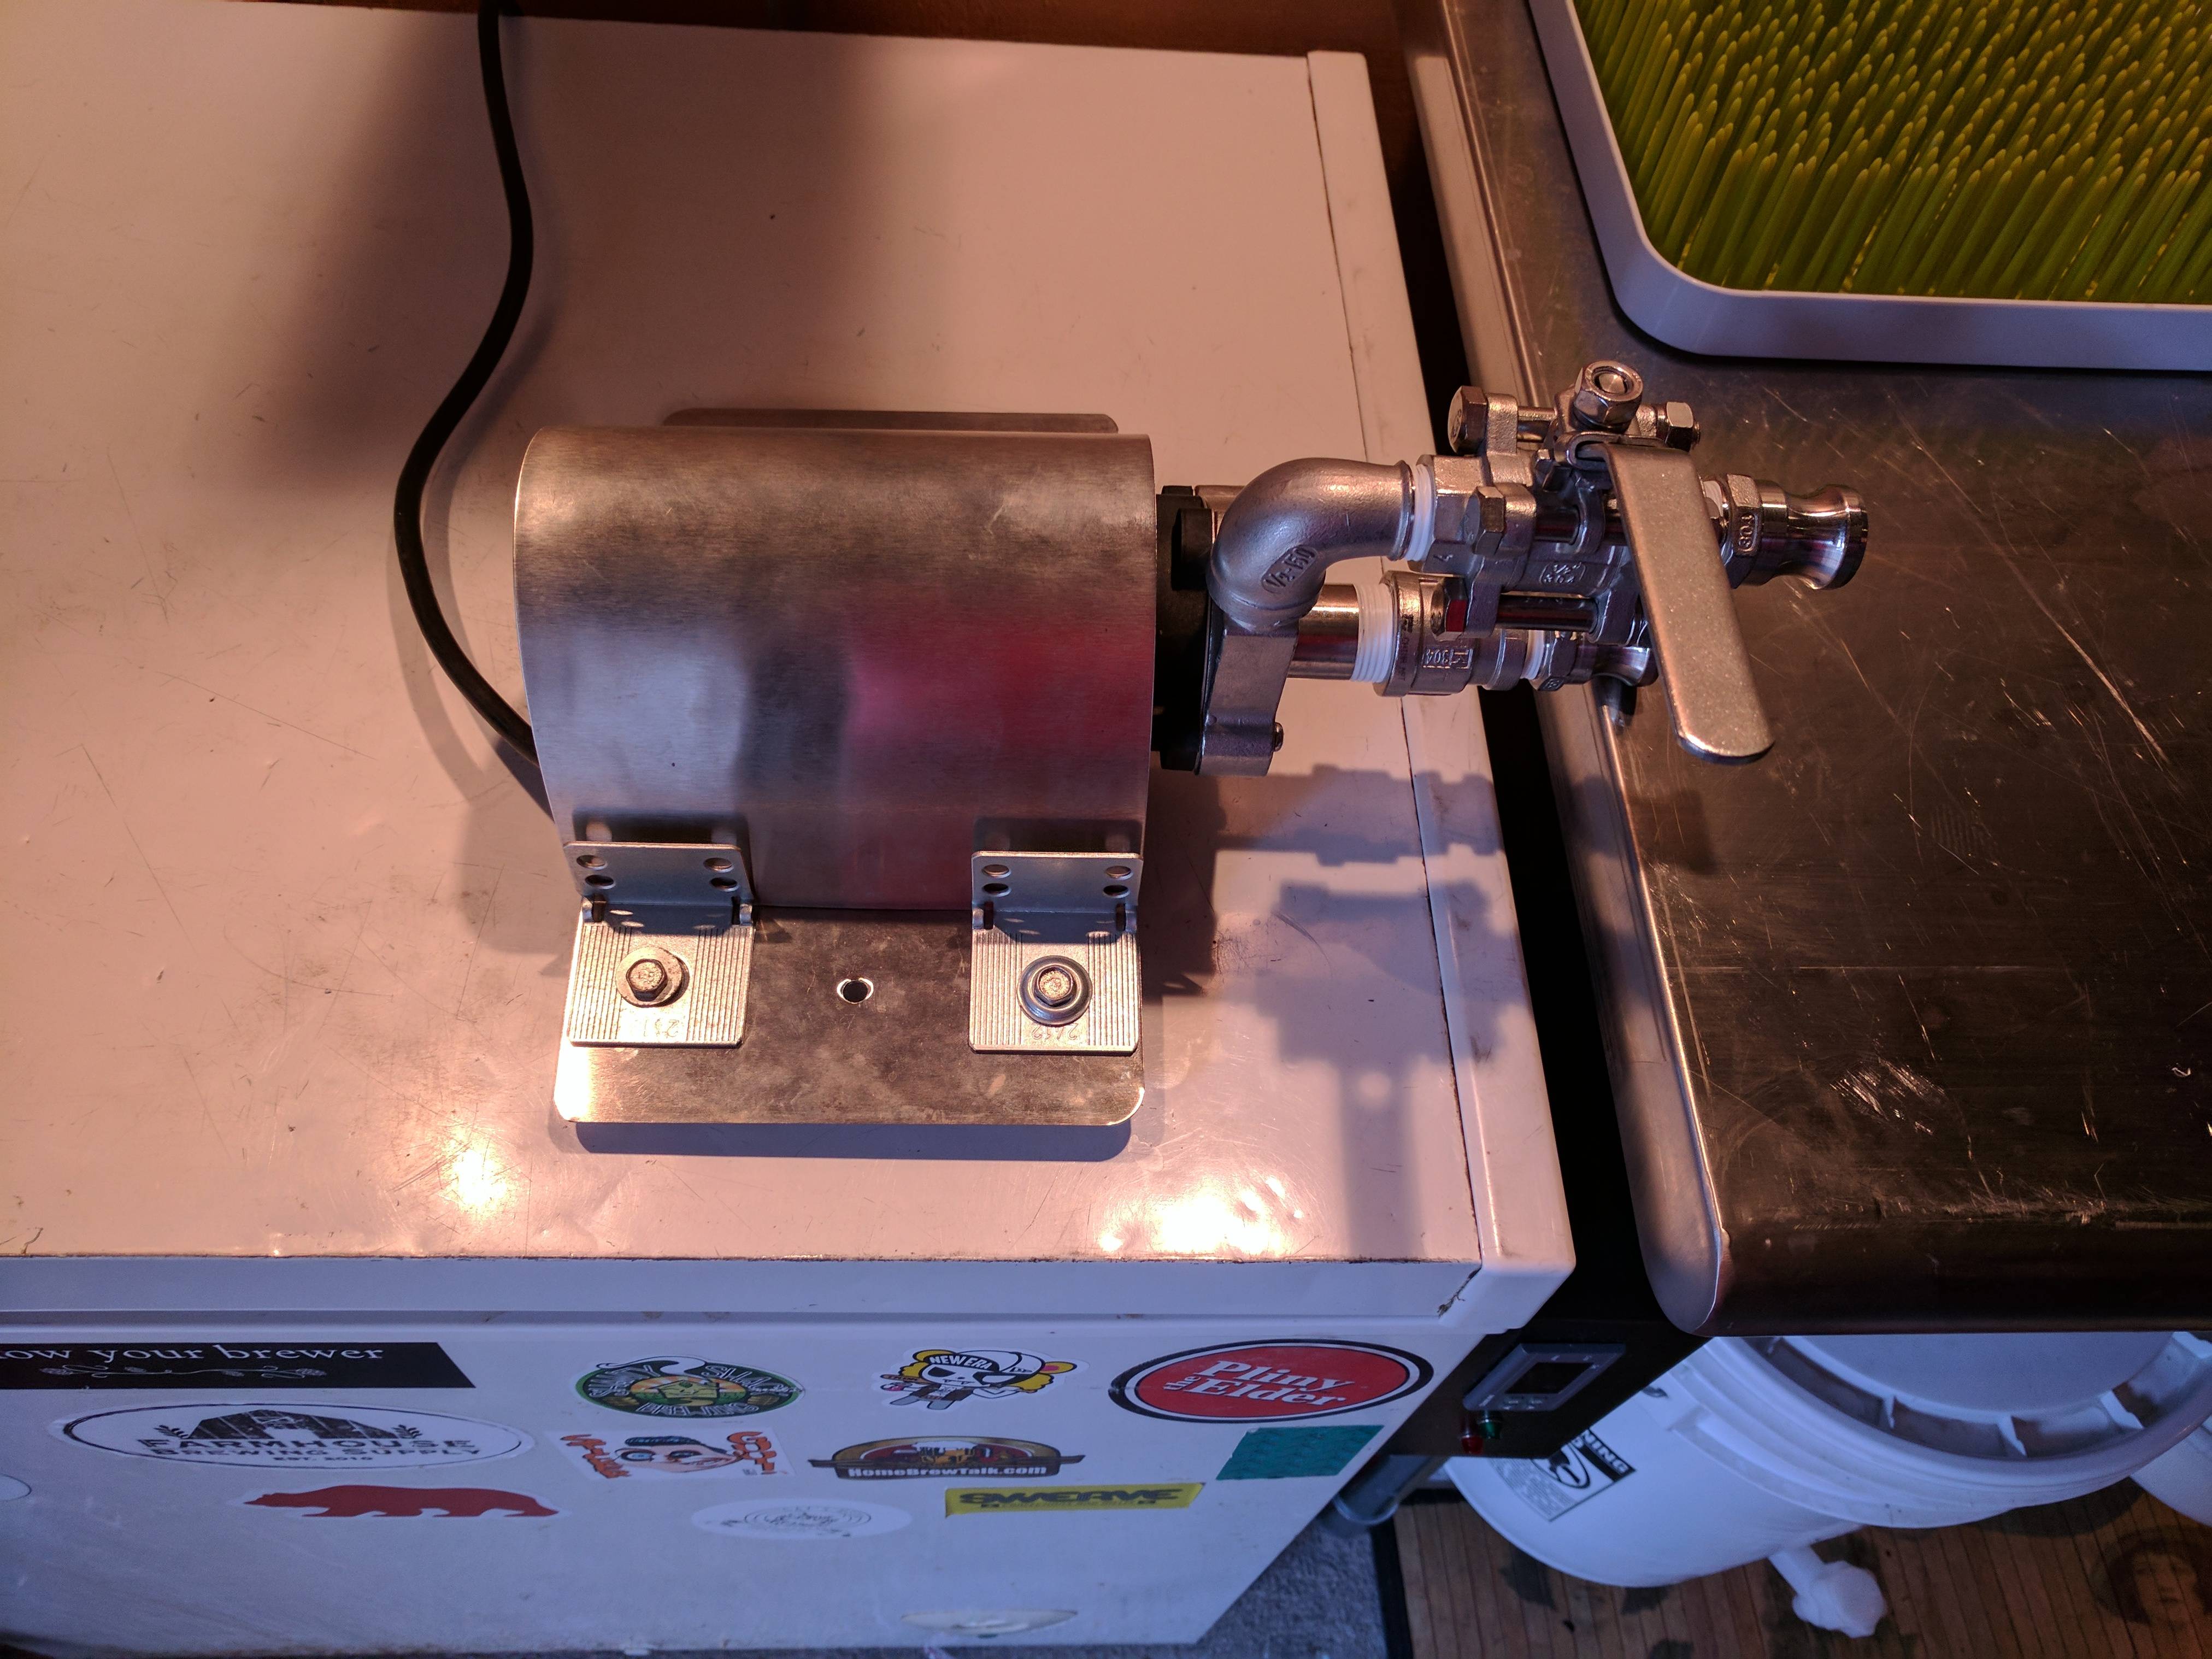
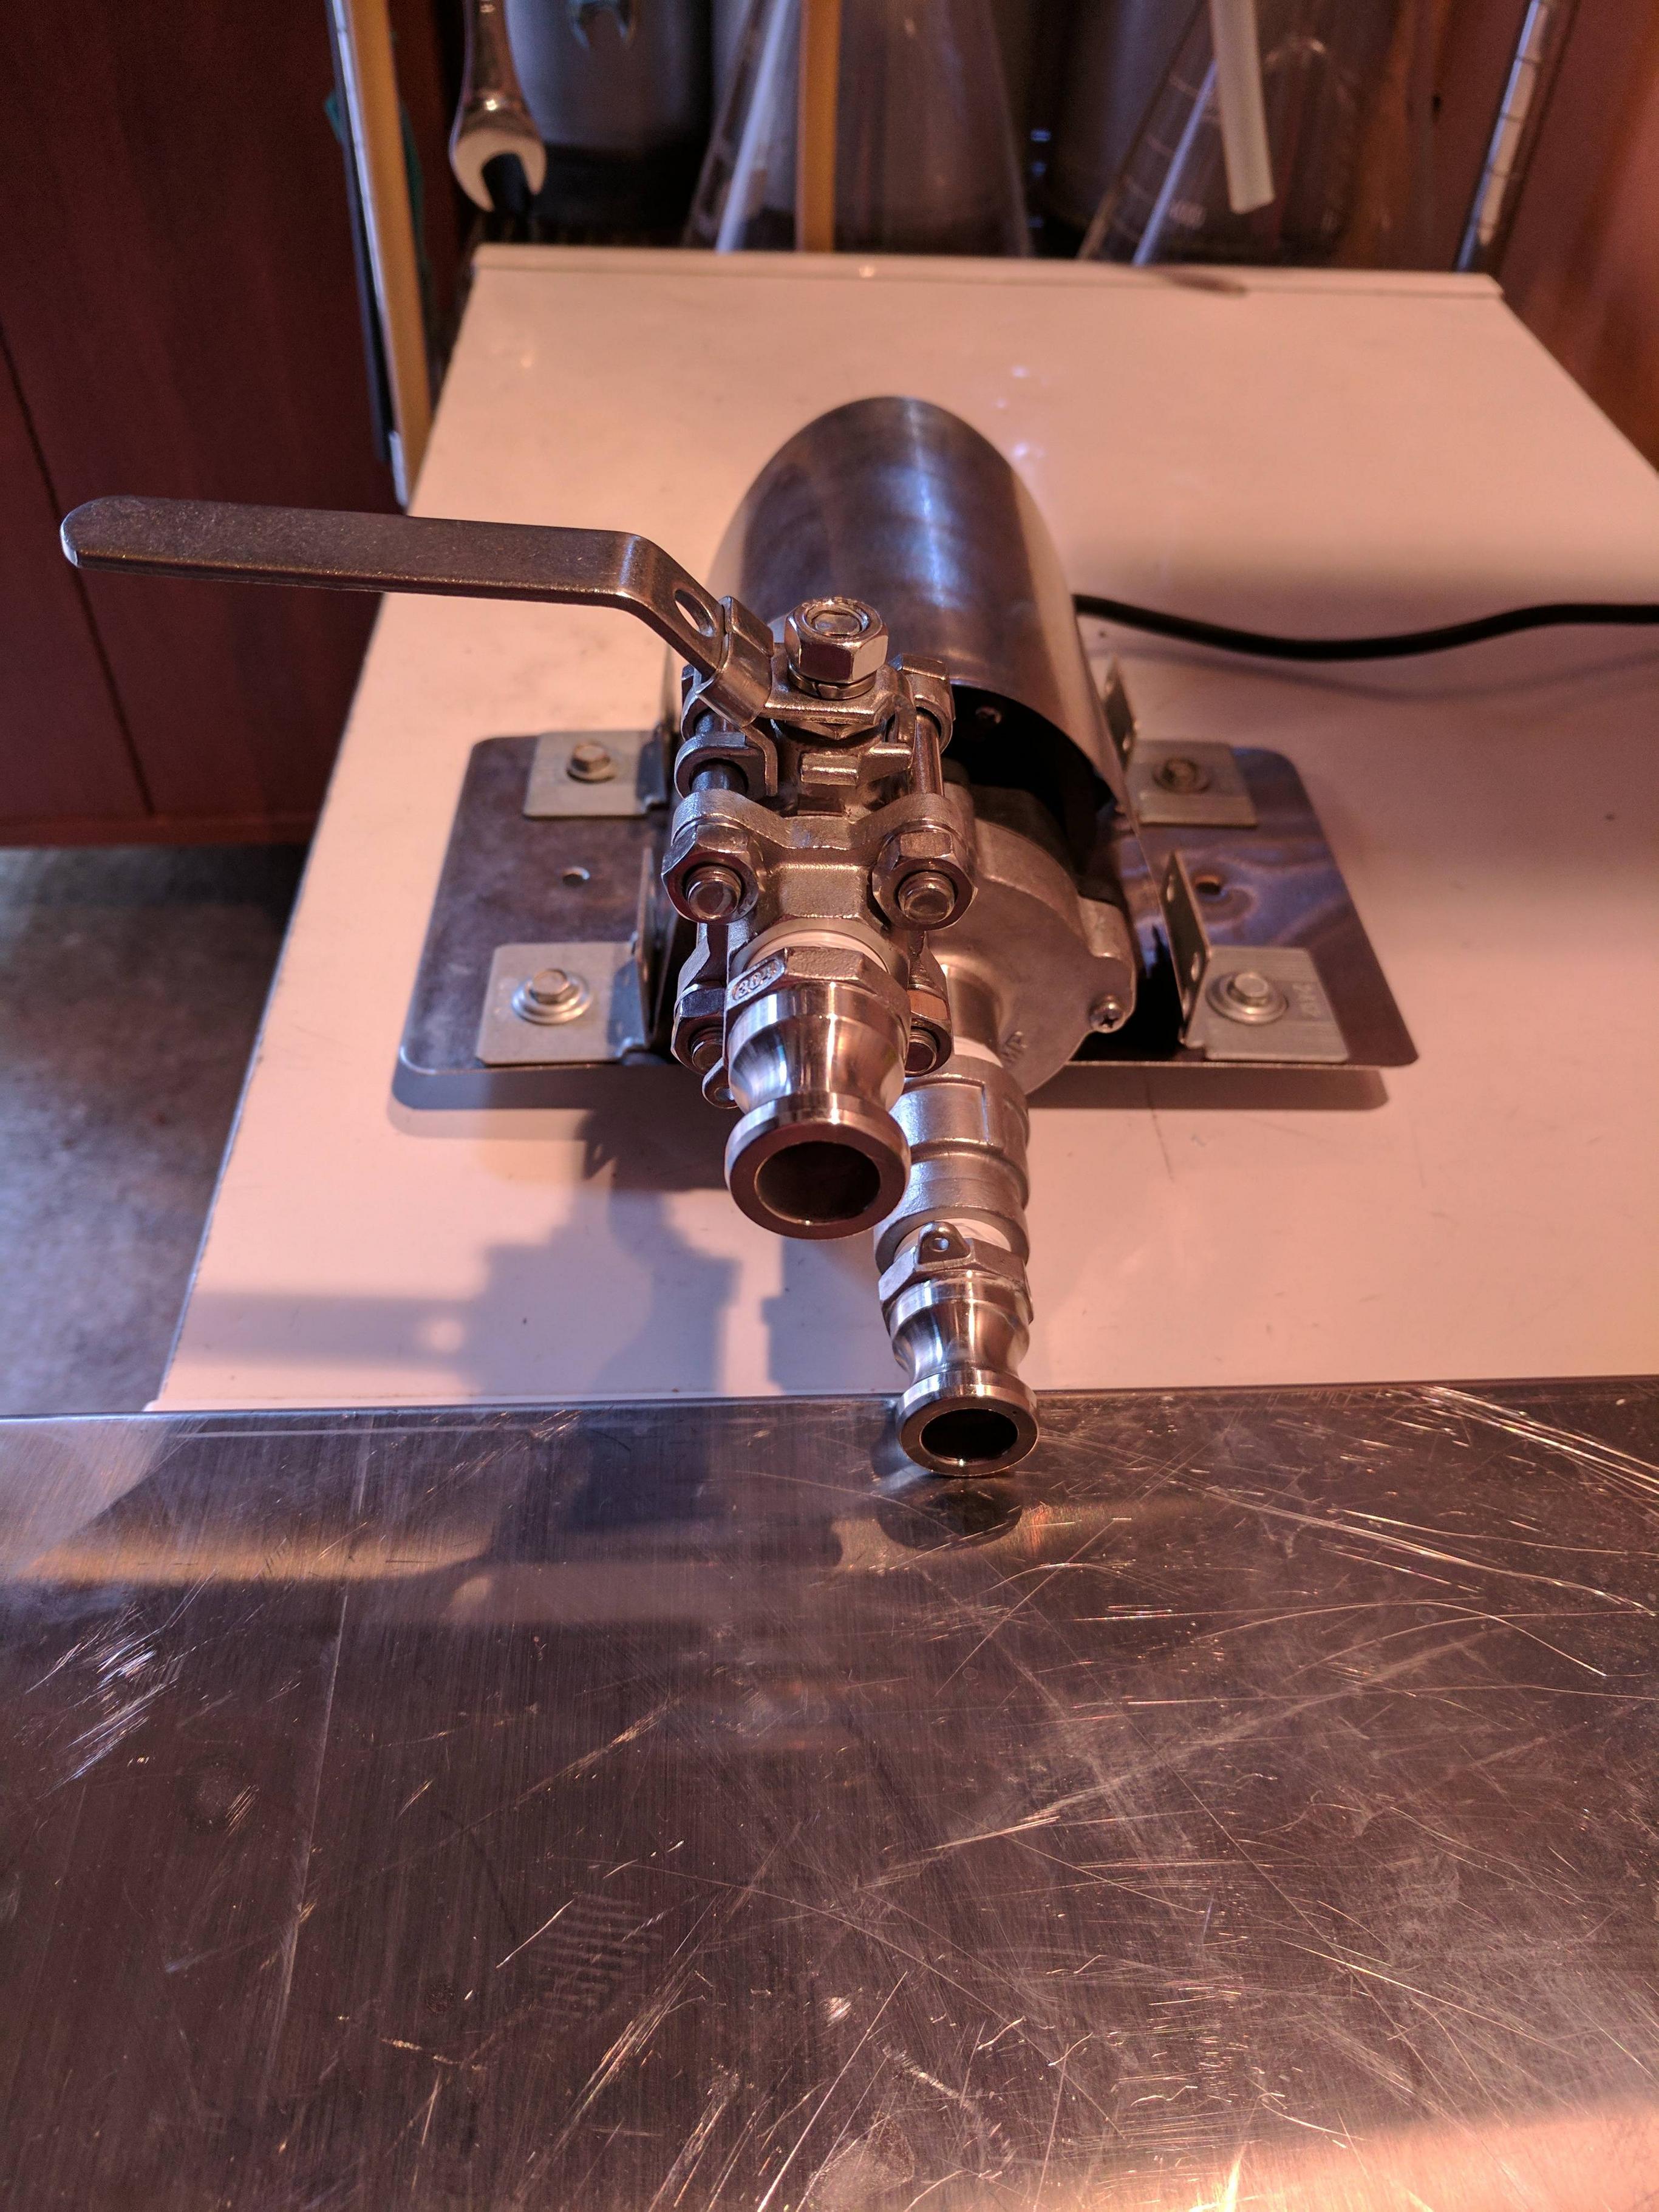
Pump is a center inlet stainless steel chugger pump. I repurposed the heat shields that came with the kettles and some other hardware I had laying around to make a stainless mounting plate and pump cover:

9om04zr.jpg


RQhqfH0.jpg


Blichmann 140,000 BTU Hellfire burner should heat up strike water and get things to a boil quickly:

1ITJHQ5.jpg


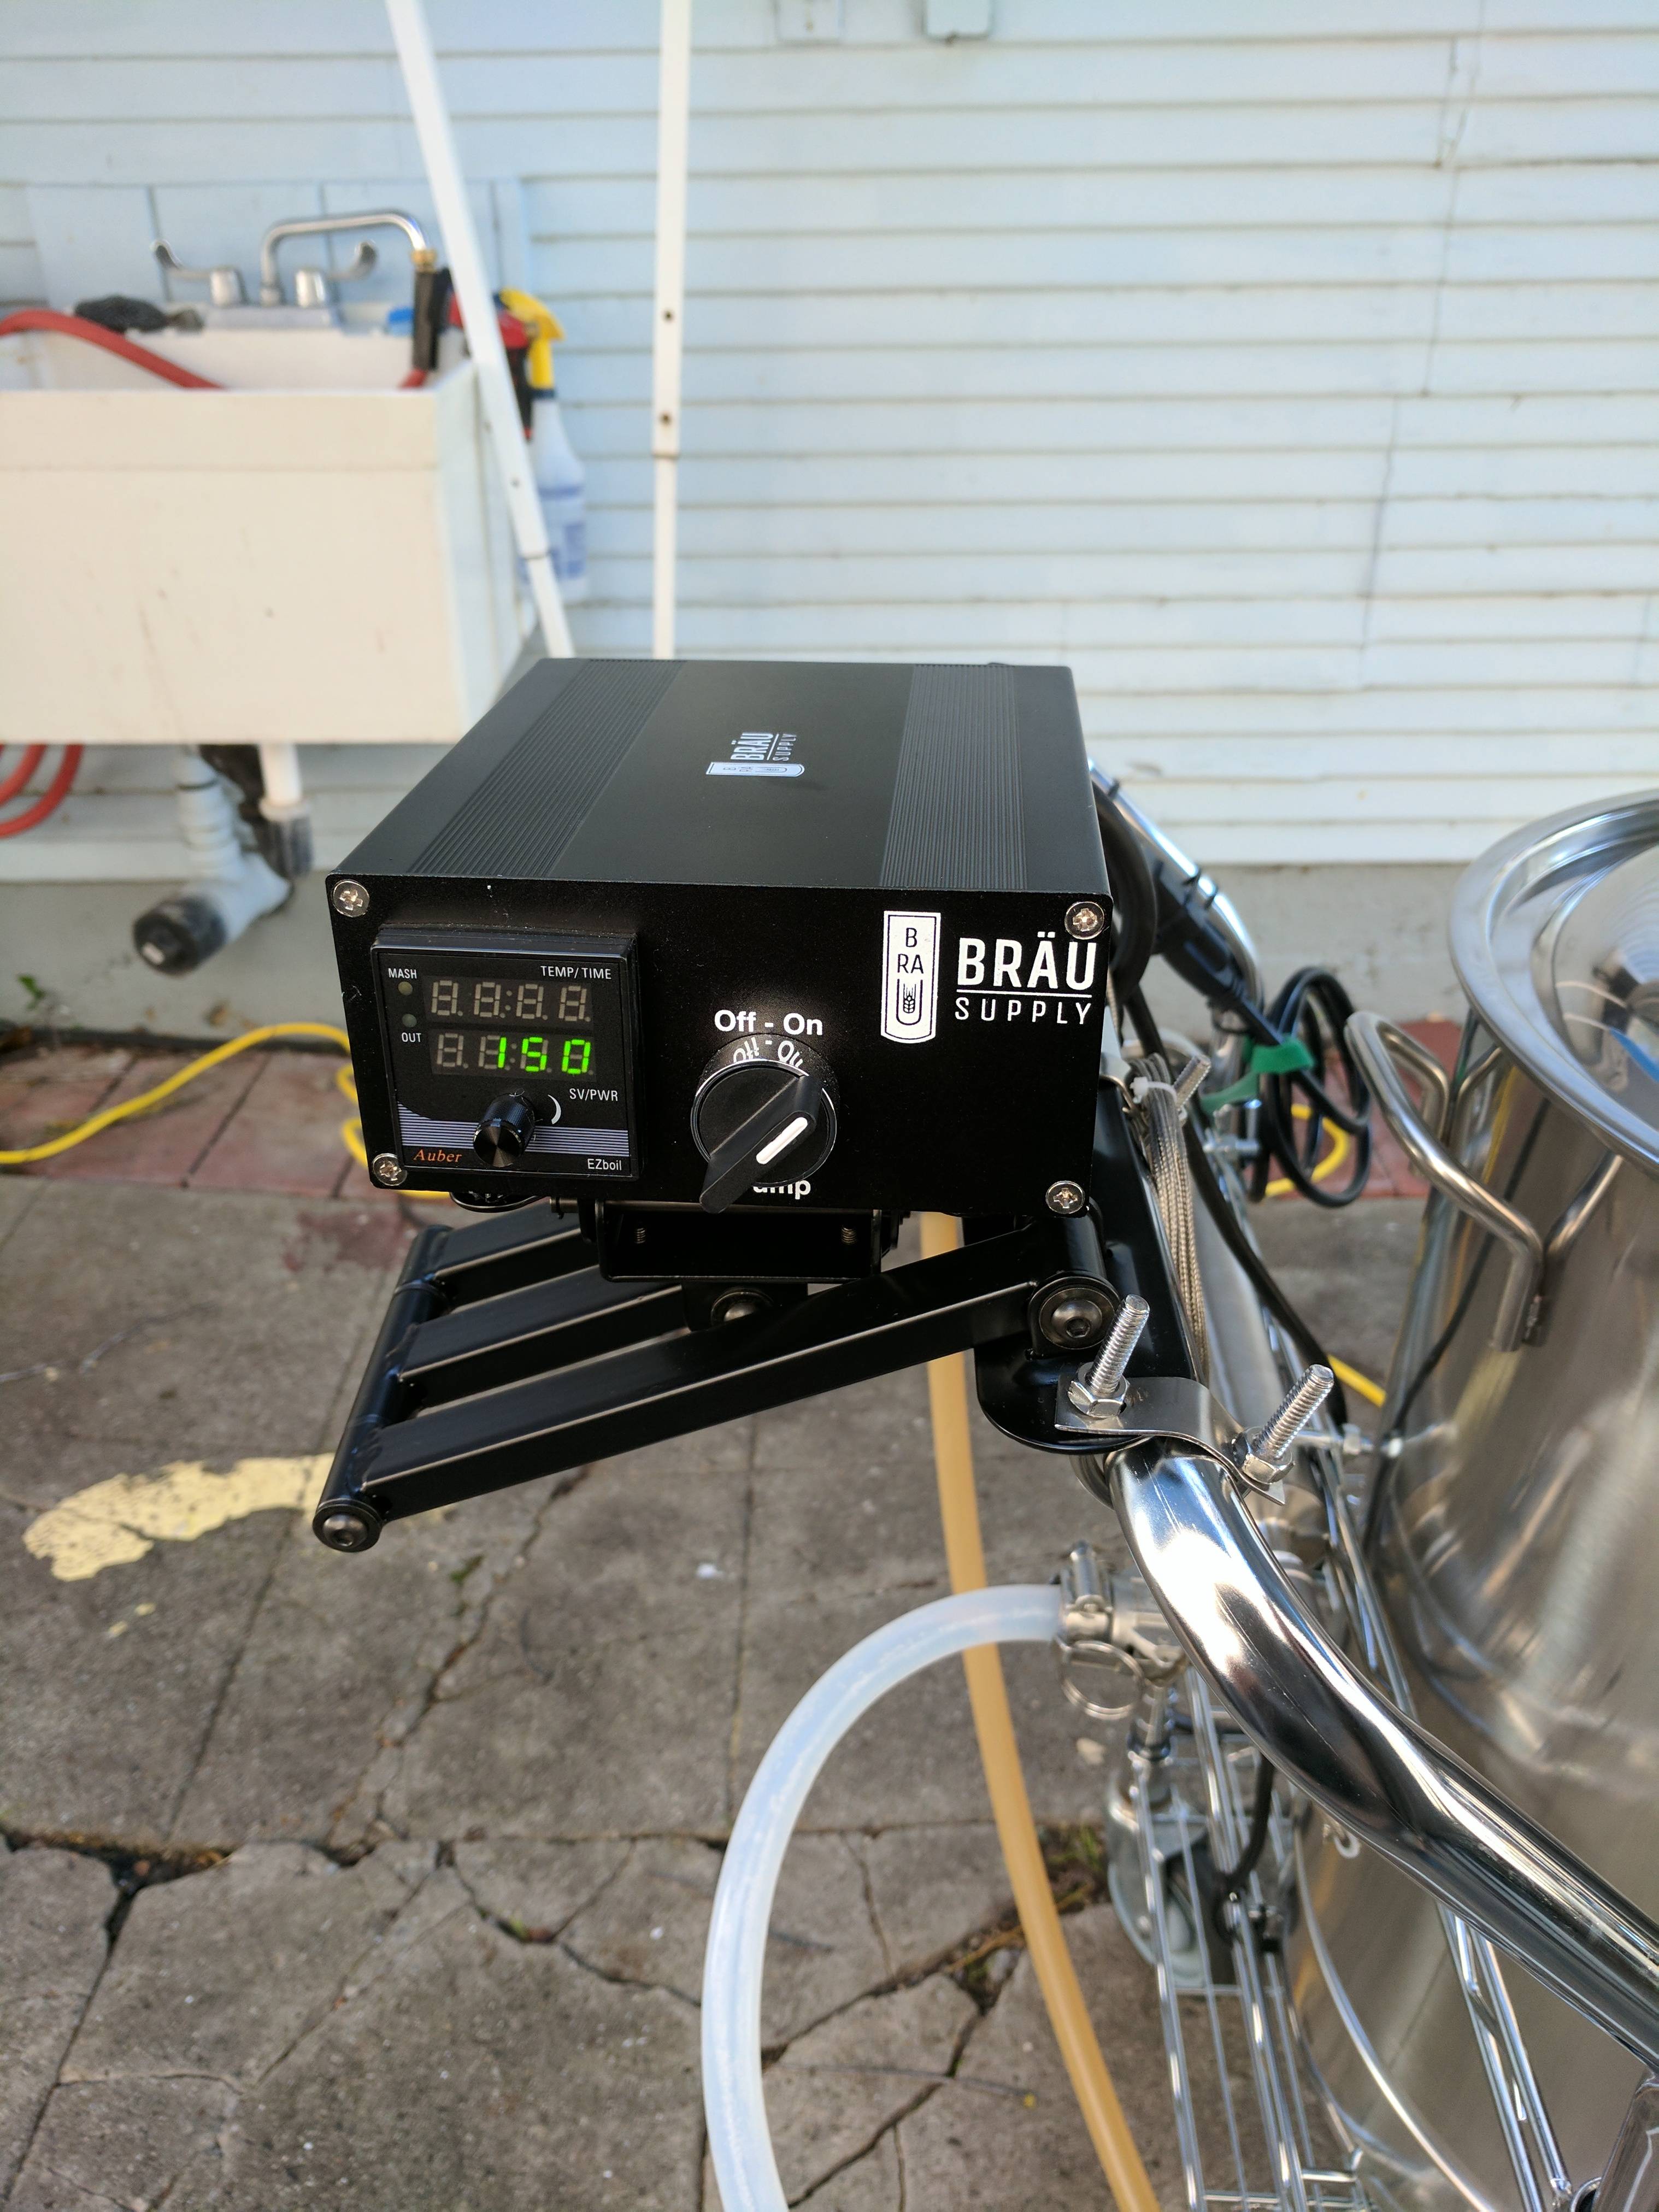
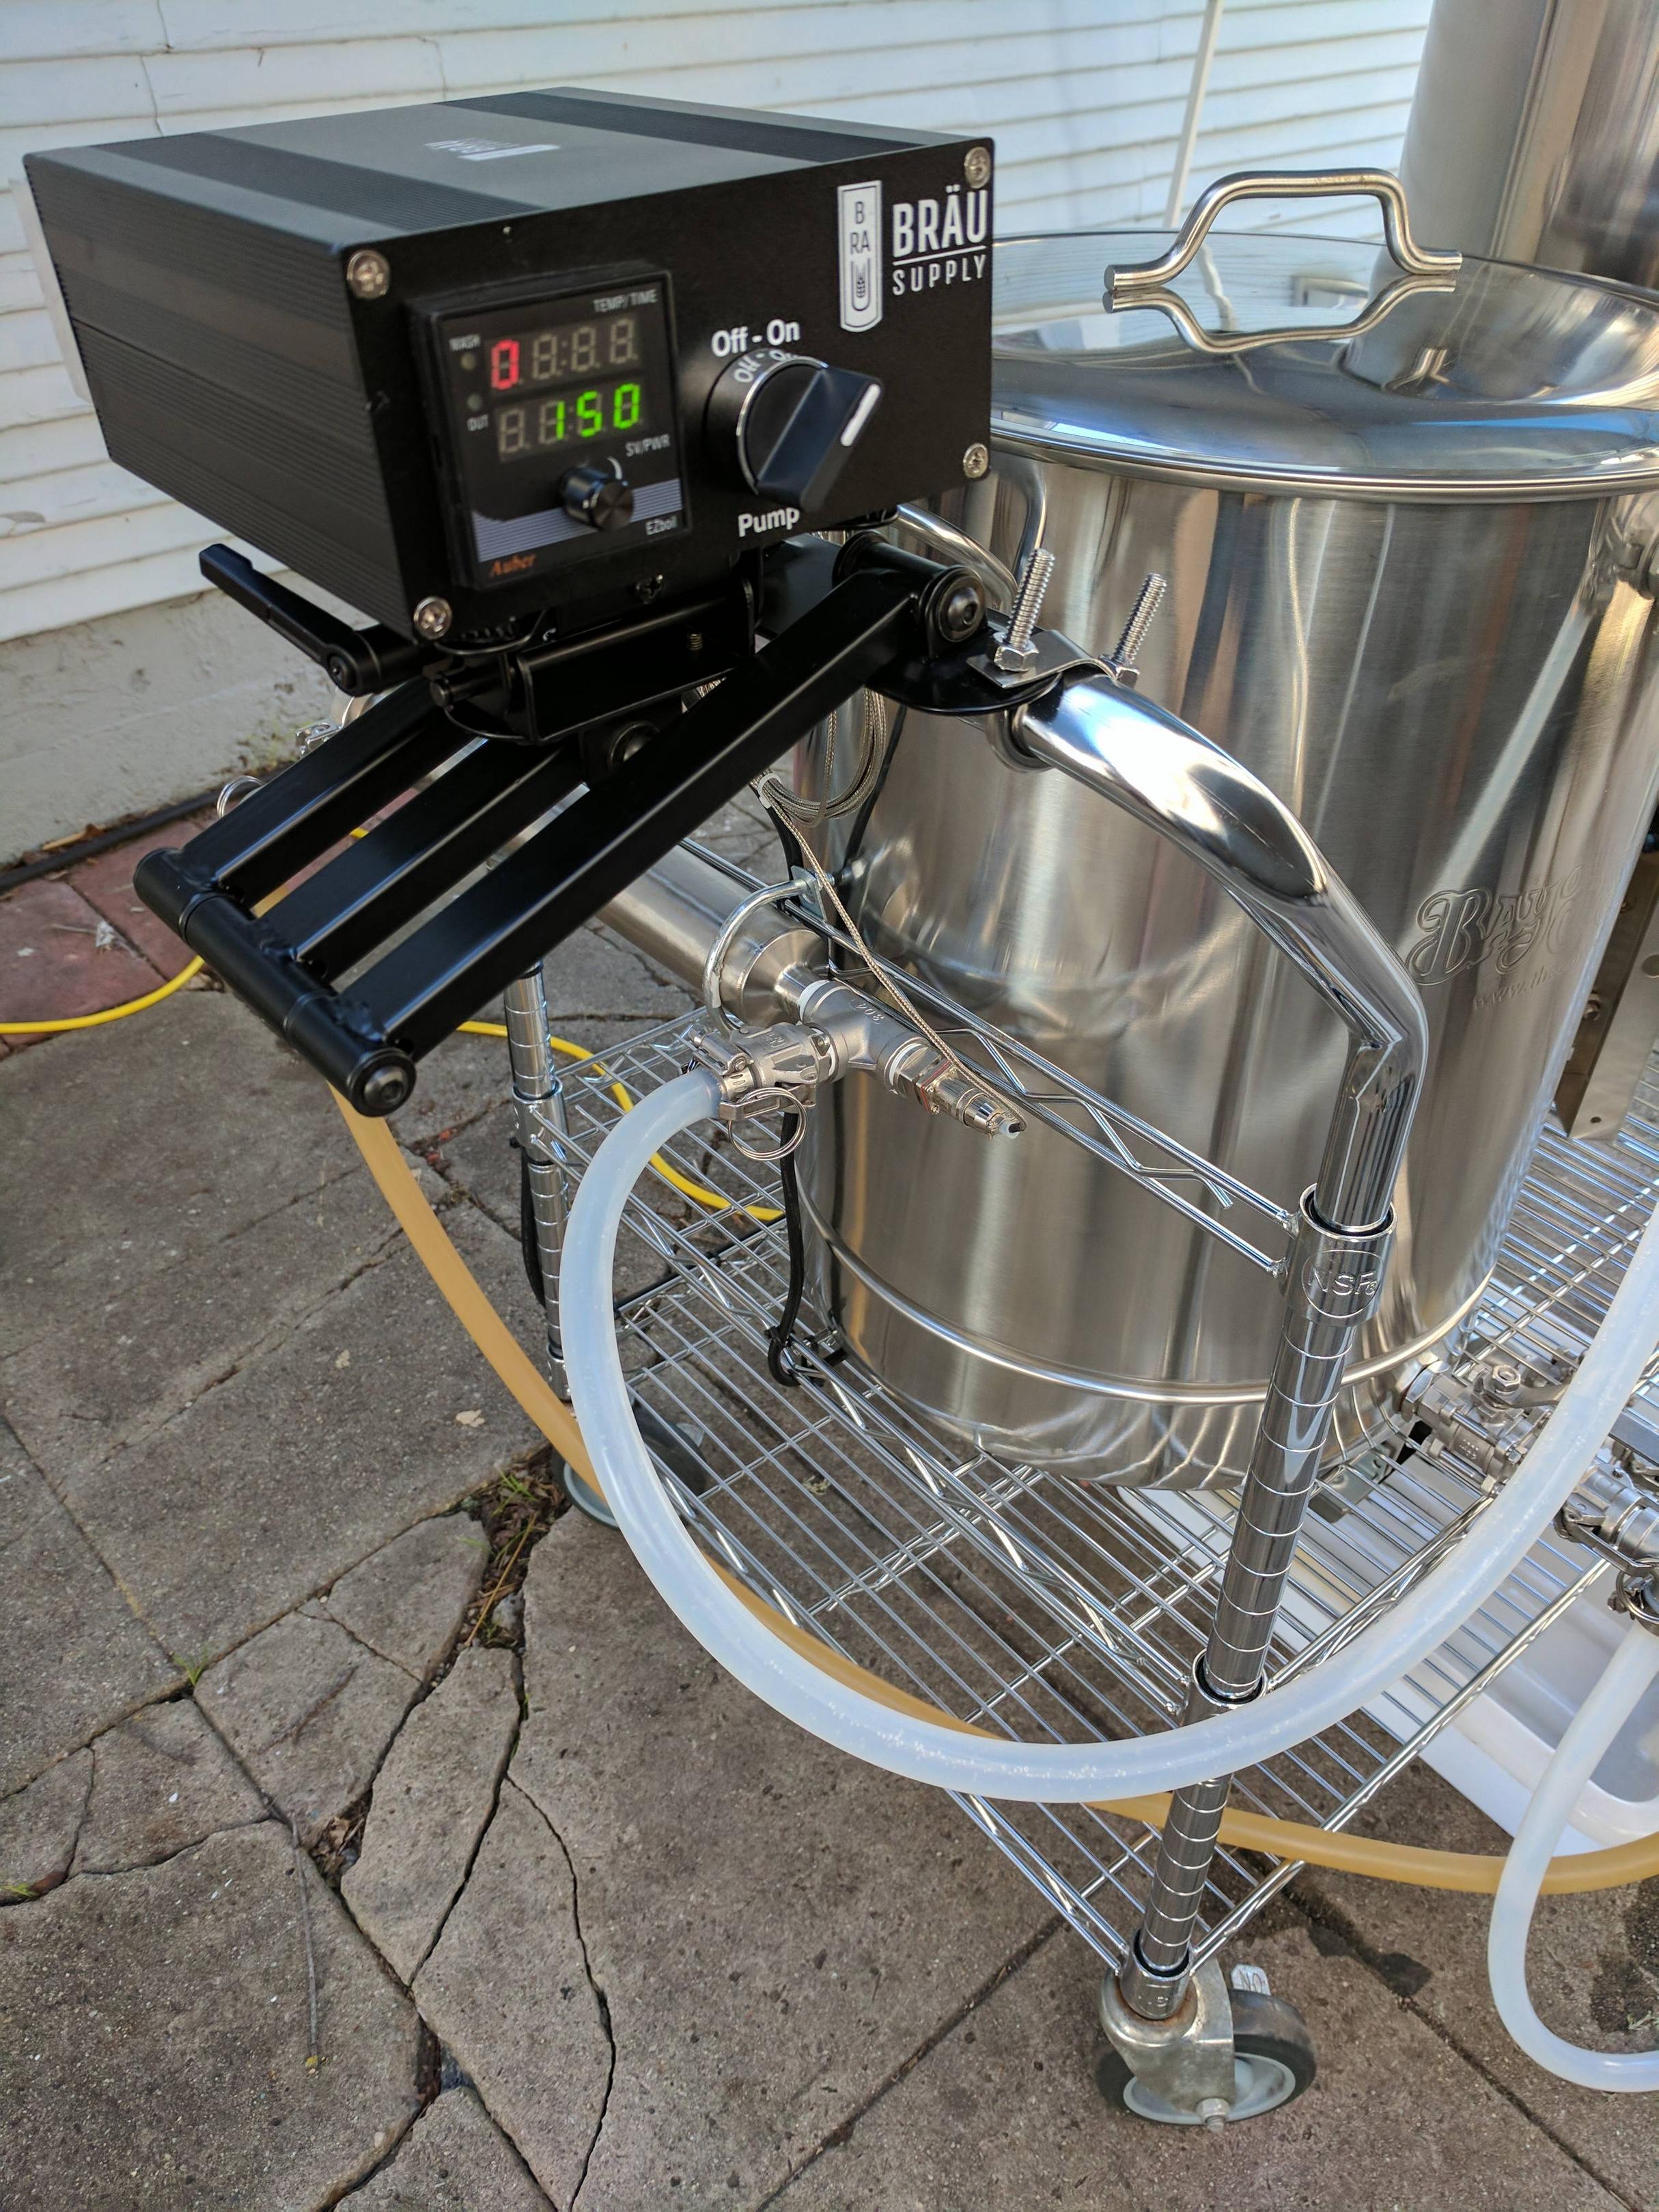
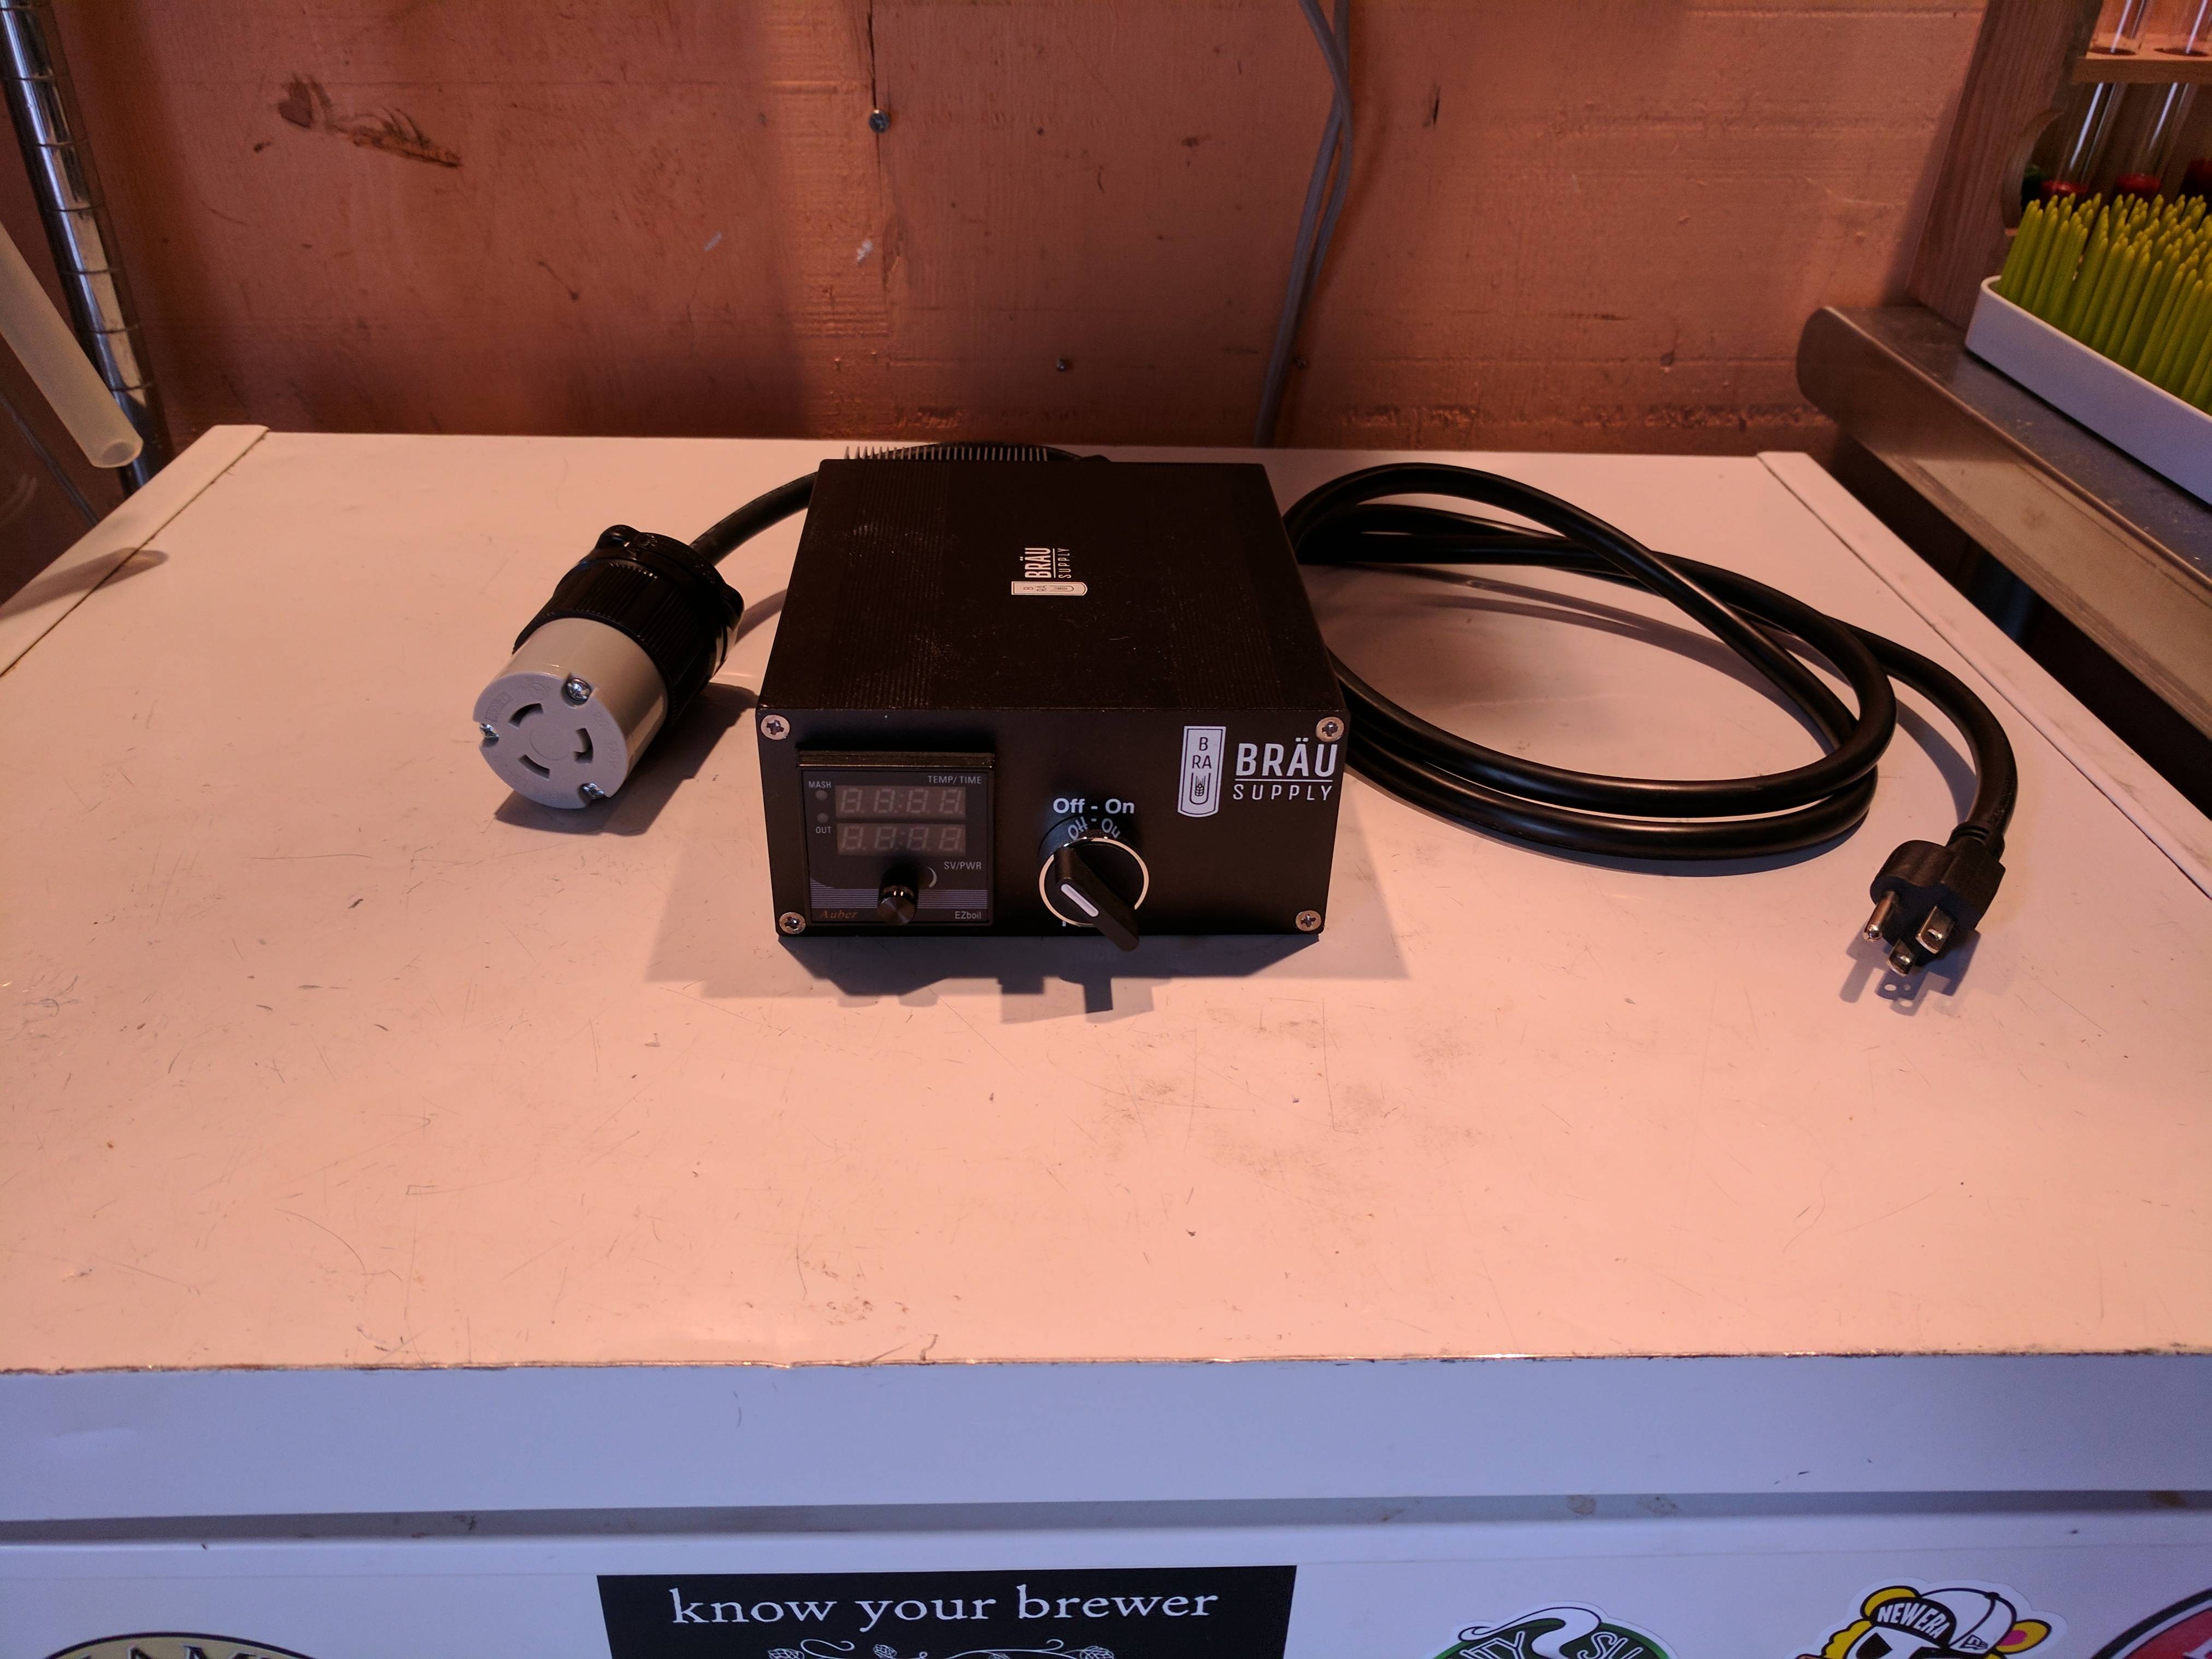
Brau-Supply 120V EZboil RIMS controller should have no problem maintaining mash temps and has the on/off switch for the pump:

5Z51cBI.jpg


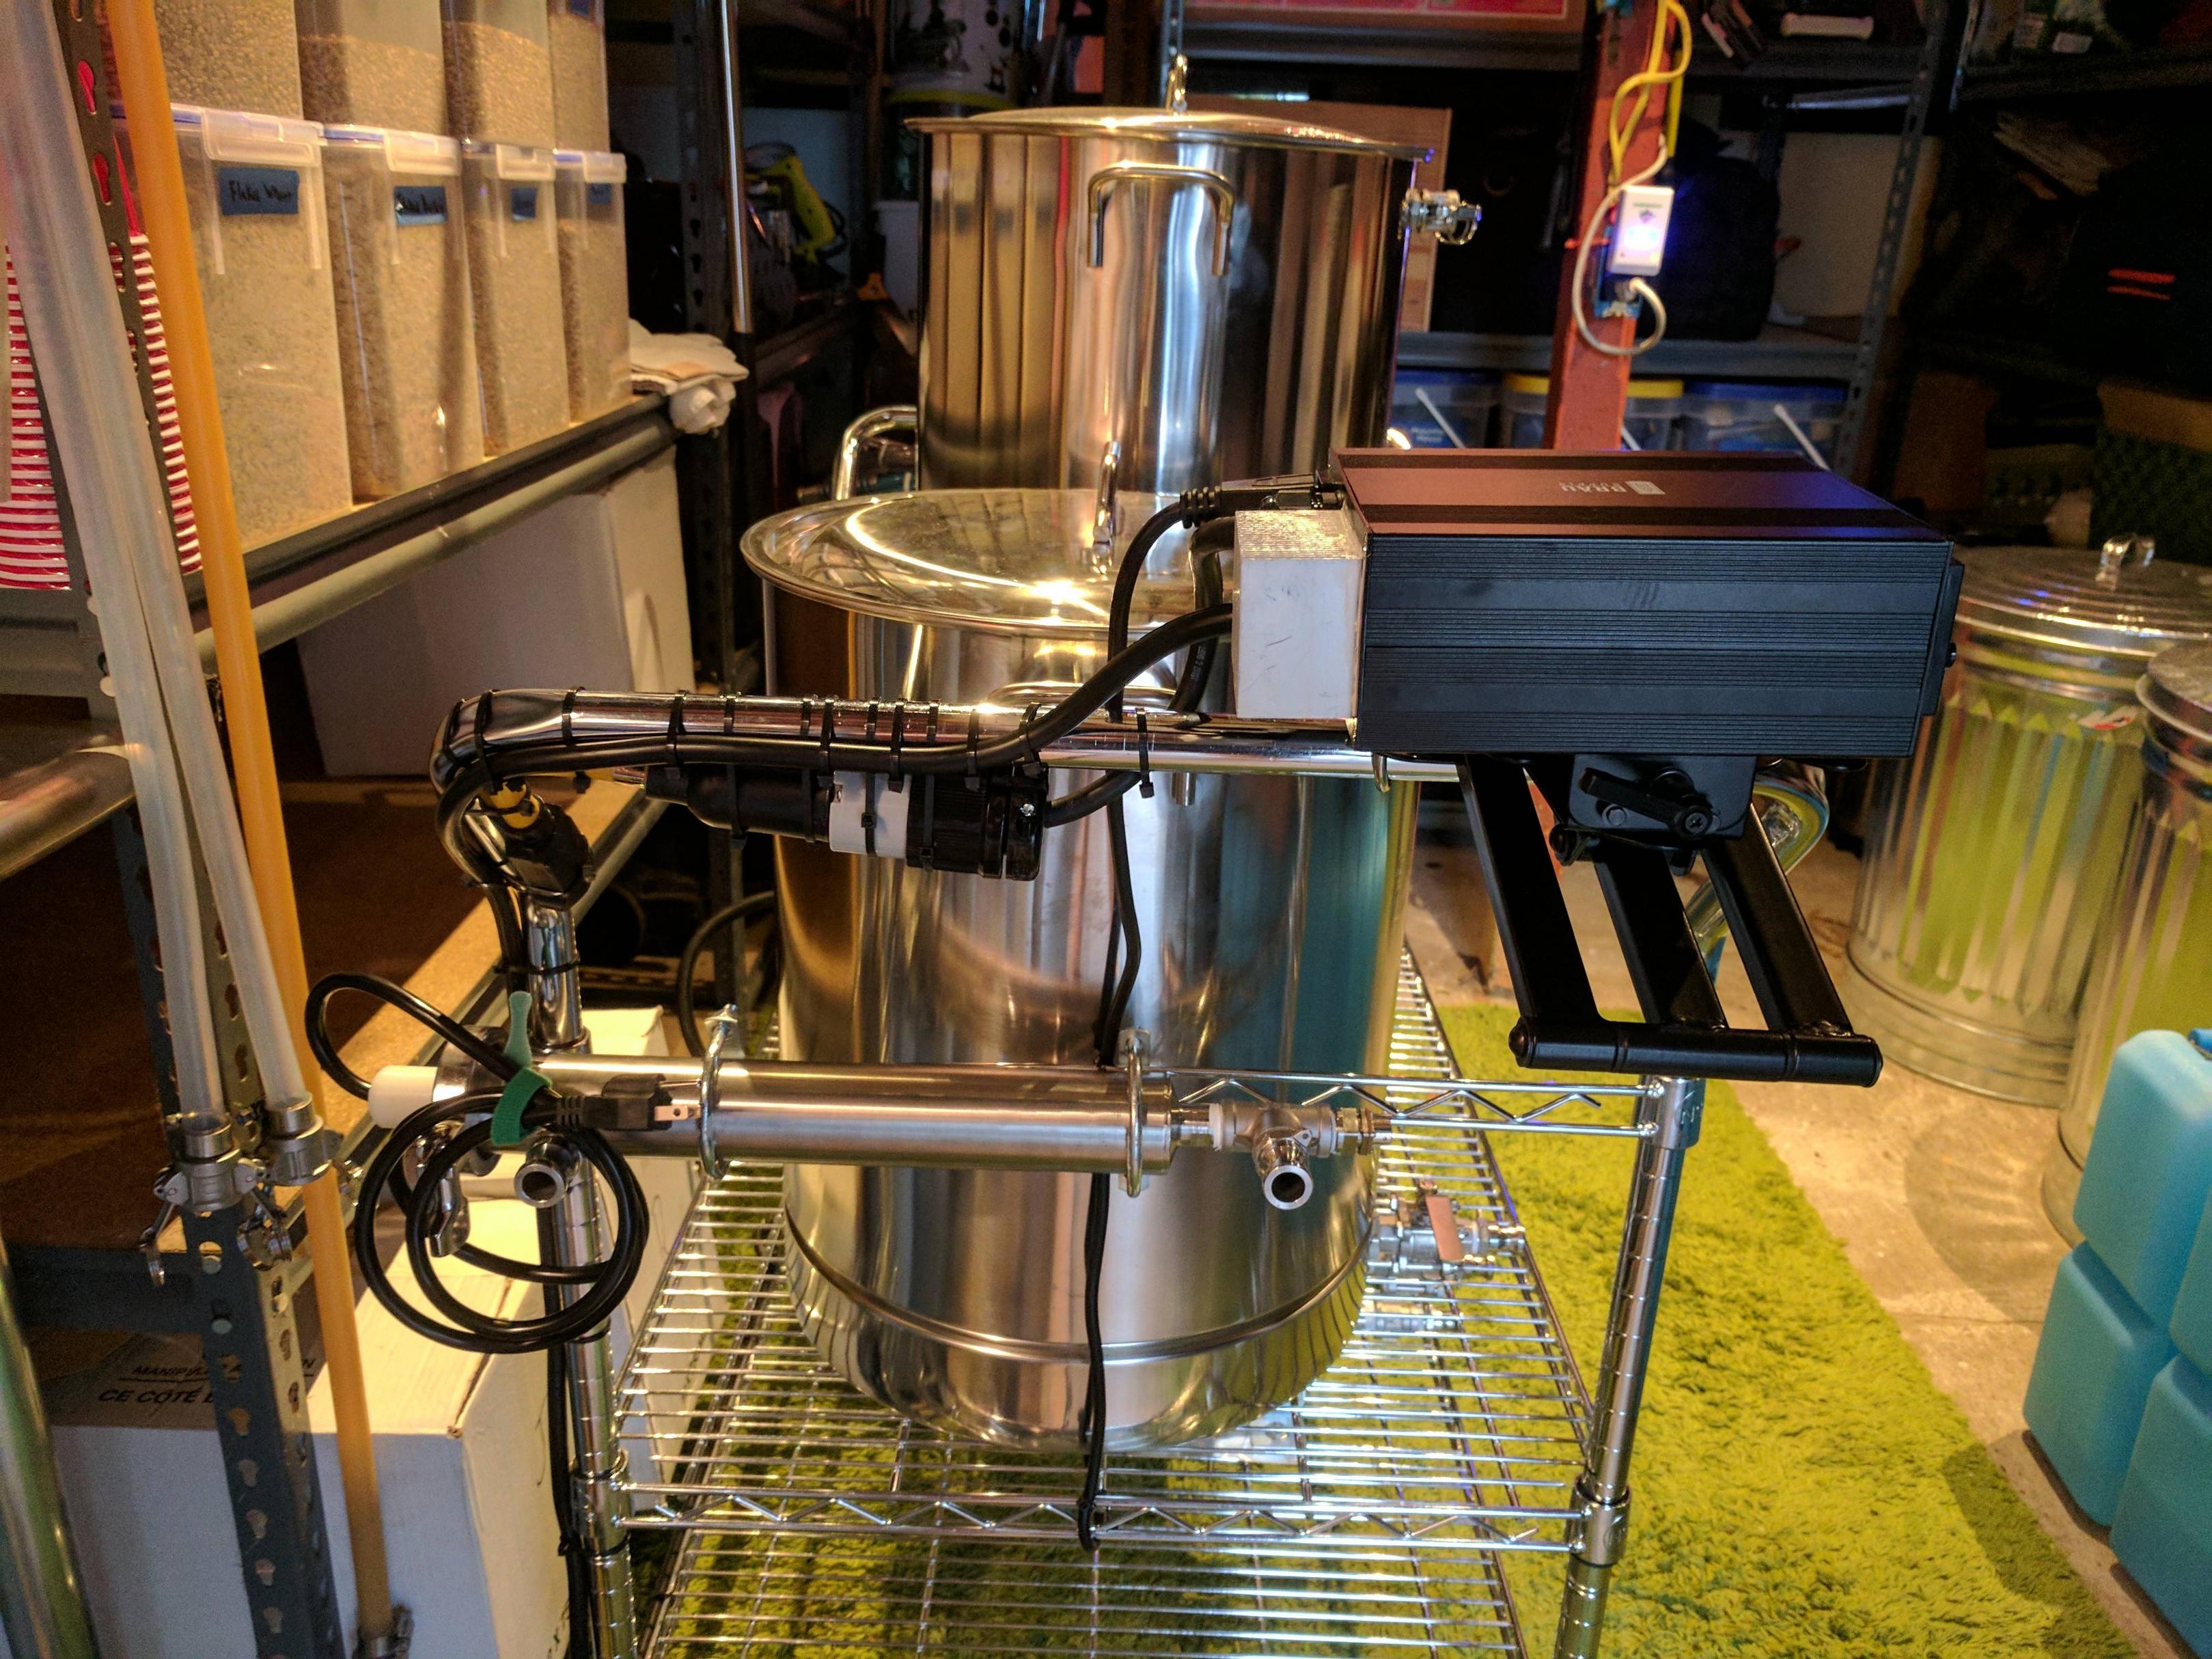
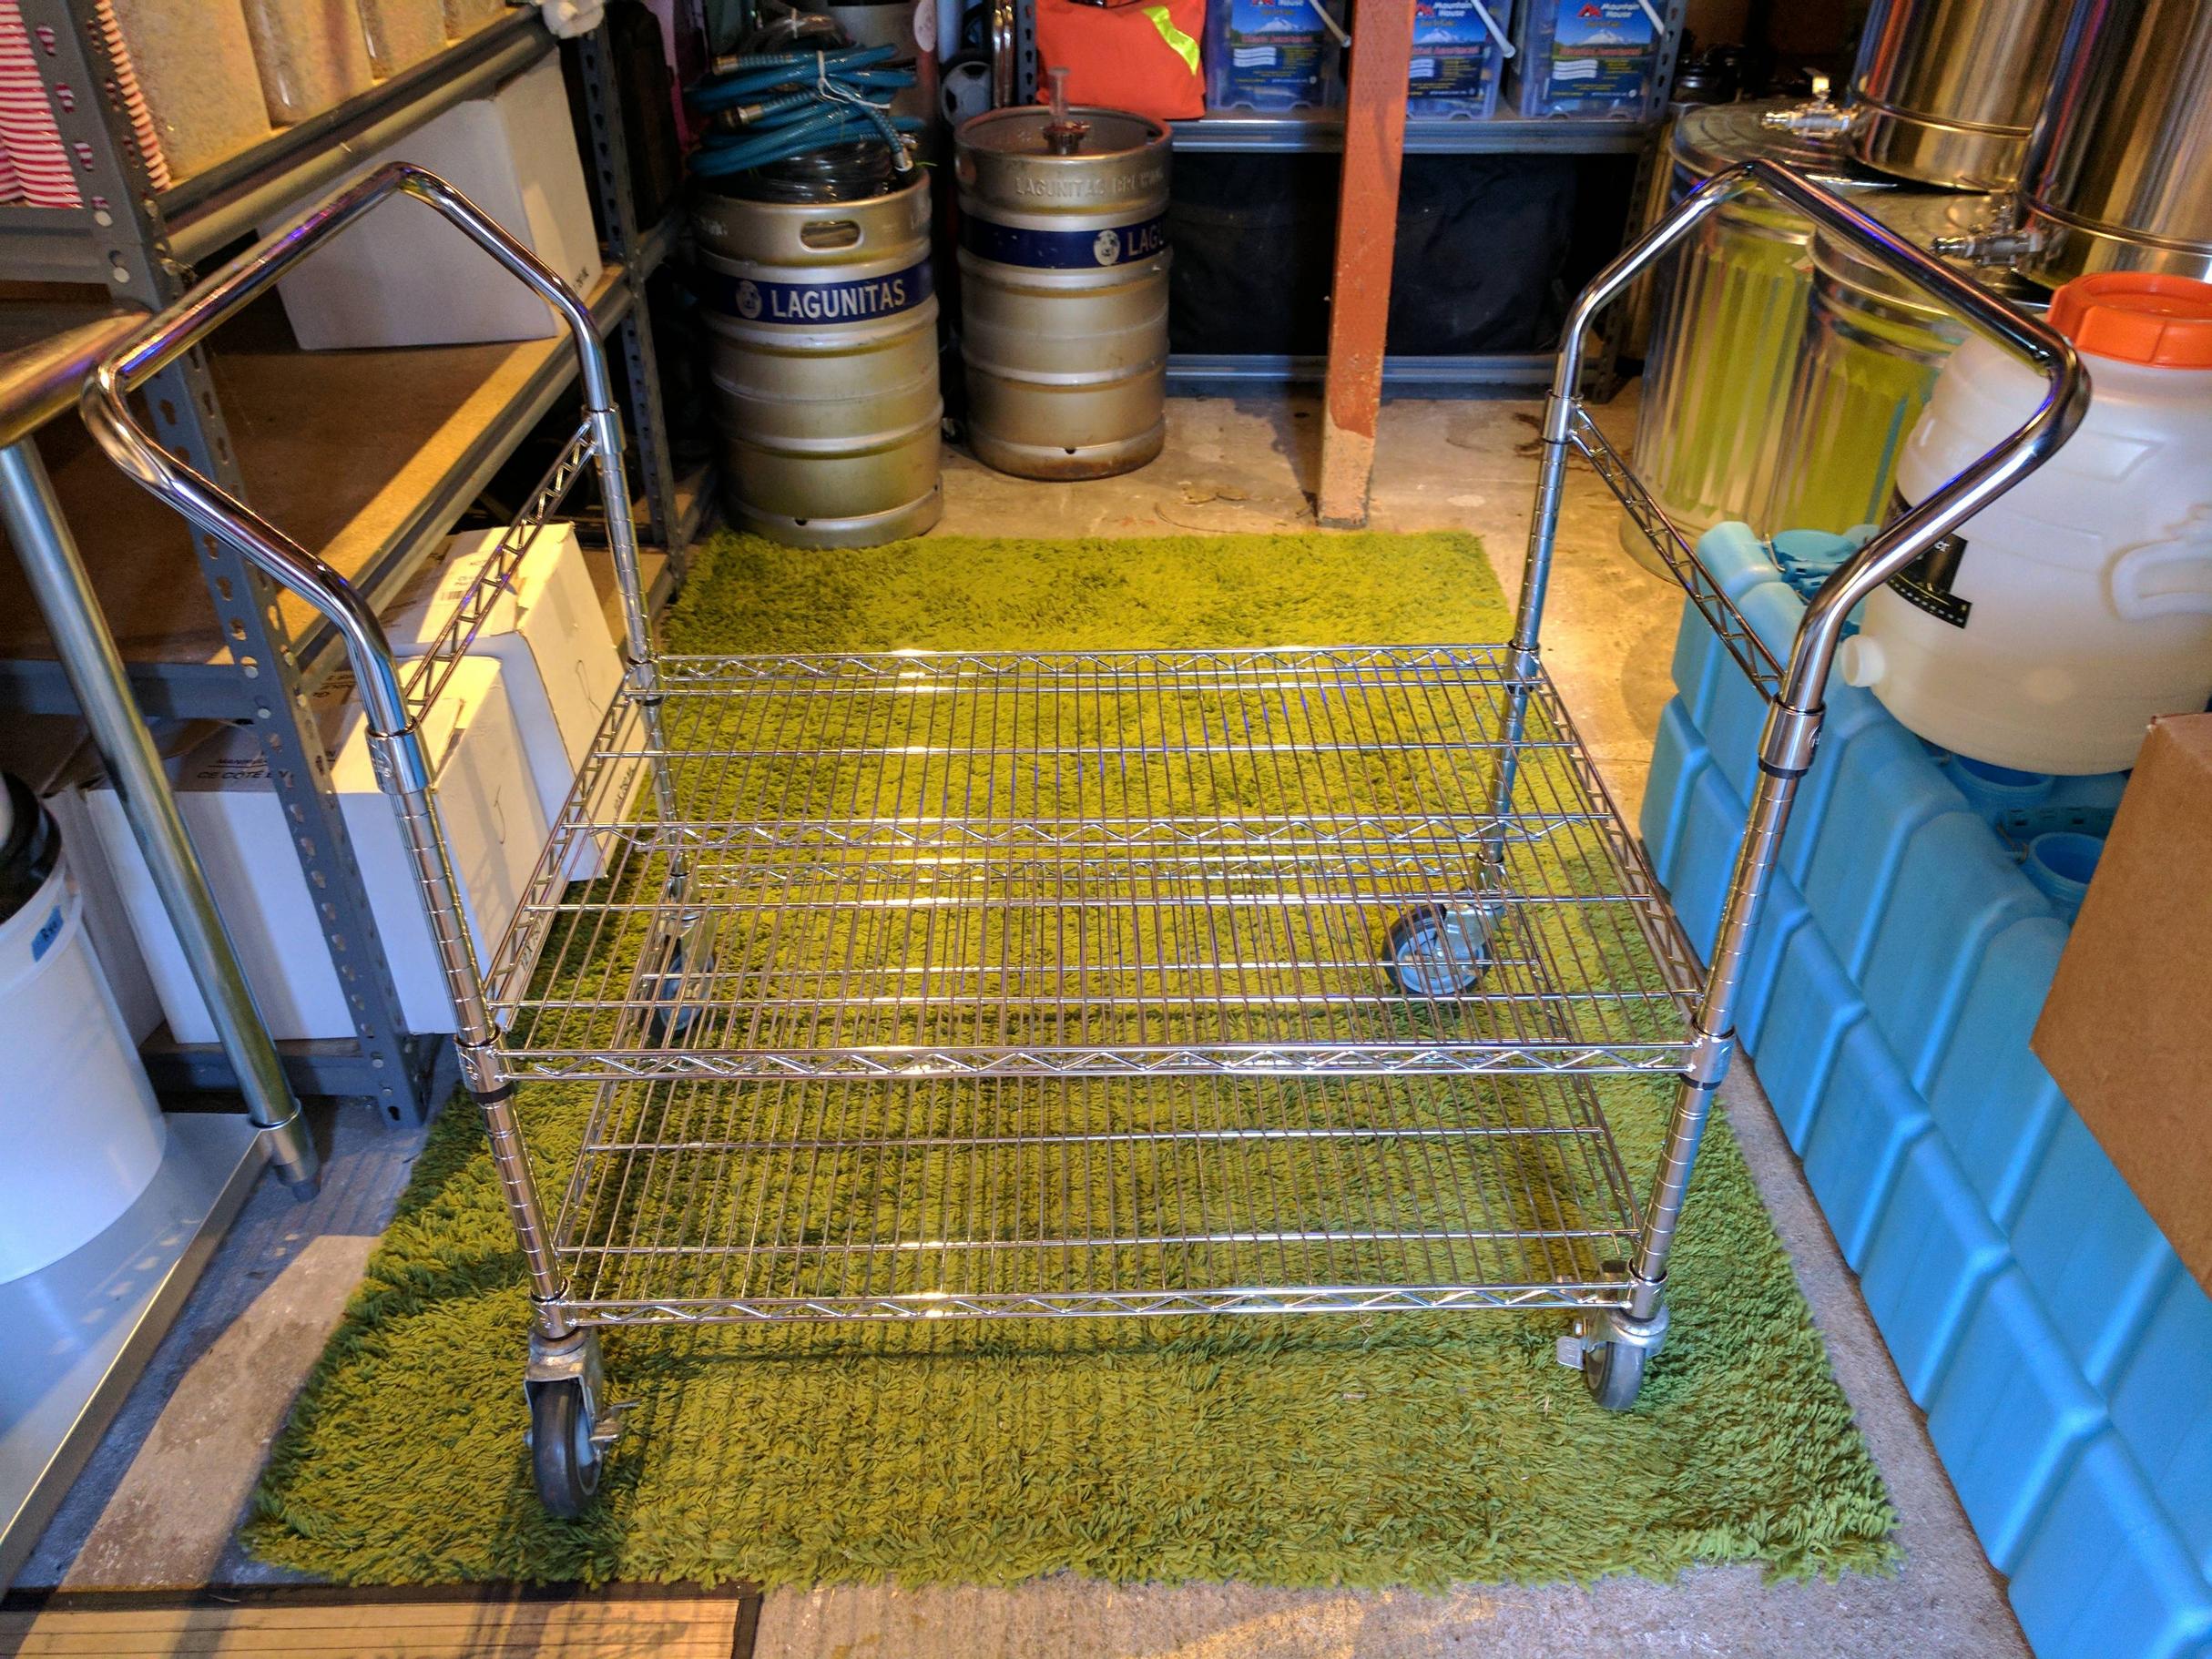
For the actual brew cart I'm using the Regency stainless wire shelving, utility cart handles, and casters. I used the Regency hanger rails to mount the RIMS tube and plate chiller up higher on the stand:

TlANK8R.jpg


RIMS tube is mounted using 2" U-bolts, and I mounted it off center on the rig so I can access the tri-clover fitting to remove the element easily for cleaning:

JXOdFT3.jpg


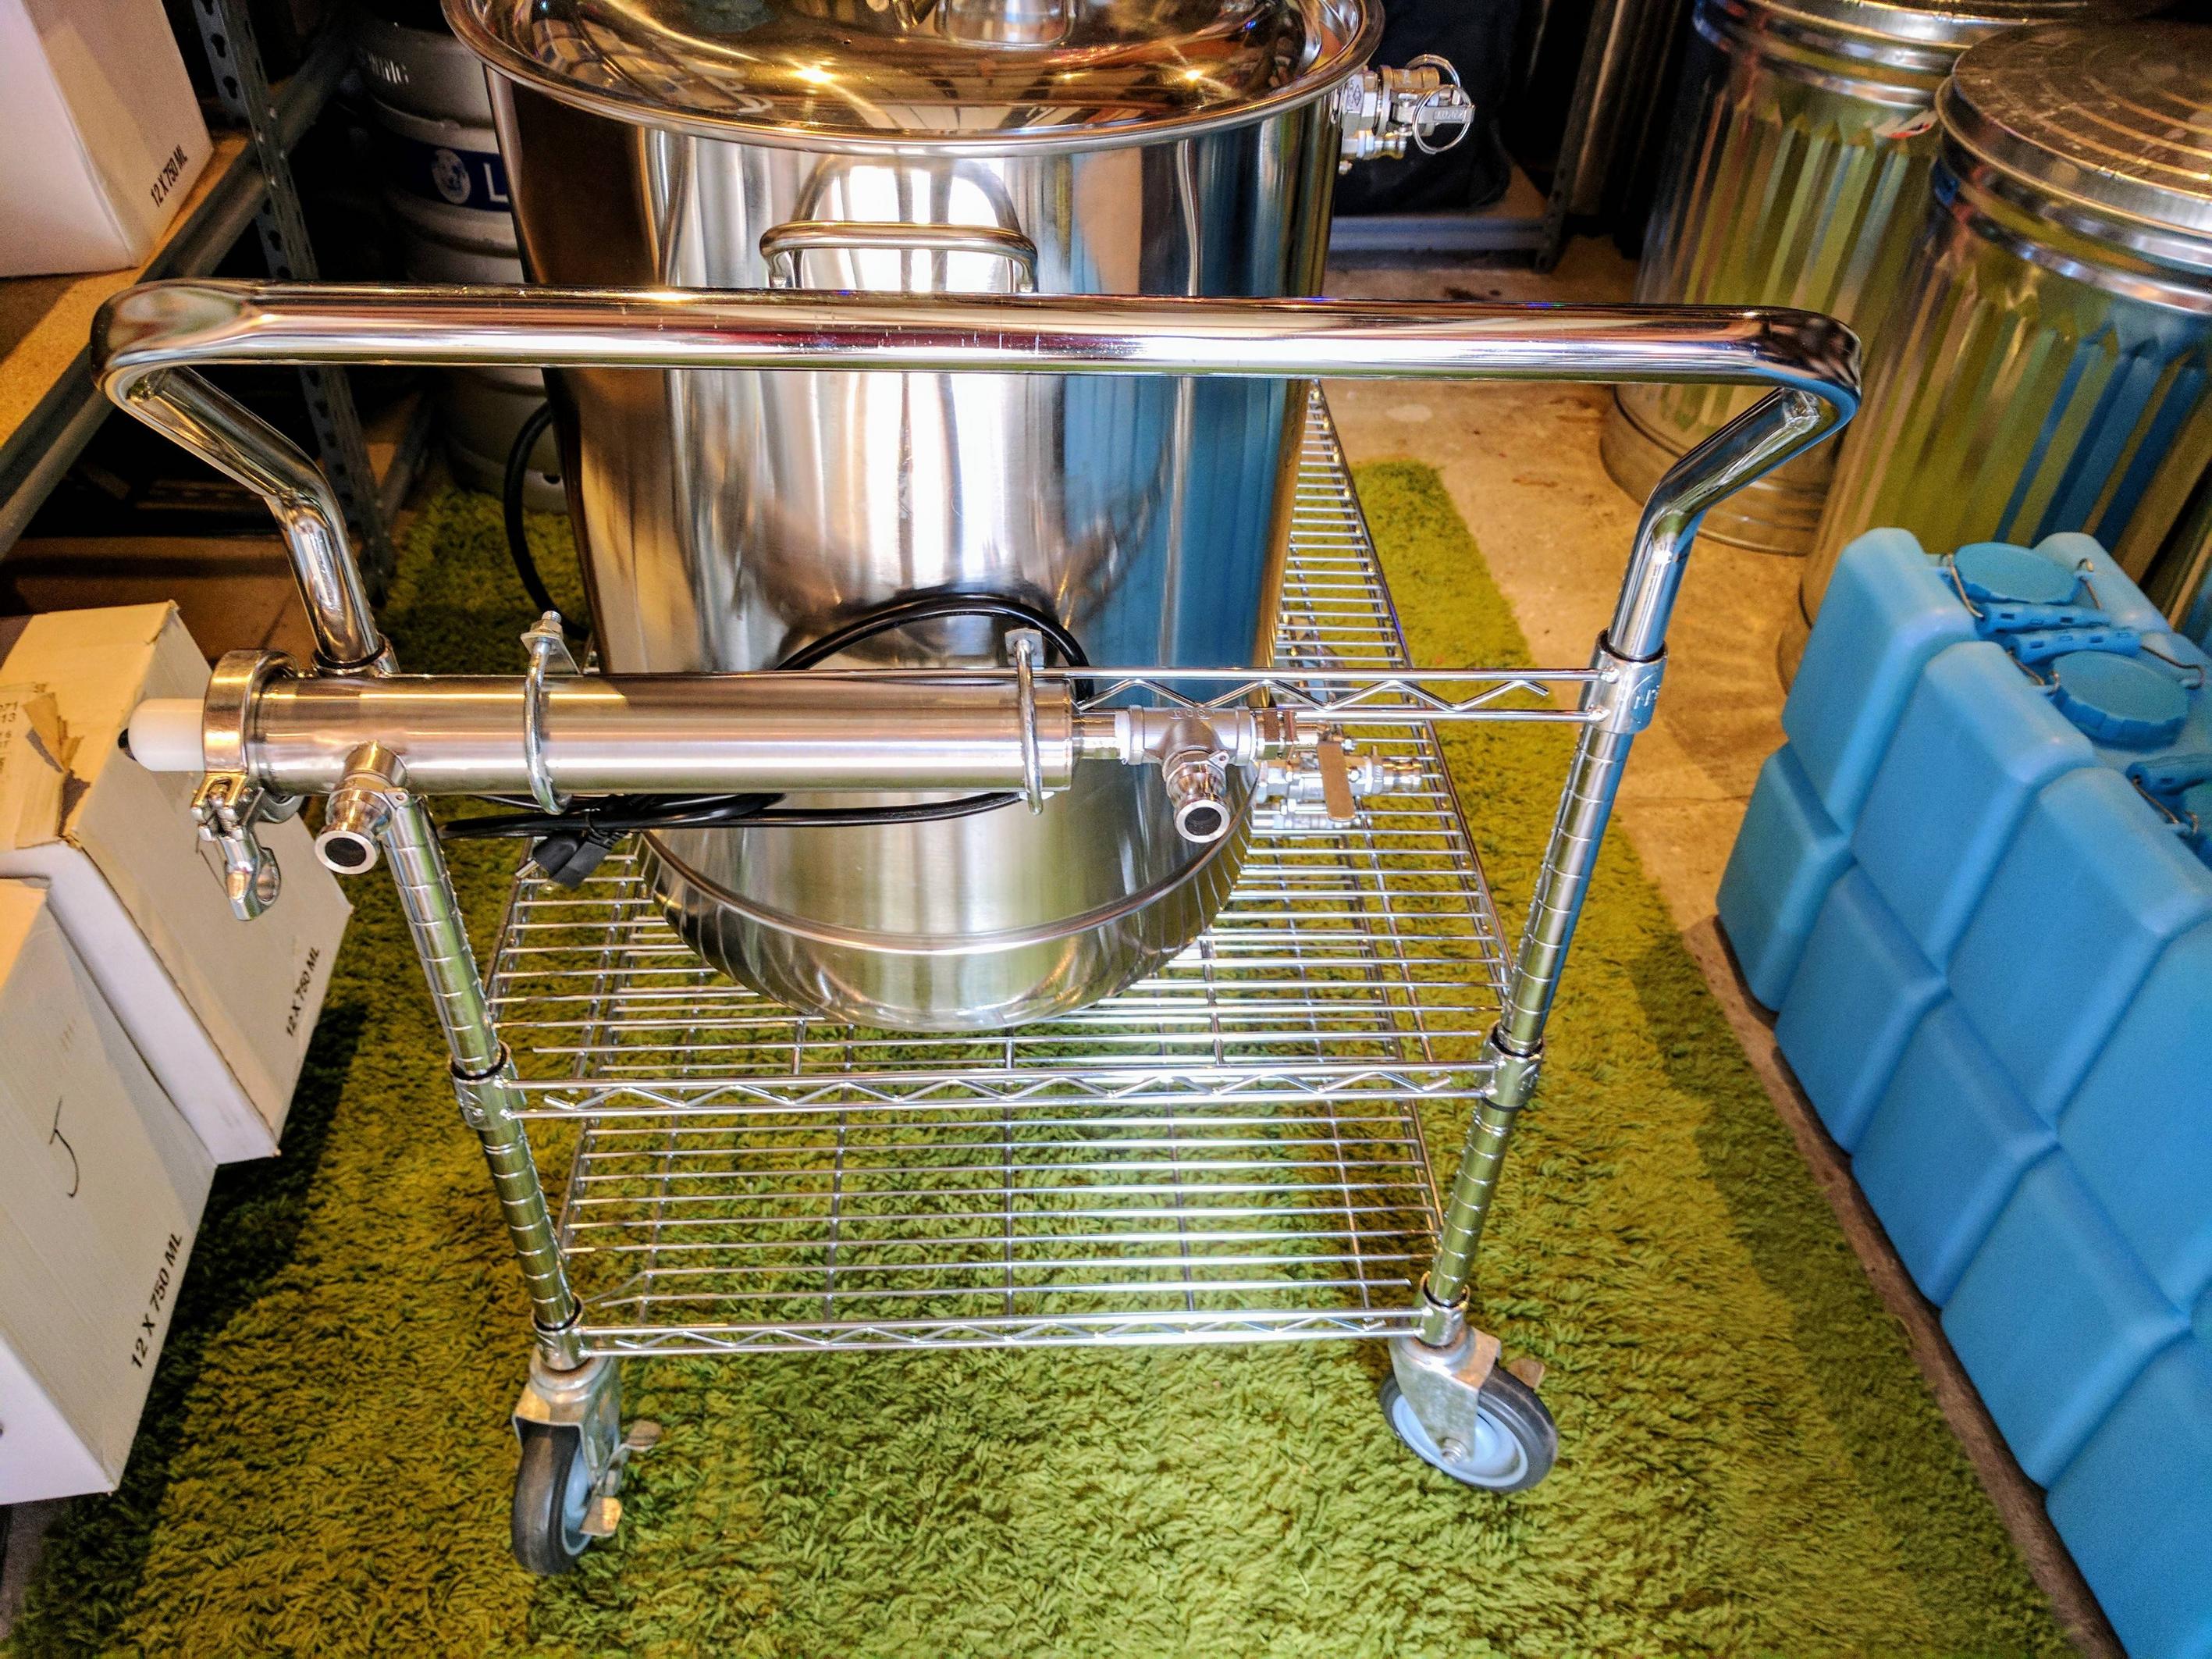
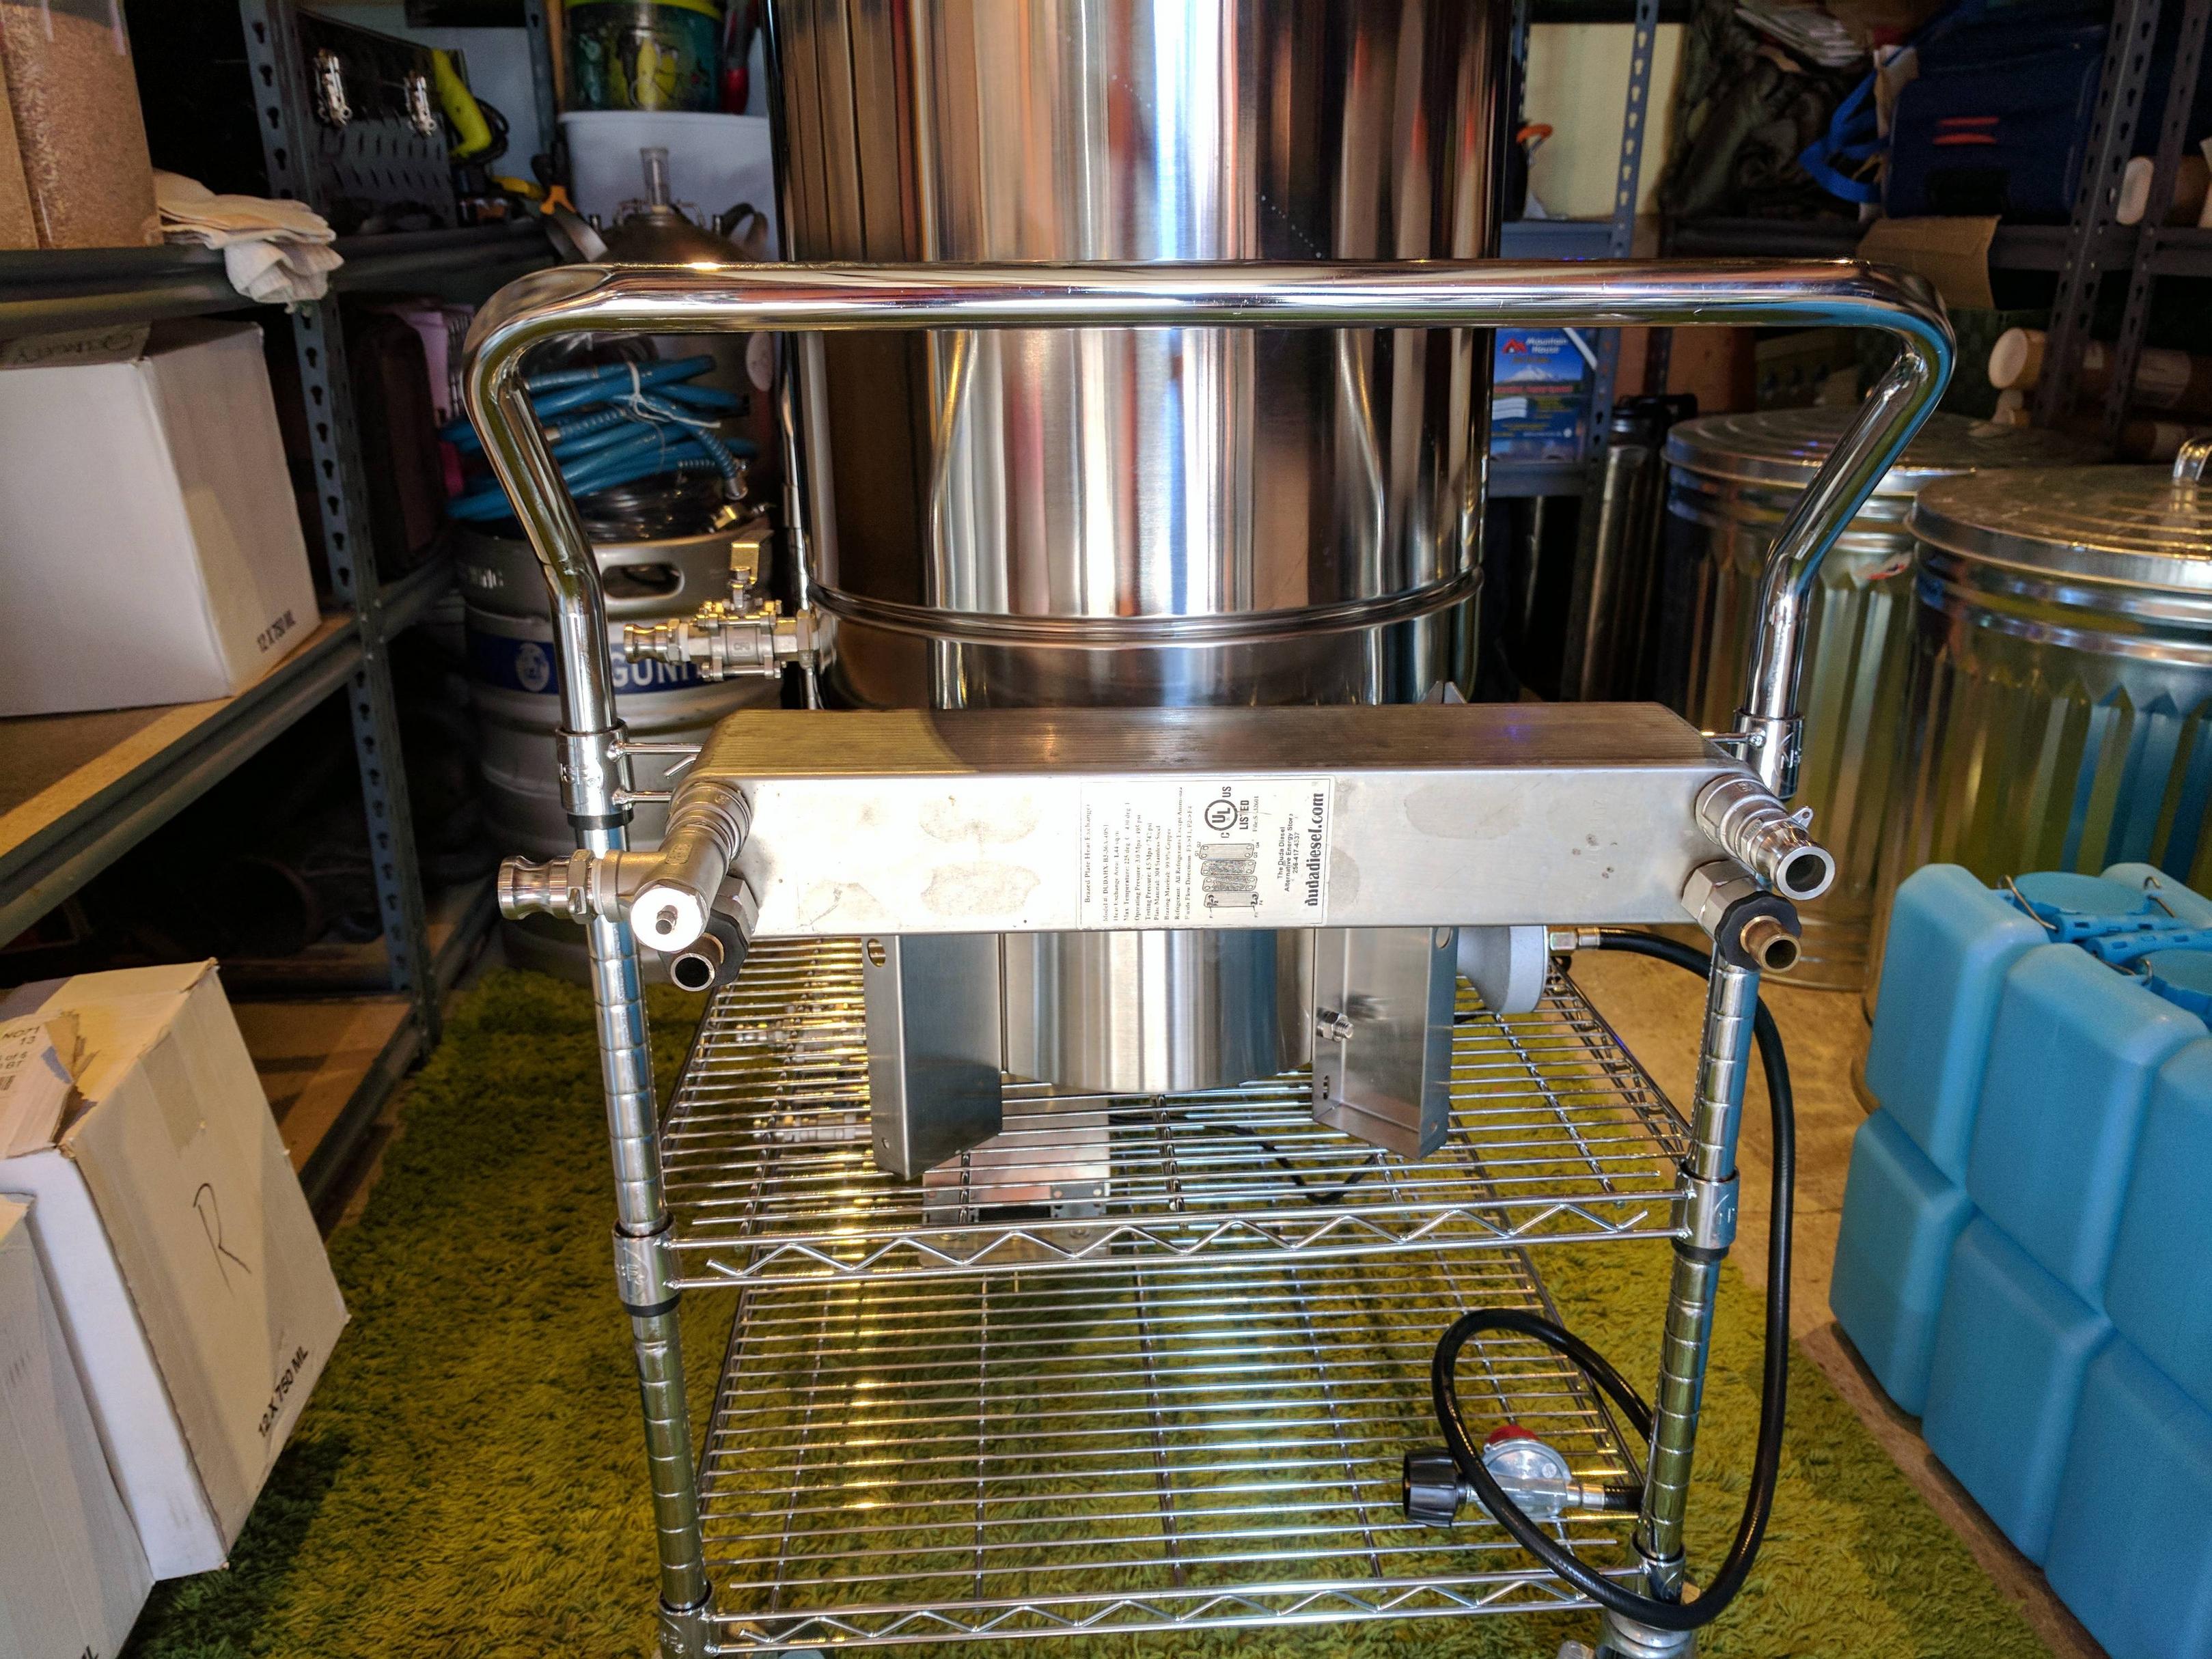
Plate chiller is mounted on the other side using the built-in bolts and 1 1/4" fender washers on the inside to keep it in place:

cikO8wD.jpg


Pump mounts to the bottom shelf with some 1/4" bolts and fender washers on the underside:

WSwfeSu.jpg


Still to-do is figure out how to mount the controller on the brew stand. If anyone has any ideas on that, I'd love to hear them. I'm looking into clamp on camera mounts and trying to mount it to the handle, but not having much luck going down that route. The other alternative is to mount it on the bottom shelf with some sort of plastic box covering it.

Once I figure that out then I can do the cable management and wrap it all up.

Wanted to give a big shoutout to @Jaybird for his help with the RIMS tube and false bottoms. I'm blown away by the quality of the false bottoms. They fit so snuggly up against the wall of the kettle that I don't think you could slide a piece of paper in there, yet at the same time they just slip right into place.

I'm hoping to get it all wrapped up and give it a test run next weekend!
 
That is a pretty sweet system! It looks very similar to a friend's, and I love brewing on his system. The only time we run into trouble is if we try to do 10 gallons over about 7.5%ABV.
 
Thanks! Are you guys doing no sparge brewing?

He heats the sparge water during the mash then transfers it to a 3rd kettle, just to hold for a few minutes while he drains to the boil kettle. He has a fly sparge arm, but he has done a batch sparge every time I have brewed with him.
 
I was thinking of using the same controller and adding RIMS to my BIAB set up. Interested to know how you like it after you are all set up and running. My plan is to go eventually the two vessel route and ditch the bag but for now one piece at a time.
 
I like the set up, I am working on a similar system, but BIABag/basket. Do you plan to drain the water from the pump when done brewing? Also what about draining wort from your lines with pump mounted permanently? just put a tub under there to catch wort/cleaner?
 
I like the set up, I am working on a similar system, but BIABag/basket. Do you plan to drain the water from the pump when done brewing? Also what about draining wort from your lines with pump mounted permanently? just put a tub under there to catch wort/cleaner?

So I had the pump mounted in the same fashion for my 3 vessel system for over a year and never really had any trouble draining it. When I was done cleaning it, I'd just spray it full of star san, turn it on for a sec, and be done with it.

No problem draining the hoses, as those aren't permanently mounted. I just have a bus tub that I put under the pump so I don't make a mess in the driveway and attract ants.

Also, I just put together this cheap back flush adapter, so now I will have no problems backflushing both my pump and plate chiller to keep them nice and clean.
 
So I got the brewery controller mounted and all the cable management done:

rU8GEsW.jpg


BC4EZcT.jpg


owUwW0n.jpg


I used a small LCD swing arm mount that I picked up from Monoprice for $11.50, attached that to the frame with some small u-bolts, and then attached the controller with industrial strength Velcro.

I'd originally thought it would be cool to be able to swing the controller around; however, that made the cable management nearly impossible, and I think I like it better in the fixed position.

Then I was able to run everything through a "dry run" yesterday:

28z2a8E.jpg


iBAslwt.jpg


NIsMm1J.jpg


THvtW72.jpg


I found a couple of very minor leaks that I was able to quickly correct and ended up re-orienting my plat chiller so the wort out was on the bottom.

I was very happy with how well everything worked out. That Blichmann Hellfire is no joke. Easy to operate, and it took 7 gallons of water from about 65 > 150 in no time. The controller and RIMS tube worked like a champ and had no problem raising the temp a few degrees in just a couple of minutes. It was able to maintain mash temp for the whole hour, and the temp in the center of the mash tun was always within about 1/2 degree of the output of the tube. The Hellfire then took it from 150 > boil in what seemed like no time, and it was pretty simple to dial it back and maintain a nice rolling boil.

The thing that really blew me away was how effective the 40 plate chiller was. It went from boil > 75 only in the couple of minutes it took me to pump the water through, and it only used about 5 gallons of water to do so.

I'll be brewing on this new setup twice next weekend! :ban:
 
Nice build!

Why did you find you had to flip the plate chiller around? Is there a risk of air pockets with the out down?
 
I've build!

Why did you find you had to flip the plate chiller around? Is there a risk of air pockets with the out down?

So the way I originally had it installed I had the wort connections on the top and the water connections on the bottom. When I disconnected the garden hose at the end of the test about a gallon of water drained out.

When I disconnected the wort hose, a gallon of wort did not drain out; however, there was still about a gallon of wort left inside, which I subsequently blew out.

I'm hoping by reversing it that extra gallon of wort will drain on its own (so as not to lose a gallon of wort every time).

I'll let you know after my brew day this weekend whether that works out or not.
 
You can mount the RIMs tube horizontally like that?

I've always heard you have to worry about local boiling in the tube unless the RIMS is mounted vertically (due to pressure constraints inside the tube).
 
You can mount the RIMs tube horizontally like that?

I've always heard you have to worry about local boiling in the tube unless the RIMS is mounted vertically (due to pressure constraints inside the tube).

Interesting, I've not heard that. I've done a water test and yesterday was my first brew session on it, and I didn't have any problems. Jay from NorCal Brewing (where I bought it) saw pics of it mounted, and didn't mention anything. Also I've seen pics of them mounted both ways.
 
Im waitimg for my thrifty rims. Hope it can maintain 10 gallon batchs. Then my stand will be done. This is what i got going on so far.

20170305_215248.jpg


20170305_215306.jpg


20170312_135213.jpg
 
Interesting, I've not heard that. I've done a water test and yesterday was my first brew session on it, and I didn't have any problems. Jay from NorCal Brewing (where I bought it) saw pics of it mounted, and didn't mention anything. Also I've seen pics of them mounted both ways.


Ok -- cool. Wonder if maybe this only becomes a concern in longer RIM's tubes?

Either way, if it ain't broke... :mug:
 
Im waitimg for my thrifty rims. Hope it can maintain 10 gallon batchs. Then my stand will be done. This is what i got going on so far.

Looks like a great build man! You're gonna love that Hellfire. I've used mine twice now, and heating ~10.5 gallons of strike water from 60F > 164F took 20 minutes! :ban:
 
Well after doing a "dry run" last weekend using only water to try to dial in my volumes, boil off rate, etc., I fixed the couple of very minor leaks I discovered and then brewed on it twice this weekend.

Saturday I did a tried and true pale ale recipe that I've brewed about a dozen times now as I figured I could easily tell if anything was off along the way. Sunday I followed up with an IPA that had two whirlpool hop additions to really test out the level 3 filtration in the boil kettle false bottom along with the plate chiller.

Saturday went pretty smooth. I hit all my volumes, temps, and mash pH spot on! Not bad for my first time on the new rig! :ban: The Brau-Supply controller and NorCal Brewing Thrifty RIMS worked like a champ, stabilizing the mash temp at 153F within about 5 minutes and then keeping it there for the duration of the mash. I checked the mash temp in the tun about every 15 minutes or so with a Thermapen, and it was always within .5F of the temp reading from the probe in the RIMS tube.

I did have a bit of a panic though with about 10 minutes left in the mash. I stepped away for a minute, and when I came back the controller had shut off. I thought I'd flipped a breaker, but the light on my extension cord was still on, so then my heart sunk as I thought my controller had died. I unplugged it and then checked the fuse in the controller, which is when I noticed the fuse housing was very loose. 5 minutes of field surgery later, and I realized that one of the wire clips on the fuse had come loose, probably due to the housing being loose. So I re-attached the wire, tightened up the housing, and I was back in business! :rockin:

The Blichmann Hellfire is definitely no joke. It heated the strike water up both days in 20 minutes or less, and took virtually no time going from post-mash temps to boil. I was afraid to step away from it getting up to boil on Saturday as I was constantly stirring to avoid burning the wort and didn't want to risk a boil over. On Sunday though I decided to do a very slow whirlpool as I was getting up to boil, and that worked great! No chance of scorched wort or boil overs, and it still got up to a boil very quickly. Both days I was able to dial the Hellfire down and had no problems controlling a soft rolling boil for the hour.

The real shocker on Saturday came when I used the plate chiller which was able to chill from boiling > 68F in 2 minutes, 9 seconds. That's no joke. It happened so fast I wasn't prepared for that, so then I was scrambling to get the fermenter in place to drain the kettle. Lesson learned there, I'm adding a 3-way ball valve to the chiller out port so I can just have the fermenter ready to go, and when I hit my temp open the valve the other way.

Sunday went even smoother, and I had no problems at all. I again hit my volumes and mash pH, mash temp was 1.5F high; however that didn't really matter due to the re-circulation and RIMS tube which got everything in order pretty quickly. The recipe had 7 ounces of hops, and 6 of those were in the whirlpool additions. I had zero problems using the plate chiller due to the awesome false bottom from NorCal Brewing, and I even did the whirlpool circulating through the chiller for 30 minutes. No clogs and no trouble at all.

Cleanup both days was an absolute breeze. I started by using my $10 back flush adapter on the RIMS tube, pump, and plate chiller. Once everything was flowing clear I used the water I collected from my chiller with some PBW and did a 5 minute CIP/re-circulation on the RIMS tube and mash tun, followed by another 5 minute CIP/re-circulation on the boil kettle, whirlpool arm, and chiller. I followed that up with a re-circulation using clean water to rinse, and then one final back flush all the way around to make sure all the gunk was really gone and the cleaner had been rinsed thoroughly. Then I just tipped the cart one way to drain the chiller, and the other to drain the RIMS tube, and I was all done.

Total brew day from stepping out to the garage to sitting down and cracking a beer after on Saturday was 4.5 hours, and Sunday was 5 hours, due to the extra 30 minutes of whirlpool. That wasn't hustling or trying to do too many things at once, which makes me think I can shave an extra 30 minutes or so off if I do things in parallel.

All in all pretty happy with the new rig, and I think I accomplished everything I set out to with this build! The only thing I was slightly disappointed with was both days I wound up at 65% brew house efficiency vs. 75% on my old 3-vessel system. As long as that stays consistent though I'll happily toss in the extra 1-2 pounds of grain each batch for all the other benefits I get with this system.
 
That is OUTSTANDING! Sounds like a solid, care free brewday for sure! The cart is SEXY! Thanks for all the shout outs! I really enjoyed working with you on your project... I love seeing projects like this come together!

Cheers
Jay
 
You have what looks like a 10 gallon corny keg in your brewery with an airlock on it and 2 stainless handles. Its in the corner of your picture. What is that thing? and where did you find that?

Cheers
Jay
 
You have what looks like a 10 gallon corny keg in your brewery with an airlock on it and 2 stainless handles. Its in the corner of your picture. What is that thing? and where did you find that?

Cheers
Jay

How very astute of you! That's actually a 15 gallon ball lock corny keg. I replaced the normal lid with a fermenting lid so I could put in the bung and the airlock. I use it for a sour solera that I have going. I swapped out the out dip tube with a normal 5 gallon/10 gallon ball lock dip tube. Then when I'm ready to pull from the solera I just put back on a regular lid, apply a little gas, and I can transfer off up to 10 gallons without racking any trub.

I got mine on Craigslist for a pretty reasonable price some time back from a guy that was moving out of the country and having an everything must go sale. I wound up buying about a dozen different kegs from him.

I see that Chi Company has them both new and refurbished.

What you can't see is that I have it sitting on a wheeled potted plant stand so I can move it around.

HOLY SMOKES! Man those are spendy little guys! and TALL! 34" tall based on CHI 411. I like it! But I really don't like the price tag that comes with it. I will have to keep my eyes open. I sold off a couple of the 10 gallon ones years and years ago and I see now I sold them for a bargain! :D:D:D

Cheers
Jay

Yeah, I didn't pay nearly either of those prices for mine as it was a Craigslist deal, but I'm very happy to have it!
 
Think you can go a little finer on your crush to help with your efficiency?

Als please tell me about that port on your rims for your Thermopen.
 
Think you can go a little finer on your crush to help with your efficiency?

Als please tell me about that port on your rims for your Thermopen.

You know I probably could go finer and get away with it. Right now I'm at 0.045" which is the factory setting. I might try dialing it down a bit the next go around.

As far as the port for the Thermapen it's just a 1/2" SS thermowell attached to the tee. I'm pretty sure I used this one from Brewhardware, but it's out of stock at the moment.

Edited for clarity - the Thermapen port is on the plate chiller, not the RIMS tube. There I've got the probe for my brewery controller.
 
So yesterday was my 3rd brew day on the new rig. I did a 100% Brett IPA using B. Anomala with Galaxy and Kohatu hops.

Prior to the brew day I made the following changes:

- I added the 3 way ball valve to the out port of my chiller so that as soon as I hit my temp I can just turn the valve to pump into the fermenter.

- I tightened the gap on my grain mill to get a finer crush and see if I could improve the efficiency. At some point in my brewing career I'd already tightened it from 0.045" > 0.035", which I'd forgotten about. I went ahead and cranked it down to 0.025" which resulted in a pretty fine crush.

The Blichman Hellfire, Brau-Supply controller, and NorCal thrifty RIMS tube all continued to perform excellently! Unfortunately though it turns out the crush was a bit too fine, as I had not one, not two, not even three, but FOUR stuck mashes during the brew day. I somewhat expected I'd get a stuck mash with the crush that fine, so I made sure to stay very close to the brew rig during the mash and was able to catch it and correct it each time with no problems.

In the end though I was able to get an efficiency bump up to 70% so the finer crush definitely helped. I think I'm going to give it one more go next weekend using the same gap setting but upping the amount of rice hulls I use and also really try to dial the flow rate down as low as possible and see if that helps. If not, I'll dial it back down to 0.035" and go with the 65% efficiency.

The NorCal false bottom for the boil kettle with the level 3 filtration is amazing. This recipe had 6 ounces of hops in whirlpool additions, and I had absolutely no problem doing the whirlpools through the chiller - zero clogs! The plate chiller also continues to work incredibly fast. At the end of my whirlpools I was down to 165F, and it took it down to 70F in just over 1 minute. Then I just turned the 3-way ball valve, and viola, pumped right into the fermenter.

Cleanup was a breeze with the backflush adapter and doing a recirc to clean the RIMS tube and plate chiller. Total brew day was 4 hours, 30 minutes, including the two whirlpool additions and probably 20 mins of cleaning time.

Still extremely happy with this rig and all the pieces that went in to it. Next weekend will be brew 4 on it - another pale ale while I work to dial things in properly.

Can't wait for next week though when brews 1 and 2 on the new rig will be done carbing/conditioning, and I can finally sample the results!
 
You have a nice setup, I like the wire shelving cart as a brew stand.

I was wondering what TC flange/adapter you used on the heating element?

I see the Williams page for the element you are using in your RIMS says to only use for heating water, have you noticed any scorching or issues with it?

If I did the calculations right I think the wattage density is about 68WPI which seems low enough to not cause scorching.

Hey, thanks! I'm pretty happy with this system for sure. That's Regency wire shelving I'm using for the stand that I got at Web Restaurant Store. They sell the utility cart handles and casters that I'm using too. Made it pretty easy to mount everything, and I love that I can just wheel it in and out of the garage as I need to use it.

The TC heating element adapter I'm using was made for me by @Jaybrid from NorCal Brewing Solutions. It's basically this one from the Thrifty RIMS setup; I just asked him to drill the hole smaller to accommodate my heating element.

I've not had any problems with the Williams element scorching the wort. I could see maybe if you were using it in your boil kettle or directly in the mash tun, but in the RIMS tube the wort is flowing pretty freely, so I think it's fine. I've done 5 batches on it so far with no scorching problems.

By the way, what part of the Bay Area are you in? I live in Santa Cruz and work in Mountain View.
 

Latest posts

Back
Top