My Kegerator Build

Homebrew Talk - Beer, Wine, Mead, & Cider Brewing Discussion Forum

Help Support Homebrew Talk - Beer, Wine, Mead, & Cider Brewing Discussion Forum:

This site may earn a commission from merchant affiliate links, including eBay, Amazon, and others.

Chris1272

Well-Known Member
Joined
Apr 9, 2010
Messages
213
Reaction score
3
Location
Auburn, AL
I thought I would share my first real DIY project with you guys.

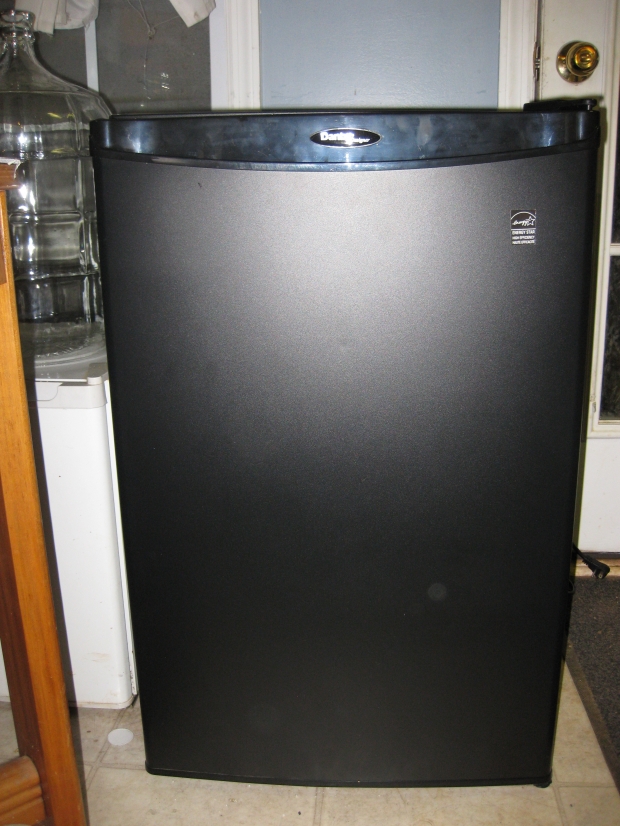
I started with a Danby 4.4 cu. ft. refrigerator. Purchased from Wal Mart.
thumb2_img_2829-59647.jpg


I removed the plastic door piece, and had a piece of plywood cut to the same dimensions. after spray painting it white I replaced the rubber boarder and installed it in the door.
thumb2_img_2830-59648.jpg


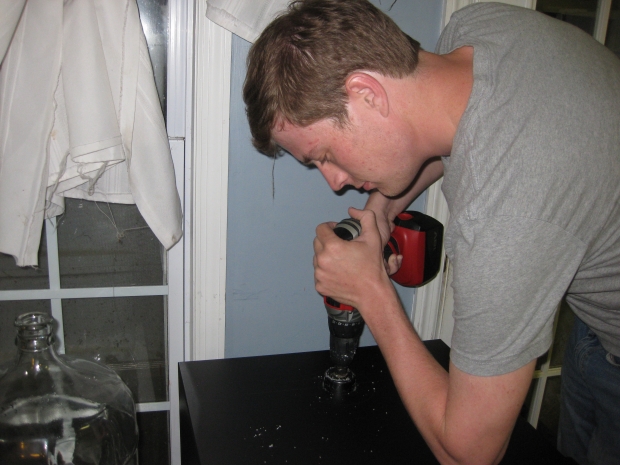
Here I'm using a hole saw to drill through the top of the unit for the tubing. It is very slow going when cutting through the metal top.
thumb2_img_2833-59649.jpg


The two Cornelius kegs and CO2 canister and manifold that will be going in the fridge.
thumb2_img_2834-59650.jpg


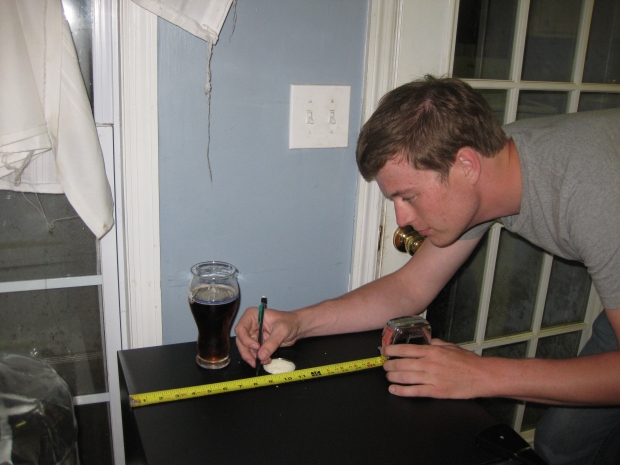
Measure twice cut once and drink home brew while your work... I think thats how it goes. anyway Im making measurements and reference points to center the tap tower.
thumb2_img_28361-59651.jpg


Here is a top down view. with waterproof tape lining the hole to keep moisture out of the exposed insulation.

thumb2_img_2837-59652.jpg


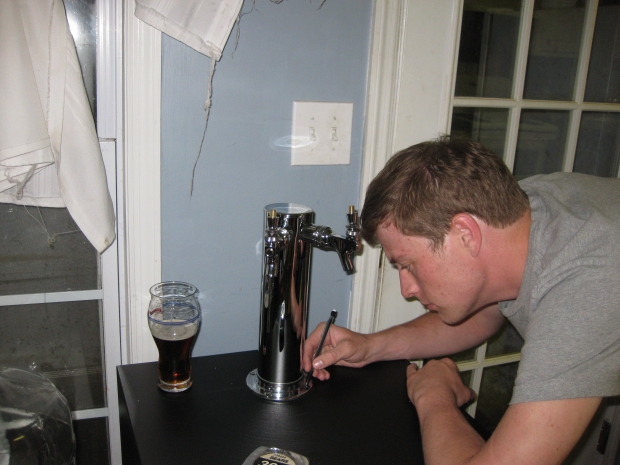
Im making marks for drilling pilot holes for securing the tap.
thumb2_img_2839-59653.jpg


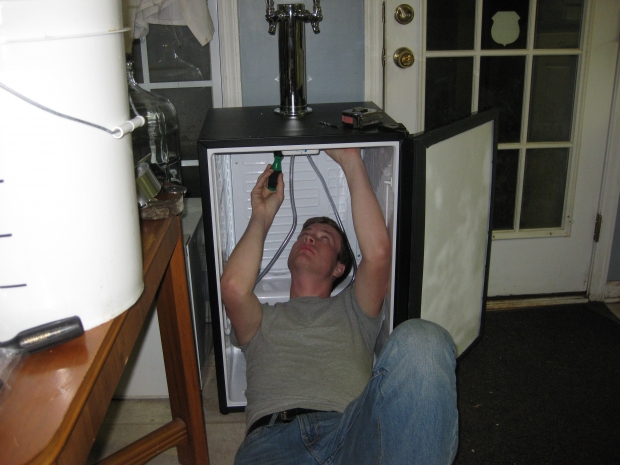
Here I am tightening the bolts from up under. I found out you need longer bolts than what come with the tap so this is right after an unplanned midnight run to wally world for some 2 1/2 in #10 bolts and washers.
thumb2_img_2842-59655.jpg


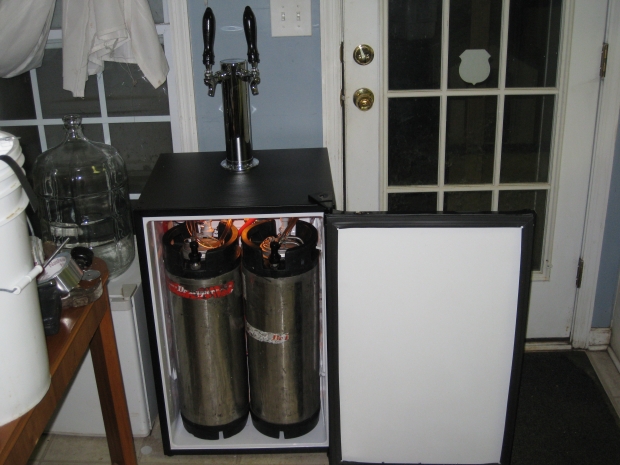
here it is all done with kegs tucked away in their new home.
thumb2_img_2844-59656.jpg


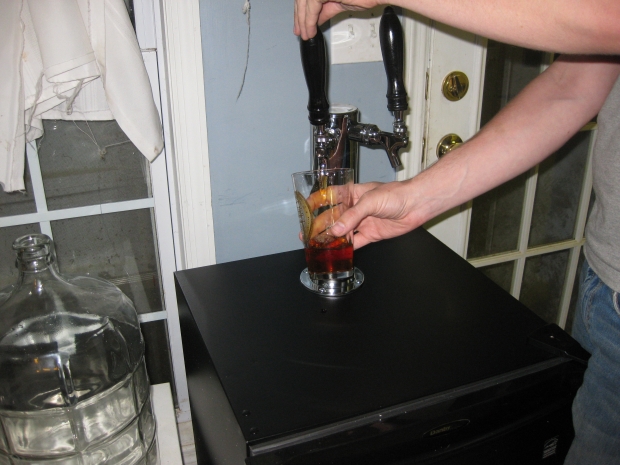
The first test pour of warm flat beer... Tastes like success.
thumb2_img_2847-59657.jpg


It was a lot of fun and certainly wont be my last project.
 
did you have to modify this fridge at all?
The only modification I did was remove the door panel that holds cans and things and add the plywood replacement. other than that a 5lb co2 tank sits nicely in the back with 2 corny kegs.


how where you sure not to hit the cooling elements??

Before starting I did a little research, this model only has one cooling line that runs across the top of the unit and it is near the front right behind the door. the only thing that is an issue is the wiring for the light and thermostat. I called danby tech support before drilling and asked if they have any lines that run in that area. The guy told me there are wires that power the thermostat and the light for the unit. during manufacture these wires are installed and the foam insulation is injected so there inst a guarantee they wont be where you want to drill. I didn't run into this problem but after broke through the metal I went very slowly by hand through the foam. If you look where the wires are heading going into the unit from the thermostat to where the cord is installed on the bottom of the unit its doubtful that you will encounter any electrical wiring.


My next project may be to cut the wire that goes to the light in the top and use it to power a fan to blow air into the tower.
 
did you use and support for your bolts that hold the tower in place I have seen people that instal a piece of plywood inside the fridge to support the tower? is this the DAR482 model?
 
did you use and support for your bolts that hold the tower in place I have seen people that instal a piece of plywood inside the fridge to support the tower? is this the DAR482 model?

My model is the Danby 440BL I have seen the builds you are talking about with the DAR482. As far as I can tell they are very similar units my model did not have the wine rack shelf or the vegetable crisper, and the shelving in the door was different. Since you are going to pull it all out anyway I don't think it makes much of a difference. as for the support I had one that I cut out of the spare plywood I used for the door, but when I installed the Tower I found that with some locking washers between the plastic and the bolt that it is secured pretty firmly. That being said the only torque on that mount should be the pulling of the tap handles if you foresee someone leaning on your tower or it being bumped a lot the extra support may be warranted.
 
I've done a same project. this fridge has no freezer, no cooling element to deal with and it fit two corny. I have a 20# co2, I had to cut a small hole to run a line in. it took me about 2hours to convert it.
 
Any idea if you could use this fridge for a double tap door mounted system? I need to get this under my countertop and don't want to drill through the top.
 
I converted the DAR482BLS just recently.. I noticed that with the lowest setting on the thermostat I was not able to get it cold enough.. So i installed a Ranco etc 111000 controller and did some rewiring and now have a stable temp..

I havent put any kegs in it yet though..Im making a trip to michigan soon and hoping I can bring back some specialty Founders beer..
 
Any idea if you could use this fridge for a double tap door mounted system? I need to get this under my countertop and don't want to drill through the top.

I don't see why not. You want to pay special attention to the material you put in to replace the plastic molding in the door. I used a thin piece of ply wood, but you would need something suitable attach your taps to and is water resistant. painting the replacement piece with a outdoor or weather resistant paint will help.
 
Any issues holding temperature with two full kegs in there? When I read about Danby fridges, this is one of the things that come up frequently...
 
Im not sure what you mean by problems holding temperature. mine stays as cold as i set it. the only problem i have is the back chill plate ices up every now and then and i have to chip away at it. If a modded fridge is having issues staying cold then there may be an issue with putting the rubber seal back on the door after taking the plastic door molding out.
 
Nah, I just meant sometimes people can't seem to get them down to the temperature they want... like the compressor will switch off at too high a temp even if they have it on the lowest setting- Its a complaint I've noticed every now and again, thus my question.

Looks great though!
 
Thanks again for the inspiration! I pulled off the door, swapped out the plastic for some $9 whiteboard material and screwed it all back together and Now I've got all the space I need inside. Still waiting on the kegging equipment and the tower will have to wait for Christmas.
The only issue I noticed is that the bottom where the door hinge is gets slightly pinched so its not a totally perfect seal on the door, but with my infrared temp gun its showing only the slightest temp drop in that area so it must not be that bad of a seal.

I had a bit of a similar problem, I fixed it by removing the screw that holds down the hinge cover. You should see that the hinge is adjustable by loosening a screw. Do that on the top and bottom and make the hinge a bit wider that should accommodate the extra with your whiteboard has generated. Hope that help you.
 
Fridge $180 from walmart.com (free shipping to your closest store)
dual tap tower $99 www.homebrewstuff.com
kegging system $180 www.midwestsupplies.com

you could probably come away cheaper if you find refurbished corny kegs or find a co2 tank on craigslist for cheap. but that will get you everything you need to have 2 of your own beers on tap at the house.

Note* only 2 ball lock kegs will fit in the fridge I used pin locks are a bit wider and shorter.
 
Any issues getting two corny kegs to fit in this? I recently did this same conversion and I don't know whether I got fat kegs, or what could be happening, but I really had to jam them in there to get them both to fit.
 
How thick was the plywood you used to replace the door liner?
I Believe it is 3/8 inch. once you get the rubber gasket off and the molded plastic out of the door just look at the space left in the gasket. I think 3/8 inch will work in there.

Any issues getting two corny kegs to fit in this? I recently did this same conversion and I don't know whether I got fat kegs, or what could be happening, but I really had to jam them in there to get them both to fit.
My kegs fit snug but comfortably. I have ball lock kegs. Do you possibly have pin lock kegs? I think they have a bigger diameter. With the CO2 canister up on the back hump of the fridge it leaves just enough room for the 2 kegs to fit in.
 
I Believe it is 3/8 inch. once you get the rubber gasket off and the molded plastic out of the door just look at the space left in the gasket. I think 3/8 inch will work in there.


My kegs fit snug but comfortably. I have ball lock kegs. Do you possibly have pin lock kegs? I think they have a bigger diameter. With the CO2 canister up on the back hump of the fridge it leaves just enough room for the 2 kegs to fit in.

Now that you mention it, they're definitely pin lock kegs converted to ball locks. In my haste, I bought what my LHBS had, not thinking that a few months later I would build a kegerator.

Now I'm thinking about running the CO2 from the outside, drilling up through that hump. I saw plans for it on here somewhere, but can't remember where. Seems like it would be a simple enough thing to do, as long as it was properly sealed.
 
That may work. Alternatively you may see if your brew shop will let you trade the kegs you have for ball locks or work out a trade with a fellow brewer that doesn't have the same size constraints you do.
 
I'm about to do this build - thanks for the write up! I don't think I'm going to put a computer fan in mine, and I see you didn't either. How has this worked out for you? Also, how long are your beer lines?
Sorry if this info is in the thread - but I don't recall seeing it.
Thanks!
 
I did rig up a fan for the kegerator but that was a few weeks after I had build the unit. I never installed it because There was no real need to I never had an issue with foamy beer out of the taps. My idea as was to cut the power line that goes to the light in the fridge and splice in an extension that powered the fan. After taking out the molding in the door, the button that turns the light off doesn't get pushed anymore. I just taped it down but you could hijack that power to run a fan. As for line length mine are 6 feet. I may go with a bit longer if I did it again, but then again I don't have foamy beer so its not really an issue.
 
Thanks for the info - I think I'm just going to put a copper pipe from the fridge to the tower to help cool the lines up there. No fan for me - for now anyway.
 
don't want to hi-jack your thread, and BTW, your kegerator looks great, but just wanted to tell some that Sams Club has the Haier beer dispenser for around $435.00 I think is what I paid and it comes with a single tap tower, tray, 5#CO2 bottle single gauge/regulater. It is 6.6cf and will hold 1 15gal keg or 3 corneys.
Just got mine yesterday by Fed EX, got it installed under bar and plugged in and is cold. I cut a hole in my bar top and mounted the tower on top of my bar. I need to get some insulation for in between the top of the fridge to the underside of bar.
Haven't got the keg in there yet to try it out. And I have to get to town to get the bottle filled yet.
But after pricing around this seemed like a good deal and it had alot of good reviews.
just hope this helps someone
Later.........TangleFoot-out
 
TangleFoot, That is really not a bad option. and The ability to fit 3 kegs is a huge selling point. My only concern is to outfit it to do that you need to buy a 3 tap tower and that's another 200-250 investment in that project. Should my keggerator breakdown that may be worth looking into if I don't just go ahead and build a keezer soon. But thanks, its good to know that product is on the market.
 
The picture links in this thread were dead for some time. They are now updated to on site hosting and should be good now. Also Update: Kegerator is still going strong and faithfully serving beer.
 
Back
Top