My DIY Whirlpool Arm

Homebrew Talk - Beer, Wine, Mead, & Cider Brewing Discussion Forum

Help Support Homebrew Talk - Beer, Wine, Mead, & Cider Brewing Discussion Forum:

This site may earn a commission from merchant affiliate links, including eBay, Amazon, and others.

DonH

Well-Known Member
Joined
Feb 16, 2014
Messages
259
Reaction score
25
Location
Ontario
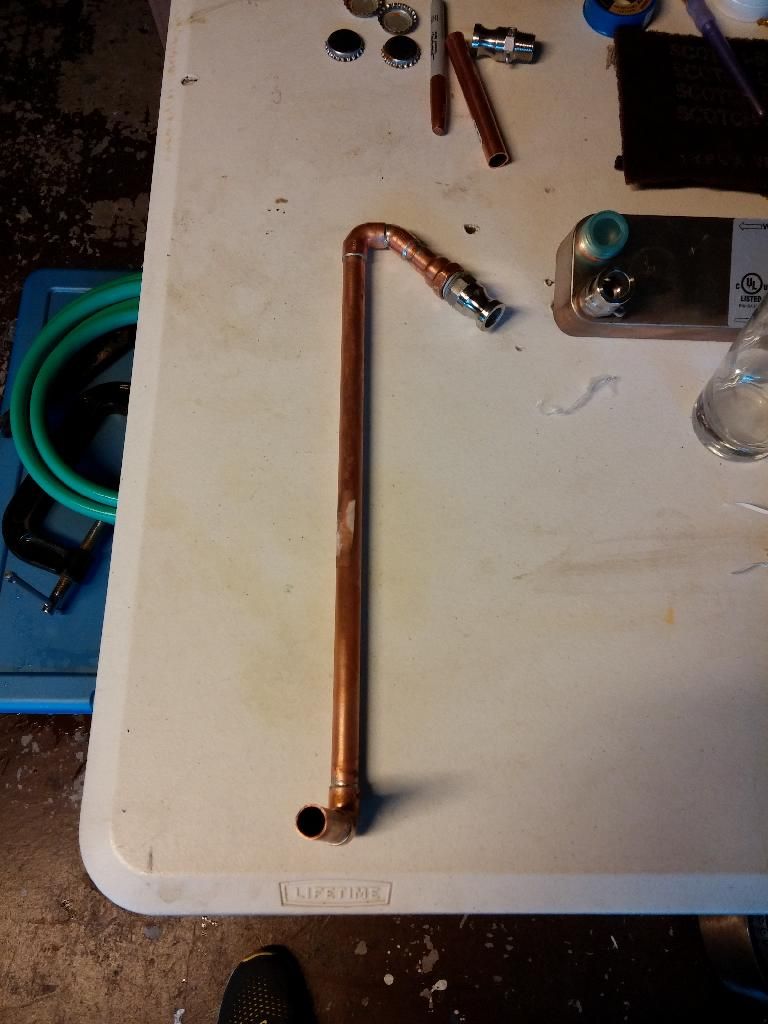
Well, I dont want to stir or finagle my hose to get a good whirlpool going.... SO I hit the homedepot plumbing section! This is what I came up with:
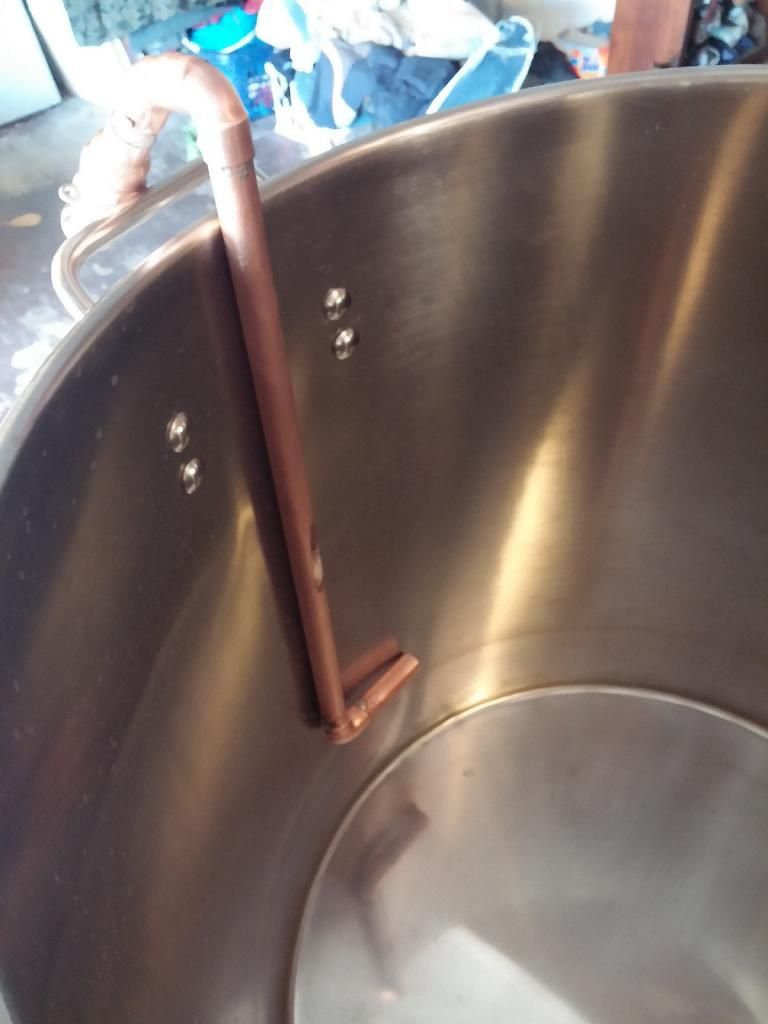
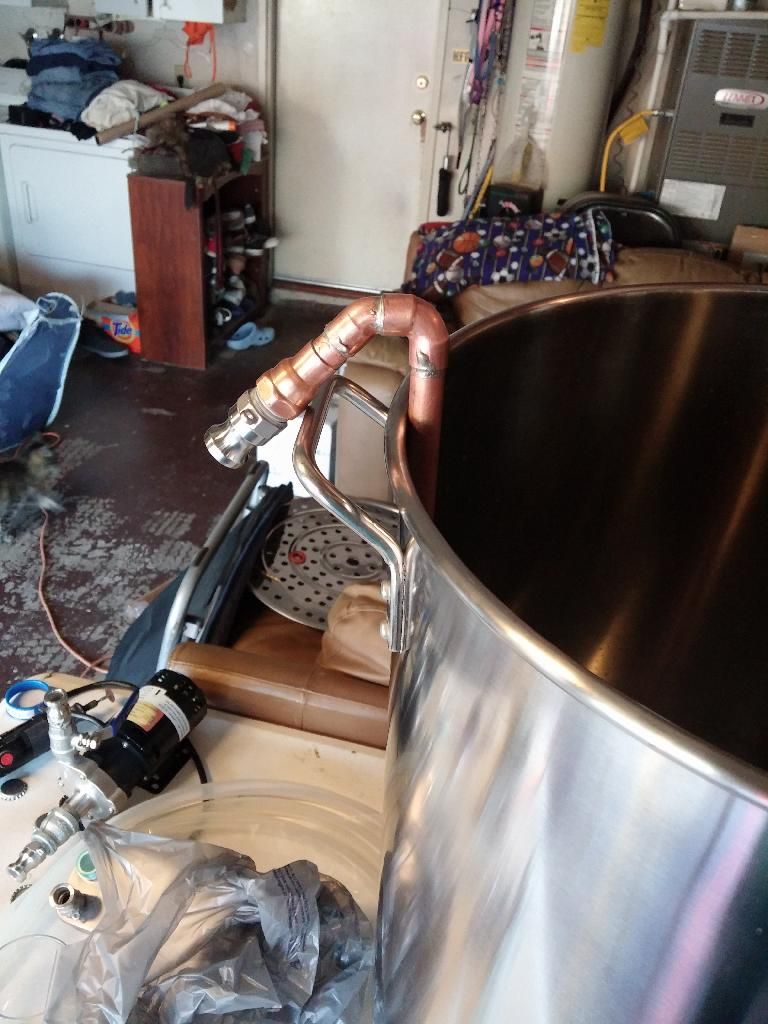
NOTE: If you can see from the picture, the bottom exit is slightly off line from the down pipe. there is a reson for this. I noticed without it somewhat angled I was getting a not so smooth whirlpool... Play around and test before you solder it up :)


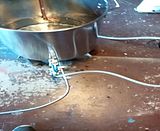
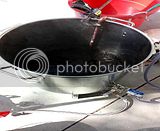
excuse the messy garage :/


Parts List:
1/2" Copper Elbow - 2 - $.79 each
1/2" Copper 45deg. Male/female - 1 $.84
1/2" 2' Pipe - $5.87
1/2" Female threaded adapter - $1.78
Male Camlock F type - $4.95
Already had flux, silver solder, and torch :)

DONE! So simple yet so effective! I dont have to drill another hole into my kettle, I dont have to gently stir... yay me! So, if you have a pump or are upgrading to incorporate a pump, go build one!

Video in action is uploading :mug:
 
Looks awesome! If I ever get around to getting a pump, I'll have to invest into this


Sent from my iPhone using Home Brew
 
Looks awesome! If I ever get around to getting a pump, I'll have to invest into this


Sent from my iPhone using Home Brew

It took about 30 minutes of my day! And I went the hacksaw way for cutting :drunk:
 
This is wicked awesome and I've been thinking of making something almost exactly like this for a while now, camlock and everything.

One thing that I was planning on doing different was to put a 1/2" to 3/8" reducer on the exit, then a short length of 1/4" flexible copper (which will fit inside the 3/8), curving it a little with the pot. Having a smaller exit will make the wort shoot out faster and improve the whirlpool.

Another thing is that I recirculate while chilling with a bottom drain on my kettle. I plan to make this whirlpool exit just below the surface of my wort to avoid temperature stratification (hot wort staying near the top).

Great job, and thanks for the inspiration for me to finish this project myself.

:mug:

I like your Idea! I will report back on sunday after brewday on how effective it is. I might have to try your method!
 
It's going the wrong direction..........Should counterclockwise in the Northern Hemisphere..........The Coriolis effect is going to play hell with your whirlpool.............:D


Just kidding!.......Looks great! Keep us posted on it's performance, please!
 
What keeps the tubing from swinging away from the outlet from the jet force?

I wonder about that too. My plan for this weekend is to get around to drilling another hole in my kettle for a whirlpool arm, it would be nice to be lazy if this system works ok.
 
well, what i did was cut a piece of pipe to fit on the outside ofthe pot as well. soldered it up and its good to go. i will take a picture once I am off of work! But you can always use a steel squeze clamp. sanitize it just in case
 
the arm kicked ass! did its job by far today. pics uploading
 
First go around


and somehow the video during brewday was chopped! ARG!


and some pics from yesterdays brew day...


darkness


Well, I have decided to solder on a reducer to 3/8 on the outlet and added a curved piece of 3/8 to get an even more aggressive whirlpool
 
small update, I have installed a ~12" curved 3/8" copper attachment to the arm to increase and have a nice whirlpool. I noticed it works best when the outlet is at the 4 o'clock position where the bulkhead is at the 12 o'clock position
 
Sorry if this a dumb question, but how are you using this? It looks like it's in your mash tun, but I thought the point of whirlpooling devices was to draw off the wort after the boil and leave the trub behind. Clearly, I don't know the first thing about recirculating systems. :(
 
What a great idea. I was thinking about attaching a pair of "wings" to the spackle stirrer that I use to mix mash - but this is a far better idea.
 
Sorry to bump an old thread but I love this idea and was wondering if you have an updated pic to post after the modification. Nice work BTW!
 
I just finished building & testing my whirlpool arm. The design is very similar to the one suggested except it accommodates BKs with valves at the top. It does a great job, and to build two dip tubes (one shown here, the other in my HLT) and the whirlpool arm it cost me less than $30 (including SS camlock fittings & SS elbow).

Thanks for the ideas shared here!

IMG_2578.jpg


IMG_2579.jpg
 
I see some great ideas flowing on this post and wanted to add some observations made recently.

I wish I had taken photos but I didn't so I'll go with a thousand words instead. I was curious how my whirlpool (Colorado Brewing Systems) was working so I did a mock up with water and used coffee grinds to simulate trub. An increase in tangential speed (by increasing discharge speed) does improve the concentration of trub in the center, BUT, the location of the pickup point appears as or more important. Seems like the flow pattern entering the pickup can disrupt the trub "cone" and draw trub into the circulation. A system that positions or shapes the pickup tube to draw further away from the cone (closer to periphery of kettle) will help. Seems to me that Blichmann had some sort of shield system to address this.
 
Something to also consider is what I used to use before I drilled and welded my kettles. I used lengths of 1/2" copper tubing the a made some bends in. The first one with a single bend for a diptube and the other was similar to the diptube, but longer and with a sweeping curve on the bottom for the whirlpool return. I clamped them to the kettle rim using copper beam clamps. Cost me less than 20$, no drilling, soldering, or aggressive angles.
 
I have a sanitary question on this.

I use my pump to circulate the hot wort during mash process.

How are you sanitizing the pump/lines after mash to do this post boil?
 
I hook it all up with 15 minutes left and start to pump during boil for the last 10 minutes.
 
Interesting.. I guess I found my next DIY project after my magnets arrive for my stir plate.

Nice thread, thanks for the idea.
 
I recirculate my wort over the entire boil as well so the pump gets heat sanitized, never a concern. If you use an immersion chiller, running a whirlpool greatly improves cooling times. I leave the whirlpool running the entire time and use a racking cane to transfer to the fermenter.
 
So glad I finally stumbled on to this thread! I've been imagining something like this in my head and trying to find one online. Was expecting to pay an arm and a leg for SS. Didn't think about copper and DIY! I've never soldered anything except wire connections before. How difficult is it to do it right? Also, thanks @rshortt for the upgrade ideas. Gonna look into building this tomorrow! My kettle is a converted keg, so may have to adapt this some. I'll update here when I've got it figured out.
 
Last edited:
OK, maybe nobody is still watching this thread? Headed to Lowes to buy copper pieces. My kettle is a converted keg, so I have a 2 inch lip to clear. Do I have to get the whirlpool output right next to the wall of the kettle? Trying to figure out how to do that with the lip. If I had something that could cut steel, I suppose I could cut a notch out at the point where I want the arm to enter the keg? But I would have to buy something. I have a good compressor, so I suppose there is an air tool that I could get at Harbor Freight fairly cheaply...
 
You should be able to make a U shape that is weighted such that it will fit over the top of your keggle or if you wanted something a little more permanent you could route it through one of the handles. Ideally the outlet would hug the inside of the vessel but without drilling the keggle that gets a little tough. As long as it generates a good vortex it should be good enough.
 
You should be able to make a U shape that is weighted such that it will fit over the top of your keggle or if you wanted something a little more permanent you could route it through one of the handles. Ideally the outlet would hug the inside of the vessel but without drilling the keggle that gets a little tough. As long as it generates a good vortex it should be good enough.
Yeah, I knocked this out a few weeks ago. As I suspected, it was a pretty easy DIY.
20181021_181604.jpeg
20181021_181411.jpeg
 
Back
Top