-TH-
Well-Known Member
First off I have to say I'm pretty fortunate to have access to a lot of scrap parts, metal, and stuff where I work. If I see something "valuable" like a gear-motor for instance in good shape on its way to the dumpster, I'll grab it and throw it in my cabinet. Also we have drawers full of things like bushings, hardware, belts & pulleys, etc. Ok you get the idea, now on to the project....
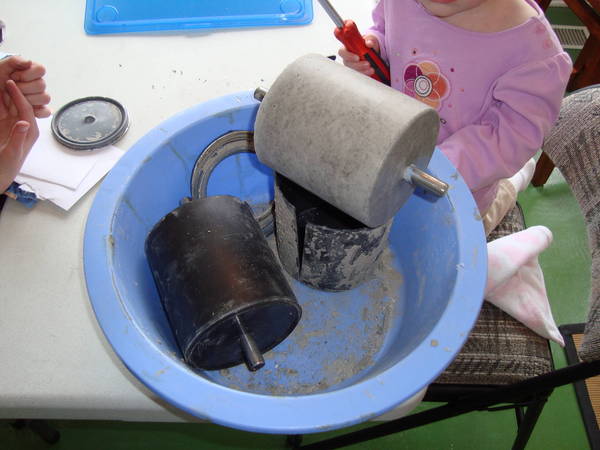
I had been wanting to build a grain mill for quite some time. I probably spent more time thinking about this project then actually working on it (can you tell I'm an engineer?). I have access to our machine shop after hours which has a lathe but I couldn't get my hands on some nice round metal bars for the rollers so I thought I'd give concrete a try. Making the rollers was tricky, because I needed to find somthing to use for a mold that would hold the axles perfectly centered, but yet be removeable once the concrete cured. After one failed attempt using empty shortening containers (rollers were out of round because the axles weren't centered well), I used two quart-sized paint cans - the kind made from plasic with only the top being metal. The tricky part was making sure the holes in top and bottom of the can were perfectly centered. I actually put the cans in a lathe to spin them and then mark them with a marker. I punched out the holes with 1/2" hollow drill bit normally used for drilling paper. The axles are 1/2" dia. steel cut to length and a roll pin pressed into them (after being drilled) to make sure they don't spin inside the concrete. The rollers ended up being about 4-1/4" in diameter.

With the axles in place I filled the cans with concrete, vibrated the heck out of them with a palm sander to get the air bubbles out (otherwise the roller surfaces would be very pitted), and pounded the covers on. BTW I used a topping mix which contains little or no aggregate, I added a little more portland cement, and also acrylic fortifier. I have a book on concrete countertops that helped me with that somewhat. I think the concrete ingredients were the only things I had to buy for this project.
I used some self-aligning bronze bushings which work nice in sheet metal and won't bind up if things aren't perfectly aligned. You can see from then next picture how I made the gap adjustable.

I discovered along the way that I needed something to keep the grain from falling past the ends of the rollers since they can't be mounted up nice and tight to the side frames. Therefore I made some pieces out of UHMW plastic to prevent that.

The gearmotor was one I've had in my cabinet for years just waiting for the opportunity to be used. Its 67 RPM. I wish it had a little more torque but oh well.

The hopper was a reflector left over from our factory lighting retrofit. We installed flourescent a couple months ago and threw the HID's out. This reflector was never used, it was a spare.
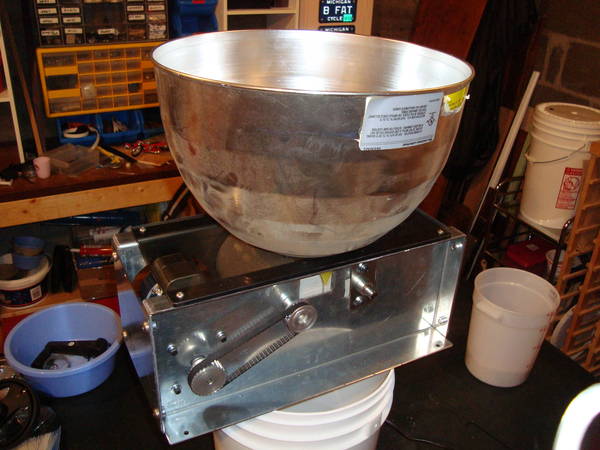

I thought 67 RPM would be slow enough as is but I found I needed to gear it down even more to gain me some more power. I also had to add an idler bearing to keep the timing belt from hopping on the motor pulley. It really takes alot of power to crush the grain. I had a small hand crank on for testing purposes once and I was able to turn it only if I did just a little grain at a time.

And the crush...

Let me know what you think, I'd love to hear your comments!!!
EDIT: Here's a video of it in action:
I had been wanting to build a grain mill for quite some time. I probably spent more time thinking about this project then actually working on it (can you tell I'm an engineer?). I have access to our machine shop after hours which has a lathe but I couldn't get my hands on some nice round metal bars for the rollers so I thought I'd give concrete a try. Making the rollers was tricky, because I needed to find somthing to use for a mold that would hold the axles perfectly centered, but yet be removeable once the concrete cured. After one failed attempt using empty shortening containers (rollers were out of round because the axles weren't centered well), I used two quart-sized paint cans - the kind made from plasic with only the top being metal. The tricky part was making sure the holes in top and bottom of the can were perfectly centered. I actually put the cans in a lathe to spin them and then mark them with a marker. I punched out the holes with 1/2" hollow drill bit normally used for drilling paper. The axles are 1/2" dia. steel cut to length and a roll pin pressed into them (after being drilled) to make sure they don't spin inside the concrete. The rollers ended up being about 4-1/4" in diameter.
With the axles in place I filled the cans with concrete, vibrated the heck out of them with a palm sander to get the air bubbles out (otherwise the roller surfaces would be very pitted), and pounded the covers on. BTW I used a topping mix which contains little or no aggregate, I added a little more portland cement, and also acrylic fortifier. I have a book on concrete countertops that helped me with that somewhat. I think the concrete ingredients were the only things I had to buy for this project.
I used some self-aligning bronze bushings which work nice in sheet metal and won't bind up if things aren't perfectly aligned. You can see from then next picture how I made the gap adjustable.
I discovered along the way that I needed something to keep the grain from falling past the ends of the rollers since they can't be mounted up nice and tight to the side frames. Therefore I made some pieces out of UHMW plastic to prevent that.
The gearmotor was one I've had in my cabinet for years just waiting for the opportunity to be used. Its 67 RPM. I wish it had a little more torque but oh well.
The hopper was a reflector left over from our factory lighting retrofit. We installed flourescent a couple months ago and threw the HID's out. This reflector was never used, it was a spare.
I thought 67 RPM would be slow enough as is but I found I needed to gear it down even more to gain me some more power. I also had to add an idler bearing to keep the timing belt from hopping on the motor pulley. It really takes alot of power to crush the grain. I had a small hand crank on for testing purposes once and I was able to turn it only if I did just a little grain at a time.
And the crush...
Let me know what you think, I'd love to hear your comments!!!
EDIT: Here's a video of it in action:
Last edited by a moderator: