Multiple newbie questions

Homebrew Talk - Beer, Wine, Mead, & Cider Brewing Discussion Forum

Help Support Homebrew Talk - Beer, Wine, Mead, & Cider Brewing Discussion Forum:

This site may earn a commission from merchant affiliate links, including eBay, Amazon, and others.

Michele Craft

Well-Known Member
Joined
Dec 4, 2019
Messages
133
Reaction score
39
Hi all,

Thank you to those who talked me out of buying that 7cu ft freezer I saw and confirmed I could NOT get 4 1/6s in it.

I've been looking through this thread
https://www.homebrewtalk.com/forum/threads/chest-freezer-specs-and-layouts.377518/page-18

and I'm now neck deep in web browser tabs trying to figure out what I REALLY need.
1.) Can anyone suggest a reasonably priced and readily available (i.e. currently available) chest freezer where I could fit 4 1/6s in it and put the CO2 on the hump. I'd LIKE to stay with a 7 cu ft but can go to a 10'ish if need be. Reason I'm stuck on sizes.....

We are putting in a home bar, front bar (tbd if it'll be an "island" or anchored to the wall on one side) with a back bar. My intent is to put the keezer on rollers and make it the centerpiece of the back bar. So I'm thinking build some shelving for the back bar, some with doors some not, put the keezer in the middle of it and try to match the height of the wood counters on either side and then put a wood top on the keezer. I won't wrap the back of it but because it'll likely be deeper than the counter top, I need to do the sides because it'll stick out some.

2.) Next question.... my plan was to do the 4 taps with 2" black iron pipe. So 10 or 12" rise, elbow, close, T, close, T etc.... elbow down, 10 or 12 back down to top. Knowing I'll have to roll it out a bit from the wall, does anyone think putting that much black iron on top of a lid (TBD if I'll use the existing freezer lid or just make one out of wood to sit above any collar needed) is too heavy? I feel like black iron is about 4.5# / ft. I could put a gas shock assist with the lift I suppose. Maybe a single riser with 2 off each side is the way to go?

3.) Tower cooling.... I've been trying to read and what I've learned is I don't need glycol LOL! I've read some people use flexible copper tubing as a "heat sink" and call it good. Others have a 1" hose with a fan blowing up into it. That seems like my best bet BUT I don't know if I should just run it up to one elbow and let it blow across and down the other side or what. If I build it with the 2 risers and 2 elbows, I don't know if I should put 2 lines up 1 side and 2 up the other thus (I think) needing two air cooling lines. Or if I do a T, just blow it up the middle....... Hoping for some help there.

At this point, the only thing I'm sure of is that I need to find short shanks and I'm going with the Perlick taps because I want to only deal with this once.

thanks so much in advance for any help/suggestions/watch outs you can offer.
 
I have no experience, but I'm highly skeptical of pushing cold air into the towers to keep them cold. Air is not a great thermal conductor, and I doubt there'd be enough air flow through the tower for significant heat exchange.

I've never seen how they are made, though. I find them pretty expensive in stores, I figure I'll make myself something on the cheap with PVC that's wide enough to allow coolant lines to keep it at good temps.
 
Actually, if the run is short, the tower is decently insulated, and enough cool air is supplied, a tower cooler works quite well indeed. Mine holds my 6-tap t-tower within 10 degrees of the beer temperature in the dead of summer, and much closer this time of year...

Cheers!
 
Resized_20191230_102246.jpeg
Thanks! My thought was to run some pipe insulation up in the tower so I may go to 2-1/2" pipe to be safe.

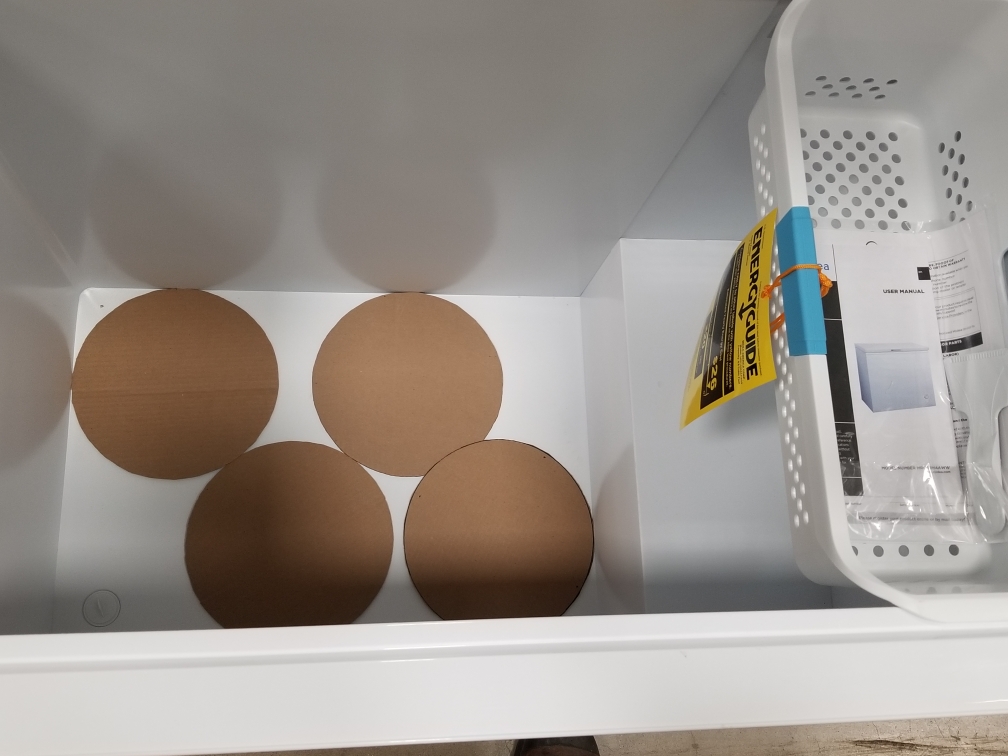
Think I found a chest freezer that'll work for 3 1/6s and a soda keg and possibly even 4 1/6s. I cut cardboard at 9-3/4" for extra room and here's how they lay out in a Lowes 8.8cu ft chest. There's a tiny bit of overlap on the 4th but they're also a half inch bigger than a 1/6 keg.

One thing I saw in the manual that concerns me is that it wants 8" clearance on the sides and back. That can't be for real right? I won't be wrapping the back but it'll be against a wall. The sides I can slot out and have next to open shelves vs a doored cabinet so that should be able to vent I'd think.
 
Last edited:
Think I found a chest freezer that'll work for 3 1/6s and a soda keg and possibly even 4 1/6s. I cut cardboard at 9-3/4" for extra room and here's how they lay out in a Lowes 8.8cu ft chest. There's a tiny bit of overlap on the 4th but they're also a half inch bigger than a 1/6 keg.
On that picture, try using proportionally scaled down discs that represent exactly your sixtels' footprint to see if 4 will actually fit. Or take actual footprints templates with you to the store. Aim to have a minimum total space left of 1/4-1/2" to juggle and compensate for irregularities and being able to lift one out and stick a new one in. They can be fairly tight, but they have to fit. If the floor is only 1/16" too small, the 4th won't fit, whatever you try.

You're sure you will only use 1/6 Sanke kegs?
 
One thing I saw in the manual that concerns me is that it wants 8" clearance on the sides and back. That can't be for real right? I won't be wrapping the back but it'll be against a wall. The sides I can slot out and have next to open shelves vs a doored cabinet so that should be able to vent I'd think.
An (good) inch of space around is plenty. As long as the heat from the sides can escape.

If it goes inside a (mostly) closed cabinet, use a (small) fan (or 2) to draw the hot air out and provide circulation around the outside shell, at least while the compressor is on, best with a 10-20 minute extended-on delay.
 
On that picture, try using proportionally scaled down discs that represent exactly your sixtels' footprint to see if 4 will actually fit. Or take actual footprints templates with you to the store. Aim to have a minimum total space left of 1/4-1/2" to juggle and compensate for irregularities and being able to lift one out and stick a new one in. They can be fairly tight, but they have to fit. If the floor is only 1/16" too small, the 4th won't fit, whatever you try.

You're sure you will only use 1/6 Sanke kegs?

Since those circles are actually 1/2" bigger than sixtels, I'm thinking 3 will definitely fit fine and then room for either a 4th or a 9" soda keg which is why our home brewing friends use, right? We tend to be "variety" drinkers.... read as, "we have a lot of random 4 packs and such that we get in our travels or get from friends that brew and bottle" so having 3 sixtels and a corney keg is more than enough. We debated going to 3 taps vs 4 but I like the symmetry of 4 lol!

An (good) inch of space around is plenty. As long as the heat from the sides can escape.

If it goes inside a (mostly) closed cabinet, use a (small) fan (or 2) to draw the hot air out and provide circulation around the outside shell, at least while the compressor is on, best with a 10-20 minute extended-on delay.

Good to know, thanks! I'll have to look into a fan that I can somehow wire in to the compressor circuit, need to do more reading up on that.

Does anyone off hand know the height of a D coupler? Will be building the collar on any cooler up so that the end height is 38 - 42" (so back bar height matches or almost matches the front bar at 42") so I assume that should be plenty of room for any coupler from what I'm seeing but thought I'd ask. I'm likely going to try to build my own lid vs drilling through the lid of the cooler. I'll just set the original cooler lid aside. Just not sure how to get a good seal, more reading.
 
Think I found a chest freezer that'll work for 3 1/6s and a soda keg and possibly even 4 1/6s. I cut cardboard at 9-3/4" for extra room and here's how they lay out in a Lowes 8.8cu ft chest. There's a tiny bit of overlap on the 4th but they're also a half inch bigger than a 1/6 keg.

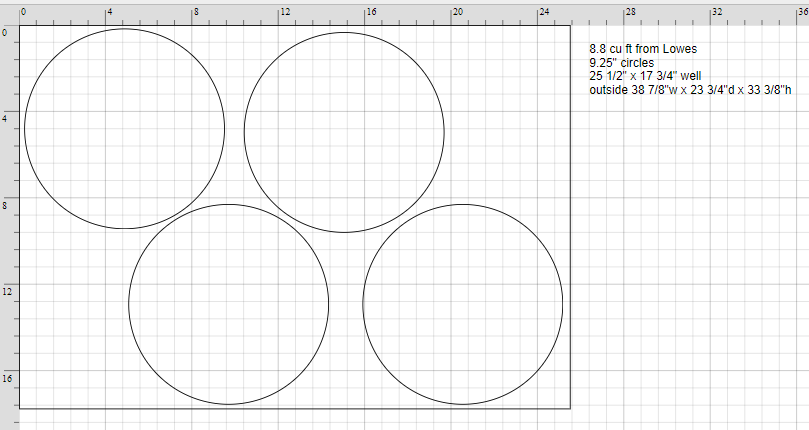
Not sure if this will help anyone but I did a drawing in SmartDraw online with the measured inside dimensions without the hump of the Lowes 8.8 cu ft one and then 9 1/4" circles. With 4 of them I still have a bit of wiggle room and since I plan to have 3 sixtels and a soda keg, with one of those circles being 9" vs the drawn 9 1/4", I'm thinking this should work fine. I purposely didn't jam the circles up against the walls or against themselves in the drawing. Am I missing anything? Now I can go investigate taps, lines etc :)
upload_2020-1-2_13-27-46.png
 
Not sure if this will help anyone but I did a drawing in SmartDraw online with the measured inside dimensions without the hump of the Lowes 8.8 cu ft one and then 9 1/4" circles. With 4 of them I still have a bit of wiggle room and since I plan to have 3 sixtels and a soda keg, with one of those circles being 9" vs the drawn 9 1/4", I'm thinking this should work fine. I purposely didn't jam the circles up against the walls or against themselves in the drawing. Am I missing anything? Now I can go investigate taps, lines etc :)
Excellent, it looks very good! You only need a little wiggle room.
This space provides for the most universal usage. It will fit either 4 Sixtels, 4 Ball Lock (not pin lock) Corny kegs, or any mix of those.
Most homebrewers use Corny kegs, very few use Sankes.

Are you homebrewing or planning to?
  • Will a Sixtel or Corny with the taps/QDs mounted fit with the lid closed? If so, you'd need no collar.
  • If height is an issue, there are low profile Sanke (D) taps/connects, they're almost flat. There are also low profile 90° Ball Lock QDs.
  • I know you're building a faucet tower/bridge. In case you'd need a collar for additional height, look around on this forum for ideas on keezer collars and see how well they'd fit in your space.

Faucets, shanks, lines:
  • Use forward sealing taps
  • Use all-stainless faucets and shanks, no brass
  • For both beer and gas, consider using 4 mm ID EVABarrier line and push fittings, over any vinyl line (e.g., Bevlex 200, etc.) no matter what they claim to be.
  • Consider using a larger (20#) CO2 tank outside the keezer over a 5# one inside. 20# swaps or refills tend to be most economical especially if you homebrew and keg.
  • Now if you're only (or mostly) going to dispense kegs of commercial beer, not purging kegs, carbonating home brew, etc., a 5# tank can last a long time.
 
Excellent, it looks very good! You only need a little wiggle room.
This space provides for the most universal usage. It will fit either 4 Sixtels, 4 Ball Lock (not pin lock) Corny kegs, or any mix of those.
Most homebrewers use Corny kegs, very few use Sankes.

Yep, I confirmed with my 2 friends that homebrew and keg that they use Ball lock kegs so we're good there.

Are you homebrewing or planning to?

I don't, and don't plan to start. Too many other hobbies. I just like to drink it, tho I've helped them brew a few times.

  • Will a Sixtel or Corny with the taps/QDs mounted fit with the lid closed? If so, you'd need no collar.
  • If height is an issue, there are low profile Sanke (D) taps/connects, they're almost flat. There are also low profile 90° Ball Lock QDs.
  • I know you're building a faucet tower/bridge. In case you'd need a collar for additional height, look around on this forum for ideas on keezer collars and see how well they'd fit in your space.

I don't have the exact well depth handy but on the hump it was 19 3/4" deep. The outer dimensions with the lid and all are 33 3/8" H x 38 7/8" W x 23 3/4" D Since we want to put this in a back bar that will be 42" high (to match from bar, as I'm reading about bar building that seems common), I'll have a collar regardless. I probably will have the kegerator a bit lower than the 42" so there's an elevation change but even if I don't, I'll be building up either way. What I have to look through threads about is not only building a collar so it's sealed well but also, not using the freezer lid but building a lid. I don't really want to put 2 holes in a perfectly good lid so I was hoping to just use the hinges and make my own lid. Then with the collar, I won't have any holes being drilled in the case at all.


Faucets, shanks, lines:
  • Use forward sealing taps
  • Use all-stainless faucets and shanks, no brass
  • For both beer and gas, consider using 4 mm ID EVABarrier line and push fittings, over any vinyl line (e.g., Bevlex 200, etc.) no matter what they claim to be.
  • Consider using a larger (20#) CO2 tank outside the keezer over a 5# one inside. 20# swaps or refills tend to be most economical especially if you homebrew and keg.
  • Now if you're only (or mostly) going to dispense kegs of commercial beer, not purging kegs, carbonating home brew, etc., a 5# tank can last a long time.

It's interesting to mention the forward sealing taps. I had been reading on the micromatic site about rear sealing taps being less prone to bacteria and such since the faucet isn't sitting full of beer. This is a real concern for me given this won't be used daily and one of our home brewing friends had a double lung transplant almost a year ago so we need to be super super careful. Tho I do understand how rear sealing taps are less prone to sticking so I think I just need to do more research. I was planning to get Perlicks and I don't know if they only come in rear sealing or not?

Absolutely not going to use any brass. Not into anything that's porous like that.

I had recently read a thread here about the EVA Lines vs the Bevlex so that was decided too :) What I'm a bit fuzzy on is how the 4mm translates to the "normal" sizes like 3/16, 5/16 etc. since 3/16 is 0.1875in and 4mm is ~ 0.1575in

Since I wasn't going to do anything with home brewing, etc. I was leaning towards a 5# but also looking at 10# since that would definitely last me a good long time. Probably going to depend what I can fit on the hump.

One thing I'm debating about is if I want to have 2 or 3 regulators and 1 or 2 manifolds. So if I do one manifold, I'm definitely going with a 2 gauge setup so I can see in and out pressure. But my thought (not knowing how much beer varies for required pressures - I only know what I typically set my uKeg growlers to when I get them filled) was it might be good to have the option to have 2 different pressures running so 2 gauges plus the tank pressure gauge and then 2 manifolds - maybe 3 port vs 2 4s knowing I'll have a max of 4 things hooked up so 2 3 ports gives me a good way to move things around where I might be locked in 2 much if I do 2 2 port manifolds - if all that makes sense.

I know since I'll be using 2" black iron, I'm going to need short shanks and then I have to sort out cooling into the tower and also air circulation in the freezer as well as what controller I'll use. A friend of mine has a new Johnson controller he's not using (a19aat I believe). It's not digital or anything but it'd probably work to get me going. I also need to think about line length and from my search here, it looks like there's a decent calculator for that.

So many things to investigate, I better go crack open a beer and get on it LOL!
 
Good planning is 9/10 of the job. :mug:

Forward sealing faucets are preferred by homebrewers, taprooms, and even bars are switching to them.
Here's why:
  1. No sticking
  2. No (sticky) beer left in a long semi-obstructed channel
  3. There's much more beer residue left behind in a rear-sealing faucet than a forward sealing one. That residue is exposed to air, insects (fruit flies), and bacteria. In a forward sealing faucet only the front (mostly the spout) is exposed. A few spritzes of Starsan inside the spout or a cleaner/water/Starsan rinse regimen will easily clean that out without leaving anything (or much) behind.
Duotight or John Guest push fittings are in mm.
8 mm (~5/16") OD are commonly used for those 4mm ID EVA Barrier lines, both for beer and gas. Due to the narrower 4 mm ID, shorter lines can be used, as short as 4-6 feet, compared to 12-16' for 3/16" ID BevLex 200 (vinyl).
https://www.williamsbrewing.com/532-EVABarrier-Beer-Tubing-39-foot-roll-P4680.aspx
Proper hose length - Mike Soltys

If you want 2 serving pressures you need a dual body regulator or a single body regulator plus a secondary regulator. Most primary regulators come with a high pressure gauge. But the gauge is not that useful. Once it starts dropping you're already "running on fumes."
http://www.ritebrew.com/category-s/1914.htm

If you leave the tank (and regulator) outside the keezer any size will work. Just run the lines to the inside.
Mind, you can't drill through the keezer body, there are lines/coils in the walls, both on the in- and outside.
 
Last edited:
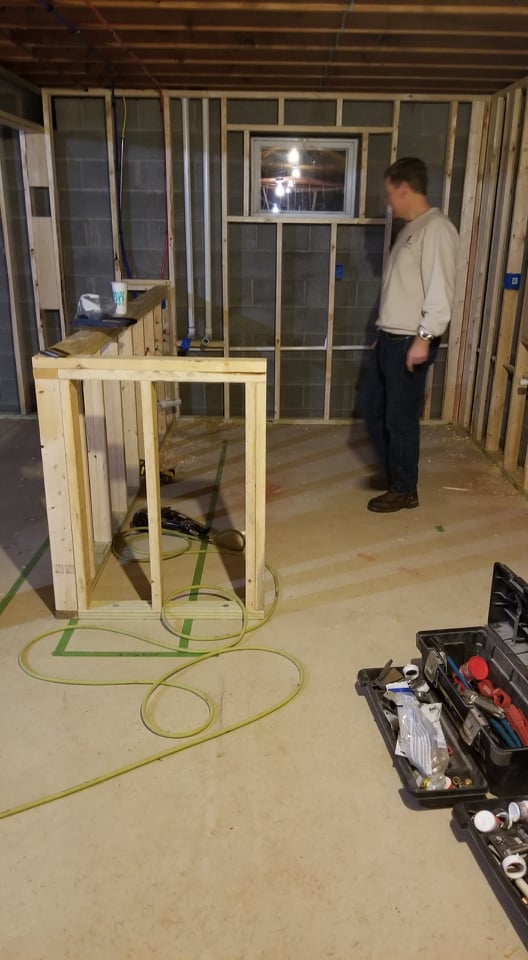
Well then that makes the tap purchase easy. Thanks for the input. Right now I'm focused on kitchen reno, that we didn't plan to do but trying to make a few small cabinet changes wasn't going to be as easy as I thought. The bar wall went up today so we're making some progress but all in good time.

 
one of our home brewing friends had a double lung transplant almost a year ago so we need to be super super careful.
I'm not a physician. He/she should definitely check with his/her doctor on consuming homebrew, tap beer, growlers, and stuff like that and if it's safe for his/her consumption, and under what conditions. Beer is full of yeast and "bugs." Pretty much anything could be a health hazard when the immune system is compromised or when using many drugs to stay alive.

Generally, the forward sealing (and stainless) faucets are recommended, especially when use is mostly incidental, such as serving homebrew and home dispensing in general. Bars are a whole different scene, the volumes served are so much larger, the tap system in perpetually "rinsed." They all need periodic (frequent) line cleaning.

Plan that bar room well, and enjoy it for many years!
 
He's good there. His doctors know he brews and tho he has to limit how much he can have in a week, where it comes from isn't a concern for them. He can't do tap soda or tap water but they weren't worried about beer (I think they're figuring you can't live in a bubble so there's always some risk). His wife is a teacher so frankly, I'd prefer they install a clorox mister at their door for when she comes home LOL!
 
Thanks for this. What I'm trying to figure out is where to route the hose since I'm not just having a single stack with a t at the top. I'm going up to an elbow, across to 4 taps, elbow and back down into the lid. So if I just let the hose sit at the bottom of the first riser pointing up that should get a bulk of the lines I guess. I was going to use 2" black pipe and run 2 lines up each riser but maybe having them come all from one side would be better
 
My 7 cu. ft. freezer also only holds 3 corny kegs, but I am building up a collar which, when able to put them on the bump, will allow it to fit 5.
 
Hi all,

Thank you to those who talked me out of buying that 7cu ft freezer I saw and confirmed I could NOT get 4 1/6s in it.

I've been looking through this thread
https://www.homebrewtalk.com/forum/threads/chest-freezer-specs-and-layouts.377518/page-18

and I'm now neck deep in web browser tabs trying to figure out what I REALLY need.
1.) Can anyone suggest a reasonably priced and readily available (i.e. currently available) chest freezer where I could fit 4 1/6s in it and put the CO2 on the hump. I'd LIKE to stay with a 7 cu ft but can go to a 10'ish if need be. Reason I'm stuck on sizes.....

We are putting in a home bar, front bar (tbd if it'll be an "island" or anchored to the wall on one side) with a back bar. My intent is to put the keezer on rollers and make it the centerpiece of the back bar. So I'm thinking build some shelving for the back bar, some with doors some not, put the keezer in the middle of it and try to match the height of the wood counters on either side and then put a wood top on the keezer. I won't wrap the back of it but because it'll likely be deeper than the counter top, I need to do the sides because it'll stick out some.

2.) Next question.... my plan was to do the 4 taps with 2" black iron pipe. So 10 or 12" rise, elbow, close, T, close, T etc.... elbow down, 10 or 12 back down to top. Knowing I'll have to roll it out a bit from the wall, does anyone think putting that much black iron on top of a lid (TBD if I'll use the existing freezer lid or just make one out of wood to sit above any collar needed) is too heavy? I feel like black iron is about 4.5# / ft. I could put a gas shock assist with the lift I suppose. Maybe a single riser with 2 off each side is the way to go?

3.) Tower cooling.... I've been trying to read and what I've learned is I don't need glycol LOL! I've read some people use flexible copper tubing as a "heat sink" and call it good. Others have a 1" hose with a fan blowing up into it. That seems like my best bet BUT I don't know if I should just run it up to one elbow and let it blow across and down the other side or what. If I build it with the 2 risers and 2 elbows, I don't know if I should put 2 lines up 1 side and 2 up the other thus (I think) needing two air cooling lines. Or if I do a T, just blow it up the middle....... Hoping for some help there.

At this point, the only thing I'm sure of is that I need to find short shanks and I'm going with the Perlick taps because I want to only deal with this once.

thanks so much in advance for any help/suggestions/watch outs you can offer.


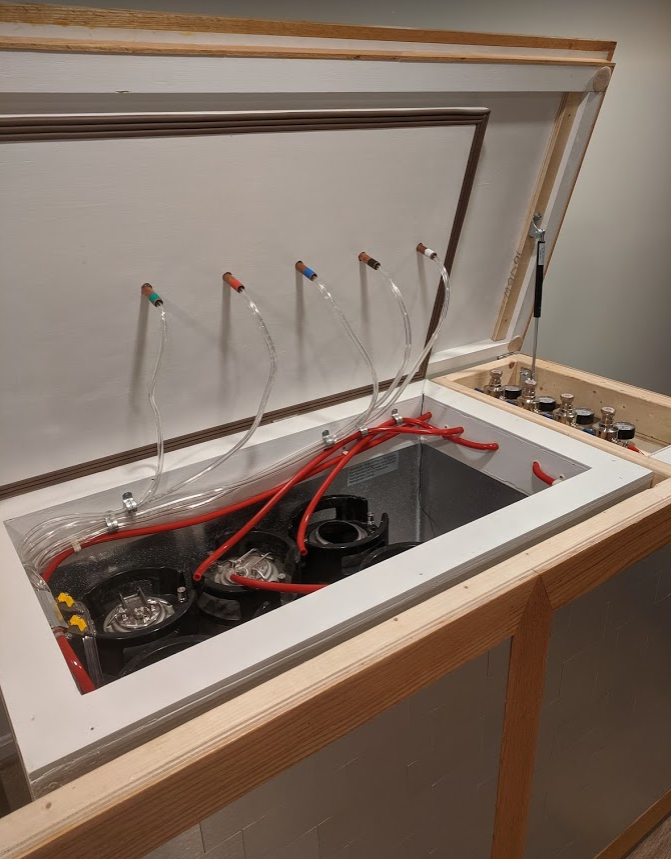
Hi I'm a little late to the game, but did anyone answer your question about the taps/ lid weight? I built a 5-tap keezer with black iron pipe towers and replaced the freezer lid with one built from wood. A little different than your setup, as I did 5 individual pipes, but either way the weight of the wood itself is going to be a lot heavier than the pipes. I ended up using a couple of gas struts, it works pretty well.
 
Hi I'm a little late to the game, but did anyone answer your question about the taps/ lid weight? I built a 5-tap keezer with black iron pipe towers and replaced the freezer lid with one built from wood. A little different than your setup, as I did 5 individual pipes, but either way the weight of the wood itself is going to be a lot heavier than the pipes. I ended up using a couple of gas struts, it works pretty well.

No, so thank you for replying. It's good to know most of the weight will be in the wood. I too, was thinking of using at least one gas strut. I'm also going to be replacing the freezer lid with one built from wood. Can I ask how you got it sealed well? I'm thinking I'll be using 2x10 based on the height I want and will use the hinges from the existing lid, but I don't know what lip I may need to build in to seal it off well and if I should just put wood on top to finish or if I should have a top lower in, then insulation, then the final lid etc. Would love to see any pictures if you have them.
 
No, so thank you for replying. It's good to know most of the weight will be in the wood. I too, was thinking of using at least one gas strut. I'm also going to be replacing the freezer lid with one built from wood. Can I ask how you got it sealed well? I'm thinking I'll be using 2x10 based on the height I want and will use the hinges from the existing lid, but I don't know what lip I may need to build in to seal it off well and if I should just put wood on top to finish or if I should have a top lower in, then insulation, then the final lid etc. Would love to see any pictures if you have them.

As far as construction goes, how are you using the 2x10s? If that's for your lid, I'd go a different direction unless you have experience with that type of joinery (jointing, planing, etc). I considered that at first, but was worried about expansion/contraction and cupping of the lumber. I went with plywood, which can be built up in layers to the height you want (use torsion box construction). This keeps the lid lighter than solid wood, and the voids can be filled with insulation. Also makes it easy to recess a drip tray, if you want that look. I used basic sanded plywood for the inside, and a nice sheet of red oak plywood on top. Edge banded with oak.

Having said all that about 2x10's, my build was initially inspired by this cool build, where two-by lumber was used for a nice rustic effect. If this is the look you are going for, have at it! :)
https://brewingwithalex.wordpress.com/2015/06/10/new-kegerator-design-reclaimed-wood-and-pipe/
This includes some good details about the pipe tower construction, which I didn't follow exactly but used as a basis.

As far as the seal, I think people tend to get a bit overexcited about making that absolutely perfect, especially if the keezer will be in a conditioned space. Your lid will be pretty heavy (mine is about 70 lbs total, 45 lbs in wood, approx 5 ft x 2.5 ft dimensions), and its own weight will be good enough for a seal if you sit it right. I used some hardware store (well, Amazon) weatherstripping which compresses between the underside of the lid and the top of the collar. Note that I have some spacing inside the keezer cabinet on either side of the freezer itself, e.g. for the CO2 tank, regulator and controls, so the portion of the lid that sits over top of the freezer collar is smaller than the total lid dimensions. I wanted a freestanding unit with a clean look.

In terms of the lip, if I understand your question, yes you'll want to lower a section of the inside of the lid so that it matches the dimensions of the freezer (and collar). Again, this can be all done with plywood torsion box construction, allowing more insulation directly on top of the freezer opening. The lip around the edge will sit on the outside edge of your keezer enclosure to create a finished look. Nice thing about this is you can really make the width/length dimensions whatever you want, and allow space around the freezer inside for ventilation.

With a DIY wood lid, I wouldn't use the old freezer hinges UNLESS you are attaching them back to the freezer body itself, and that would make me nervous due to lid weight. Assuming you are building a collar for the freezer, which you should, you can use simple utility hinges from Home Depot (about $3 for a pack of 3) and attach to the back of the collar. You are going to need at least on gas strut, which makes the spring inside the old freezer hinge useless, and I'm skeptical that it could handle the weight anyway.

Hope this helps.

Capture.PNG


Capture2.PNG


Capture3.PNG
 
Last edited:
Back
Top