Kettles leak around elements

Homebrew Talk - Beer, Wine, Mead, & Cider Brewing Discussion Forum

Help Support Homebrew Talk - Beer, Wine, Mead, & Cider Brewing Discussion Forum:

This site may earn a commission from merchant affiliate links, including eBay, Amazon, and others.

TechyDork

Dork of all Tech
HBT Supporter
Joined
Dec 14, 2008
Messages
862
Reaction score
128
Location
Seward
So we did our first water test on the BK and HLT for our new E HERMS last night. Everything was good with the exception of both element enclosures.

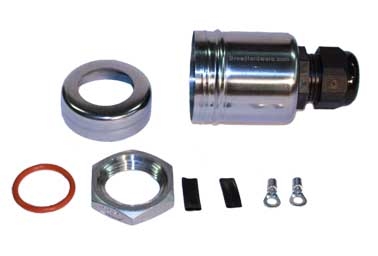
We are using two of http://www.brewhardware.com/product_p/hotpod-ewl.htm these weldless enclosures from @Bobby_M. The nuts are from Amazon.

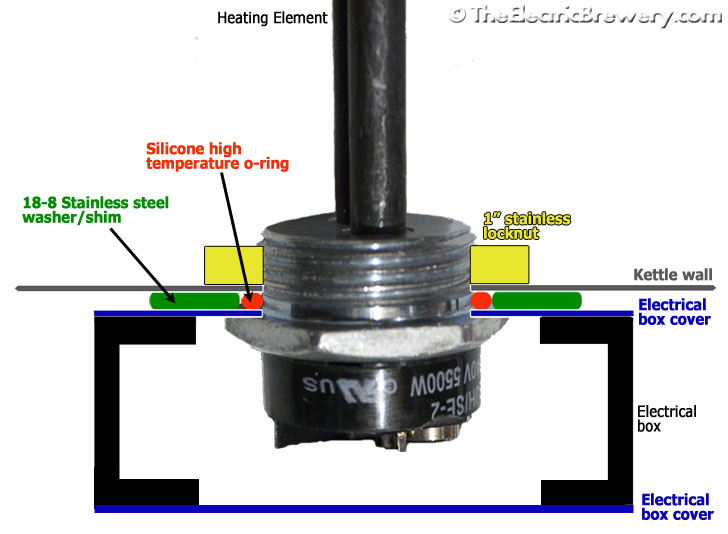
We have the o-ring on the inside of the kettles but cannot get them to seal properly. They are installed in Bayou Classic 82qt SS pots.

Do we just need to keep working to get them tighter? A buddy suggested moving the o-ring to the outside, but I wan to make sure the kettles are properly connected to ground and was thinking having the o-ring on the outside would break the connection to the ground in the element enclosure.

View attachment ImageUploadedByHome Brew1429803618.596158.jpgView attachment ImageUploadedByHome Brew1429803634.179685.jpgView attachment ImageUploadedByHome Brew1429803649.963840.jpgView attachment ImageUploadedByHome Brew1429803673.579584.jpg
 
Make sure you remove the thick stock o-ring that comes on the element before installing it. Mine came with a black one and I took it out so the element nut could be tightened down all the way.

I say this as the nut looks like its not on screwed down all the way and it looks like that stock o-ring is still on there from one of your other pics of the outside of the element. That thick stock o-ring will cause leak issues like this as the nut cannot seat down fully.
I also put some food grade sealer around the nut on the outside as well just to be 100% sure NO water comes back into the case where the wiring is to the element. Just a safe catch for me.
Also get a element socket and tighten it down good once you make sure the stock o-ring is outta there.
 
Make sure you remove the thick stock o-ring that comes on the element before installing it. Mine came with a black one and I took it out so the element nut could be tightened down all the way.

I say this as the nut looks like its not on screwed down all the way and it looks like that stock o-ring is still on there from one of your other pics of the outside of the element. That thick stock o-ring will cause leak issues


I had not read about this before? Does everyone remove the stock o-ring?

I had thought of getting some good grad sealer, but would like to avoid it if possible.
 
Check Kal's install guide on removing this stock black washer. I removed mine and have not had a single leak on my elements:
http://theelectricbrewery.com/heating-elements?page=3

and where he put the food grade silicone on the outside nut as a failsafe. I did the same as I want to be sure NO water is getting into that enclosure if I can help it. The food grade silicone will not be in contact with the beer nor the components of the element that will cause any issues.
http://theelectricbrewery.com/heating-elements?page=7

Kal (and my build) is using a 2 gang box as the element enclosure, but from what I can see from your photos, the enclosure you are using should be assembled the same way on these particular components...
 
Yea his guide is very detailed and its easy to miss a few of those details. I ran into this same problem when I went to put in my elements as I noticed the nut was not seating all the way down like Kals looked to be in his photos and I was like WTF?
I went back through the element install guide 2 more times and then saw that note on the black stock o-ring needing to be removed and it all clicked into place.

I swear I think I read his guide cover to cover at least 50 times during the course of my build. I found some new nugget of info almost every time.

:D
 
I went back through the element install guide 2 more times and then saw that note on the black stock o-ring needing to be removed and it all clicked into place.
Yes. There is indeed a TON of info... I'm not sure of the best way to make sure people do not miss things but it's not obvious!

Often people who miss something suggest I highlight that item in bold red, but the problem is everyone misses something different so by the end of it it would be 600 pages of bold red text. ;)

There are a number of people who only look at the pictures too and don't read, so in some cases I've added text to the pictures to try and ensure they see the information. Everyone's different!

Kal
 
Yea his guide is very detailed and its easy to miss a few of those details. I ran into this same problem when I went to put in my elements as I noticed the nut was not seating all the way down like Kals looked to be in his photos and I was like WTF?
I went back through the element install guide 2 more times and then saw that note on the black stock o-ring needing to be removed and it all clicked into place.

I swear I think I read his guide cover to cover at least 50 times during the course of my build. I found some new nugget of info almost every time.

:D

I know i read the control panel guide atleast 20 times, but I dont' think i read the element guide because i was planning on using these pre-built element housings.

Yes. There is indeed a TON of info... I'm not sure of the best way to make sure people do not miss things but it's not obvious!

Often people who miss something suggest I highlight that item in bold red, but the problem is everyone misses something different so by the end of it it would be 600 pages of bold red text. ;)

There are a number of people who only look at the pictures too and don't read, so in some cases I've added text to the pictures to try and ensure they see the information. Everyone's different!

Kal

Kal, I just wanted to thank you for your great site and all the great guides. I ordered the guide and also the accessories kit with all of the wire and other neccessary pieces. I have to say that living in Alaska it made the process so much easier. I didn't have to hunt everything down and wonder if it the hardware store would have it.

I will remove those stock washers tonight and give it a shot.

thank you both for the help!
 
So I was under the impression that the o-ring should be on the inside of the kettle to allow the element enclosure to make full contact with the kettle on the outside and provide grouding for the kettle?

After reading the guide on Kal's site it looks like the o-ring is on the outside of the kettle and a flat washer is used?

element_box_cutaway.jpg


Here are the instructions from BrewHardware for the element enclosures we have.

HOT POD Model EWL and EWL3 instructions for installation and use.
For proper installation, your vessel must be drilled or punched to a 1.25” (1-1/4”) with no sharp edges inside.
1. Remove any gaskets from your heating element and wrap the threads with 4-5 wraps of Teflon tape.
2. Unscrew the hot pod drilled lid off of the main body and hold the flat side of the lid to the drilled hole in your vessel. Insert the heating element through the holes so the element is sticking into the vessel and the metal hex bushing of the element is in direct contact with the inside of the enclosure lid.
3. Roll the 1” red silicone oring (we recommend a light coating of Vaseline or keg lube be applied to the oring in advance) over the element threads and thread the 1” NPS locknut onto the element with the machined groove facing towards the oring. Snug the locknut up by hand.
4. Rotate the locknut until one of its points is facing up and hold it there while tightening the element by its hex flange on the outside of the vessel. Note that a low install of a ripple style element may require tightening the locknut while the element remains still. In this case, work slowly as to not tear the oring (lube is absolutely required). As you tighten, the oring should be captured behind the locknut within the machined groove. If it bulges out, you may have the locknut backwards or the oring you selected is too large (the EWL3 comes with the correct size).
5. NOW IT IS TIME TO LEAK TEST BY FILLING YOUR VESSEL WITH WATER. If this area drips water, the first remedy is to tighten the element hex another 1/8th turn. If the leak does not stop, the next remedy is to start over, removing the Teflon tape and rewrapping with extra Teflon tape. The thread tape is to stop liquid from going between the element bushing and the locknut. Do not continue without verifying that the connection holds water with absolutely no drips. Do not try to solve leaks with silicone sealant or epoxy.

HotPod-EWL3-2T.jpg


I am going to try this again tonight with the stock gasket removed and the o-ring on the inside of the kettle. I was just wondering if anyone else that has used these enclosures had any input or experience to add?

thanks,
 
If you're building to my design (the picture you posted above), follow my instructions. If you're building to someone else's design, do whatever they recommend. If Bobby says to do something differently, follow his instructions if using his products.

Kal
 
If you're building to my design (the picture you posted above), follow my instructions. If you're building to someone else's design, do whatever they recommend. If Bobby says to do something differently, follow his instructions if using his products.

Kal

I would 100% agree that you need to follow Bobby's instructions and I noticed he mentions the removal of that stock gasket as well:

"1. Remove any gaskets from your heating element and wrap the threads with 4-5 wraps of Teflon tape."

As for my experience, I used NO tape on my element threads, removed that thick stock o-ring, and placed the red o-ring and washer as Kal describes in his guide (I used the ebrew element kit which is the same build out as kals) and I have absolutely no leaks on either of my pots element wise. I did put the food grade silicone on the back of the element base within my 2 gang box as a fail safe to keep any water from getting in, but on all of my leak tests before I applied the silicone (and I did alot of leak testing), I had zero leaks anywhere. The silicone was just a last line of defense water barrier wise.

Let us know how it works out and I echo your thanks to Kal for all of the info he provides on his build for those of us who have followed in his footsteps and are brewing indoors and without propane! Good stuff!
:fro:
 
I have yet to get out to the shop and try this again. When I do I will be sure to follow Bobby's install steps.

I hope to work on this over the weekend and will be sure to report back on the final results.
 
If you use my product and choose to ignore my detailed instructions there is nothing I can do to help troubleshoot other than tell you to follow the instructions.


Bobby,

I will be sure to follow your instructions. I'll report back when I get a chance to try installing them again.
 
If you use my product and choose to ignore my detailed instructions there is nothing I can do to help troubleshoot other than tell you to follow the instructions.

Just to drive this point home for others, I used "a lot" of teflon tape and the single silicone o-ring like Bobby instructed and my elements sealed perfectly the first time.

Amazingly enough, all my keggle fittings came from Bobby and not one leaked upon initial installation.

Chris
 
Back
Top