Just another wood brew rig build...

Homebrew Talk - Beer, Wine, Mead, & Cider Brewing Discussion Forum

Help Support Homebrew Talk - Beer, Wine, Mead, & Cider Brewing Discussion Forum:

This site may earn a commission from merchant affiliate links, including eBay, Amazon, and others.

davekippen

Well-Known Member
Joined
Dec 28, 2011
Messages
1,256
Reaction score
172
Location
Grand Ledge
Same ole story... tired of balancing my mash tun on old janky patio tables and stuff LOL. Time to grow up a little...

Step 1: buy some wood

IMAG1708.jpg

Step 2: Mock up some basic height and length measurements

IMAG1709.jpg

Step 3: Start from the bottom and build up. I knew that I wanted a "detachable" stand for my burner.

DSCN3956.jpg

Step 4: Build the rest of the structure!

DSCN3957.jpg

Step 5: Add the super simple control panel and wiring. I went with a retractable power cord and mounted it up under the top work surface. I love that I can pull the cord out and plug it in, then just retract it back.

IMAG1736.jpg
 
Here is a shot of the pump and control panel test. One switch controls my new electric HLT, one controls the pump. The other one doesnt do anything right now LOL

IMAG1754.jpg

This is the pig tail sticking out from the retractable cord

IMAG1738.jpg

And here is a shot of everything tucked away for storage

IMAG1725.jpg

Used it for the first time last weekend. Everything went well! Now that I know I like it, she will be getting a coat of paint and a glass tile top.

Thanks for looking!
 
Gorgeous build. I love the compactness and the retractable cord is a great idea. May have to borrow that one. :mug:
 
Thanks! Gave it one more test run yesterday. The only thing I will have to ponder is the placement of that control panel. I wanted to leave that end of the bench "open" as a work surface, but that panel is kinda in the way. Its not a big deal, and I am happy as heck because that is all I can find to complain about!

Time to put some lipstick on that pig!
 
Great job! Very well thought out design, I especially like the pigtail cord, and the compactness of the whole thing....you have a usable work surface when you're not brewing....that's important in a garage shop. Wood is a pretty awesome medium to work with...I am learning to weld, etc. but there's nothing like chopping up some 2x4's and screwing them together. After a nice paint job, you'll probably have less maintenance than with a rusting metal frame.
 
I do like the versatility of a wood structure. I dont have the equipment or know how to build much with metal. And this cost like maybe $100 ($30 was the retracting cord) and took probably 3 working hours to put together! :rockin:
 
Awesome stand! only thing i want to mention is trying to seal that asap... a bunch of dripping liquids on plywood = not good int he long run...
but other than that, looking good sir!
 
Yeah, and some of it is actually MDF which is even worse. I wont brew on it again until I get it sealed. Outdoor house paint should seal it fine, no? Its too ugly to stain :eek:
 
Nice job!! Looks like a setup that would work well for my future plans as well. Couple of things:

Would love to see some pics of how you set it up with your mash tun on brew day.

Also, could you share how you did your setup for your electric HLT? Most of the e-brewery set ups on here are much more complex than I am comfortable with. I have a 5 gallon kettle that I am planning to use as an HLT and doing it electric would be great.
 
Yeah, and some of it is actually MDF which is even worse. I wont brew on it again until I get it sealed. Outdoor house paint should seal it fine, no? Its too ugly to stain :eek:

yup! house paint should work just fine :mug: but you never know what a good stain will do to anything, no matter what it looks like :)
 
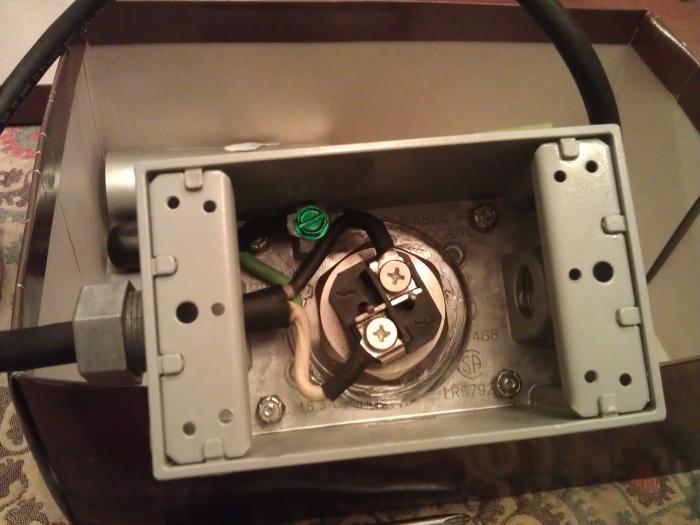
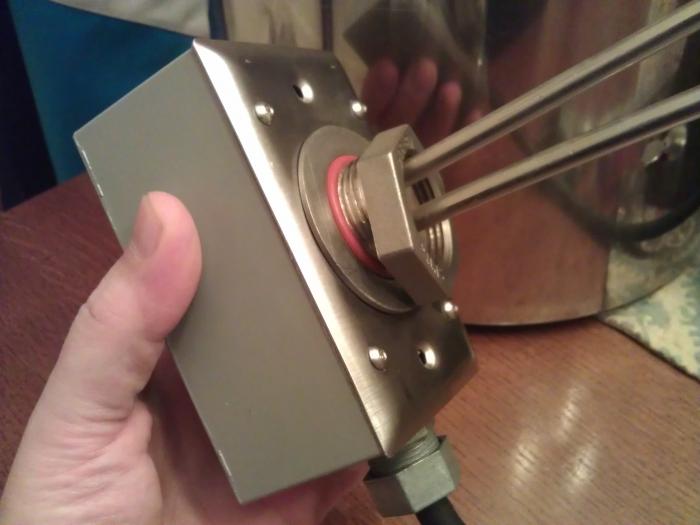
VMcosco, I will get some pics of my next brew day so you can see how it is set up. Some pics of the EHLT are below. I didnt build it (a buddy of mine made it for me, he had built many many of them before!) but it looks easy enough to do. It's just a 1500 watt element coming through the back of the kettle. One o-ring and a washer seals it to the kettle along with some food grade silicone. One cord and plug that plugs straight in to an outlet. I have the outlet on a switch, so its either on of off, nothing in between. Good enough for some hot water! I know there are many build threads on the actual element install.

Theck, the control panel and switches were from an old junk bin at work! I think you can buy those 6 hole boxes at any electrical supply shop? And those switches should be easily available too. If you want, I can get some more info from my maintenance manager. I actually only used the face plate and not the actual "box". I jig-sawed an opening in the plywood and just screwed it down over the hole.

IMAG1739.jpg


IMAG1740.jpg


IMAG1741.jpg


IMAG1743.jpg
 
The element works well I guess. Brings 6 gallons of water to 175 in about 90 minutes. Its nice to just turn it on and go about my business of prepping for the brew session.
 
The pig has some lipstick! Went with a gloss black exterior paint for the base. I was going to glass tile the top but holy hell that stuff is expensive. Ended up with some vinyl tiles. Good enough for what I need now!

Pic of the stand and top "finished" ( is it ever really done? )

IMAG1813.jpg

This is how it is set up on brew day. The hoses move around a little of course. I will be adding a 3 way valve to the inlet and exit of the pump and 2 more hoses so on brew day I just hook up all the hoses and turn valves. No more moving hoses.

IMAG1814.jpg

And one more shot of it all tucked away.

IMAG1815.jpg

Not the most flashy rig, but it sure will be great for my brews!!!! Thanks to everyone who posts pictures of their brew stands. So much inspiration here :rockin:
 
Its been awesome! I have logged probably 10 brew sessions on it since it was built. Its holding up very nicely! The only thing I would change is still the placement of the control panel. I would move it off the top work surface.

Its so nice to have a standard rig that operates the same every time. Way better than balancing the various components on whatever chairs / tables are available.

Cheers!
Looks great!

If you want to move the panel, is there any way to mount it on the vertical face, right under where it currently is? I can't tell if that board is wide enough to fit the entire panel or if there would be any concerns about bumping into the switches accidently. That's just the first thing that popped in my head.
 
The only thing I would change is still the placement of the control panel. I would move it off the top work surface.

Nice build and I agree about the control panel. I don't think that I would have it horizontal where it is subject to liquid spills. Your thread has me thinking about electric brewing.
 
The element works well I guess. Brings 6 gallons of water to 175 in about 90 minutes. Its nice to just turn it on and go about my business of prepping for the brew session.
Did you mean 9 minutes? Either way, this build seriously has me re-considering spending my lunch time drawing up a brew rig and planning out my move to all-electric over the winter! Nice job!
 
Nice build! I am definitely stealing some ideas from this.

Have you thought about adding a drawer below the CP/above the burner storage area? It looks like there may be enough space for one?

Would you mind providing dimensions?

Lastly, I assume you bath sparge and don't fly sparge right?


Sent from my iPhone using Home Brew
 
I was wondering the same. 90 seems like a really long time.

I use a similar element for heating my strike/sparge water. With only 1500W of heating power, it takes quite a while to heat 6 gallons of water to those types of temps - 90min seems reasonable to me, especially in an uninsulated vessel.

That's why we see all the 240V 5500W electric builds.

Cheers.

p.s. Forgot to add - Really nice work on the brew stand davekippen. Very well though out and well executed design.
 
Thanks for all the comments guys!

Yes, it is 90 minutes to heat up the HLT to about 180. Just one small element that plugs into 110v outlet.

Yes, I batch sparge. I just dump in the required volume to get me to my pre boil target, stir like im mad at it for about 5 minutes, recirculate until it runs clear then pump to kettle.
 
Back
Top