Inkbird IPB-16 PID Controller Inquiry

Homebrew Talk - Beer, Wine, Mead, & Cider Brewing Discussion Forum

Help Support Homebrew Talk - Beer, Wine, Mead, & Cider Brewing Discussion Forum:

This site may earn a commission from merchant affiliate links, including eBay, Amazon, and others.

BlurryEyed

Well-Known Member
Joined
Oct 19, 2012
Messages
193
Reaction score
26
Location
West Sacramento
Does anyone own or have any experience with Inkbird's IPB-16 PID Controller?

IPB-161-01-01.jpg


http://www.ink-bird.com/products-PID-controller-ipb16.html

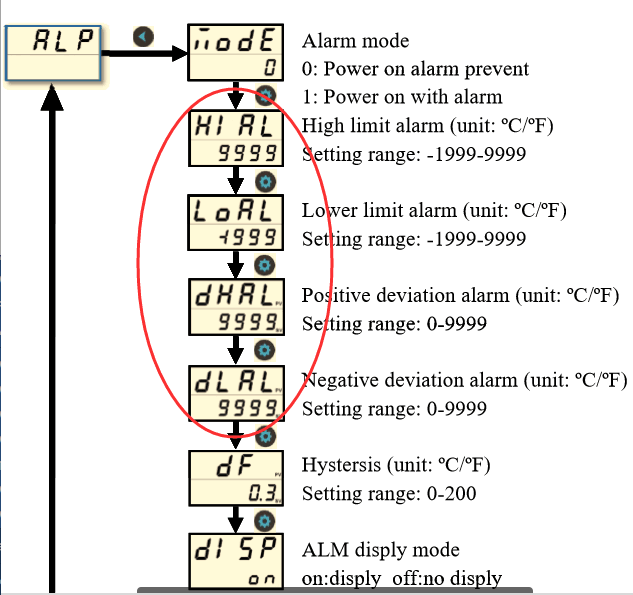
It has two outlets - Output and Alarm

IPB-163-01.jpg


Max output current:
OUT:15A for 120V AC, 12A for 220V AC
ALARM: 8A for 120/250VAC (resistance load)

I emailed Inkbird support to see if the Alarm outlet could serve as an auxillary output (for my pump) and they indicated it could. When I asked how to do so, they did not respond.

I'm hoping this could be an option for my RIMS tube setup (rather than building a controller). Is the ALARM Output specs enough to drive a Chugger pump? Can anyone think of any pros/cons to a controller like this?
 
I doubt the unit is rated at 15 amps + 8 amps simultaneously.


It says 8amp (resistance) for the alarm. I read that a chugger pump only draws 1.5 amp but can't confirm.

Not sure what resistance means, but I am assuming it could power a 1200w element with ease. I'm no electrician tho
 
1200 watt element on 120v circuit draws 10 amps. If your pump is 1.5 amps you should be fine on a normal circuit. If its 3 or more amps you will be pushing the limits of a normal household circuit.

What are you thinking for a heating element for your rims tube?
 
Assuming you are running 120 V.

That RIMS element is pulling 1,100 watts at 120 V = 9.2 amps

"Classic Chugger" pump is 1/20 HP per their site but they don't list the amps. Here's a page I found that gives typical current draw for motors. It is saying 2.5 amps for a 1/20 HP motor. They don't list the inrush current though when the motor is first energized. While brief it can be like 10-20 times the normal draw, so 25-45 more amps!

Total draw when motor running: 11.7 amps

When motor spins up, possibly 30+ amps. Might pop a circuit/blow a fuse.

Can you use a smaller pump? The chuggers have quite the flow rate and I'm not sure that's needed for a RIMs.
 
Last edited:
...
"Classic Chugger" pump is 1/20 HP per their site but they don't list the amps. Here's a page I found that gives typical current draw for motors. It is saying 2.5 amps for a 1/20 HP motor. They don't list the inrush current though when the motor is first energized. While brief it can be like 10-20 times the normal draw, so 25-45 more amps!

...
The ratings plate on my Chugger says it draws 1.4A, but doesn't say anything about startup current.

Brew on :mug:
 
Assuming you are running 120 V.

That RIMS element is pulling 1,100 watts at 120 V = 9.2 amps

"Classic Chugger" pump is 1/20 HP per their site but they don't list the amps. Here's a page I found that gives typical current draw for motors. It is saying 2.5 amps for a 1/20 HP motor. They don't list the inrush current though when the motor is first energized. While brief it can be like 10-20 times the normal draw, so 25-45 more amps!

Total draw when motor running: 11.7 amps

When motor spins up, possibly 30+ amps. Might pop a circuit/blow a fuse.

Can you use a smaller pump? The chuggers have quite the flow rate and I'm not sure that's needed for a RIMs.

I mean...I could get another pump but I'd prefer to just use the one I've got.

Looks like I'm on my own here, so I might just have to buy, try, and report back. Worst case scenario I return the controller and build the ammo can controller I've been drooling over.
 
I think you would be fine. But the initial surge when running the pump might be too much and pop a breaker. When you plug the pump in today, do you see the lights dim at all?

If it were me I'd try it out.
 
No surges when running the pump, but I agree - it will certainly max out a 15A breaker. Hoping to buy, try, and report back with my results. Thanks for your help thus far!
 
I just got 50 of these for stock and I took one apart. It's got a 40amp SSR for the heater output. The input cable is 14 gauge and the output receptacle is typical 15 amp. The alarm outlet is tapped off the main power input on a circuit board and goes through a small mechanical relay triggered by the electronics via alarm temp programming. It would be pretty simple to install a separate toggle switch that directly feeds the alarm outlet and completely bypass the alarm usage of it.

I'm considering offering them with that kind of modification because I suspect more people want a pump switch than an alarm output.

Heck ya Bobby! I like the price point for a simple no frills controller.

I have a question. I emailed Inkbird and they said the Alarm port can be left always on by setting the values to the following settings:

sD6kGG9.png


I wonder if you might test that and report back? My concern is the unit will just be beeping at me or something the whole time.
 
Right, that's how it works. It doesn't beep an alarm at alarm set point but it does energize that outlet. Calling it an auxiliary temp controlled output would be better than alarm. It's only an alarm if you plug a 120v buzzer in. I'm more thinking i want to offer installing a second toggle switch before that outlet.
 
I was about to buy the RIMS Basic package when I saw on the note that you are considering adding the switch for pump control.

Any idea on when you might have that available?

Also, how is the temp probe dealt with with the RIMS kit since this doesn't use a NPT fitting, Is there a thermowell included in the kit that the prob fits into?
 
never mind I just saw this uses an ssr which actually makes it a good choice for a lower wattage rims.
BTW I use an 1800w rims for my 11 gallon brews and the most my element sees is 20% power to maintain temps with 9 gallons of wort so you can do quite a lot with the right length element. I found the key for me is longer length elements and lower flow speed.
 
I just got 50 of these for stock and I took one apart. It's got a 40amp SSR for the heater output. The input cable is 14 gauge and the output receptacle is typical 15 amp. The alarm outlet is tapped off the main power input on a circuit board and goes through a small mechanical relay triggered by the electronics via alarm temp programming. It would be pretty simple to install a separate toggle switch that directly feeds the alarm outlet and completely bypass the alarm usage of it.

I'm considering offering them with that kind of modification because I suspect more people want a pump switch than an alarm output.
what type of ssr? The generic white ones often sold as foteks and others that usually only have the 12a rated internals? In this case either way its the perfect application for them but im curious.
 
I just got off the phone with someone at Brewhardware a little bit ago and the option with the switch for the alarm outlet should be available Friday-ish.
 
I'd also be interested in one of these. I would also probably like to change out the probe port for something like a mini-xlr so that I could use a PT-100.
 
I'd also be interested in one of these. I would also probably like to change out the probe port for something like a mini-xlr so that I could use a PT-100.

Hopefully Inkbird is watching this thread.

The market for an affordable RIMS/HERMS controller is relatively untapped.

The only off-the-shelf product I'm aware of is this @ $300...way too pricey for my tastes considering you can build one for much less.
 
There is the Brau Supply controller also but it's also more expensive at 325-350 depending on which one you went with for 120v.

Yep, forgot about that one. These things are so simple, I don't understand how they can market them for anywhere over $150.

I'm operating my RIMS tube off a cheap-o ITC-308 and wireless IR remote switch on my pump plug. Does the job, but with this hobby, the upgrades are always on-going.
 
I'd also be interested in one of these. I would also probably like to change out the probe port for something like a mini-xlr so that I could use a PT-100.

Not sure I understand this comment, as the IPB-16 already uses a Pt-100 sensor. I find the covering on the OEM sensor adversely affects its response time, so I understand the desire to use a different model/installation with a faster response time. You could solder on a stereo plug and use the OEM jack or replace it with an XLR one. Either way you would need to determine and set a sensor configuration value other than zero. I had to do that with th OEM sensor anyhow. Perhaps Bobby or someone else who has already opened one up can confirm the wiring setup for the OEM stereo jack?
 
Yeah, I guess I wasn't really clear. What I meant was that I could use a different three wire PT 100.

What I'd really like is to see what the guts look like before I make the purchase. I'm sure that we can hack this thing into something great.
 
Not sure I understand this comment, as the IPB-16 already uses a Pt-100 sensor. I find the covering on the OEM sensor adversely affects its response time, so I understand the desire to use a different model/installation with a faster response time. You could solder on a stereo plug and use the OEM jack or replace it with an XLR one. Either way you would need to determine and set a sensor configuration value other than zero. I had to do that with th OEM sensor anyhow. Perhaps Bobby or someone else who has already opened one up can confirm the wiring setup for the OEM stereo jack?

If Bobby or someone else were to create one, I'd buy it in a heartbeat! I'm curious if anyone has played with changing the sensor type? In the manual, if you Select IP then Sn (Input Type) you can select between K, S, Wre, T, E, J, B, N, Cu50 and Pt100. Section 5.2 has additional detail about the probe parameters.
 
Well, I couldn't resist myself. I removed the base from my IPB-16 and had a look inside. Fortunately Inkbird labeled the connection point on the controller board, as well as the daughter board with the solder points for the stereo connector. Using a multi-meter I mapped the pinout for the plug. :D

TC-/A = base ring
TC+/B = tip ring
b = middle ring

Here's what that means:

Pt100 (3-wire)
Solder the A-wire (uniquely colored lead) to the base ring.
Solder the B-wire (one of the other color leads) to the tip ring and the b-wire (other lead of the same color) to the middle ring.

Pt100 (2-wire)
Solder the A-lead to the base ring.
Solder the B-lead to the tip and middle rings.

Thermistors
Solder the negative lead (-) to the base ring.
Solder the positive lead (+) to the tip ring.
I ordered an inexpensive 3-wire Pt100 off eBay and can test the functionality of this sometime next week after it arrives.
 
Yep, forgot about that one. These things are so simple, I don't understand how they can market them for anywhere over $150.

I'm operating my RIMS tube off a cheap-o ITC-308 and wireless IR remote switch on my pump plug. Does the job, but with this hobby, the upgrades are always on-going.

yes that Brau one priced out to be about $80-90 -in retail priced hardware... huge markup due to supply and demand... if a popular lower cost solution was released that worked well a lot of these other products would wither dry up ad go away or drop in price as they can make more money right now with less manufacturing, they currently have no reason to drop the prices as the markets easy pickings..
 
Not sure I understand this comment, as the IPB-16 already uses a Pt-100 sensor. I find the covering on the OEM sensor adversely affects its response time, so I understand the desire to use a different model/installation with a faster response time. You could solder on a stereo plug and use the OEM jack or replace it with an XLR one. Either way you would need to determine and set a sensor configuration value other than zero. I had to do that with th OEM sensor anyhow. Perhaps Bobby or someone else who has already opened one up can confirm the wiring setup for the OEM stereo jack?

I've successfully ground down the molded jacket on the probe to be able to fit inside a 5mm ID thermowell and the thinner rubber coating makes it respond nicely.
 
I've successfully ground down the molded jacket on the probe to be able to fit inside a 5mm ID thermowell and the thinner rubber coating makes it respond nicely.

I just ordered one from Bobby with the switch option and I can't wait for it to come in. :D:D:D
 
Back
Top