Home Made Wort Chiller - Pics (no steps)

Homebrew Talk - Beer, Wine, Mead, & Cider Brewing Discussion Forum

Help Support Homebrew Talk - Beer, Wine, Mead, & Cider Brewing Discussion Forum:

This site may earn a commission from merchant affiliate links, including eBay, Amazon, and others.

SublimeBW

Member
Joined
Dec 27, 2013
Messages
20
Reaction score
3
Location
Ann Arbor
Hey gang,

my parents purchased me a brewing kit for Christmas (yup, 30 years old and married and my parents still get me KILLER Christmas presents) and it has been a great thing for my Dad and I to bond over. So far we have made a Honey Wheat (which should be ready next week) and a Kolsch. Great times!

Enough mini blogging, now for the real reason of the post. My Dad & I have been purchasing small gadgets each time we go to the local brew shop (Adventures in Homebrewing) and got to thinking that a wort chiller would be nice but they are extremely over priced for what they are. Each time we go my dad has been going on and on how we need to just make one and this weekend we finally did that.

Here are a few pictures I took during the process. We have 50 feet of 3/8 tubing that split from a single 1/2 tube. It isn't complete yet but shouldn't take too long to finish.

Making the bottom 25 feet
GAxw13i.jpg


Aligning the top and bottom exit tubing
EKdVR4t.jpg


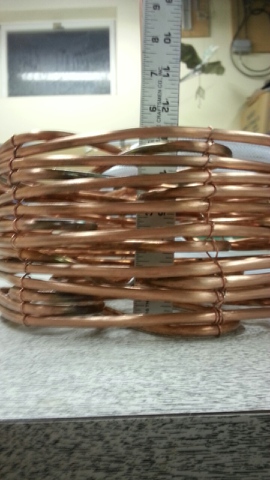
Joining the top and bottom sections
VXkqbSO.jpg


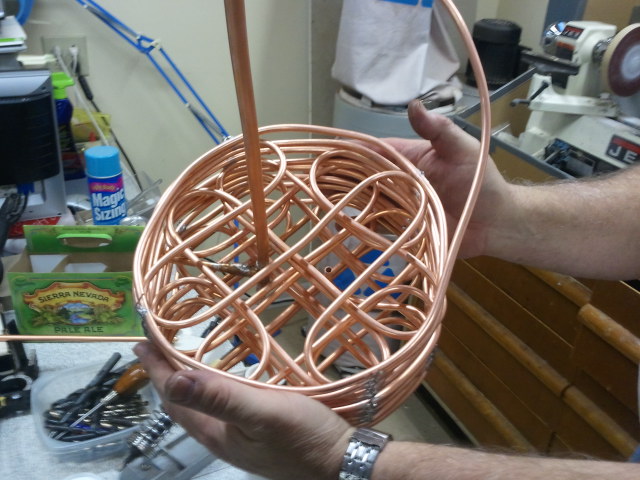
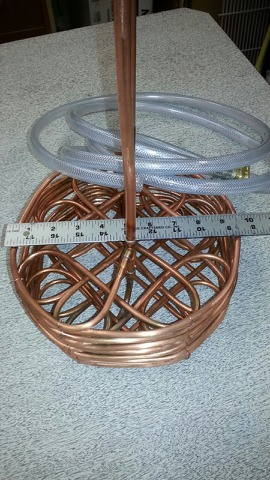
Top down view before finishing soldering
YjfYUlk.jpg


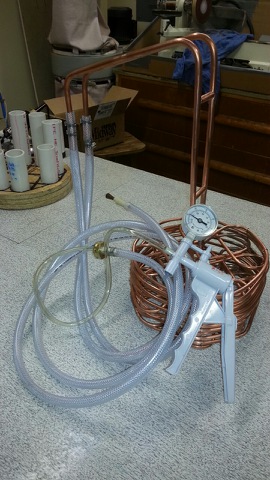
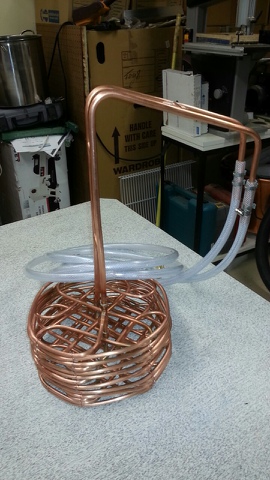
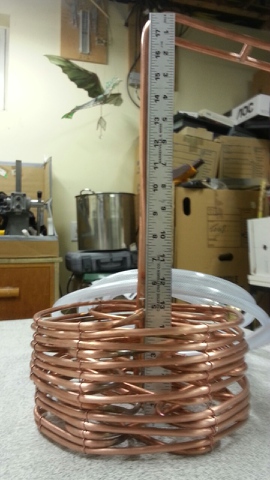
Where we stopped at tonight
mIkvXLq.jpg
 
Looks awesome. Just remember that you want a majority of the tubing at the center mass (or above - heat rises) of your wort! I see that you have some nice spacing in your 3rd pic so I assume that that was what you were aiming for.
 
Nice progress so far. Let us know how well it works on your next batch. Cheers!
 
Very cool design and neat idea on making a PVC jig for the tube bending.

That will work especially well if you swish it up and down and around in the wort while chilling since stirring a spoon around inside it is obviously not an option.
 
It looks great, but am I the only one that is a bit leery about adding solder to hot wort; especially if it is leaded solder? I know technically the wort shouldn't get hot enough to melt it off, but as an electronic engineer I do know the tensile strength of solder isn't the greatest so that over time the tubes could pull apart and bits of leaded solder could flake off into the beer.

Personally what I would have done is either let the sections stand free (so that you can adjust the height to fit your pot better) or used some thin insulation free wire (between 26-30AWG probably) and then threaded it through the sections to hold them together.
 
It looks great, but am I the only one that is a bit leery about adding solder to hot wort; especially if it is leaded solder? I know technically the wort shouldn't get hot enough to melt it off, but as an electronic engineer I do know the tensile strength of solder is the greatest so that over time the tubes could pull apart and bits of leaded solder could flake off into the beer.

Personally what I would have done is either let the sections stand free (so that you can adjust the height to fit your pot better) or used some thin insulation free wire (between 26-30AWG probably) and then threaded it through the sections to hold them together.

My thoughts as well about being leery of solder in the hot wort.

Was it at least lead-free solder?
 
I made one and used lead free solder and have had no problems with taste and all the solder is right where I put it. Btw, I used the solder to add structural stability to the cooler, I.e. Keep it from opening and closing like a slinky, not for making up liquid tight joints.

The solder (plumber type 95/5) shouldn't start breaking down until something like 600 degrees, if memory serves correctly.
 
Btw, I also really liked your jig. The cross over pieces will make for great surface area heat exchange contact. Though you'll still probably have to move the wort around to maintain consistent temps.
 
Trox said:
It looks great, but am I the only one that is a bit leery about adding solder to hot wort; especially if it is leaded solder? I know technically the wort shouldn't get hot enough to melt it off, but as an electronic engineer I do know the tensile strength of solder isn't the greatest so that over time the tubes could pull apart and bits of leaded solder could flake off into the beer.

Personally what I would have done is either let the sections stand free (so that you can adjust the height to fit your pot better) or used some thin insulation free wire (between 26-30AWG probably) and then threaded it through the sections to hold them together.

That is a very nice piece there! Good job OP!

I made one using lead free solder and have at least a dozen brews on it and it is still solid, I don't know what temp solder melts at but concidering direct heat from a propane torch is needed I doubt boiling water will have any effect on it. Just my 2 cents.
 
WOW! JUST WOW! That chiller is amazing.
As long as its lead free solder you have nothing to worry about.
Thanks for posting a unique DIY wort chiller.
 
The Old Man went ahead and wrapped up the project without me (which is fine since he did most the work anyway) so here is the completed product with a few minor corrections to the info I gave and additional information.


  • Tubing size: 2 - 25' coils of 1/4" O.D. tubing totaling 471 sq in. of surface area fed by 3/8 O.D. copper tubing.
  • Solder: The solder used was Oatey Safe-Flow Lead Free Plumbing Solder. Melting point 420 deg. F to 460 deg. F.
  • Removed all solder from external supports (it was ugly) and replaced with a wire weave.
  • Initial testing found NO FLOW through the bottom coil. It was necessary to disassemble and remove a solder blockage from the lower coil below the fittings. We now have flow through both coils.
  • Applied 24 inches of vacuum to the assembly - held vacuum for 24 hours. NO LEAKS.
  • Lesson Learned: It would have been better to run all 1/4" tubing up above the wort level before connecting the 3/8" feed lines.

Vacuum gauge installed on assembly
JFFGGov.jpg


Vacuum gauge held 24 inches of vacuum for over 24 hours
L5Gco1w.jpg


The finished product
NOBhDqi.jpg


Finished product width
HVjtICI.jpg


Finished product height
FXmNRyR.jpg


Finished product coil height and up-close of wire weave
kpJLe4h.jpg
 
So, we had a temperature speed test using our brew pot with 3 gallons of boiling water. This is going from boiling and then submerging the chiller in the boiling water for 7 minutes before starting the water. The timer starts as soon as the cold water is turned on:


  • Boil to 100 deg. F in 2 min. 33 sec.
  • Boil to 70 deg. F in 4 min, 33 sec.
  • Boil to 65 deg. F in 5 min. 15 sec.
  • Boil to 60 deg. F in 6 min. 7 sec.

Height is good. With 3 gallons in the pot the top coil is only 1-1/4 inch below the surface of the water.

So figure wort would take a bit longer due to it being a bit more dense and the having sediment holding heat in but still interesting to see how quickly it cooled the water. Now to just figure out what we want to brew next (thinking a maybe a Bock with spring coming around around in a few months or the Scottish Ale from Brewers best).
 
You guys need to step it up to >=5g batch full boils now. That wort chiller would have no problem chilling 10-12g batch.
 
That is awesome! Kind of looks like a french horn.

I have been thinking of building a better IC with greater lengths of thinner tubing. Try to get fast chilling with not so much water waste. I might have to make something like yours. I do like the PVC jig, very clever.
 
Thanks everyone! Always great to hear the support.

As for the PVC jig, the nice thing about it is that the PVC was removable so you just pulled which ever you needed to bend the tubing into proper place and then place it back in to hold it there.
 
Thanks everyone! Always great to hear the support.

As for the PVC jig, the nice thing about it is that the PVC was removable so you just pulled which ever you needed to bend the tubing into proper place and then place it back in to hold it there.

What diameter PVC did you use? Looks like about 2" schedule 40. I have a set of large Forstner bits and could drill a scrap of wood to set the tubes in. I like your alternating criss-cross pattern. I think that would provide good heat transfer throughout the wort volume. How difficult was it to wrap the 1/4" tubing around those PVC pipes without it collapsing?
 
A word from the Old Man,

The PVC is indeed 2 " OD (1.91" actual O.D.) I made the holes in the fixture base using a 2" hole saw from Harbor Freight. The actual hole size is 2.05". We had to wrap the bottom of each tube with 8 layers of electrical tape to take up the clearance between the tube and the hole (0.14"). The tape at the bottom of each tube made it tricky to remove each tube as needed.

If I were to do it over I would find a forstner bit or hole saw that would make a hole closer in diameter to the tube. I would go as far as to make a 1-7/8" hole and adjust the size to match the tube using a small drum sander in the drill press.

The 1/4" O.D. copper tubing is not difficult to bend around the tubes (no special tools needed). We did use a tubing bender to bend the 4 - 90 deg. bends at the end of each coil (where the tubing turns upwards). Plan your bends around the tubes. get it right the first time as the more you bend / rebend the copper seams to work harden and beccome more difficult to bend.
 
Heat transfer indeed!

We brewed our 3rd beer Friday evening and used the new home made wort chiller. The time saved compared to the cold water / ice bath was great. The time to cool 3 gallons by placing the brew pot in a sink filled with ice water was approx. 25 minutes. Using the new home made wort chiller it took only 6 minutes 30 seconds to go from full boil to 65 deg. F. We were very happy with the results.
 
I do think it's a work of art, but all the convoluted criss-crossing is a lot more work and complexity than the benefit you think you're getting out of it. The most efficient way to use an immersion chiller is to make sure either the chiller is moving or the wort is moving or both. In that regard, it doesn't matter how you cram the coils under the liquid level. Just jostle the chiller up and down and you're good to go.
 
Very nice....and for a small fraction of the price of the commercial stuff...and by the looks of the design...more than likely a much better one to boot!!:mug:
 
I am intrigued by this design as it appears to have more efficient heat-transfer properties while using less water. This may be due to the higher ratio of tubing surface area to tubing inside volume. And the criss-cross design means you're not just chilling the outside area of the wort, as you would with a simple helical design. I would like to quickly chill my 5 gallon batches without wasting so much water.

I noticed that Jaded Brewing offers somewhat similar chillers, using smaller diameter tubing.
 
Back
Top