Graham Condenser as a Wort Chiller...

Homebrew Talk - Beer, Wine, Mead, & Cider Brewing Discussion Forum

Help Support Homebrew Talk - Beer, Wine, Mead, & Cider Brewing Discussion Forum:

This site may earn a commission from merchant affiliate links, including eBay, Amazon, and others.

EGSHQ

Active Member
Joined
Jul 8, 2013
Messages
26
Reaction score
1
Location
Fort Worth
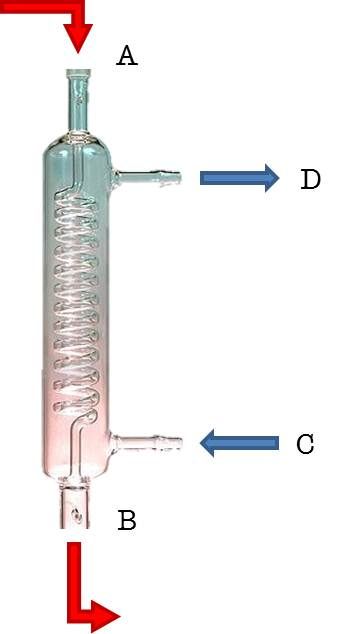
Has anyone had experience using a Graham Condenser as a Wort Chiller in SS or copper?

Displayed below in glass to make it easier to explain; wort goes into coil at "A" on the top and runs down though the coil and out the bottom at "B". The cold water flow goes in the bottom at "C" and out the top at "D" thus, creating the counter flow for good heat exchange.

I made a prototype out of copper and it worked quite well. Using water only, the temperature went from 170ºF to 70ºF in about 15 minutes in a closed system set up. While disconnected, I filled the condenser halfway up with water and placed it on the left side (as viewing this picture) in the freezer overnight. The placement was to keep the orifices from being completely blocked by ice and therefore, blocking the flow of water.

Comments, please...

 
In the book Brew Ware: How to Find, Adapt & Build Homebrewing Equipment by Karl F. Lutzen and Mark Stevens, there are instructions on how to make one out of copper coil for the inside and a rather large diameter PVC pipe for the outside. Looked pretty neat, but I decided to go with a copper coil inside a garden hose instead.
 
How did you get a coil inside a garden hose!? ;)
The coil I used is 3" in diameter and 18" long made with 1/2" OD tubing.
 
The tube in tube counterflow design is much more efficient because the flow of the coolant is much more strictly constrained. It's also easier to get 25 feet of 3/8" OD to coil that way. It's much harder to get that size tubing into a tight coil.
 
"The tube in tube counterflow design is much more efficient because the flow of the coolant is much more strictly constrained".

Bobby_M, are you saying the copper tubing inside a garden hose is more efficient or the other way around or both as compared to single direction flow??

"It's also easier to get 25 feet of 3/8" OD to coil that way. It's much harder to get that size tubing into a tight coil".

I guess it depends on how one goes about making the coil that determines which is easier. The video made it look labor intensive especially for the quality of the end product.
 
The tube in tube counterflow absolutely guarantees a very linear application of the coolest water to coolest wort (why you counterflow in the first place). With the Graham design, the coolant flow is relatively haphazard. You can help by making the clearance between the shell pipe and coil OD pretty close and also filling the central column with a spacer like a 2" OD tube with caps on both ends. This forces the coolant to follow the helix without blowing past too much.

I'm not sure which would be more difficult to make or which takes longer but I do know that coiling the tubing in a tight helix to make a compact package would be tricky and after that, make the in/out ports of the shell water tight would be the next challenge. If you use PVC, I'd cement in a short piece of 1/2" pvc tubing, run the copper through that and fill the gap with 3M 5200 polyurethane.

One thing you mentioned in the original post that I didn't comment on was trying to freeze in areas of ice but that's probably not the best idea. For one thing, you do risk bursting the copper. The other is that the amount of ice you would end up with would melt pretty quickly. If you built two of these things and ran the wort in series where the first is run on 100% tap water and the second one was filled with icewater, that would be effective.
 
"With the Graham design, the coolant flow is relatively haphazard".
That doesn't make sense to me. The water flow is in from the bottom and out through the top. How could that be "haphazard"?

You can help by making the clearance between the shell pipe and coil OD pretty close and also filling the central column with a spacer like a 2" OD tube with caps on both ends. This forces the coolant to follow the helix without blowing past too much.
The reason for having the volume is to enhance heat exchange; less fluid has less capacity to retain heat. "Blowing past..." Flow rate can be controlled. But if you mean controlling the flow so that it is more evenly dispersed and more proximal to the coils, I understand and will look into that idea. Thanks...

"I'm not sure which would be more difficult to make or which takes longer but I do know that coiling the tubing in a tight helix to make a compact package would be tricky..."
Actually, making a tight helix is not that difficult a task. Nevertheless, it does not have to be too tight as this would reduce effective surface area for heat exchange. Good coil spacing (x:y) is important too.

"and after that, make the in/out ports of the shell water tight would be the next challenge".
As you can see from this photo, it is actually a quite simple design. Making it water tight would only require good soldering or in my case, TIG welding the copper. Of course, a larger unit would be preferable for a more efficient unit in home brewing; wider and taller than what is shown.


If you use PVC, I'd cement in a short piece of 1/2" pvc tubing, run the copper through that and fill the gap with 3M 5200 polyurethane.
I don't know why using PVC would be an option unless this was to be a temporary unit or one's budget was greatly limited.

One thing you mentioned in the original post that I didn't comment on was trying to freeze in areas of ice but that's probably not the best idea. For one thing, you do risk bursting the copper.
I agree it may not be a highly efficient method, but it did have a positive effect with minimal effort in preparation. As for bursting the copper, there is more than enough space for expansion of the ice. But again, its not the feature with a great amount of influence in the process. My first attempt was to understand the rate of heat exchange and how to influence it. Not too much thought was given to the its practical application. But again, it didn't take much effort to freeze water in the cylinder. Nonetheless, I probably would not do it routinely due to the small amount of return of the effort.

NOTE: The final unit will have a stainless steel outer cylinder with either ss or copper coils. The reason is for durability. But, should there be more copper influence on the beer?

Great Feedback! Thanx... :mug:
 
Why couldn't you build the hose model into a bucket filled with ice? You could drill holes in the top and bottom of the bucket for your wort in and out and your water in and out. Then you could drill a hole for a water spickett to drain the water of the melted ice rubber should absorb the cold if you start your ice and water before your done brewing.
 
The reason for having the volume is to enhance heat exchange; less fluid has less capacity to retain heat. "Blowing past..." Flow rate can be controlled. But if you mean controlling the flow so that it is more evenly dispersed and more proximal to the coils, I understand and will look into that idea. Thanks...

He does mean controlling the flow so that more of the coolant runs close to the inner coil. It's more efficient to have only a small amount of your coolant in the system, in close proximity to the hot liquid, at a time, rather than to load the cooler with lots of coolant, most of which is insulated from the hot liquid by the coolant that's closer to the hot liquid. If you run the same coolant flow through both designs (same gpm), you'll have a higher flow rate close to the coils in a hose type design as the area is lower, and hence better heat transfer.
 
dyqik,

"It's more efficient to have only a small amount of your coolant in the system, in close proximity to the hot liquid..."

Would this be close to what you are describing?


Thanx for the feedback!
 
CFC? Not sure what that is.
Plate Chiller... all that I've read/heard about this unit, other than from die hard supporters, is that it is a pain in the rear to service and for the cost, there are better options.
 
CFC is counter flow chiller.. tube in hose typically. I don't know what you mean by die-hard supporters but I think you're suggesting that it takes some kind of disorder to find utility and value in plate chiller. All it takes is keeping hop gunk out of them by using mesh bags and then properly backflushing them after each use. 1800 craft breweries can't all be fanboys can they? Although those larger units can be taken apart for thorough cleaning, I hear that they only do it like once a year because it's such a ***** to get them back together without leaking. I've used immersion, tube in tube CFC, and plate chillers at some point in my brewing and I'm sticking with the plate chiller. All effective chillers are going to run between $70 and $150 and in the realm of equipment costs, it's a pretty good value.
 
"... units can be taken apart for thorough cleaning, I hear that they only do it like once a year because it's such a ***** to get them back together without leaking".
This is what I meant by "... a pain in the rear to service...".
 
Homebrew level plate chillers are brazed and are intended to be cleaned in place which is what the pro brewers do for 11.9 months out of the year. Any chiller that has wort flowing through it has basically the same cleaning process. The only difference is that you need to keep the majority of particulate matter in the kettle when using a plate chiller.
 
Back
Top