
JadeAug
New Member
So I decided to try my hand at building one of these magical unicorn appliances I have read about people making. This all started because was an exclusive BIAB brewer for the past few year, and I was wanting a better way to control mash temps. I have recently upgraded to a cooler mash tun after a melted bag incident but I still desire more control.
Like many of you I am a mechanical engineer and a control freak who loves to tinker with their gear and have max control over their process. In fact I think I actually might enjoy designing and building my brew system more than actually brewing the beer. Since I am an apartment kitchen brewer I wanted to use my existing brewing infrastructure to save space so I figured the best way to do this would be to turn my counter flow chiller in to a multipurpose heat. The other heat exchangers I have seen posted on this forum try to make a HERMS CHiller by putting a coil in a water chamber but since I figure chilling is the most demanding use of the homebrew heat exchanger I decided to just modify my chiller instead of making a chiller.
I started by finding some band clamp heaters that would fit around my coils. I got mine on ebay but these can be had from McMaster Carr as well. In order to get full contact with the heaters I rolled some 0.040" aluminum to fit around the coils, underneath the heaters. This allows the heaters to not have any airgaps underneath them both improving heating efficiency and reducing hot spots that could prematurely burn out the heater. This also effectively reduces the energy density and imparts heat to more of the coils.
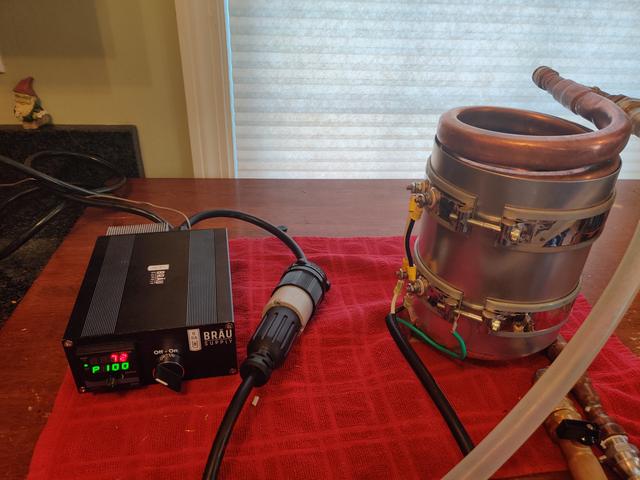
I wired my two heaters in parallel to a boil controller that I had lying around that I was going to use for a RIMS build, but currently was only being used as a pump switch and temperature display. I figured the eHERMS operation would be a no brainer since it does not require much energy to keep wort warm so I wanted to test how much heat I can impart to the water side of the heater exchanger. I fired it up and my two elements pulled about 1450 watts. I started moving some water through it and was pretty impressed by how hot it got. I still wondered how I could make it more efficient.
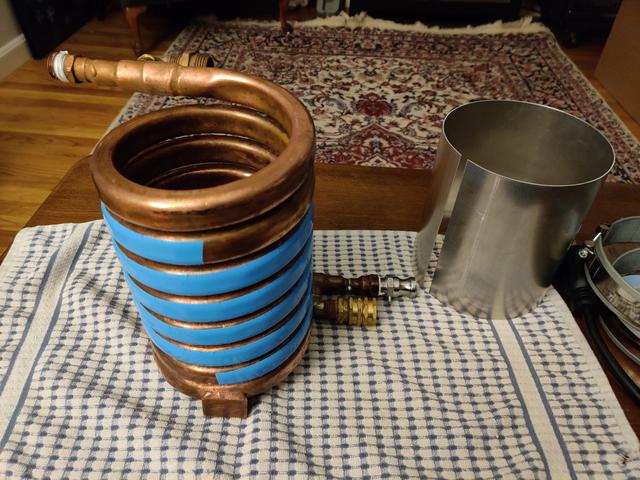
I had some heat conductive tape lying around that I thought would be good to put under the rolled aluminum. In theory this should increase the heat transfer area to the coil by evening out the surface of the coils. In turned out that it was difficult to get the aluminum roll around it properly and I may have ruined some of the wraps because it kept sticking and stretching as I was getting the roll on but I decided to go for it and test it out. The temp was higher than before but I had no way of knowing if this was better because I was just collecting temperature and flowrate data and analyzed it afterwards. You can see my results below.
The biggest issue I had with this other than the exposed electrical contacts was the fact that I was losing of heat to the air. I needed to insulate this heat exchanger so I made a quick trip to Home Depot to see what I can get. I ended up getting a fiberglass pipe wrap roll and some aluminum tape. This was a big mistake because I was dumb enough to wrap this while I was sitting on the couch in front of the TV and ended up covering myself, my couch, and my floor in fiberglass.
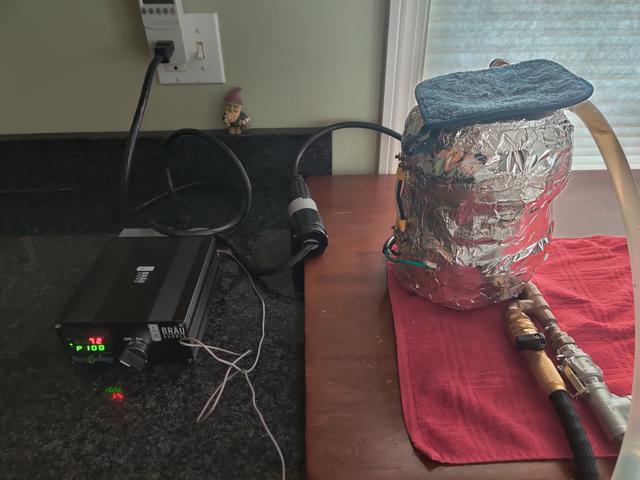
My final tests showed some decent progress. I cranked down on the valve so I was only getting a little trickle but that water came out hot hot hot. This insulation helped a little bit, but the outside was still very hot to the touch meaning I'm still losing to much heat.
I analyzed my numbers and was really impressed with the efficiency I was getting. I soon realized my numbers were not accurate as I was taking my initial temperature at the faucet, when in reality that water traveled through 25 feet of hose in a 72 deg F room before entering the heat exchanger.

I think soon I will do a test run with all my gear set up. I am still working to figure a few things out and I can update this thread with more tests and pics.
So thanks for reading my build diary. I posted this because I would like to get some suggestions on what I should do to insulate this thing better and make it safer so I dont shock myself or burn my house down. I also dont know what I should call this heat exchanger. Chermller? Chillherm? HERMCH HEX? I don't know you tell me.
Like many of you I am a mechanical engineer and a control freak who loves to tinker with their gear and have max control over their process. In fact I think I actually might enjoy designing and building my brew system more than actually brewing the beer. Since I am an apartment kitchen brewer I wanted to use my existing brewing infrastructure to save space so I figured the best way to do this would be to turn my counter flow chiller in to a multipurpose heat. The other heat exchangers I have seen posted on this forum try to make a HERMS CHiller by putting a coil in a water chamber but since I figure chilling is the most demanding use of the homebrew heat exchanger I decided to just modify my chiller instead of making a chiller.
I started by finding some band clamp heaters that would fit around my coils. I got mine on ebay but these can be had from McMaster Carr as well. In order to get full contact with the heaters I rolled some 0.040" aluminum to fit around the coils, underneath the heaters. This allows the heaters to not have any airgaps underneath them both improving heating efficiency and reducing hot spots that could prematurely burn out the heater. This also effectively reduces the energy density and imparts heat to more of the coils.
I wired my two heaters in parallel to a boil controller that I had lying around that I was going to use for a RIMS build, but currently was only being used as a pump switch and temperature display. I figured the eHERMS operation would be a no brainer since it does not require much energy to keep wort warm so I wanted to test how much heat I can impart to the water side of the heater exchanger. I fired it up and my two elements pulled about 1450 watts. I started moving some water through it and was pretty impressed by how hot it got. I still wondered how I could make it more efficient.
I had some heat conductive tape lying around that I thought would be good to put under the rolled aluminum. In theory this should increase the heat transfer area to the coil by evening out the surface of the coils. In turned out that it was difficult to get the aluminum roll around it properly and I may have ruined some of the wraps because it kept sticking and stretching as I was getting the roll on but I decided to go for it and test it out. The temp was higher than before but I had no way of knowing if this was better because I was just collecting temperature and flowrate data and analyzed it afterwards. You can see my results below.
The biggest issue I had with this other than the exposed electrical contacts was the fact that I was losing of heat to the air. I needed to insulate this heat exchanger so I made a quick trip to Home Depot to see what I can get. I ended up getting a fiberglass pipe wrap roll and some aluminum tape. This was a big mistake because I was dumb enough to wrap this while I was sitting on the couch in front of the TV and ended up covering myself, my couch, and my floor in fiberglass.
My final tests showed some decent progress. I cranked down on the valve so I was only getting a little trickle but that water came out hot hot hot. This insulation helped a little bit, but the outside was still very hot to the touch meaning I'm still losing to much heat.
I analyzed my numbers and was really impressed with the efficiency I was getting. I soon realized my numbers were not accurate as I was taking my initial temperature at the faucet, when in reality that water traveled through 25 feet of hose in a 72 deg F room before entering the heat exchanger.
I think soon I will do a test run with all my gear set up. I am still working to figure a few things out and I can update this thread with more tests and pics.
So thanks for reading my build diary. I posted this because I would like to get some suggestions on what I should do to insulate this thing better and make it safer so I dont shock myself or burn my house down. I also dont know what I should call this heat exchanger. Chermller? Chillherm? HERMCH HEX? I don't know you tell me.
