Counter flow HERMS

Homebrew Talk - Beer, Wine, Mead, & Cider Brewing Discussion Forum

Help Support Homebrew Talk - Beer, Wine, Mead, & Cider Brewing Discussion Forum:

This site may earn a commission from merchant affiliate links, including eBay, Amazon, and others.
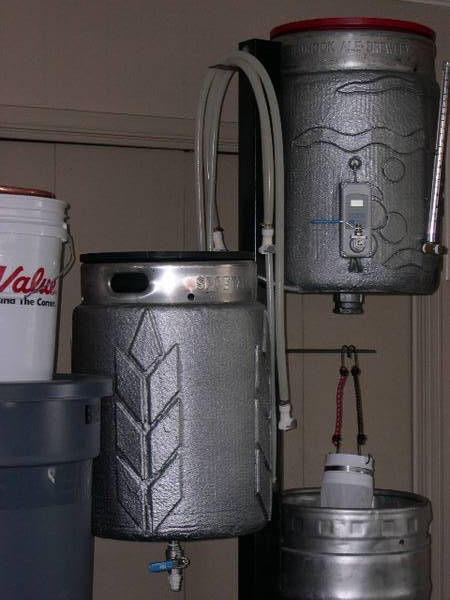
Just wanted to post, because I am still trying to figure out what I am going to do for my system and came up with this
threaded_drain_plug.JPG


to control anything that gets past my false bottom. A very simple screen that catches all the big stuff. Here's another view and then a view of it in the bottom center of my mash tun.
threaded_drain_plug1.JPG

threaded_drain_plug2.JPG


I love having the drain for my mash tun in the absolute lowest part of my tun for 100% complete drainage or the wort. This thing solved any problems with debree and I am confident it would work well with my Therminator in a HERMS setup. Just thought I'd show it off for others to get ideas from. It screws into the top of the welded coupler even though the coupler is supposed to be one sided threads. Doesn't need to be water tight in its connection to serve its purpose.
 
Wortmonger,

Thanks for posting that. I was a little confused when you said your HLT drains from the bottom in the other thread, I figured you meant your MLT. Are you using an inverted converted keg for the MLT? I can't quite tell from your picture, it looks like SS but I can't get enough detail to tell what it is.
 
GearBeer said:
I was a little confused when you said your HLT drains from the bottom in the other thread, I figured you meant your MLT. Are you using an inverted converted keg for the MLT? I can't quite tell from your picture, it looks like SS but I can't get enough detail to tell what it is.
I don't know what other thread you are reffering to, so please tell me so I may check to see if I messed up on my HLT and MT talk. My mash tun drains from the bottom and it is a regular keggle type non-inverted. I simply had my coupler welded into the dip tube depression in the bottom of the keg for complete drainage. That is what this drain screen screws into. Hope it clears it up for you, and please let me know the thread so I can double check my wordage on it.

Here's the mash tun as it it in my setup.
New_Brewery_2.JPG
 
Ok, got it ;)

Those keg wraps look pretty sweet.

Here's the post I was talking about. I'm not sure if it actually is wrong, since it looks like you have a port in the bottom of your HLT, too (or maybe it doesn't... I can't tell what that is)! It's just before the picture.
https://www.homebrewtalk.com/f11/plate-chiller-herms-58747/index4.html#post891708

The reason I asked is that I'm looking at inverting a keg to create a center drain. I have an old sanke tapper (how barbaric!) that doesn't pump anymore from a lot of brewing equipment I bought. My coworker-brewer suggested that I cut it up and use it to get a keg to drain from the center.

Yep, I screwed up. Just changed the HLT to MT. Thank you!

Thanks for the keg wrap props! Those are wrapped with three layers of Reflectix and then shot with Line-X truck bed liner.

The thing in the bottom of my HLT is the element access in case I have a element failure and need to swap.

I wouldn't worry about tapping a inverted keg. It is easier to cut the top off and drill a centered hole in the bottom of the keg to have a coupler welded in. The way a tap connection shrinks in size would be problematic compared to a 1/2" threaded coupler, IMHO.
 
Hijack-Punk.jpg


I designed a DIY tube-in-shell counterflow Heat Exchanger awhile back. I used 1/4" copper which was too small, but I'm thinking of doing it again and using 1/2" copper. It's a little unwieldy, but it'd be just fine for installing on a brew stand. I'm thinking of soldering some 10 gauge copper to the outside of the tube, both to center the tube and to create turbulence in the cooling/heating water.

Here are a couple pictures of the one that was too small. I'm going to try to make it work for my 5 gallon KISS rig (when it's at home).
chillerschematic.jpg

CFC-3.jpg


EDIT: Check out my newest 2-pot flow diagram (2 posts): https://www.homebrewtalk.com/f11/another-herms-designed-clock-135250/index2.html#post1552751

Alright guys I have been working on my E-HERMS build and have posted updates in another thread called https://www.homebrewtalk.com/f11/another-herms-designed-clock-135250/ The photos below show the final design of the heater/chiller. I still have to add silicone hose at the ends to connect the beer line and then mount it to the stand but that's it. Anyway check out the other thread and let me know what you think.
157_5748.jpg


This heater/chiller is made from 1inch diameter outside pipe with 1/2inch diameter inside pipe. The water from the heater will flow from the bottom port to the top port as shown on the left and the beer will flow from the top down.
157_5750.jpg
 
I was concerned about the PE insulation, but it looks like the melting point is ~250*F.

The alternative I'd considered for the heater was header wrap.
 
I do have some polyethylene pipe wrap that I am going to cover the 4 lengths of pipe with. I think the max temp I would ever possibly see in these pipes should be no more than let’s say 200 degrees.

I will wrap the pipes and then attach the pipes as an assembly to the back of my stand which will have an aluminum panel. this should be plenty strong enough and secure.
 
So I just did a simple calculation and for 25 feet of tubing the water volume is less than a quart. With 1500 watts this system must work a lot faster than a traditional herms. Would this system benefit from heating glycol?
 
So I just did a simple calculation and for 25 feet of tubing the water volume is less than a quart. With 1500 watts this system must work a lot faster than a traditional herms. Would this system benefit from heating glycol?

JVD_X, I do not want to use glycol in this system because the water is not only used for cooling but also strike water. I believe I have enough length in the system along with a 5500Watt heater that it should not have any problem getting to strike temp. Heck the heater itself must hold about two quarts. Since I am going to use this to heat strike water what I planned on doing is for some reason if the water is not up to temp, I will just recirculate through the heater loop until I reach temp and then open another valve to send the water directly to the mash tun.

To be honest with you I do not know exactly how glycol works. That is interesting topic that I will have to read up on.

Oh - I see you are using an open/closed process. I just started using my propane for my strike... previously I was putting my strike water at room temp into my tun and using my rims to heat it to strike. This allowed me about an hour to prepare grain and get all my ducks in a row. However, I have found that I no longer need that much time and found the propane more efficient for this.
 
Back
Top