Collecting the toys to get started

Homebrew Talk - Beer, Wine, Mead, & Cider Brewing Discussion Forum

Help Support Homebrew Talk - Beer, Wine, Mead, & Cider Brewing Discussion Forum:

This site may earn a commission from merchant affiliate links, including eBay, Amazon, and others.

troy2000

Well-Known Member
Joined
Sep 29, 2013
Messages
1,057
Reaction score
484
I recently brewed a 2 gal batch of 'American Light Beer,' because that's what was in a Mr. Beer kit I picked up on clearance sale from Kmart. And I wound up with a rough approximation of lite beer, that was almost drinkable. Although the experience may have scarred me for life, it didn't scare me away from brewing. Instead, I decided to learn how to do it right - which takes more equipment than the 2 gal little brown jug and handful of 1 liter PET bottles Mr. Beer gives you. So I made a list.

In the time-honored tradition of enthusiastic noobs everywhere, I started at the wrong end of that list. I bought a case of 12 oz bottles, a cheap wing capper, and a gross of bottle caps. It took me about fifteen minutes mano-a-mano with that wing capper, to decide it was a toss-up who was gonna wear who out first..... so I decided to get a bench capper instead.

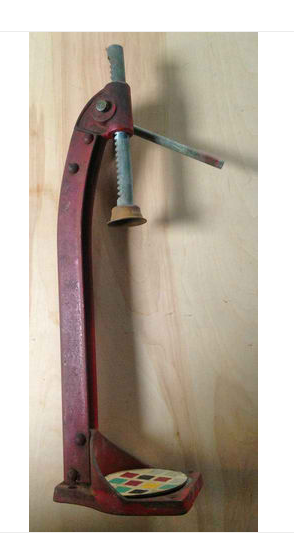
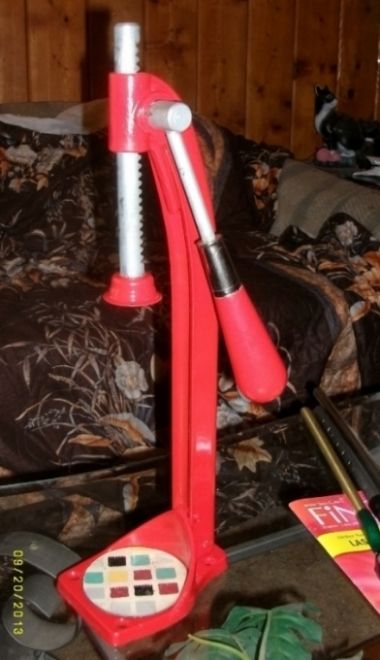
I looked at the ugly and relatively expensive chunks of plastic online, and decided to go with a solid golden oldie instead. This one cost me $24.99 on ebay, shipping included. I sandblasted the rust and old paint off, repainted it, and added a wooden file handle from Ace Hardware. It works great.

I didn't have the heart to get rid of that cracked, brittle and worn old piece of real linoleum on it. So I spent twenty minutes carefully removing it before I sandblasted, epoxied it back into place when I was done, and started soaking linseed oil into in hopes of making it flexible again - or least least keeping it in one piece.


Nice job on the refurbish. I have been looking at the old benchers on ebay as well but by the time I pay for it and shipping, I can get a new one through Amazon. And thanks for the Mr.Beer story, I had a good laugh.
 
Nice job on the refurbish. I have been looking at the old benchers on ebay as well but by the time I pay for it and shipping, I can get a new one through Amazon. And thanks for the Mr.Beer story, I had a good laugh.
Don't stop looking. Like I said, mine was only 25 bucks with free shipping. I also bought a can of paint, and a handle I could drill out to fit.

If I could get a new plastic capper for the same money, I'd still take this one instead. :)
 
Another miscellaneous piece of equipment. I'm a tool junkie; does it show? :eek:

I wanted a grain mill, so I ordered a corn grinder from Discount Tommy for about $25.00. Okay, so I'm a cheap tool junkie. Your point?

First, the bad news: it's a sorry piece of junk, worth about what I paid for it. The castings are so bad I had to file the opening in the handle before I could slip it onto the shaft. Holes are drilled off-center; things don't quite line up; the hopper fits so poorly I'll probably have to tape it on to keep grain from falling out around the edge; it sprays grindings so far and wide I'll be using a custom aluminum foil guard on it to direct them into the bowl. And to top things off it's coated with cheap aluminum paint, in a pathetic attempt to make it look respectable.

The good news: the thing cracks grain like crazy, and it's easy to adjust. I started with rice in an attempt to clean some of that paint off, then I ran some raw wheat through it (which is notoriously uncooperative in a grain mill, or so I've read). Both came out fine. So I guess I'll adjust to its personality quirks and just enjoy using it - like I adjusted to the hot chick who used to get wasted and knock on my cabin door in the middle of the night, back in my bachelor days.

She never showed up in the daytime. And for some reason she never rang the doorbell; she always knocked. Go figure....:confused:


Funny stuff right there, lol. I ended up finding 2 cappers last night on ebay. One I put a bid on for a dollar and the other I'm fighting the urge to buy it outright. I just know for sure that if I buy that one, I'll win the auction on the other. The problem is there is only a few hours left on the one I like (the buy it now one). My next project is making a cider press. That should be interesting.
 
I posted these pic's in the Introductions section already. But I'll redo them here, with updates. I bought a mini-fridge from Walmart online for 99.00 with free shipping, and I'm turning it into a fermenting chamber. I threw away the shelves, and cut the door shelving out with a utility knife (box cutter). It was smaller inside than I thought it would be; I wound up notching the insulation foam all the way to the door skin to make room for a 5 gal carboy. I don't think anything bigger will fit. To make up for the lost insulation, I added a piece of 1" foam to the outside of the door.

I could have fitted a collar to the refrigerator and reattached the door to it instead, but I wasn't that ambitious. If I get the urge later, I suppose I can still do it. Then if I unscrew the freezer and manage to fold it against the back wall without kinking the refrigerant line, a bigger carboy will fit anyway. For now, I'll settle for 4 gal batches....


Oh yes... temperature control. I bought an STC-1000 dual stage aquarium temperature controller; the one folks here refer to as 'the Amazon controller." Except that I ordered mine from Newegg.com, and it showed up in a couple of days instead of a couple of weeks. So I'm cheap, but also impatient....

So far I've installed the heater, which is just a ceramic heating element from PetSmart. Instead of sticking the cord through the front and hoping the door will seal around it, I drilled the back of the fridge. Wasn't looking forward to drilling sheet metal, but I lucked out: there was a plastic plug in just the right spot. I assume it's where they blew the expanding foam in. I fastened the electrical box down with two #10 x 3/4" pan head screws, being careful not to strip them out of the thin plastic of the fridge liner by over-tightening them. And the wire for the temperature probe should fit through the same hole as the heating power cord, with a little cussing and fiddling.

I'm working on the temp controller assembly; should have the whole setup working today. And you guessed it: I'll post pic's. ;)


I was a little worried about that ceramic heat bulb. I was afraid it would be overkill, and maybe even do something drastic like warping the plastic fridge liner. But I wired up my STC-1000 dual phase temp control today, and tried it out. No problem; I think it'll work just fine.

I'll wait until I have the temp setup looking pretty before I post pic's. Right now it works, but it's in a blue plastic 2-gang box. I'm going to slap some wood around it to make it look respectable, before screwing it to the top of the fridge. Probably tomorrow evening I'll have pic's....

I admire people who can say, "this took me about an hour and a half, because I was distracted by the kids/wife/in-laws/natural gas explosion next door." But I have to admit I blew most of the day on my temp controller setup - and I'm not done yet. Part of that is because I was scrounging around my shop, truck, carport, back porch, storage sheds, etc. for parts I could use, instead of running off to Home Depot. A lot of it's because I'm off work for a few days, and I've ramped down to piddling-around mode. If anyone wants to verify that, all they have to do is monitor the level in my latest bottle of good bourbon....
 
OK. Finished the temp controller, set it on the fridge. and decided I didn't like it. It had the STC-1000 and outlets on top of the box. I decided there was no point in making the fridge and heater cords turn an extra corner... and that outlet facing up was just begging for someone (like me) to spill beer into it.

So I headed down to Radio Shack and bought the biggest project box on the shelves. I figured I had the whole top of the fridge, so there was no use skimping and working in tight quarters. I still put the STC-1000 facing up though, so it would be easy to see and work without squatting down. But I placed the outlets on the back side, facing the cords.

Instead of futzing around with stranded wire, I cut up some 14/3 Romex so I could use solid wire. That gave me black for power into the unit and switches, white for the neutral leg, and red for the switch legs to the outlet. And the box came with a bottom, that I screwed into place when I was done with everything else.

The wiring is strictly basic and by the book: the power cord's white wire goes to the outlets, which are still tied together on the neutral side. From there I ran another white wire to the neutral side of the unit itself. I tied the power cord's black wire to three black pigtails, using a wire nut: one for the unit, one for the cooling switch, and one for the heating switch. Coming out of the cooling and heating switches, I used red wire to connect to each of the outlets. And I broke the tab between the outlets on the hot side, to separate the heating and cooling circuits.

I drilled a hole in the back and installed a cable clamp, to keep the power cord from pulling out. I ran the probe wires through the same hole, and taped them to the power cord.

And since I had all that empty space on top, I filled it with a copy of juvinious' Celsius conversion chart and STC-1000 operating instructions. Thank you, juvinious... :mug:

Oops, almost forgot. I connected the power cord's ground wire to the ground on the outlets.


I was playing with the temp control yesterday evening. With the probe in the air, the unit was 'hunting' and overshooting the mark. On the cooling cycle, the temperature would keep dropping after the fridge compressor shut down, until it triggered the heater. The heater would also shut off at the proper temp, but the temperature inside would keep climbing until the compressor came on again.

I tried dropping the probe into a tea kettle full of water, but it wasn't enough thermal mass. It still kept bouncing between the compressor and the heater, although not as quickly, even after I raised the differential from .5 C to 1.0 C.

So I poured 4 gallons of water into a 5 gal carboy. I laid the probe against the glass about halfway between the water level and carboy bottom, folded a piece of synthetic chamois twice to make a 4" x 4" pad four plies deep, and taped that over the probe. And the thing kept on hunting like the probe was in the open air....

Until I got smart, and taped a piece of plastic cling wrap over the chamois. That did the trick. I set the temperature at 22 C, and when I went to bed it was at 22.2 C. When I woke up this morning it was at 22.1 C, and it hasn't budged for two hours. :rockin:

All that's left is to squirt a little silicone into the hole for the heater cord and probe wire. That'll have to wait until the next time I pass a Home Depot. Which shouldn't take long because there's one about four miles east of here, and another one four miles to the west.
 
My mash/lauter tun, from a '20 qt' Coleman cooler that really only holds 16 qts. But that should be enough to make 4 gallon batches, which is what I'll be doing for a while.


Everything is dry fitted, except for the joint inside the cooler wall between the threaded adapter and the tubing stub-out. I used a 1/2' drill bit to make the hole, then a round file to enlarge the holes in the outer wall and inner wall separately, so that both the adapter and the tubing stub were tight fits. Then I slathered everything (especially the insulation around the hole) with silicone adhesive, to hold everything in place and seal it.

Reason for dry fitting? So I can disassemble the manifold and clean it. Also so I can scavenge fittings if and when I move to a larger cooler; they aren't cheap. And the slots are turned up in the photo so they can be seen, but I'll probably face them down when I'm actually brewing.
 
Upgrade on the mash tun; I added a digital thermometer that pokes through the lid. That means it's completely out of the way when I'm stirring....

Those bottles in the background are from 12 packs of Beck's Sapphire, on sale at my local Rite Aid drugstore for $11.99 plus tax and CRV. People can hate on Beck's all they want for being brewed in St. Louis now instead of Germany, but I love heck out of those black bottles. I'll keep buying it until I have enough to bottle a five gallon batch in them.

I'm also working on a full set of Guinness Draught bottles. They're not only black, or close to it; they're wasp-waisted. Kind of a Chevy bowtie in a bottle...

Cool bottles will totally make my beer taste better, right? :p

bad hair day, Belgian candi 012.jpg
 
I see I haven't updated this thread for a while...

Getting back to the converted mini-fridge: to cover the temperature controller's probe after taping it to the carboy, I've been using foil-covered bubble wrap. It works better than the chamois and Saran Wrap did.

I've been impressed with the cooling capabilities of my little rig. When I cold crash my beer, it'll hold a temperature right above freezing for several days. But I was having trouble with the heating element. The hot air was pooling at the top of the fridge, to the point of making the carboy hot to the touch above the wort. So I bought a 3" cooling fan at Radio Shack. I installed it on one side, a few inches above the heater. The built-in grooves for the old shelves didn't give it quite enough air, so I added nylon spacers at each screw.

I wired it into the same circuit as the heating element, so every time it kicks on so does the fan. End of problem....
 
Update on the little Corona mill: I installed it in a food-grade plastic bucket from Lowes, with the bottom cut out. I slip that bucket into another one, and when I'm done I lift the mill bucket out and leave a bucketful of grist behind.

I have a 3-gallon plastic water jug I use for a hopper; it sticks right through the bucket lid into the mill.

I was having serious trouble getting a good grind, and finally figured out why: the cotter pin didn't hold the grinding plate tightly enough to the shaft. So the plate was cocking, until the edge was contacting the stationary plate as it turned. That means I was getting a mix of flour, grist and unground grain. So I added a spacer, and stuffed a machine screw through the hole instead of the cotter pin. It works beautifully now. Next time I have it apart, I'll take a pic.
 
My drill-motor powered carboy cleaner, made from a 1/2" wooden dowel and a chunk of synthetic chamois. I split the dowel with a thin-kerfed tablesaw blade, and used a couple of tiny brass tacks to hold everything together. It's on that humongous drill because that's the only 1/2" one I had handy; I've since shaved the end down to fit my 3/8" battery-powered drills.

I just add a couple of inches of soapy water to the carboy, and go to work. Took a little practice to get the knack of using it without wrapping the chamois fingers around the shaft (and it does it anyway sometimes), but it does a good job. Much easier and faster than a long bottle brush...


Just found this thread - thanks for posting it! I am thinking about putting together a small fermenting chamber soon myself, so that was helpful...

You're welcome. I started the thread partly because I hoped it would help other people who are just getting started. But don't do what I did, and buy a fridge that's just a tad too small....:)

My mistake was measuring the mini-fridge at work, and verifying my carboy would work in it, before ordering one that had the same exterior dimensions. Unfortunately, the one I bought is smaller inside, where it counts.
 
My wort chiller and pre-chiller. The chiller is made from a 50' coil of 3/8" OD copper tubing; the pre-chiller from 10' of the same.

They're both based on the 'rib-cage' chiller by RedIrocZ-28, at this thread:

https://www.homebrewtalk.com/f51/diy-interwoven-rib-cage-immersion-chiller-106415/

For the chiller, I counted coils and marked the approximate center with a piece of tape. Then I started at one end, wrapping around a 1-gallon paint can. When I got close to the center, I switched to the other end. I did the same with the pre-chiller, except that I used a 1-quart paint can instead, and stretched the coils out a little when I was done.

Here are pics of the chiller right after I made it, before I added any fittings or hoses, and a pic of it setting inside my brew kettle hooked up to the pre-chiller. I use them in a large double sink, with the brew kettle floating in ice and water and the pre-chiller set in a stockpot of ice and water.

By the way, my brew kettle is a 28 qt (7 gallon) aluminum tamale steamer from Walmart. It only cost me twenty-something bucks, complete with a nice glass lid. Cheap and thin; works fine. But I have my eye on an 8-gal stainless steel stockpot sold by a restaurant supply house in the Coachella Valley; its lid alone is heavier than any pot I own. :p

When I get around to it, I'll probably add a spigot to one or the other of the two pots. Obviously, I'd have to use a non-welded one on the tamale steamer....

Wort chiller 1.jpg


Wort chiller 2.jpg


Wort pre-chiller.jpg
 
Pic's of my upgraded 'Corona' mill. It's housed in a bucket with no bottom now, clamped to a 2x4 shelf. I set it inside another bucket when I'm grinding, and when I'm done just pull the mill bucket out. Normally I take the handle off and run the mill with a drill motor.....

The hopper is a 3-gallon water jug, stuffed through a hole in the lid.

This setup was put together with ideas from Revvy's 'My Ugly Junk - Corona Mill Station' thread.

https://www.homebrewtalk.com/f51/my-ugly-junk-corona-mill-station-90849/

bucketmill1.jpg


bucketmill2.jpg
 
Back
Top