Chest Freezer Kegerator Build

Homebrew Talk - Beer, Wine, Mead, & Cider Brewing Discussion Forum

Help Support Homebrew Talk - Beer, Wine, Mead, & Cider Brewing Discussion Forum:

This site may earn a commission from merchant affiliate links, including eBay, Amazon, and others.

bakersbrew

Well-Known Member
Joined
Apr 21, 2009
Messages
110
Reaction score
2
Location
Los Angeles, CA
UPDATE - Well, I did it! Jump ahead to the end for pictures. If you were like me and dont know how to build anything, let me know and I will try to help out. Thanks to anyone who gave me advice.


alright, here is the situation -

i am very new to homebrewing, but i already love it. on my second batch i am already ready to keg. thus, i need a kegerator. i have decided to convert a chest freezer into a kegerator using the collar build method.

here is my problem. i am not very handy. i can build things and have in the past, but i sort of need some instruction. i have been searching everywhere for a definitive DIY for days but havent found anything with step by step instructions. everything is just a general description of the build.

can anyone help me out on this?

here is some info on what i want to do - i am going to use the magic chef 5.5 cu ft chest freezer. i only need to have two beers on tap at once. no more. here is the link to the chest freezer.

Magic Chef 5.5 Cu. Ft. Chest Freezer - MCCF5WBX at The Home Depot

any help you guys can give me would be much appreciated. i really want to build this bad boy. thanks
 
What part are you specifically looking for? Do you need help with the collar, faucet mounting, etc....
 
the collar build to start with. how is the collar attached to the freezer?

the other stuff i will deal with after i have built the collar.
 
I was concidering doing a keezer myself, but was concidering just doing a tower, rather than a colar, because that will be alot easier for me to acomplish. As long as the chest freezer is deep enough to close with the cornies with DCs attached, I think i can get away with no colar.
 
yeah the collar thing confused me too, cuz no one really talks about how its attached to the keezer. Most folks just use lots of silicone and the weight of it will keep it on. I used a small piece of scrap metal on the back and used the existing holes from the hinges to attach to keezer and wood screws. On the front I had to use the existing latch hole that was on there to create something. I think you'll be fine with silicone and what ever you can do on the back.

THe drip tray was also confusing , cuz I see lots of folks with them and no one says how they attached them. I just use angle magnets used for welding and the tray just sits on it. Good luck.

The collar is fairly easy to build , if you build it the same size as the measurements of the outside of the keezer, you might even be able to get HomeDepot to do the cuts for you.
 
I routed notches in corners of my collar, then cut some aluminum strips we use at work for test marking and grinded them to shape to sit in flush with the corners. Then screwed them into the collar. The spot in the middle then screwed into the lid. My collar opens with my lid. I'm thinking of redoing it, but keep putting another keg in it when I empty it.
 
Yup, JesseRC's on it.
Collar is 2x4s (or 2x6s) on edge. Make a box the same size as your freezer. Take off the top, and set the 2x4 collar on the freezer, silicone to seal it. Then screw the top onto the collar and voila!
you can paint to match, stain and varnish, whatever. Then you can drill holes thru the wood to mount your shanks and faucets. (and a hole thru the back for your CO2 line). My collar allows me to stand my CO2 on the compressor hump, inside with the kegs. (don't expect the tank pressure reading to be correct, though!)
The collar also gives you some wood to mount your temp controller onto.
kegeratorcollar.jpg
 
My collar is silicone caulked to the lip of the freezer.

Some people make the whole collar hinged and others like myself do the opposite. There are some advantages to the first method, but it's a little bit more work.

For attaching the drip tray I just used angle brackets and heavy duty double sided tape.
 
what tools do i absolutely need to do this?

what is the best tool to drill the holes?

thanks for all your help. i am starting to get a better idea of what i need to do. i think i am going to start next week sometime.
 
what tools do i absolutely need to do this?

what is the best tool to drill the holes?

thanks for all your help. i am starting to get a better idea of what i need to do. i think i am going to start next week sometime.

uh a drill:D. seriously though a drill (cordlesss will be fine) , some wood screws, some angles if you want, some silicone for caulk gun, i forget the bits I used for making the tap holes. Some paint. If you've got a harbor freight in your area, you can get some cheap tools there.
 
what tools do i absolutely need to do this?

what is the best tool to drill the holes?

thanks for all your help. i am starting to get a better idea of what i need to do. i think i am going to start next week sometime.

Man tools.....

Drill, Circular saw, Screwdriver, woodworking clamps.

If you dont have any power tools at all, Look into a battery powered cobo kit.
 
I did everything with a circular saw and cordless drill. I used a deep well hole saw that was the same diameter as the shank for the holes. Circular saw to cut the wood to lenth and drill to screw it together. I didn't even paint the collar, I just used some wood grained contact paper to cover it.
 
this may be a stupid question but why is it better to do the collar build rather than a tower conversion with a chest freezer?

there is nothing to risk if you are drilling through the top right? i talked to my brother tonight and he tried to convince me to do the tower and now i am thinking i should. what is the difference?
 
2 reasons come to mind.

1. Tower on top of lid makes it more of a pain to open and change kegs.

2. You'll want to rig up some sort of cooling fan for the tower (read more work).
 
how big of a freezer are you going to use?


how many taps do you plan to run?


There are some great pics of freezer kegerators with 6 or more taps in the collar on this site. That would not be an easy feat with draft towers.
 
i am using a magic chef 5.5 cu ft with a max of three taps. but i have decided to do the collar.

the only thing left i need is a shopping list. i know the best faucets to use, but what about the other parts like shanks? which are the best to use?

does anyone have a shopping list?
 
so i got my chest freezer last week. my goal is to have this done in month or so. i think my next step is to get the perlicks and shanks and then go from there. little by little. then i will have this bad boy done in no time, serving up ice cold joy for thousands....or just whoever i have over to my place
 
I got my perlicks and shanks in on Friday. Also my 3 way manifold. Next weekend I am going to home depot to get the wood. I'll make sure to document my build to help those true unhandy people like myself
 
I used rope caulk to attach my collar to the chest. It is self adhering and easily removed if desired. It is also easy to work with as it has the consistency of putty or stiff modeling clay. The weight of the collar is enough to hold it in place without the need for any additional screws or brackets of any kind.

Mortite 90' Gray Rope Caulk [B-2] - $5.25 : blackEnergy, the Power to Empower

The collar is made of 2 x 6 lumber. The corners are simply butt joints doweled together. I used a forstner bit for the shank holes. These bits make a very clean cut. Much better than a spade bit, but they are pricey. Sanded the collar and used a white wash pickling stain and satin polyurethane for the top coat.

3210443826_5bec35f3ed_b.jpg


This is a 7.5 cu ft freezer. It will fit four kegs and a 5 lb CO2 tank on the compressor hump. I glued a piece of 1 x 3 (sanded and painted to match the collar) to the side of the freezer. The trick is to rough up the paint with some coarse sandpaper to give the glue something to grip. No need to drill holes into the side of the freezer for this. The drip tray is then hung from two small stainless screws in the wood. This allows the entire tray to be removed for cleaning when necessary. This freezer is in my kitchen, so I use the top as a work surface when cooking and such. A tower would be in the way when opening the lid and would make the top less appealing as a work surface.
 
I had similar questions to the ones that Bakersbrew had, glad to see this thread.

Quick question, do you need a temp controller? or is the freezer controller on the unit being used... i.e., set on the highest level possible?
 
this is what i did tonight. then i had a beer to celebrate. next weekend i am going to attach the collar to the freezer. then boom - kegerator

photo.jpg
 
so very close. check out those perlicks. i am going to pick up some stain tomorrow and stain the collar. then that is it. i am going to attach it and then work out the plumbing later.

2.jpg


1.jpg
 
so very close. check out those perlicks. i am going to pick up some stain tomorrow and stain the collar. then that is it. i am going to attach it and then work out the plumbing later.


sexy! the 425ss faucets. why not get the brushed stainless flanges? im obsessed with 316L and 6061-T651...

northern brewer has them for $3.5, item# K207.
NORTHERN BREWER: Liquid Hardware
 
well - here it is. the construction is complete. it was really easy. alot easier than i thought. the only thing left is the plumbing. i will finish that this weekend. also, the tap handles are in the mail.

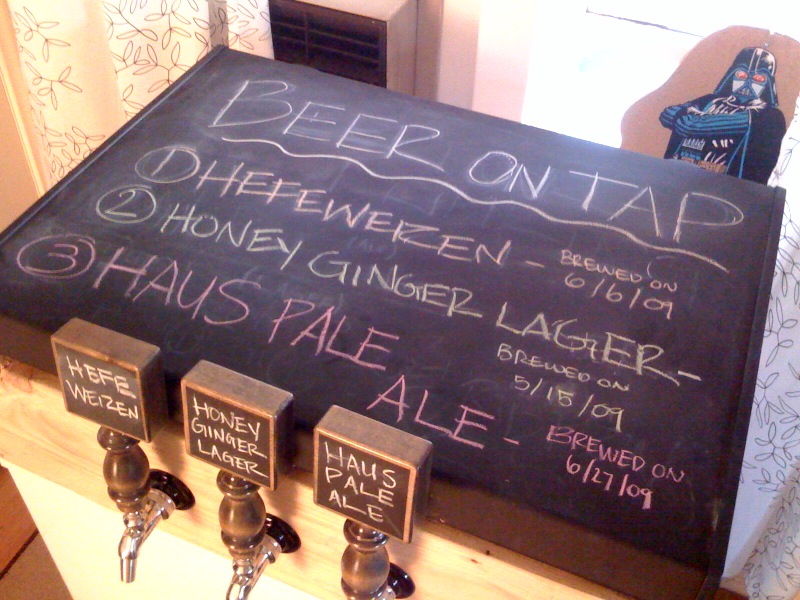
here is a picture. i did a chalkboard finish on the top so i could write on it. let me know what you guys think.

i think i might get those flanges mordantly. niceeeee

Keezer2.jpg


Keezer.jpg
 
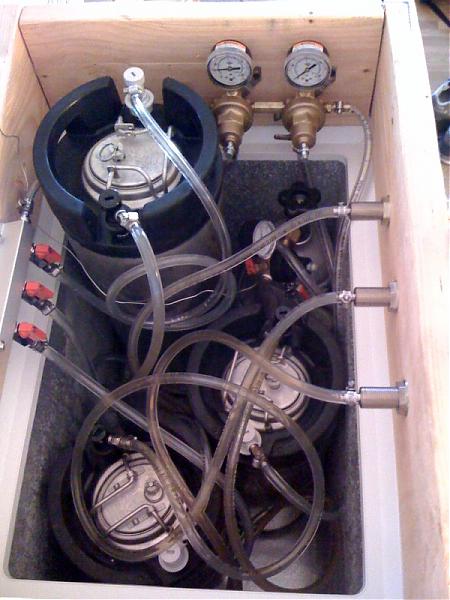
Here she is completely finished. All thats left is to hook up the beer line and kegs. I feel like the luckiest man in the world right now....homebrewed draft beer at home....doesnt get any better than that. Thanks for your advice. Let me know if you have any questions. Also if you have any ideas for upgrades let me know.

innards.jpg


finished2.jpg


taps.jpg
 
well i thought i would post some pictures of the kegerator all filled up with its first three kegs. here are some pictures

Kegerator2.jpg


Kegerator.jpg


KegeratorInside.jpg
 
how do you hook up the temp control ? more info on that would be a big help and a pic or two

Thanks
 
basically it is connected to the back of the collar. i put some screws there and hung it, then i put the probe between the lid and the collar. i dont have any pictures now, but i will take some when i get home and post them
 
definitely. this was much easier than i suspected. seriously, you should go with this because it is much easier to change the kegs. and i heard there is an issue with the beer warming in the tower. no such problem with a collar. and it is so easy to build
 
Looks to be a long reach to the bottom of the freezer. Not a problem until you want to clean out any spilled beer. I made my collar from 2 x 6 material and now wish that I'd used only 2 x 4's. I can reach the bottom, but it's a stretch.
 
Catt...indeed it is hard to reach the bottom. And I have had two beer leaks. I had to come up with clever ways to clean that beer out.

But it had to be that tall so I could fit my third keg in there.

It's not perfect, but it works. And I love it, as any man would love his beer dispensing machine
 
Catt...indeed it is hard to reach the bottom. And I have had two beer leaks. I had to come up with clever ways to clean that beer out.

But it had to be that tall so I could fit my third keg in there.

It's not perfect, but it works. And I love it, as any man would love his beer dispensing machine

I have mitigated the cleaning problem by using a shop vac to suck up any beer leaks which are inevitable. I think I would do it this way even if I could easily reach the bottom. Quick and easy really.
 

Latest posts

Back
Top