chest freezer kegerator assembly questions

Homebrew Talk - Beer, Wine, Mead, & Cider Brewing Discussion Forum

Help Support Homebrew Talk - Beer, Wine, Mead, & Cider Brewing Discussion Forum:

This site may earn a commission from merchant affiliate links, including eBay, Amazon, and others.

BrewDoc_Md

Well-Known Member
Joined
Mar 22, 2008
Messages
77
Reaction score
0
Location
Frederick, MD
I'm getting a 7.2 cuft chest freezer later today and plan on building a collar for it to hold 4 cornys and a CO2 tank (picking up a 20 # tank tomorrow dirt cheap). I've read a bunch of articles on here and elsewhere about how to construct it and have a few last minute questions:

1) Proper spacing between faucets? I've read where most people install them 4" apart from center to center. Anything magical about that number? Is there "optimal" spacing for some reason? I made a 14" wide drip trough, so 4" spacing would be ok. Just curious.

2) A couple guys remarked that if they could do it all over again, they'd put the CO2 tank on the hump and drill the faucets+shanks and secondary CO2 manifold near the hump, too. Is the thinking that doing this would allow for easier, less obstructed corny access in the deeper part of the freezer?

3) I know the beer lines have to be a certian length to prevent foaming. Do the CO2 lines need to be a certain length as well for any reason? Or can they be as short as possible (say, from regulator to manifold)? And do I need to sanitize (like with StarSan) the CO2 lines/manifold before usage?

4) When installing the shanks, do I NEED anything else in the drilled hole besides the shank? A couple guys put PVC piping in theirs...but I wasn't sure if this is "clever", or just to compensate for drilling their hole too large initially. Does there need to be extra foam/styrophoam insullation around the shank?

Thanks for the advice! :mug:
 
Will a 20# tank fit in a 7.8cu ft chest freezer with 4 cornies? I've been wanting to pick up this one (as per Bobby_M's recommendation).

http://www.lowes.com/lowes/lkn?action=productDetail&productId=155204-53913-EHL090FXRQ&lpage=none

That will fit 5 cornies and might fit a small tank on the hump.

I was thinking about just doing 4 so I could put a bigger tank in the 5th "spot". The room I want to put the freezer in doesn't lend itself to having the tank show.

Also, I have some questions too...

I see Midwest has this setup.. (They have a 4 way too, but the 2 way has a picture..)
http://www.midwestsupplies.com/products/ProdByID.aspx?ProdID=7739

Would I be good to go with a setup like this, but adding on a set of faucets and shanks to replace the picnic taps? Do I need to get different tubing? Is a 5lb tank enough for a 4 keg system? Is there a preferred faucet/shank set to look for? Is there anything I need to be aware of for keeping the tank on the inside rather than the outside?

I seen on Bobby's YouTube video he disassembles the thermostat setup. I'm not comfortable messing with that. Would I be ok with something like this?

http://www.austinhomebrew.com/advanced_search_result.php?keywords=thermostat
 
I'm using 2"x8" boards for my collar, so an extra corny can fit on the hump (2 more if I put the CO2 outside). The extra height will let me put the 20# CO2 inside. 5# is enough to serve multiple cornies, but not to force carb (you'll still be refilling it pretty often just serving).

I bought a Ranco temp controller off ebay pretty cheaply and wired itmyself using the diagrams and step-by-step instruction found on threads on this site. All you need to buy the Ranco and an appliance extension cord to splice (and one extra little piece of wire). You can buy a pre-wired one, but it's simple to do yourself:
https://www.homebrewtalk.com/showthread.php?t=26496

I bought that Midwest kegging system kit to start with. But also added a couple extra cornies and a 4-way manifold. I like having the second regulator to force carb at 30 psi while still being able to serve the other kegs at 10-12 psi.

Everyone recommended you get Perlick faucets if you can afford them (> $30 each). Rapids wholesale has the best price on new ones:
http://rapidswholesale.com/Merchant...duct_Code=8P490&Product_Count=&Category_Code=
 
Just wanted to give this thread a bump for BrewDoc. I'm building up parts list and doing research for a keezer project as well and I'm interested to hear feedback on his questions.
 
I happen to space my faucets 4" on center also, not because what I read, but it just looks the best.

I used 1"x6" and added a 1"x1" lip around the top of my collar for more surface area for the lid. Also, I added a 1" thick piece of foam around the inside of the collar for extra insulation. If I did it over again, I would use 2"x6" and forget about the lip and use different insulation. Also, don't mitre the corners. Use straight cuts and screw the pieces together. Once it's sanded, and painted (mine is white so it's pretty seamless) you can't tell anyway.

I'm using 2"x8" boards for my collar, so an extra corny can fit on the hump (2 more if I put the CO2 outside). The extra height will let me put the 20# CO2 inside. 5# is enough to serve multiple cornies, but not to force carb (you'll still be refilling it pretty often just serving).

I can carb and serve about ten cornies worth on a 5lbs. tank. I would figure, roughly that you should be able to do about the same per 5lbs. of CO2.

I bought a Ranco temp controller off ebay pretty cheaply and wired itmyself using the diagrams and step-by-step instruction found on threads on this site. All you need to buy the Ranco and an appliance extension cord to splice (and one extra little piece of wire). You can buy a pre-wired one, but it's simple to do yourself:
https://www.homebrewtalk.com/showthread.php?t=26496

Me too ... easy-breezy and much cheaper. You can get a nice single stage digital controller and extension cord for about $65 as opposed to the $100 they're asking for at online HBS. Follow the links and diagrams provided and it's pretty simple. It took me about 1/2 hour to do.

Everyone recommended you get Perlick faucets if you can afford them (> $30 each). Rapids wholesale has the best price on new ones:
http://rapidswholesale.com/Merchant...duct_Code=8P490&Product_Count=&Category_Code=

I bought my shanks, guages (I have two secondary regulators), "Y" splitters and check valves there and was pretty happy. From all the comparison shopping I did, they have the best price and most complete selection for what you'll need.
 
I think I spaced my faucets at 3" and don't have any problems. Gas line length doesn't matter, either. I think placement of the faucets relative to the CO2 tank is more aesthetic than anything; you're probably going to have to move beer lines out of the way, and since the gas lines are generally shorter, they don't really get in the way (or so I've found). I use my hump for bottled beer or lagering carboys. If space is an issue, you can move the tank outside of the kegerator anyway.

My shanks fit tightly into the holes in my collar, so I didn't put anything in there. You might want to seal it up if there's a gap. Even though cold air sinks, the whole inside will get cold and you'll lose cold through the gap. Don't run any liquid through your gas lines, nothing will live in the pure CO2 environment anyway.
 
Mine worked out to be 4.5"but it was purely aesthetic. Unless you are trying to pour from two adjacent taps simultaneously, you just need to be able to get to the handle.
 
I happen to space my faucets 4" on center also, not because what I read, but it just looks the best.

I used 1"x6" and added a 1"x1" lip around the top of my collar for more surface area for the lid. Also, I added a 1" thick piece of foam around the inside of the collar for extra insulation. If I did it over again, I would use 2"x6" and forget about the lip and use different insulation. Also, don't mitre the corners. Use straight cuts and screw the pieces together. Once it's sanded, and painted (mine is white so it's pretty seamless) you can't tell anyway.


I can carb and serve about ten cornies worth on a 5lbs. tank. I would figure, roughly that you should be able to do about the same per 5lbs. of CO2.


Me too ... easy-breezy and much cheaper. You can get a nice single stage digital controller and extension cord for about $65 as opposed to the $100 they're asking for at online HBS. Follow the links and diagrams provided and it's pretty simple. It took me about 1/2 hour to do.


I bought my shanks, guages (I have two secondary regulators), "Y" splitters and check valves there and was pretty happy. From all the comparison shopping I did, they have the best price and most complete selection for what you'll need.

Great info! :rockin:
 
Good info indeed, Thanks!

Although using 2" x 8"s for the collar makes it really tall (harder to transfer full kegs into), I'm glad I did. I can get 5 cornies inside (two on the hump) if the CO2 tank is outside. I think I can use the extra corny for long-term, cold-temp lagering.

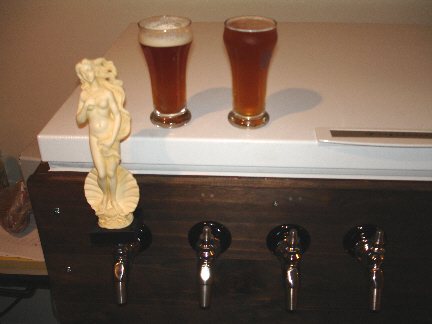
I went with the 4" faucet spacing. I figured the extra space would be handy if I get some odd-shaped tap handles. Only have one so far, a little statue of the "Birth of Aphrodite" I picked up at a yard sale for $1 and stuck a 3/8" coarse T-nut in its base. Classy (yet topless!) little statue...nice! This is the time of year for yard sales, and I'm keeping a eye out for anything I can use ont he kegerator.

I'll post a photo when I get all four tap handles. Someone suggested using fancy table legs...I'll look into that, too.
 
Good point about tap handles. I was thinking that I wanted to keep all four on one side so that I could go with one drip tray and also not have to worry about bumping the taps with kegs going in and out.

Did you mount your collar to the body of the freezer or to the lid (I think this is the way Bobby did his - great vids Bobby)
 
I mounted the collar to the body of the freezer. I've read on other threads on here that if you make the collar too heavy, the springs on the lid are not strong enough to hold it up.

If I just used 2"x4"s, I probably would have mounted the collor on the lid. But 2"x8"s are much heavier. I also have a 2"x"10" running the length of the front face that makes the collar even heavier. But it serves several purposes. First, it looks better than the knotty pine the collar is made from. I've stained with a deep mahogany stain, and it looks good. Second, having it extend beyond the collar gives me something to attach the splashguard and drip trough to without showing any additional screws/nails for it. Third, it helps hold the collar in place. The collar is attached to the freezer only by some screws in the original spring holes, but no where else. I did use silicone caulk under the collar, but that's not very strong. The 2"x10" lip overlaps the freezer body in the front, hugging it snuggly.

All sounds pretty good. My plan was to use 2x4s for the collar and mount them to the lid but I like the idea of having a nice big wood "face" on the front of the unit, more so for looks than anything else but your point about the drip trays makes perfect sense.

I seem to recall that there may be a way to actually fasten the collar safely with more than just the old hinge holes (Bobby's vid again? - I'll have to look).

Big Kahuna: Point well taken. If I had the pics, I'd be posting them but right now, it's all "upstairs" for a bit.
 
5# is enough to serve multiple cornies, but not to force carb (you'll still be refilling it pretty often just serving).

5 lb of CO2 is enough to force carb 10 and serve over 7 kegs (I can't say how much over because keg 8 had a leak on me) For me that was about 5 months with multiple parties in there. You don't NEED a 20 lb tank, but they are kind of nice.
 
i did the same conversion as bobby. I used 1X3's and attached to the lid using aluminum angle iron attached by pop rivets and wood screws along the front and the back. holding on like a champ. Even with the 1X3's the lid won't stay up by itself. Although I do have 2 big ceramic tap handles, but that's besides the point. I don't think there's any need for anything wider than a 1X.
 
Good point about tap handles. I was thinking that I wanted to keep all four on one side so that I could go with one drip tray and also not have to worry about bumping the taps with kegs going in and out.

Did you mount your collar to the body of the freezer or to the lid (I think this is the way Bobby did his - great vids Bobby)

I centered my taps. I did that because now I only have four, but I can expand up to 6 (I have a 10 cu freezer) and possibly 8 if I use 3 gal cornies on the hump (it might fit 5 but I don't really want to fight to get them in there).

My CO2 is on the outside, with one line feeding in for my secondary regulators on the inside. My collar is mounted to the freezer and not the lid. It's a bit easier that way and I'm not certain mounting it to the lid makes it that much easier. I mean, if you're lifting a five gal keg, what's an extra 6"-8", and if it really is a problem, then the best bet would be to open the lid, set the corney in empty and rack from carboy/pail to corney in the freezer. I mean, if you have to lift the carboy/pail above the keg any way for transferring you might as well just transfer directly into a keg in the freezer. save yourself some extra lifting.

I have a 19" speedrail for a drip tray. I have magnets glued to the back, but that doesn't hold (partly because it was bent when I got it) so I took wire from tied to screws on the collar down to the pre-drilled holes in the speed rail.
 
My plan was to use 2x4s for the collar and mount them to the lid but I like the idea of having a nice big wood "face" on the front of the unit, more so for looks than anything else but your point about the drip trays makes perfect sense.

Why not use 2- 2x4s. one attached to the lid and 1 on the freezer. use the lids rubber gasket between the 2x4s. This way you get the extra keg head space, yet not as high when lifting a keg into the keezer and wide enough for the faucets. This is what I have been thinking of doing. BUT I am also thinking 1x" and not 2x". Still thinking tho'. Charlie
 
My lid used to stay up fine when I had 4 faucets but now that I added the fifth, I have to prop it up. I'm pissed off because I saw the same chest freezer at the local dump and could have taken the spring-containing hinge off of that one so that both hinges had the spring.

The whirlpool 8.9cuft that I used will hold 5 cornies and a 5lb tank on the hump.
keezerdone.jpg


People that put PVC into the holes before the shank are doing so because they're drilling through the wall of a fridge. The PVC holds the thin walls from buckling under the pressure of the shank nut. In a collar, this is unnecessary.

I personally like having the collar flush with the body of the freezer as it makes it look stock.

keezerdone2.jpg
 
I mounted the collar to the body of the freezer. I've read on other threads on here that if you make the collar too heavy, the springs on the lid are not strong enough to hold it up.

If I just used 2"x4"s, I probably would have mounted the collor on the lid. But 2"x8"s are much heavier. I also have a 2"x"10" running the length of the front face that makes the collar even heavier. But it serves several purposes. First, it looks better than the knotty pine the collar is made from. I've stained with a deep mahogany stain, and it looks good. Second, having it extend beyond the collar gives me something to attach the splashguard and drip trough to without showing any additional screws/nails for it. Third, it helps hold the collar in place. The collar is attached to the freezer only by some screws in the original spring holes, but no where else. I did use silicone caulk under the collar, but that's not very strong. The 2"x10" lip overlaps the freezer body in the front, hugging it snuggly.

folks have glued the wood to the body of the keezer. the type of glue depends on its future use. The better the glue the less chance the keezer can be restored to a freezer if you ever change your mind. I think most of us plan to run the freezers into the ground, at least I do. Charlie
PS I'm from MD as well
 
How many kegs in a garden variety 5 cu ft chest freezer ? (tank inside)


Here is another example of a 7 cu ft with a collar ... he says it fits 4 corny's comfortably :

www.mikebeer.net/chestfreezer.htm

A friend of mine just picked up a 5.3 cuf. freezer from lowes...some brand I've never heard of- it will fit 4 cornies, very tightly- 3 on the floor and 1 on the hump- he used a 2x8 collar- and the keg that fits on the hump is pin lock. Its debatable right now if the freezer will also fit a 5lb tank on the floor- it looks as though the tank would fit, but not sure about the regulator. Will actually try it out when we get some more kegs

I did the same freezer set up as the link above (Mikebeer, thanks if you are out there, thanks to BobbyM too) with an identical freezer- and I did a 2x8 collar and I'm speculating that I could also fit a pin lock on the hump- it will be very close, but I think it will work. A ball lock will not fit on the hump, neither will my 20lb tank...both are just too tall. At this point, I think the pin lock would be a 5th keg in that freezer... but I wont know until I get the keg back with the fittings on it, etc.
 
Thx for info on 5.3 freezer ... I guess the name doesn't matter ! (smile) .. I have a TV which has a name no one has heard of (CC 's "house" brand)..

BTW - did you use 4" shanks instead of 3" ?

I have never quite understood +'s and -'s abt pin lock vs ball lock. I was planning to start with 2 ball lock cornys ... better parts availability (?) ...

I am looking to start with 2 kegs, migrate to 3. I have another monster chest freezer which I can convert if it becomes an overflow situation ... right now it is being used for food (What a concept!!)
 
I did use 4 inch shanks. That 5.3 freezer is a real nice find, and for folks with space concerns, it seems like a perfect solution to have 4 on tap- alteast there is some room to grow instead of the sanyo- another data point for folkss to consider anyway.

I've done enough readin on ball vs. pin to say that neither keg is necessarily better. Pin locks are less common- parts seem to be a little more of a premium... they are shorter and fatter than a ball lock. Thats about it. Seems like preference and availability beyond that.

I have all ball locks, but a friend has a pin lock that we did a trial fit with and thats where my speculation comes from. I'll get the keg back from him soon and put it inplace with fittings on. I'd just measure, but the lid of my freezer is not flat and before I plunk down money for some pin locks, I want to make sure they fit.
 
I centered my taps. I did that because now I only have four, but I can expand up to 6 (I have a 10 cu freezer) and possibly 8 if I use 3 gal cornies on the hump (it might fit 5 but I don't really want to fight to get them in there).

My CO2 is on the outside, with one line feeding in for my secondary regulators on the inside. My collar is mounted to the freezer and not the lid. It's a bit easier that way and I'm not certain mounting it to the lid makes it that much easier. I mean, if you're lifting a five gal keg, what's an extra 6"-8", and if it really is a problem, then the best bet would be to open the lid, set the corney in empty and rack from carboy/pail to corney in the freezer. I mean, if you have to lift the carboy/pail above the keg any way for transferring you might as well just transfer directly into a keg in the freezer. save yourself some extra lifting.

I have a 19" speedrail for a drip tray. I have magnets glued to the back, but that doesn't hold (partly because it was bent when I got it) so I took wire from tied to screws on the collar down to the pre-drilled holes in the speed rail.

I'd like to do at LEAST four taps (starting with four). I've got a 13.7cuft freezer, although I've yet to check how many kegs will fit, I think that I can get six in w/o using the hump easy. I think based on what I've read here I'll just attatch the collar to the freezer.

How did you fix the collar to the freezer, just at the back?
 
Why not use 2- 2x4s. one attached to the lid and 1 on the freezer. use the lids rubber gasket between the 2x4s. This way you get the extra keg head space, yet not as high when lifting a keg into the keezer and wide enough for the faucets. This is what I have been thinking of doing. BUT I am also thinking 1x" and not 2x". Still thinking tho'. Charlie

The headspace doesn't seem to be an issue right now, although I've yet to do anything other than some visual inspections. I just liked how clean Bobby's set up was when you lifted the lid and everything was out of the way. That said, I think that I'm going to just mount to the freezer.
 
I still need a few tap handles and maybe another coat of stain, but my new kegerator is basically done. I've got a 20# CO2 tank outside, the hose drilled through the collar to a 4-nipple manifold in the freezer. I ended up going with 2x8s for the collar so I could put a 4th and maybe 5th corny (for lagering) on the hump.

7-Kegerator-angle.jpg


6-Inside_freezer.jpg


5-first-brews.jpg


Props to advice from this thread and many others on this forum; I couldn't have done this without the info/tips. :tank:
 
NICE job ... I am really inspired now ..

Dark Stain - is that right ?

question abt CO2 - I see 2 supply lines coming out, but one feed going in ... is the second for an eventual additional manifold ?

Which temp regulator did you use ?
 
I bought a Ranco off ebay. Wired it myself using diagrams and instructions on other threads on here.

The wood is stained with a mahogany polyurithane stain. I feel like I should have gone with something more reddish now. The stain I have is really dark! But, oh well.

The second CO2 line from the regulator was supposed to be used for force carbing, if I needed it. So far, though, I've been carbing naturally (corn sugar). It's slower, but they say beer gets better with some aging; naturally carbing forces me to wait yet another 2-3 weeks.
 
I'd like to do at LEAST four taps (starting with four). I've got a 13.7cuft freezer, although I've yet to check how many kegs will fit, I think that I can get six in w/o using the hump easy. I think based on what I've read here I'll just attatch the collar to the freezer.

How did you fix the collar to the freezer, just at the back?

You should be able to fit 8 cornies without using the hump.

I have a 10cf freezer and can fit 6 cornies without using the hump and 8 with the hump.

Do a tall enough collar and you could fit 10 using the hump.
 
You should be able to fit 8 cornies without using the hump.

I have a 10cf freezer and can fit 6 cornies without using the hump and 8 with the hump.

Do a tall enough collar and you could fit 10 using the hump.

Good to know. Hopefully uncle sam will send out some checks here soon and I'll get to work.
 
Back
Top