bulding a wort chiller ok to solder?

Homebrew Talk - Beer, Wine, Mead, & Cider Brewing Discussion Forum

Help Support Homebrew Talk - Beer, Wine, Mead, & Cider Brewing Discussion Forum:

This site may earn a commission from merchant affiliate links, including eBay, Amazon, and others.

yezzo

Active Member
Joined
Dec 3, 2007
Messages
30
Reaction score
1
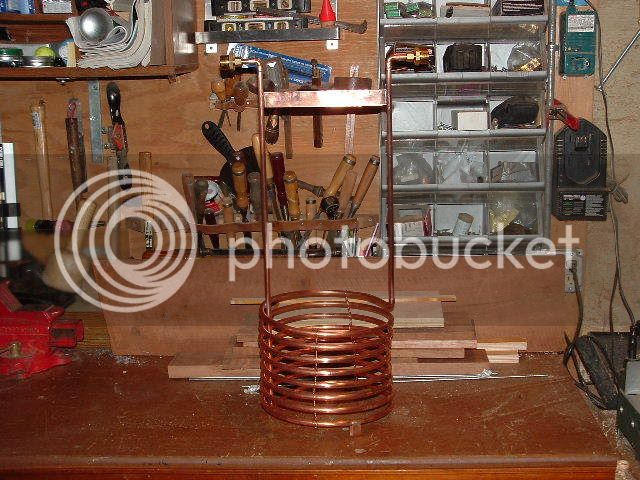
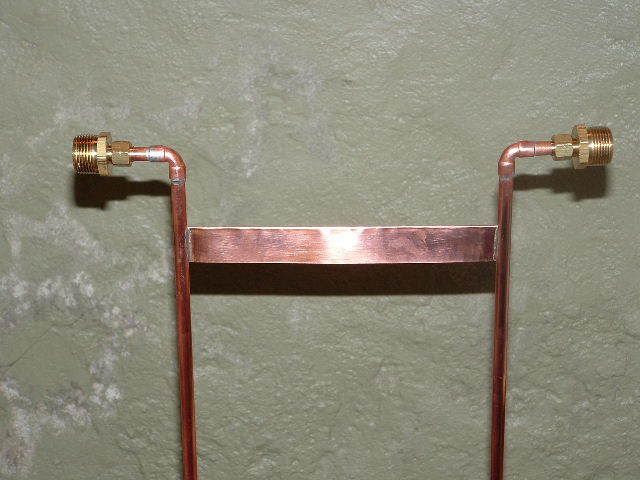
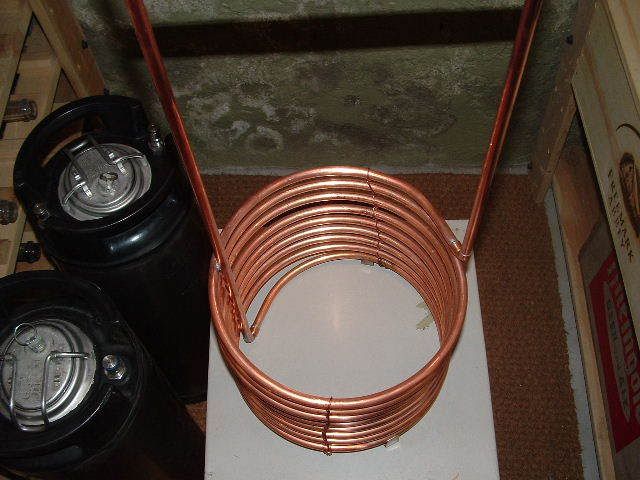
I got a coil of copper from our shop, I'm going to clean it up and make a wort chiller out of it. But I don't want to kink the copper trying to bend one end through the middle to get both ends on one side.

Is it ok to solder or braise a 90 on the bottom to get both ends on top or will the solder effect my wort?
 
Just thought that sentence sounded weird. Wouldn't it be outside the tubing that is important, for an immersion chiller?

Whaddo I know. I can't solder. :)
 
thanks, I am not worried about flux because after it's set i am going to boil it in vinager and salt to clean the copper.

I'll post before and after pics when I'm done.
 
If you bend the tubing AROUND something, it won't kink. Just make a gradual 90 degree bend and then wrap your tubing around it.

Here's the one I made but unfortunately you can't see the inside bend. I bent the inside tail up and then wrapped the whole thing around a corney keg.

7601-March242007002.jpg


Here's another shot when I modified it to fit my larger pots.

7601-chillerinpot.jpg
 
chriso said:
Wouldn't it be outside the tubing that is important, for an immersion chiller?
Duh. You're right. And it's easy to clean flux off of the outside with a bit of solvent.

For some reason I was thinking about running wort through the chiller...but unless you're making a CFC, you won't be doing that.
 
Sorry to call you out on that one! I figured that you probably read his question as asking about a CFC and not an IC. :)

Hey, this means I got a question right! GO ME! That rarely happens! Usually I get 4-5 replies with links to wikipedia detailing en masse why I am wrong. Wait - You too know that feeling - Poor Yuri. :D
 
OK here's my update, I had a bunch of crap leftover from jobs so i was going to solder a 90 on the bottom and bring a piece off the top. Then I had 2 3/8" to 1/2" reducer couplings I was going to solder on and some 1/2" pipe on both ends. After that I was going to come out with shark bites and attach pex on one side for a drain and hose fitting on the other.

What ended up happening was my torch in this wind, couldn't get the copper hot enough for me to get the solder to take right. So earlier I was at Austin Homebrew and the guy showed me one of their's and told me a couple tips, thick tubing etc.

So now I am in for about $12 making a replica of the austin homebrew chiller, I was lucky to get the copper free and it's already coiled up to the right size. Right now I have it boiling in salt and vinager to clean it up and I'll post some pics in a bit.
 
It's done, the easy way only took me about 10 minutes after the copper was clean. Here it is.

BEFORE

P6120022.JPG


AFTER

P6120023.JPG
 
One other thing you can do is add a loop of copper wire (or two loops) to unify the loops and prevent a 'slinky' effect while you move it, lift it, etc. I used a fairly heavy gauge of wire and made loops on opposite sides of the coil. You could also weave them through the loops if you wanted to.

Nice work - looks great. Was that 1/2" or 3/8" tubing? Looks like 1/2".
 
Wow! You'll be doing some serious chilling with the diameter of that thing..and the price was right.

That's just the spirit of homebrew, fixing stuff we acquire to brew beer. Anyone else get dragged to antique stores by SWMBO and while they're looking at the Fiesta ware, you're looking at the very sturdy, solid antique bottle capper for 10 bucks?
 
I had some pure copper wire, so I just did a little weave up the sides in a few spots to bind all the coils together. no more slinky-chiller
 
BrianP said:
One other thing you can do is add a loop of copper wire (or two loops) to unify the loops and prevent a 'slinky' effect while you move it, lift it, etc. I used a fairly heavy gauge of wire and made loops on opposite sides of the coil. You could also weave them through the loops if you wanted to.

Nice work - looks great. Was that 1/2" or 3/8" tubing? Looks like 1/2".

Yeah the guy at austin homebrew told me to tie the two together but I want to get a tubing bender and modify it before I put one on. I didn't know that was the reason thanks for the input.

It was 3/8" tubing, but after I saw how small they were at Austin homebrew I ended up cutting the coil in half. It's still bigger than what they have and the top is about even with my stock pot.

I really don't know the length of it because it was already coiled when I got it. It's probably about 30 feet, but thats just a guess. It stands 9" high and is about 8" across.
 
For you guys building wort chillers, there are some things to consider. Temperature disparity for one. IE: You have 30 feet of copper, the cool water enters through one end and starts to exchange heat. It heats to the temperature of the wort, in say, the first 10 feet. What's it doing for you the rest of the trip? How fast will your chill be?

If you do some searching, you can find many a conversation about these things.

here's one:

Anyway, for you guys with bigger pots, think: multiple shorter pipes = more surface area contact = larger flow volume = greater temp disparity = faster chill.
 
Here's one that I did with elbows and a rigid piece of copper at the top to act as a handle for lifting. I also soldered some feet on the bottom so it would stand straighter in my pot. Also sent the in one direction and the out the other way, this works for my sink setup.

2003_0131Image0038.jpg


2003_0131Image0039.jpg


2003_0131Image0042.jpg
 
That looks excellent, bowenz. Good work! Very nicely DIYd.

Yezzo, that's some supa-dupa diameter tubing, I think you are going to be a very happy dude when wort chillin'.
 
Seabee John said:
Anyway, for you guys with bigger pots, think: multiple shorter pipes = more surface area contact = larger flow volume = greater temp disparity = faster chill.
My 50' single coil chiller takes as aggressive a flow as I would want and the 42 degree water going in comes out too hot to be able to hold my hand in. I understand and agree with your argument so I wonder if perhaps the quicker chill times would come into play when there is less of a temp disparity between the wort and the water. In other words, it probably wouldn't chill any quicker initially, but may take it down to pitching temps faster on the tail end of the chill.

I'll put chiller modification on my list of things to do. In fact, before I do it, I'll take time and temp measurements before and after and post the results. Don't expect this in the near future, though.

*edit* Never mind. I just read through the entire link posted. I don't think I could add anything to the discussion.
 
mrbowenz said:
Here's one that I did with elbows and a rigid piece of copper at the top to act as a handle for lifting. I also soldered some feet on the bottom so it would stand straighter in my pot. Also sent the in one direction and the out the other way, this works for my sink setup.

2003_0131Image0038.jpg

Wow- that's a really nice job. I'm jealous- that's awesome.
 
5 Is Not Enough said:
Just an FYI, tubing is measured by outside diameter. That really looks like 5/8". That thing is a monster! Nice job!

ty, it's 3/8" OD it just looks bigger in the picture.
 
That really does look bigger than 3/8", but 3/8" will work well just the same. I have a fairly short chiller I made out of 20' of 3/8" copper.

Seabee John said:
For you guys building wort chillers, there are some things to consider. Temperature disparity for one. IE: You have 30 feet of copper, the cool water enters through one end and starts to exchange heat. It heats to the temperature of the wort, in say, the first 10 feet. What's it doing for you the rest of the trip? How fast will your chill be?
I was actually worried about my 20' IC tube being too short after seeing and reading about a lot of them having 50' of copper. My worries were gone after the last batch I made. With the cold winter tap water I got a 5gal boil down to pitching temp in less than 10min. In fact, the discharge was only warm, so I turned down the faucet until the water out of the chiller was too hot to touch.
 
Back
Top