Bottom drain on keggle

Homebrew Talk - Beer, Wine, Mead, & Cider Brewing Discussion Forum

Help Support Homebrew Talk - Beer, Wine, Mead, & Cider Brewing Discussion Forum:

This site may earn a commission from merchant affiliate links, including eBay, Amazon, and others.

conpewter

Well-Known Member
Joined
Nov 2, 2007
Messages
5,076
Reaction score
59
Location
East Dundee, Illinois
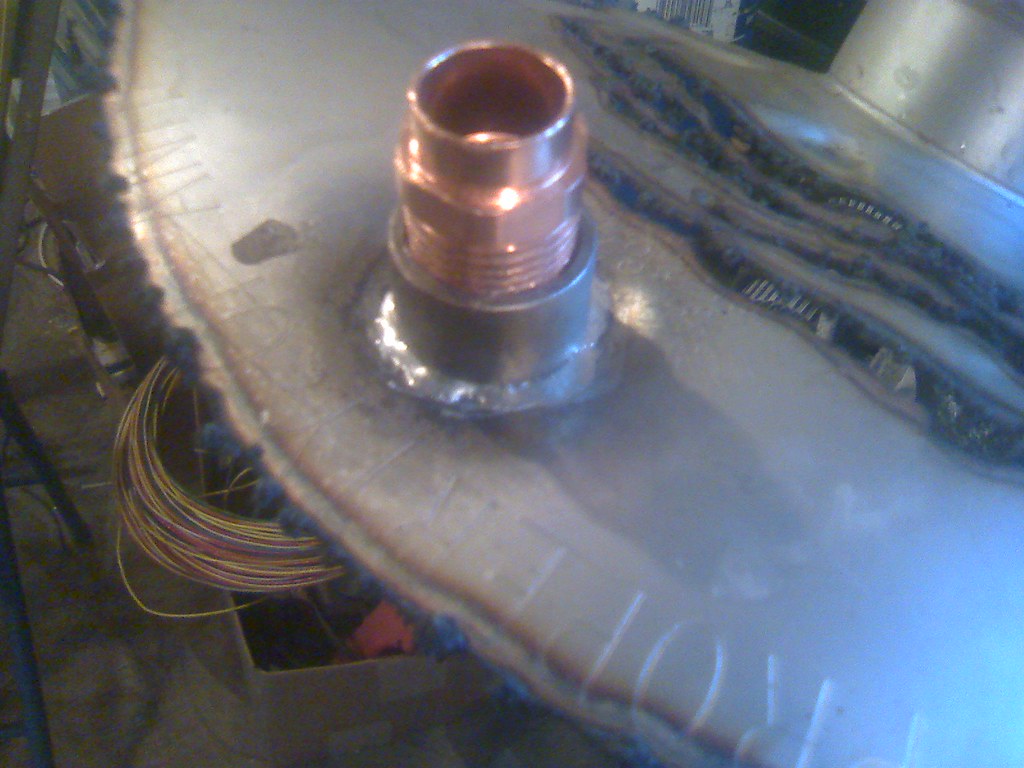
Built this bottom drain in my keggle a while back. In the future I plan to go with 3/4" pipe instead of 1/2" since it would be easier to dump the hop/water slurry out a valve (the valve would be a 3-way valve, inlet, 1/2" reducer to QC, 3/4" dump).

Anyway for this build I used 1/2" pipe


Copper tubing and flaring tool
P2250027.JPG


closer look at copper piece. I first flared it, then turned it over on the other side of the tool and beat it even flatter with a hammer
P2250028.JPG


Flare and pipe bending set (Harbor Freight I think)
P2250029.JPG


Step bit and cutting oil...er pam... I've bought actual cutting oil since I built this... (My wife kept getting annoyed that I'd steal the PAM and leave it in the shop)
P2250030.JPG
 
You'll really want to make sure to get the right flux to solder to the stainless. I did get it to work eventually but it was a lot of trouble, and I ended up putting JB weld around the fitting (on the outside of the keggle) just to help. Also secure the copper tubing to the rim of the keg as well, the fitting soldered to the keg won't take much torque before it leaks.

Wish I'd had this when I did this project :)
https://www.homebrewtalk.com/f51/soldering-stainless-steel-155782/
 
I've never used it on a propane burner in this configuration, I'd be worried about scorching if I did. I'd probably try to add a heat shield and recirculate throughout the whole boil. This kettle is electric so no need for any of that.
 
So, how's this working? Is the 1/2" tube able to handle rinsing debriss out of the keg without clogging?

I might like to solder a 3/4" SS half coupler into the bottom of a megapot...but I do like how that "lip" works to keep a good seal on your build.
 
Yeah, I wondered about that. It's 'sposed to be 5mm total, with an aluminum core. I imagine if you clean/prepare the SS outer portion, it should still bond. Plus, the thicker bottom will put more material in contact with the fitting. At the least, I'm sure it would fill the space....
 
Are you sure you're not going to plug that up with hops or other debris? Do you not use an IC?
 
I don't understand the big concern about clogging. Most everyone uses 1/2" piping. Regardless of being bottom or side mounted, it's still the same sizetube to fit through.
 
Nice job!

I just soldered 6 fittings to my HLT. I used stainless half couplings and copper females for the HEX coil.

Flux and clean surfaces is most important. I also noticed that just enough heat to melt the solder is best. Too much heat just burns off the flux and nothing sticks. I also tinned both mating surfaces before I soldered them together.

After about 4 hours work on that project I am pretty confident with soldering stainless now.

This is my practice run. I also used a hydraulic punch to indent the fitting a bit. It made a little well that helped to keep the solder where I wanted it.

4294227138_91a3e1ffbb_b.jpg
 
I don't understand the big concern about clogging. Most everyone uses 1/2" piping. Regardless of being bottom or side mounted, it's still the same sizetube to fit through.

I hear ya...but I'm looking to get my stuff pretty clean with a CIP sprayball, etc. It's not like where you have a diptube off to the side, and the junk stays in the center. ALL the crap is going down the drain. Yet another reason why I'm liking the idea of a 3/4" drain.

I wonder what size mesh would be good to put over the drain but not clog it?

How would you place mesh over the hole....maybe solder that too?
 
I don't understand the big concern about clogging. Most everyone uses 1/2" piping. Regardless of being bottom or side mounted, it's still the same sizetube to fit through.

My clogging concern isn't because of the size of the tubing, but the placement of the drain. Hop debris, hot/cold break, other additives on the brew (orange peel, corriander, etc.) will all naturally settle to the center bottom of the keg. It is shaped like a bowl. Once you start to draw liquid from that point it will be even worse because there will be suction there, pulling all debris out of the drain potentially.

My side-mounted drain has a pickup tube about 5" away from the center, and I have a stainless chore-boy type pad wedged between it and the bottom of the keg to filter out whole hops and other material.

It might not plug up, especially if he uses a CFC and drains hot through CFC into the fermenter. It was just a concern I would have with this design.
 
I have a false bottom over the drain (about 8" diameter) that catches all the whole leaf hops. On my next version of this I want to go with 3/4" pipe so that I can CIP easier. It just takes too much time draining out of the 1/2" pipe w/ gravity for me, and I seem to have to rinse several times to get everything to go down (I suck the hops off the false bottom with a shop vac). With a 3/4" pipe I don't think I'd have to use a shop-vac anymore as I can just let the hops go down the drain when I remove the false bottom and out a separate outlet (I'll still have a 1/2" QD for during the brew, but a 3 way valve for use during cleaning, with no restriction)

I want to do the pipe in stainless so I don't have to worry about corrosion on the inside as I do with copper. I also prefer no threads on the inside of the fittings so I wanted to go with tubing just like copper, but they don't seem to make fittings like that.
 
You could have a big tri-clover welded in to that spot. That would be easy to take apart & clean.
 
I've thought about that too, but If I was going that route I'd need to get a piece of custom pipe to come off the tri-clover, do a sharp 90 and then go for about 10", then I can tri-clover a valve on after that. I'm just not sure where I'd get that pipe.
 
Nice job!

I just soldered 6 fittings to my HLT. I used stainless half couplings and copper females for the HEX coil.

Flux and clean surfaces is most important. I also noticed that just enough heat to melt the solder is best. Too much heat just burns off the flux and nothing sticks. I also tinned both mating surfaces before I soldered them together.

After about 4 hours work on that project I am pretty confident with soldering stainless now.

This is my practice run. I also used a hydraulic punch to indent the fitting a bit. It made a little well that helped to keep the solder where I wanted it.

I'm glad you "piped" up. Get it? Piped? thank you. I'll be here all week.

Anyway, I was thinking about a few things like this today. I was rinsing my BK out and thinking that I needed a draintube. How hard would this be to do? You know my limitations, but adding just the drain hole and the pipe doesn't sound too involved.
(Oh, and after you answer that question, I wanted to pick your brain about taking the HLT gear and putting it on a keg- I'll talk to you about it on Thursday).

Conpewter- nice job. You've given me much to think about. The keg empty is heavy, and cleaning it hasn't been fun with the CIP system. There is always that hops residue, and then using tons of water to clean it. I've actually been reduced to "bailing" out the BK after a brew to get the sludge all out.
 
...
Conpewter- nice job. You've given me much to think about. The keg empty is heavy, and cleaning it hasn't been fun with the CIP system. There is always that hops residue, and then using tons of water to clean it. I've actually been reduced to "bailing" out the BK after a brew to get the sludge all out.

Thanks Yooper :)

I would go with 3/4" as mentioned, the 1/2" works but it won't really let the hop cones go through it so I vacuum them out, and I'd rather not use my shop vac at all when brewing. I could just do this all with copper again since I know how to work with that better.
 
Need a tight elbow at one end, if you got one I'm interested :)

Use a 2" triclover to 3/4" FPT adapter. Then, get a swagelok 3/4" MPT to 3/4" tube elbow. From there you can run as much SS tube you want. Then, terminate with another swagelok tube x MPT straight adapter. Screw that into another 3/4" FPT x 2" triclover adapter. Hard to explain, not too hard to do. It can be easily broken down.
 
I've looked for a 90 2" to 1/2 for and it's not easy to find. I was trying to keep things as low profile as possible. Not sure about the 3/4" version. I really want to try this for my mashtun.
 
I'm glad you "piped" up. Get it? Piped? thank you. I'll be here all week.

Anyway, I was thinking about a few things like this today. I was rinsing my BK out and thinking that I needed a draintube. How hard would this be to do? You know my limitations, but adding just the drain hole and the pipe doesn't sound too involved.
(Oh, and after you answer that question, I wanted to pick your brain about taking the HLT gear and putting it on a keg- I'll talk to you about it on Thursday).

Conpewter- nice job. You've given me much to think about. The keg empty is heavy, and cleaning it hasn't been fun with the CIP system. There is always that hops residue, and then using tons of water to clean it. I've actually been reduced to "bailing" out the BK after a brew to get the sludge all out.

Shouldn't be difficult at all. I have everything in my shop to get it done. See ya Thursday.
 
This sounds like something we need to get Swagman involved in :)

That's what I was thinking :)

Get a 2" tri-clover that has either a 3/4" NPT elbow welded on it, or a piece of tubing with a 90* that is long enough to come out from under the keggle.

The reason I don't just go with a pieced together setup as mentioned above is I'd like to keep it as free of threads as possible to keep anything from getting stuck in them.


Yes
God Bless
Dominus Vobiscum
Swagman
 
I am using 1/2" SS tube and Swaglok fittings so 1/2" fittings would work great for me, however I see the advantage of 3/4" for a dump valve. I could always use a reducer on the 3/4" to make fabrication easier. Just thinking out loud.
 
Just curious has everyone run to Ebay and started bidding on 2" tris? Cause I was watching stuff earlier today and noone was bidding now they have multiple bids!
 
Before we get too carried away; are we sure the connection on a sanke keg is 2"?
 
conpewter; as before with reply #19 by me stainless solders with ease with the proper acid flux you should be plenty strong unless you want to Tig weld your copper to stainless.
 
conpewter; as before with reply #19 by me stainless solders with ease with the proper acid flux you should be plenty strong unless you want to Tig weld your copper to stainless.

Sounds good, I just can't find the tubing and fittings to make it all fit together and be soldered on.
 
Before we get too carried away; are we sure the connection on a sanke keg is 2"?
Yes:
I used the neck's from keg's and used two with a two inch clamp to connect to my brewing system.
Check out the picture of my system in my gallery. Each keg is connected by a neck and a two inch clamp. I cut a gasket groove in each neck on the lathe. Dominus Vobiscum

Swagman
 
Back
Top