

Pleased with the HLT/heat exchanger project shown in a previous article, my friend Rick asked me to help him with his MLT build. We used the same techniques and many of the same components for this phase of his three vessel brewing system. This was the simplest kettle of the project, requiring only two 13/16” holes, so it was completed very quickly.
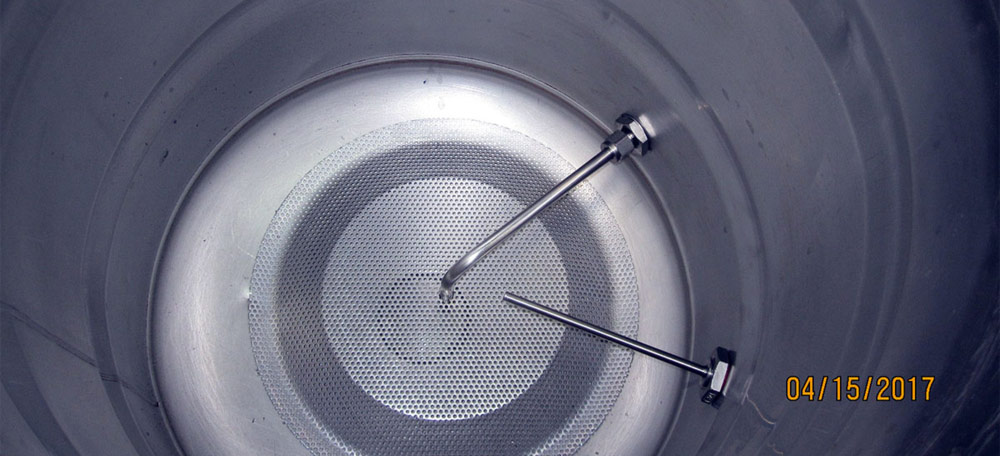
He already had a domed false bottom with 3/8” dip tube so we used those. He had a nice clamping sparge arm on hand, so we didn't have to install anything for the input feed. Because of the domed false bottom we did not install a sight glass, as there would be no grain-free region from which to feed it. If he decides later to switch to a full false bottom, we will at the same time change to a 1/2” compression bulkhead and dip tube and will add a sight glass.

Preliminary Steps for Mash Tun Build
Step one is to gather the tools and components required. We selected a weldless bulkhead fitting with 1/2” MPT on the outside for the ball valve and an internal 3/8” compression fitting for the dip tube from BrewHardware. Because the dip tube will need to be removed from the bulkhead fitting when removing the domed false bottom for cleaning, we selected a fitting with a silicon ferrule rather than stainless steel so it can be loosened for disassembly and reused. The three piece ball valve ($10.95) and the Camlock fittings came from Bargainfittings. The weldless thermometer came from Bargainfittings as well for about $17.
Tools included my little 10V lithium drillmotor, 1/8” and 3/8” twist drills, the 13/16” Greenlee punch, misc. wrenches, a measuring tape, pipe thread tape, spray lubricant, and a hammer and center punch. We didn't use a step bit for anything on this kettle so the big drillmotor wasn't required.
As always, I recommend using a center punch to ensure accurate hole locations and to avoid surface marring by a skittering twist drill. Carefully select and mark each hole location. Important factors to consider include the height of the ball valve/diptube fitting (you want the end of the diptube to finish up at the correct height), the location of seams and bulges in the keg (fittings won't be reliably leakproof unless mounted in a flat area), and the desired orientation of the ports in the end product.

Once the holes are located, I start each hole with a quality 1/8” twist drill. I then open the hole up to whatever size is required for the step drill or Greenlee punch that will make the final hole. I MUCH prefer the Greenlee punches over step drills. They provide clean, round holes of the same size every time.
NOTE – the keg is stainless steel. It is relatively easy to drill or punch, but only if the twist drill is sharp and oil is added frequently to both lubricate and cool the tool. Keep the punch lubricated also, both to prevent wear and to make removing the slug easier.
General Notes For This Mash Tun Build
ALWAYS tape the pipe threaded fittings before assembly. For this simplest kettle of the project, this applies only to the mounting of the ball valve to the bulkhead fitting and to the mounting the camlock fitting to the ball valve. It is done only partially to prevent leaks. Even more importantly than that, it lubricates the threads and prevents galling. Stainless steel pipe threads assembled without tape can gall so severely that they are effectively welded and disassembly may become impossible.
Please note that all hardware has been installed IN BETWEEN the vent holes in the base ring rather than above any of them. Hot gases will escape these vents and can damage or destroy thermometers, gaskets, O rings, and valve seals. This should not be a concern with flat bottom kettles unless you permit the burner to go crazy but with keggles any escaping flames are concentrated into small areas..
I recommend the false bottoms offered by Norcalbrewingsolutions. If you use a full false bottom, as I do in my system, a sight tube can also be added. I recommend the one we used for the other two kettles, as it is relatively inexpensive (about $27 from Brewhardware). It requires only a 1/2” hole at the input, which saves some time and effort also.
If you need a sparge arm, I can recommend the Autosparge from Blichmann (about $70). I use that on my own MLT and it makes flow regulation for fly sparging very simple.
We have also completed the boil kettle, which incorporates a whirlpool fitting as well as the usual thermometer, ball valve/dip tube, and sight glass. Please watch for that article to completed as time permits. Upcoming projects include a 12 or 24 station bottlewasher and a recirculating beer line cleaner (don't want to ignore either the bottlers or the keggers within the community!)