Another Glycol Chiller Build

Homebrew Talk - Beer, Wine, Mead, & Cider Brewing Discussion Forum

Help Support Homebrew Talk - Beer, Wine, Mead, & Cider Brewing Discussion Forum:

This site may earn a commission from merchant affiliate links, including eBay, Amazon, and others.

etk29321

Well-Known Member
Joined
Mar 25, 2011
Messages
103
Reaction score
23
Location
Raleigh
I have had an A/C unit sitting in the corner of my garage for a year or so now from a failed attempt to air condition my garage (when I bought it I had not realized that, although drywalled, they did not actually insulate the exterior walls of my garage). So, after reading some of the other glycol threads, that of course meant I needed to transform it into a chiller.

This build also differs slightly in that the unit is a "portable a/c" instead of a window unit. That means it's tall and thin and pretty easy to use with a rather larger cooler.

Parts:
Haier 12,000BTU Portable A/C
Coleman 75 Quart Cooler
560 GPH pump (feed gylcol lines)
120GPH pump (recirc)

A/C unit disassembled and evaporator coil folded down:
attachment.php


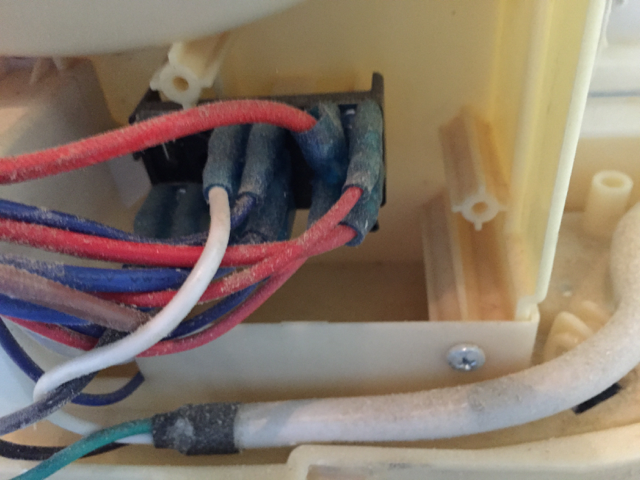
When it came to wiring, this unit had a pleasant surprise. All the 120v was wired through a handy terminal block. Rewiring to remove the control board and wiring in the recirculating pump was just a simple matter of patching them in this block. I did of course have to cut the plug off the recirc pump cord and replace with terminal connector that i happened to have on hand.
attachment.php


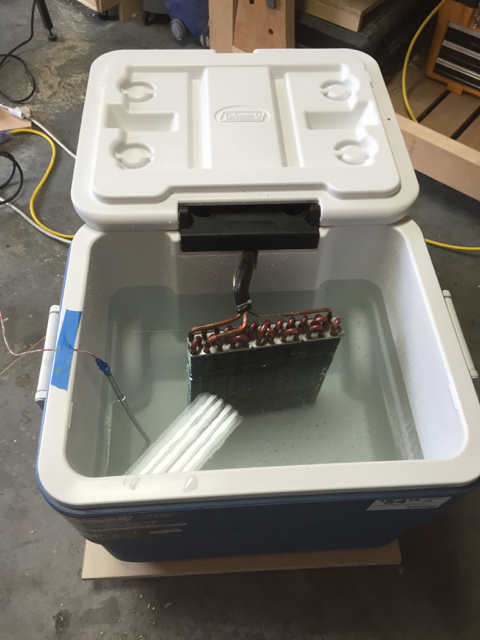
Cooler modified for the evaporator coil and ready for test
attachment.php


Auber controller wired to the A/C unit and ready to go (ignore the temps on the controller. I had it set in C by accident when I took the picture)
attachment.php


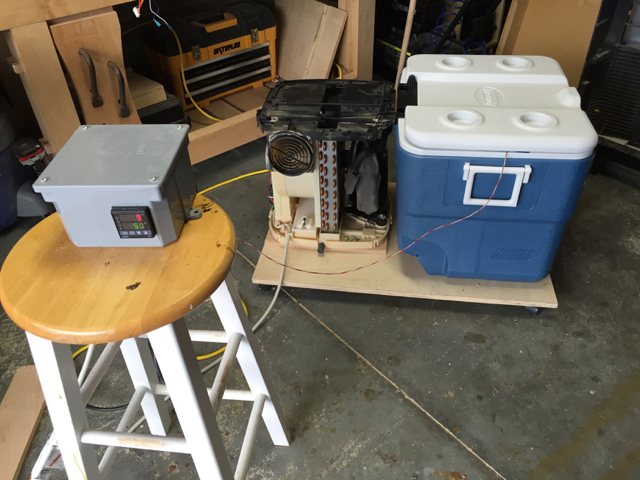
Bonus, the A/C unit came with casters that I was able to reuse on the bottom of the base, making the whole unit much more portable.

At this point I have been able to test the unit and confirmed that it does function. Next step is to wrap my fermenter in 1/2" copper and test it with a brew this weekend. For now, I'm just using 2 auber temp sensors (one in the glycol reservoir and one in the beer). Assuming this test is successful I'll be building a RPi based controller soon.

IMG_0424.png


IMG_0418.png


IMG_0428.png


IMG_0430.png
 
This is becoming a slow project now between new baby and christmas. I did finally get the coils around the fermenter. It's totally overkill - 50' 1/2" copper tubing on a 7gal blichmann.

attachment.php


Wrapping the coil was a pain, especially towards the bottom of the cone where the radius is rather tight. I used one of those spring-type tubing benders to keep it from kinking there, but it still took about 2 hours to get the whole thing in place.

After wrapping it around, I soldered it to keep it in place. I had grand plans to solder the whole length to the fermenter to ensure good thermal contact, but scrapped that plan because it would be a huge amount of most likely unnecessary work and because it was rather hard to get in-between the coils as close as they are at places.

The 1/2" OD copper fits very nicely on 1/2" ID tubing without the need for any fittings, so for now this is how I am connecting the coil to the glycol pump. In future I do plan to add some quick disconnects but they're just not in the budget this year.

attachment.php


With the coil in place, I covered the whole thing in insulation, sealing the joints with AL tape. In the picture you can see a brew belt I tried out to add some heating options. In tests, it just doesn't have the juice to do much. Instead my next modification is to add a second cooler, pump, aquarium heater to create a "hot" reservoir. There will be an overflow line between the two coolers to ensure I never pump everything out of one cooler into another as a result of any kind of valve malfunction. With the ultimate automated design, I'm thinking about putting in these 3-way valves to switch between heating and cooling. For testing though, I'll just be manually switching the lines. It is very rare that I have to go between heat and cool in the same day in my garage. It's either one or the other during the winter (cool during active fermentation and heat after that subsides).

Now... if only I can get time to brew the batch I was supposed to brew last friday to test everything out for real... At this point I'm hoping it happens monday.

I do have one question for anyone out there... if you do heating via the coils that means having a reservoir at ~80F. How do you keep nasties from growing in there? With the price of glycol, changing it out more than once a year at most is just not feasible. Even that I'd rather avoid.

IMG_0432.png


IMG_0434.png
 
"Water" says "Biocides are also recommended for closed-loop glycol systems because glycol can be a food source for some bacteria." (pg.208)

At ~25-35F in the chilled reservoir I wouldn't be that concerned since essentially nothing grows at that temperature, but at 80F I have to wonder. Star San (or rather, saniclean, the non-foaming version) is a good idea, but I'm not sure about the prolonged exposure to an acid sanitizer on the copper coil. Had I splurged for stainless, that would probably be the answer. Cpu overclockers, who tend to use copper heat exchangers, seem to prefer iodine-based biocides for their cooling loops. Is anyone doing anything similar today?

I need to use glycol in both sides since in the design there is no way to segregate the warm loop from the chilled loop unless I put two coils on each fermenter. Over time, the mix will most likely become mostly homogenous regardless of how I fill them initially just due to the residual glycol solution in the coils when the valves switch from cool to heat.
 
Rather than adding the complexity of a separate "warm" water/glycol bath, have you considered wrapping the fermenter with some sort of heater band?
 
I tried with a brew-belt. Just not enough power there. I'm not sure how I feel about putting a higher wattage wrap under the insulation. It's not that I fear it's flammable as much as I wonder about how well it can handle prolonged exposure to direct contact with the heat source since it's surface temp would be much higher than the 80F the bath would provide.
 
"Water" says "Biocides are also recommended for closed-loop glycol systems because glycol can be a food source for some bacteria." (pg.208)

At ~25-35F in the chilled reservoir I wouldn't be that concerned since essentially nothing grows at that temperature, but at 80F I have to wonder. Star San (or rather, saniclean, the non-foaming version) is a good idea, but I'm not sure about the prolonged exposure to an acid sanitizer on the copper coil. Had I splurged for stainless, that would probably be the answer. Cpu overclockers, who tend to use copper heat exchangers, seem to prefer iodine-based biocides for their cooling loops. Is anyone doing anything similar today?

I need to use glycol in both sides since in the design there is no way to segregate the warm loop from the chilled loop unless I put two coils on each fermenter. Over time, the mix will most likely become mostly homogenous regardless of how I fill them initially just due to the residual glycol solution in the coils when the valves switch from cool to heat.

Good point about the eventual mixing of the vats. I suppose you could use idophor in both vats if you are worried about having acid in your copper coils.
 
Would you have enough room to slide some flex watt under the coils? Obviously it would be a pain to get it under there initially, but would be way easier and much less expensive than adding a hot side to the coils. I'm guessing that the brew belt was positioned too high to be effective.

Its too late now, and you already did a great job with the coils, but I think this would have been right up your alley: Cooling Jacket
 
I did seriously consider the cool zone jacket, but it doesn't work with the design of the blichmann unless I want to cut and grind off the welded posts that the legs bolt to. I am leaning that route for use around a keg I use for the second half of 10gal batches.


Brewed a batch yesterday, and right now I'm testing using my RIMS tube to supply warm water to the coil. Still just pure water, but that works just fine for everything except crash cooling.

I can run the reservoir at 45f with no ice on the coils. During testing I got 6gal down from 55f to 50f with the reservoir set at 45f in ~15 minutes. Plenty fast enough for me.
 
Ah yes, I now see your point with the lower bolts. I didn't realize the blichmann's legs unscrewed like that, and thought wow maybe those would work, but maybe the larger ones will. I use sanke kegs for my 10g batches and the jackets work very well with them. Someday when I do get a conical, being able to use the jackets is something that will weigh very heavy on the decision. For your keg, by all means get one and try it out, you won't be disappointed!

I would still recommend the flex watt for heating if you can slide some between the coil and fermentor. It comes in different widths and you can cut it to length. It is a very gentle warmth, and your large chunk of SS fermentor will disperse the heat pretty well, so I don't really fear that aspect too much. It will make your system much easier and less complex. You also won't have your rims tube tied up while fermenting. With an stc-1000+ I am able to ramp up the temp after a few days and finish the beer quicker, then cold crash with the jackets. It works effing amazing, and is super simple. Definitely worth a look!
 
Ok, finally have whittled down the honey-do list to the point that I'm about to restart my build. In the meantime many holidays have past, I've built cabinets for the laundry room, built patio furniture, put in some retaining walls and a couple vegetable gardens, and generally landscaped the whole yard. Can I just say... retaining walls... I have never moved dirt from pile A to pile B and back to pile A more in my life.


I just received a cool zone belt for my corny fermentor. Unfortunately the velcro on it does not work for something as small in diameter as a corny. Easy fix though. I'm just going to get some velcro tape from Lowes and slap it on there.

I also got 2 40watt flex strips -- one for the corny and one for the blichmann. I will try to slip the strip under the already soldered coils. If that doesn't work, I might just see if it works wrapped over top of the coils. Worst case, I'll do some desoldering. Despite my reluctance at first I have come around to the idea that this is just the best way to heat my conical.
 
This weekend was spent on building an enclosure for the chiller. I had it mechanically functional at christmas, but it was rather ugly and vulnerable to dust from my woodworking tools. I build a simple box to dress it up and act as a way to keep that dust out.

For ventilation, I got two 12"x12" return air grils and put standard cheap A/C filters in them using some battens as you can see in the pics. This way they're easy to change out just by lifting the lid and sliding them out. The A/C unit is oriented such that it sucks air in from one side of the unit and blows it out the other side.

The whole enclosure sits on some aluminum L brackets and then is secured to the base using 4 screws. This makes it easy to remove in future to gain better access to the unit. The top is just set on top and aligned with some wood blocks to keep it in place. Since my destination for this unit is under my stairs in the garage, I didn't want to hinge the lid. I might not always have enough headspace to hinge it up but I know I can lift it up a few inches and pull it out.

You can also see the input/output lines coming out the front of the box. All in all, I think this cleans up the look of the system quite a lot. I still have to put some varnish on it of course.

IMG_0495.jpg


IMG_0497.jpg


IMG_0498.jpg
 
I threw together a high-level plan for the overall system. I will be using a brewpi spark as the brains, but I am still undecided on how much of the brewpi software I'll be using. The hardware is exactly what I want, but as of now the software doesn't seem like it fits for glycol systems or for multiple fermenters. Once I get my hands on one and have a chance to play with it I'll know better.

Physically, the BrewPi will be mounted conveniently on the wall were I can access it. The chiller goes under the stairs, and the fermenters are on wheels with disconnects for chiller lines, heater power, and temp sensors so that they can be disconnected from the system and easily moved over to be filled on brewday. As a result, I'm going with 1wire for most of my interfaces. That should also make it easy to expand the system to any arbitrary number of fermenters in future.

The other thing I might try too is adding a 3rd valve into the system to control flow through a counterflow chiller. That chiller would be used to prechill tap water going into my other counterflow chiller. Summers in NC the tap water gets too hot to cool my wort down to pitching temps without some ice to help prechill it. Since my a/c unit is so large, I want to experiment with whether or not it has enough oomph to get my tap water cold enough to get me those last few degrees cooling in my wort.

chillerdesign.002.jpg
 
I threw together a high-level plan for the overall system. I will be using a brewpi spark as the brains, but I am still undecided on how much of the brewpi software I'll be using. The hardware is exactly what I want, but as of now the software doesn't seem like it fits for glycol systems or for multiple fermenters. Once I get my hands on one and have a chance to play with it I'll know better.

Physically, the BrewPi will be mounted conveniently on the wall were I can access it. The chiller goes under the stairs, and the fermenters are on wheels with disconnects for chiller lines, heater power, and temp sensors so that they can be disconnected from the system and easily moved over to be filled on brewday. As a result, I'm going with 1wire for most of my interfaces. That should also make it easy to expand the system to any arbitrary number of fermenters in future.

The other thing I might try too is adding a 3rd valve into the system to control flow through a counterflow chiller. That chiller would be used to prechill tap water going into my other counterflow chiller. Summers in NC the tap water gets too hot to cool my wort down to pitching temps without some ice to help prechill it. Since my a/c unit is so large, I want to experiment with whether or not it has enough oomph to get my tap water cold enough to get me those last few degrees cooling in my wort.

How are you liking the BrewPi+Spark for controlling your glycol loop/ferm temp? I'm looking to finally put together my glycol cooling system and have just about come to the same conclusion as you stated above: BrewPi doesn't seem to like glycol based cooling loops w/heaters.

what kind of valves did you end up using? I've been considering using either motorized ball-valves or solenoid driven irrigation valves.


It's still in progress, so no verdict yet. I'm just going to use cheap solenoid irrigation valves. Cost-wise they're not that much cheaper than the Chinese motorized ball valves everyone gets, but I like the fact I can buy parts at lowes in case something breaks in the middle of a batch and since the ball valves are not proportional control I really don't see the benefit to them in a non-food-contact situation.
 
It's still in progress, so no verdict yet. I'm just going to use cheap solenoid irrigation valves. Cost-wise they're not that much cheaper than the Chinese motorized ball valves everyone gets, but I like the fact I can buy parts at lowes in case something breaks in the middle of a batch and since the ball valves are not proportional control I really don't see the benefit to them in a non-food-contact situation.

The only issue I thought might be a problem with the irrigation valves is the fluid temp going through them (brittle when cold?) and the line pressure to actuate the diaphragm. Ball valves would have neither on these problems.

Though break downs of cheap valves would be a large problem.
 
The ones doing my garden are fine so long as they don't actually freeze, so I'm not too worried about temp but that is probably the most likely reason for them not to work. In my experience, the failure mode for them typically is the expansion of freezing water cracking a seal or connection.

The pressure shouldn't be an issue. They're designed to work with full household water pressure, and I really doubt my pump can create more than 100psi of pressure in the lines.

I either case, we'll know by the end of july. Right now life is getting busy again and I doubt I'll get to brew until june and I know I wont have the valves wired into the system until july.
 
Finally got a shipment on the way from Elco with a brewpi and all the assorted parts! Thankfully I got my order in before he goes on vacation. It should be here by the weekend so I can playing with it. Before I start doing any code changes, I'll go ahead and hook it all up as per the standard brewpi install process once if for no other reason than to see the pretty touchscreen work.

In other related news, I brewed a 10gal batch the other day that required me to use both fermenters. This is the first time I've tried that with the system since my brewing partner typically takes his half home, and wow... the conical is much more thermally efficient than the corny. Without the controller to turn valves on/off, Ive been relegated to just treating both as a single zone. With the conical at a steady 68F, the corny got up to 80F!! I've been having to play a fun game of move the pump control sensor and manually turn valves to try and keep the corny relatively cool, but at this point it is what it is. The corny with the chill zone jacket will defiantly get down to temp, so I do not anticipate any problems once I get the brewpi working.
 
I have now begun serious development work on new BrewPI Photon firmware. I'm about 80% to a working release that'll give me the features that I need to run my system.
I had hoped to just add what I needed on to Elco's work, but in the end it is becoming mostly a rewrite.

- Communications over either USB(serial) or wifi
- PIDs class to decouple the implementation of PIDs from sensors. Right now I do not implement Elco's method with the cascade filter. Just getting it working first.
- Flexible connection class to define the relationship between PID outputs, GPIO inputs, and the things we're ultimately controlling. (e.g. do things like turn on glycol pump if either fermenter A or fermenter B call for cooling")
- a JSON class to handle JSON encoding/decoding. Plan to use this for both local config and as the backbone of a revamped communications protocol.

I don't need PWM personally, but that would be easy enough to add in.
 
Completed control box for the BrewPi SSR's. I'm using 24vac irrigation valves (hence the 2v transformer) and the 40watt heat mats from cool zone.
attachment.php


Exterior view of the box mounted and closed up. The RJ12 jacks from the BrewPi DS2413 module are exposed though holes in the side of the box. The green cable is the cat 5 OneWire lines daisy chained from BrewPi (on top of box) to the box and on to the glycol chiller below.
attachment.php


The fermenters in action. There's a IPA sitting happily at 68F in both the conical and corny fermenters with independent heating and cooling.
attachment.php


The glycol valves. These are just cheap irrigation valves from Lowe's. So far they work great!
attachment.php


fermctrl.jpg


IMG_0579.jpg


IMG_0580.jpg


IMG_0581.jpg
 
Oh, I also hooked the BrewPi up to Nagios for some simple monitoring. I was already using Nagios for monitoring of my servers and services in my house, so this was a simple addition. Nagios sends me a text if the BrewPi becomes unresponsive for any reason. This has been a slight issue given that the wifi can be a little flaky on the photon. Pnp4nagios also very kindly graphs the temps over time too. That kinda duplicates what the official BrewPi gui will do in future, but its nice to have a simple graph now while the official BrewPi firmware/etc upgrades get to a point where they work with my system.

nagiosgraph.png


nagios.png
 
Back
Top