All Grain Brewing Set-up

Homebrew Talk - Beer, Wine, Mead, & Cider Brewing Discussion Forum

Help Support Homebrew Talk - Beer, Wine, Mead, & Cider Brewing Discussion Forum:

This site may earn a commission from merchant affiliate links, including eBay, Amazon, and others.
Joined
Jul 12, 2009
Messages
458
Reaction score
13
Location
Denver
I posted this for a couple of reasons:
1. To share my process with people who might learn from any of it
2. To get feedback and learn from the people here.

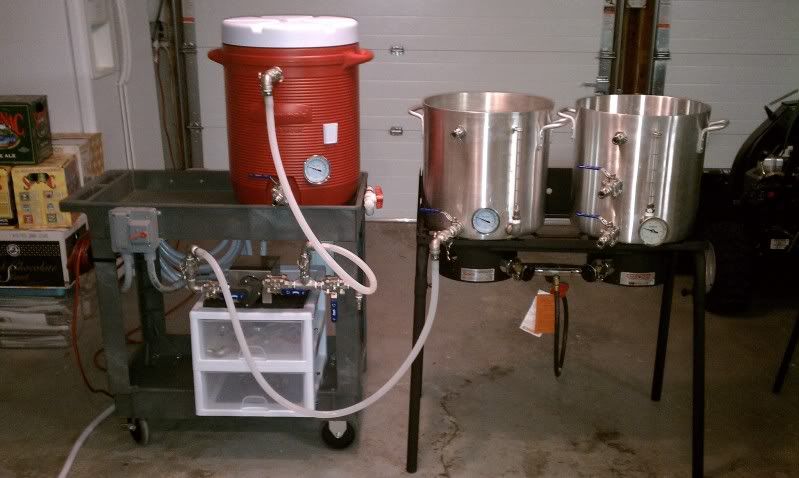
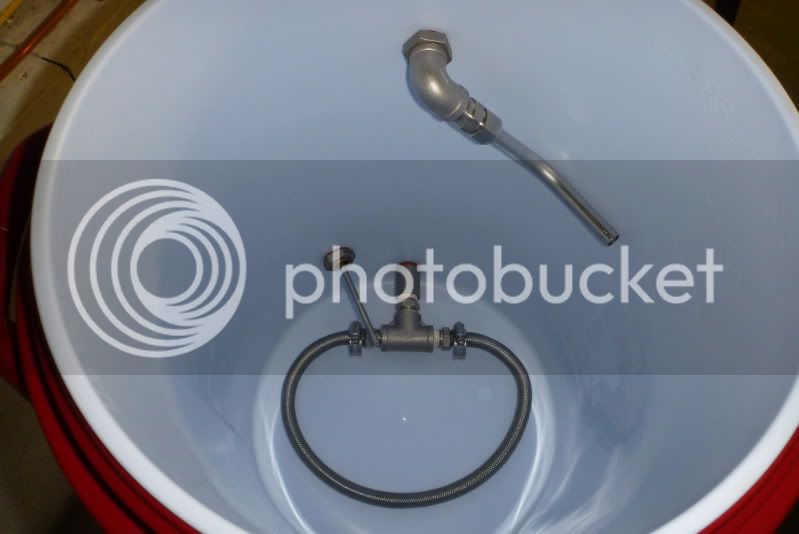
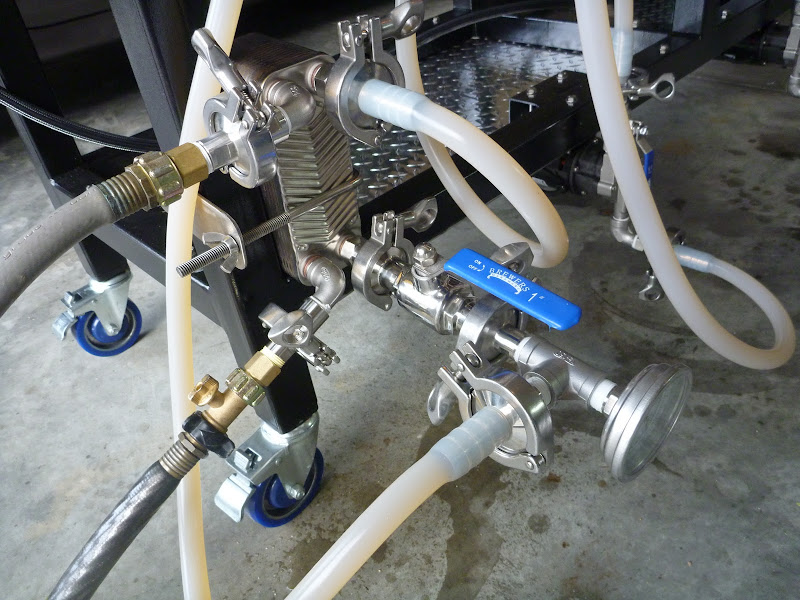
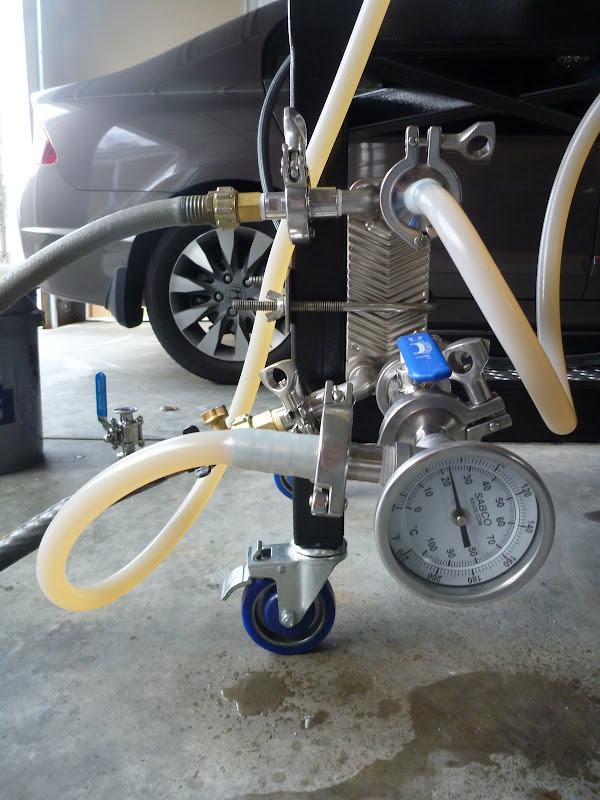
As a brewer you never spend enough money and time trying to improve what you do. On my last brewday I jotted down a lot of notes on what would make the next brew day better. I got feedback from a lot of great brewers, a few of which I focused on. Few of those was getting disconnects and using my pump to its fullest. I was planning to brew this weekend, tomorrow, and developed a recipe i thought i would like and have a yeast starter going. Tonight when i was setting up my Camlocks in my system, my mash tun ball valve snapped off. Very sad, wanted to make the best of it by redesigning my system. I have 2 converted kegs for my HLT and BK and a 10 gallon round cooler for my MLT.

I've outlined my new plans for the system, mainly for myself to visually see what I need to do and thought I would share, and at the same time get feedback from pro's who have done this before. Pic explains everything. Need to fix my mash tun and get the camlock system working nicely to brew asap as my starter is bubbling away since yesterday.
Cheers.


brewsetup01142012.jpg

By aussiebrewerincolorado at 2012-01-14
 
Aussie,
I think this will be an interesting post. I agree that the right set up makes the brew day a little more relaxed and enjoyable. Here are a few thoughts from my setup (that I continue to try to improve):
1. The 4th hose is nice because it seems you always need it. The silicone hose does crimp at the disconnects as it heats up. The elbows do reduce this, but any sharp angle will cause a kink. Extra length sometimes makes this worse as the weight of the hose pulls on the angle.

2. I placed my mash tun in-between my HLT and kettle. Therefore, my liquid moves from left to right overall in the process. The exception being top off for final volume, but it is usually less than 1-2 qts in my system. This reduces the length needed for the hoses.

3. Plan ahead for a hop back.

4. The chiller and pump should be close. A plate chiller uses less space than mine, so you might be good to go. I now flow from kettle > pump > chiller > kettle(for whirlpool) or fermenter. Interesting, I no longer use a long whirlpool. I do for a few minutes to get a stable temp coming out of my chiller, then route directly to my fermenter. This shortens the chill time greatly and results getting the wort to my desired pitch temp.

PlainJay brewery resize.jpg
 
Thanks PlainJay! I have thought about putting my MLT in the middle but thought my banjo's would melt it. You don't have any issues with that? or rising temps in it while heating sparge during mash? I want to get another keggle for a mash tun but don't want to make that move until I have some sort of RIMS type setup to deal with the heat loss.
 
Aussie, Actually I do have a small issue melting my mash tun. I did put heat shields (slab of ceramic floor tile) between it and the burners. So in ~20 batches, I have only softened the plastic twice (where it touched the shield). If I were to rebuild my stand, I would add a few more inches between them. But I still like it in the middle. I haven't noticed the burner actually heating up the mash contents, but I am running a herms system. I have thought about a keggle mash tun, but cannot complain with the cooler method. It holds temp amazingly well (even without the herms) and I have been using the one in the picture since about 1998, so it feels like family. If it cracks, I still think I will replace it with a square cooler to get a bit larger capacity.

Regarding hoses, etc. I have found that shut off valves after the pump and after the chiller are nice. I also valve my water flow thru the chiller to help control that variable as well. I have a thermometer (now a homemade thrumometer sytle-not the one in the pic) after the chiller and can dial in the temp fairly stable. I am convinced that recirculating during the mash and sparge helps with efficiency, even using batch sparging.
 
My setup is like yours, just that I have the HLT and brew kettle switched. With the 90 degree street elbows and hose barbs I have not had any kinking of the hoses.

BrewRigFront.jpg
 
My setup is like yours, just that I have the HLT and brew kettle switched. With the 90 degree street elbows and hose barbs I have not had any kinking of the hoses.

BrewRigFront.jpg

Great looking setup! That is the first thermometer in a cooler I've seen. How did you add that? I like the two piece setup rather than one all integrated setup. That way if you want to use the burners for cooking you aren't wheeling the whole thing around.
 
My hoses crimp all the darn time! The elbows do help, but don't alleviate it totally. As was mentioned, a longer hose is more likely to do that, especially as it goes to the top of the MLT and makes the curve. The hot wort tends to make the silicon more pliable and it'll crimp a bit. I just have my system now where I "prop" the hose up against the stand and MLT as it returns. This is for my HERMS, and it works ok.

With one pump, a two-tier system works great as you can gravity drain to the BK with the MLT in the middle. Or you can batch sparge, but you have to change the hoses around a lot.
 
Great looking setup! That is the first thermometer in a cooler I've seen. How did you add that?

Thanks!

I used one of these:

Cooler Bulkhead Kit

The inner cooler wall is drilled to the size of the nipple and the cooler foam and outer wall is drilled to the size of the coupling, so the inner wall is sandwiched between the nut/washer and coupling.

I did end up with a little leakage at first on the thermo port, probably due to not drilling the hole straight enough. As a fix I took it apart and used Aquarium safe silicone (Silicone) on the outside of the inner cooler wall and on the cooler foam. The service temperature of the silicon is up to 350F.

Here's the inside of the cooler. The fill tube was a bit too low so I have since re-aimed it to near the top of the cooler:

MLTInside.jpg
 
Aussie, Actually I do have a small issue melting my mash tun. I did put heat shields (slab of ceramic floor tile) between it and the burners. So in ~20 batches, I have only softened the plastic twice (where it touched the shield). If I were to rebuild my stand, I would add a few more inches between them. But I still like it in the middle. I haven't noticed the burner actually heating up the mash contents, but I am running a herms system. I have thought about a keggle mash tun, but cannot complain with the cooler method. It holds temp amazingly well (even without the herms) and I have been using the one in the picture since about 1998, so it feels like family. If it cracks, I still think I will replace it with a square cooler to get a bit larger capacity.

Regarding hoses, etc. I have found that shut off valves after the pump and after the chiller are nice. I also valve my water flow thru the chiller to help control that variable as well. I have a thermometer (now a homemade thrumometer sytle-not the one in the pic) after the chiller and can dial in the temp fairly stable. I am convinced that recirculating during the mash and sparge helps with efficiency, even using batch sparging.

Thanks! I do have water control on the water in, but ball valve on wort out might be a good idea. Do you gravity feed into carboys or pump?
 
My setup is like yours, just that I have the HLT and brew kettle switched. With the 90 degree street elbows and hose barbs I have not had any kinking of the hoses.

BrewRigFront.jpg

Thanks for sharing Chris. Any benefit to switching the BK and HLT or just the way you set-it up. I've had it both ways and can't see a big difference, only that my HLT burner is a little further away from my plastic cooler.
 
Thanks! I do have water control on the water in, but ball valve on wort out might be a good idea. Do you gravity feed into carboys or pump?

Aussie, I use the pump to push thru my chiller and then into my carboy fermenter. I now go kettle > pump > chiller > fermenter. I have had the chiller before the pump, but recently switched. When my kettle/pump runs empty, I am left with the wort in the chiller and hoses. That is usually about a pint that I end up draining into my fermenter by hand.
 
AussieBrewerInColorado said:
Thanks for sharing Chris. Any benefit to switching the BK and HLT or just the way you set-it up. I've had it both ways and can't see a big difference, only that my HLT burner is a little further away from my plastic cooler.

None, it just seams like the HLT should be next to the MLT where the water is being used most.
 
Brewed on my new set-up design today and it went pretty good. I like it and see it working great once I get used to it and make a few tweaks. My biggest issue was my plate chiller positioning, and hose lengths for it, i'm not happy with it at all. Interested how others use their plate chillers on single tier with cam lock fittings. I definitely need to get a temp addition for the chiller as i was way too high and am waiting for my temp to drop (not good) before pitching. It is at 79 right now.

PlainJay, what does your homemade thrumometer look like on your set-up?

Cheers!
 
My hoses crimp all the darn time! The elbows do help, but don't alleviate it totally. As was mentioned, a longer hose is more likely to do that, especially as it goes to the top of the MLT and makes the curve. The hot wort tends to make the silicon more pliable and it'll crimp a bit. I just have my system now where I "prop" the hose up against the stand and MLT as it returns. This is for my HERMS, and it works ok.

With one pump, a two-tier system works great as you can gravity drain to the BK with the MLT in the middle. Or you can batch sparge, but you have to change the hoses around a lot.

Might need another pump, there was definitely a lot of hose switching!
 
PlainJay, what does your homemade thrumometer look like on your set-up?

Cheers!

Honestly, I am pretty sure I stole my idea from others on this forum. So, do a search. Here is a pic of mine, it works pretty well (within a couple degrees). The design I had in the earlier pic was based on a regular probe thermometer and was way too sensitive. The strip is about right and I added enough length to cover both ale and lager temps.

homemade thru mometer.jpg
 
here is my chiller setup - my thermo is connected to chiller via Tri-clamps. Makes for easy removal and cleanup.

it's a little cluttered, so trying to find a better way to mount/plumb.

2012-01-07%252520010.JPG


2012-01-07%252520009.JPG
 
Aussie,
For what its worth, my neighbor uses one just like mine with a plate chiller and he is pleased with the results. Then again, making the equipment that you like is part of the hobby, so design away.

edit: I think this post inspired my creation and he was using a plate chiller. https://www.homebrewtalk.com/f51/inline-thermometer-build-3-4-simple-simple-163779/

Thanks for the link PlainJay. Great idea. Looks like it only lasted a year for him and he ended up going with a dial in a t.
 
How do you sanitize? I wasn't sure how to do it once I put the camlocks on the chiller. From what i've read, running hot wort through it for a few minutes works which is what I may do. That should sanitize the lines, chiller, and thermometer, then just put the camlock female fitting in some santizer before it goes in fermenter?
 
Back
Top