
zzARzz
Well-Known Member
- Joined
- Jul 7, 2012
- Messages
- 410
- Reaction score
- 52
While in Home Depot the other day I was wandering through the plumbing section when I got the idea for a sparge arm using cheap copper parts. I just put it together and I have to say I'm happy with the way it turned out. So I thought I'd share it with a parts list and how to. I'd love to hear everyone's comments and suggestions.
Parts List
(1) 1/2" Copper Tee $0.99
(2) 1/2" Copper Caps $0.67/EA
(1) 1/2" x 2' Type M Copper Pipe $4.70
(1) 1/2" Lead-Free Brass Male Barb Sweat Adapter $1.57
Optional:
Plumbing Soldering Kit
or
Sealing Tape
(1) Wire Coat Hanger to fashion supports with
Tools
1/16" Drill Bit
Low Speed Drill
Hack Saw or Jig Saw with metal cutting blade
Metal File
How-To:
1. Measure the top diameter of your mash-tun and design your measurements 1/4" short of that measurement. For instance, my Igloo 10g cooler is 13", so I made the total length 12-3/4" (1/8" clearance on either side).

2. Mark off the cuts on the pipe including the dots for drilling the drain holes. Dry fit the parts together and use a pencil to mark off how far the pipe will be recessed into the caps and tee. There is 3/4" of space inside the tee separating each arm, so I made each arm 6" (for a total of 12-3/4").
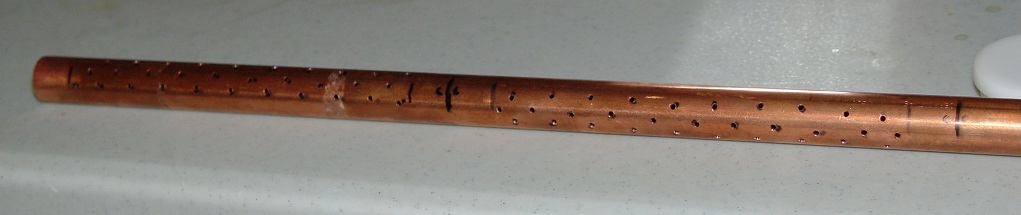

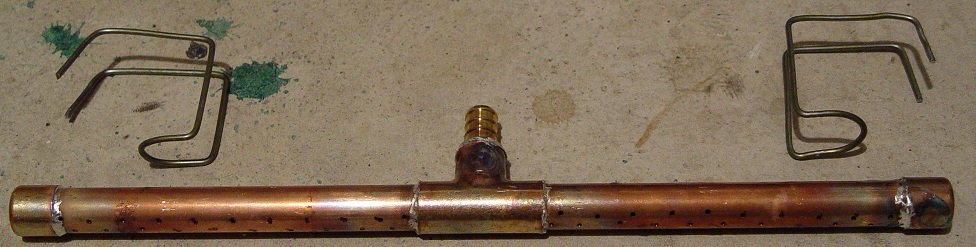
3. Drill the holes with the 1/16" bit before cutting each arm with the hack saw. Cut each arm and clean off any barbs inside the pipe. I used a piece of the coat hanger to clean them out which worked well. Use a metal file to clean each end of the arm pipes until smooth. Here are the parts laid out as they will be put together:

4. Optional: I used a plumbing soldering kit I already had to bond and seal all the parts. If you've never soldered copper before, there's a decent YouTube video with a tutorial. Just be sure to use lead-free solder meant for plumbing, of course. You could also use sealing tape, I suppose, but I didn't try this. When I ran water through the sparge arm with the parts dry fitted it leaked like a sieve, so I would recommend one of those two options. I also used a single wire coat hanger I had to make supports for the sparge arm while attached to the mash tun as seen below with the sparge arm already soldered (I'm not the best solderer, btw ).
).
Here is a picture of it in action with my hot liquor tank attached to it via a gravity feed. It covers most of the surface while running and overall I'm excited to try it with my next brew. I'll post an update to let everyone know how it worked.

Let me know what you think!
Parts List
(1) 1/2" Copper Tee $0.99
(2) 1/2" Copper Caps $0.67/EA
(1) 1/2" x 2' Type M Copper Pipe $4.70
(1) 1/2" Lead-Free Brass Male Barb Sweat Adapter $1.57
Optional:
Plumbing Soldering Kit
or
Sealing Tape
(1) Wire Coat Hanger to fashion supports with
Tools
1/16" Drill Bit
Low Speed Drill
Hack Saw or Jig Saw with metal cutting blade
Metal File
How-To:
1. Measure the top diameter of your mash-tun and design your measurements 1/4" short of that measurement. For instance, my Igloo 10g cooler is 13", so I made the total length 12-3/4" (1/8" clearance on either side).
2. Mark off the cuts on the pipe including the dots for drilling the drain holes. Dry fit the parts together and use a pencil to mark off how far the pipe will be recessed into the caps and tee. There is 3/4" of space inside the tee separating each arm, so I made each arm 6" (for a total of 12-3/4").
3. Drill the holes with the 1/16" bit before cutting each arm with the hack saw. Cut each arm and clean off any barbs inside the pipe. I used a piece of the coat hanger to clean them out which worked well. Use a metal file to clean each end of the arm pipes until smooth. Here are the parts laid out as they will be put together:
4. Optional: I used a plumbing soldering kit I already had to bond and seal all the parts. If you've never soldered copper before, there's a decent YouTube video with a tutorial. Just be sure to use lead-free solder meant for plumbing, of course. You could also use sealing tape, I suppose, but I didn't try this. When I ran water through the sparge arm with the parts dry fitted it leaked like a sieve, so I would recommend one of those two options. I also used a single wire coat hanger I had to make supports for the sparge arm while attached to the mash tun as seen below with the sparge arm already soldered (I'm not the best solderer, btw
).
Here is a picture of it in action with my hot liquor tank attached to it via a gravity feed. It covers most of the surface while running and overall I'm excited to try it with my next brew. I'll post an update to let everyone know how it worked.
Let me know what you think!
Last edited by a moderator:


