3 Tier Gravity Brew Stand

Homebrew Talk - Beer, Wine, Mead, & Cider Brewing Discussion Forum

Help Support Homebrew Talk - Beer, Wine, Mead, & Cider Brewing Discussion Forum:

This site may earn a commission from merchant affiliate links, including eBay, Amazon, and others.

TwoHeadsBrewing

Well-Known Member
Joined
Feb 28, 2008
Messages
3,949
Reaction score
53
Location
Chico, CA
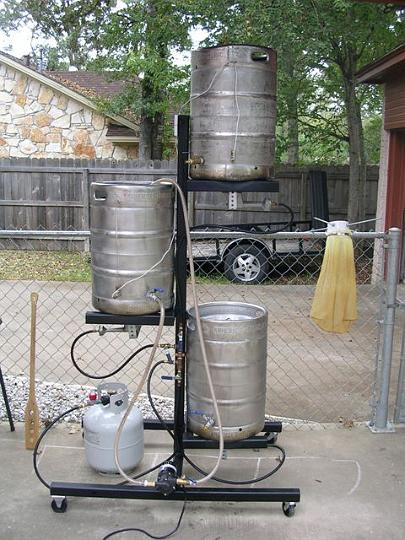
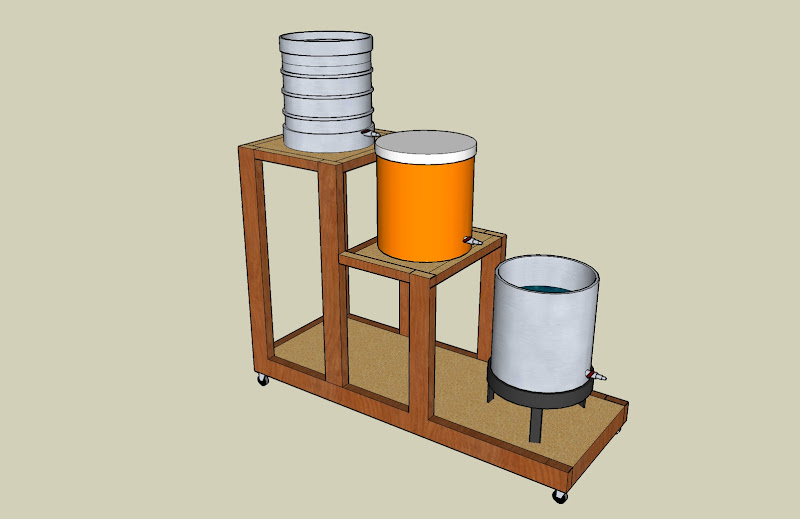
Well I don't have all the parts for my 3 tier setup, but I'll start this thread anyhow. Here's my first lame attempt at google sketchup. I figured, what better way to learn SketchUp than with a diagram of my 3 Tier Stand!

Stand%20Sketchup.jpg


I need to purchase/build the following items:
Keggle for HLT (have copper for dip tube, and weldless ball valve)
(2) Thermometers - 1-2" for HLT, 1-6" for MLT
Bayou Classic SQ-14 for boil kettle (Will be using current turkey fryer for HLT)
Counterflow Chiller (will be building)

Should be a pretty straight forward setup. I have a water filter that connects to the hose, and that will feed the HLT. Then it's all downhill from there...literally. I've got my boil kettle setup with a SS ball valve and a Bazooka T Screen.

Any words of advice for a 3-tier noob?
 
Looks good. I've been planning one out in my head, and realized the lowest tier isn't really necessary. Just put the burner on the ground. The other two tiers could then be lower as well. It would cut down on construction costs and how much space it takes up too.
 
If your going to use gravity to drain the boil kettle it better be above the height of your fermentation vessel.

yeah, I need to measure the height of the carboy shoulder of my 6.5g carboy, then subtract the height of the boil kettle valve. Then I'll figure out what the height of the bottom step should be, and just build up from there. I'm hoping to make each of the 3 tiers able to disconnect from the rest of the stand by using bolts, washers and wingnuts. That way it will be more portable and be more easy to put away.

Thanks for the advice and input. I've got another week or so before I'm going to start building it, and hoping I can get some good tips and advice. I plan on having everything done around the first of the year. everything outfitted with sight glasses, thermometers, and ball valves. woohoo! I don't know what I love more about homebrewing...the beer I make or the stuff it makes me want to build! Now if only SWMBO felt the same way...I guess it's time to make my citrus wheat beer again ;).
 
You might want to consider raising your top tier a bit. If you ever decide to start flysparging, you'll want a bit of a drop to the MLT, and if you just batch sparge you'll still want a bit of a drop to make a pickup tube effective...Other than that it looks great!

PS if you're lifting your HLT or dumping into it, it would be cool to put some kind of fold down step on the backside to facilitate you getting up there. Plus it could double as a seat/shelf while you are brewing, depending on how wide you make it.
 
Personally, I prefer the brew tree design. Compact footprint + less materials and construction complexity. Don't think you could do this with wood, though.

 
Personally, I prefer the brew tree design. Compact footprint + less materials and construction complexity. Don't think you could do this with wood, though.


This was going to be my comment. I was torn between the idea of a tree vs. a tiered stand and came to the conclusion that I'd potentially go with a tree based on it's smaller footprint.
 
I remember recently seeing an idea that I really like for the mounting of Kegs on a tree. It was a very basic thing, but ingenious. It was a series of "L" shaped brackets mounted on a center tube. On top of the keg, the long arm of the L pointed down. On the bottom of the keg, the long arm of the L pointed up. You just lock the thing in on the top and slip it into the bottom. The heavier it is, the better it holds on. This made for a frame with a minimum amount of metal used and looked very well designed. Can't find the thread though.
 
Looks good. I've been planning one out in my head, and realized the lowest tier isn't really necessary. Just put the burner on the ground. The other two tiers could then be lower as well. It would cut down on construction costs and how much space it takes up too.

I was thinking the same thing. I have been designing my stand FOREVER but during my winter break and xmas time i wil probably start construction. I am downloading sketchup right now...looks like a pretty cool program
 
My father and I are doing it based on the pic and the cut list that I got off of the web. We are using 1 inch angle iron and some bayou burners. Though the pots(which are way cool and outside of my means) are not part of my gear. I have keggles.
 
Check out this guys design: all grain
I am using his specs but buying the steel at a local steel supplier, they sell the angle iron for 20 bucks per 12ft piece. A whole lot cheaper than going to Home Depot or Lowes.
 
I remember recently seeing an idea that I really like for the mounting of Kegs on a tree. It was a very basic thing, but ingenious. It was a series of "L" shaped brackets mounted on a center tube. On top of the keg, the long arm of the L pointed down. On the bottom of the keg, the long arm of the L pointed up. You just lock the thing in on the top and slip it into the bottom. The heavier it is, the better it holds on. This made for a frame with a minimum amount of metal used and looked very well designed. Can't find the thread though.

Yep...here it is, great idea.

https://www.homebrewtalk.com/f11/keggle-mlt-insulation-62233/
 
Personally, I prefer the brew tree design. Compact footprint + less materials and construction complexity. Don't think you could do this with wood, though.


I wanted to know if it needs to be gravity fed when you have the pump installed? I was thinking to do gravity fed you didn't need a pump. And if you had the pump you could have the three kegs sitting one next to the other. Is there a reason for both the gravity fed system with a pump? Thanks
 
With a pump you can recirculate your mash, whirlpool while cooling, pump to fermenter etc. With a 3 tier you don't need a pump, but there are certain tasks that are easier with one.
 
i built a stand that hast he burner on the ground for under $20, its a simple design where everything lines up and makes my brew day much easier. plus i put some peg board on the side of it to hold stuff i need.
 
curious as to why 3 tiers? for whatever reason it is not sinking in my head. i have recently jumped from extract to AG and my setup consists of the following: i have a 10 gal cooler mash tun with false bottom. i put my grains in and heat up water to put in the mash tun. i put the water in and cover and let that sit for about an hr. then start draining into my boil pot. using a smaller pot i bring more water to temp for sparge and sparge what i need to make a full boil. if there is a thread that explains all this in stupid people terms please feel free to direct me there.
 
I just finished building mine. Yours looks pretty much the same. Just make sure the valve on your boil kettle is high enough to drain into your fermenter.
 
curious as to why 3 tiers? for whatever reason it is not sinking in my head. i have recently jumped from extract to AG and my setup consists of the following: i have a 10 gal cooler mash tun with false bottom. i put my grains in and heat up water to put in the mash tun. i put the water in and cover and let that sit for about an hr. then start draining into my boil pot. using a smaller pot i bring more water to temp for sparge and sparge what i need to make a full boil. if there is a thread that explains all this in stupid people terms please feel free to direct me there.

Using gravity to transfer fluids from one container to the next
 
curious as to why 3 tiers? for whatever reason it is not sinking in my head. i have recently jumped from extract to AG and my setup consists of the following: i have a 10 gal cooler mash tun with false bottom. i put my grains in and heat up water to put in the mash tun. i put the water in and cover and let that sit for about an hr. then start draining into my boil pot. using a smaller pot i bring more water to temp for sparge and sparge what i need to make a full boil. if there is a thread that explains all this in stupid people terms please feel free to direct me there.

You need three tiers to allow gravity to carry the sparge water into the mash tun, and to let the mash tun drain into the boil kettle. You need three tiers if you fly sparge AND do not have any pumps.
 
Thanks guys I think I understand. It is what I am doing already. Just no fancy stand haha
 
Back
Top