You are using an out of date browser. It may not display this or other websites correctly.
You should upgrade or use an alternative browser.
You should upgrade or use an alternative browser.
HOWTO - Make a BrewPi Fermentation Controller For Cheap
- Thread starter FuzzeWuzze
- Start date

Help Support Homebrew Talk - Beer, Wine, Mead, & Cider Brewing Discussion Forum:
This site may earn a commission from merchant affiliate
links, including eBay, Amazon, and others.
- Status
- Not open for further replies.
thyirishmen
Well-Known Member
To run the backup sd script. Do you just put the script on the pi. Run the script and have a Sd in a USB reader attached to the pi?
TheFlangerBeer
Active Member
- Joined
- Feb 18, 2017
- Messages
- 39
- Reaction score
- 18
Hy guys.
I have a refrigerator combi model "Teka NF 350 with a single compressor.
The only thing missing me to have the brewpi functioning (level hacking of the refrigerator 3 :rockin") is to bypass or override the thermostat.
is to bypass or override the thermostat.
Can someone tell me what to do?
Attached some technical drawings of the refrigerator and photos.
My knowledge of electricity and electronics are almost nil ... but I dare with everything. I followed Elco's hacking tutorial on brewpi.com.
I just hope that does not exploit all to connect to electricity
(Please, I do not know if it's off topic in this forum, if so I ask moderators move where applicable).
Thank you!


I have a refrigerator combi model "Teka NF 350 with a single compressor.
The only thing missing me to have the brewpi functioning (level hacking of the refrigerator 3 :rockin
is to bypass or override the thermostat.Can someone tell me what to do?
Attached some technical drawings of the refrigerator and photos.
My knowledge of electricity and electronics are almost nil ... but I dare with everything
. I followed Elco's hacking tutorial on brewpi.com.I just hope that does not exploit all to connect to electricity
(Please, I do not know if it's off topic in this forum, if so I ask moderators move where applicable).
Thank you!
To run the backup sd script. Do you just put the script on the pi. Run the script and have a Sd in a USB reader attached to the pi?
Yup, that's all there is to it. Totally automagic...
Cheers!
JDL
Well-Known Member
Hello Everyone,
I know I am late the brewpi party but am about to place my order and will be following the Wiki. Wanted to at least throw the items up here and maybe some glaring error can quickly be found which will save me a headache in the future.
I have wired up a control box with an SSR to power a 110v e-kettle before but that is the extent of my electrical experience.
I will be using a mini fridge and a ssbrewtech brewmaster brewbucket that has the thermowell already in it. I will be using 100AMPs wiring diagram included in the Wiki to wire everything.
I have read through about half of this thread and took notes so below is what I am ordering.
1- Arduino Uno board from Amazon
2- Raspberry Pi 3
3- SainSmart 2 Channel Relay Module
4- 4.7k Ohm Resistors (pack of 25 from amazon)
5- Cal-Hawk Wire Connectors (from amazon)
6- Lasko Personal Heater
7- Leviton Power Outlet from Home Depot
8- Power Cord – I have from an old PC
9- Extra SD Card to do a backup on it as corruption seems like a guarantee while setting it up.
10- SD Card Reader
First question is temperature sensors, can someone link to a good site to get them as I keep reading that there are issues with them being made different now and want to ensure I get the right ones.
Second Question: I want to not have to Solder and was hoping someone could show me what additional parts are needed to use connector wires instead.
Thanks in advance,
Jeff
thestraw0039
Active Member
https://www.amazon.com/gp/product/B01LZF1ZSZ/?tag=skimlinks_replacement-20
That's what I used, worked well. You have to buy way more than you'll ever need but I didn't have to do any soldering.
That's what I used, worked well. You have to buy way more than you'll ever need but I didn't have to do any soldering.
Last edited by a moderator:
thestraw0039
Active Member
I also bought these in January and they are working fine as well. https://www.amazon.com/gp/product/B00CHEZ250/?tag=skimlinks_replacement-20
Last edited by a moderator:
Hey all,
Thanks for all of the help getting this set up to make it a pretty easy process for me. I did notice a couple of things as i put it together and wanted to add my 2 cents where applicable.
First off the "Publicly accessible BrewPi" code linked in the first post appears to need some updating. I found that it would never actually display any graphs or fill out the LCD display. so I dug in and updated the code provided by FuzzeWuzze. See below:
- Goto /var/www
sudo mv index.php admin.php- Create a file with vi or nano called index.php and add the contents of the code block below (Mostly fixes in the Javascript section of the file)
[/LIST]
I just installed brewpi and am trying to start a publicly accessilble brewpi, but I am having trouble with step one. The only files in /var/www is an html folder and do_not_run_brewpi. There is a index.php file in the html folder but I did not find an admin.php file.
any suggestions. Thanks dan
CadiBrewer
Well-Known Member
Newer versions of the raspberry pi operating system install the files in /var/www/html. Use that location in your command.
MikeLastort
Well-Known Member
I currently have an Inkbird 308 and a two space heaters inside my Kenmore chest freezer. I'm thinking about replacing it with a DIY BrewPi, and I don't want to hack the freezer's thermostat. So what I'd need is some sort of solid state relays that I can plug into the wall sockets and that can be switched on or off by a microcontroller that reacts to temp probes inside the freezer, correct?
At least that's the way I understand it. Something like what's described in "method 1" here
https://www.brewpi.com/fridge-hacking-guide/
At least that's the way I understand it. Something like what's described in "method 1" here
https://www.brewpi.com/fridge-hacking-guide/
Bigdaddyale
Well-Known Member
Have a look at post #1 of this thread.I currently have an Inkbird 308 and a two space heaters inside my Kenmore chest freezer. I'm thinking about replacing it with a DIY BrewPi, and I don't want to hack the freezer's thermostat. So what I'd need is some sort of solid state relays that I can plug into the wall sockets and that can be switched on or off by a microcontroller that reacts to temp probes inside the freezer, correct?
At least that's the way I understand it. Something like what's described in "method 1" here
https://www.brewpi.com/fridge-hacking-guide/
Groovetheory
Member
- Joined
- Nov 1, 2016
- Messages
- 5
- Reaction score
- 1
I am new to working with python and Raspberry Pi so forgive my lack of understanding. I have brew-pi up and running for a few batches now, but I am having difficulty setting up the Tilt Hydrometer and connecting it to brew-pi. I am running the legacy branch of Brew-Pi on a Pi 3 card.
I am following the instruction on the github website.
https://github.com/sibowler/brewpi-brewometer
When I run the following command to setup the :
sudo apt-get install bluez python-bluez python-scipy python-numpy libcap2-bin
ipy python-numpy libcap2-bin
Reading package lists... Done
Building dependency tree
Reading state information... Done
libcap2-bin is already the newest version.
python-numpy is already the newest version.
bluez is already the newest version.
bluez set to manually installed.
The following extra packages will be installed:
python-imaging
The following NEW packages will be installed:
python-bluez python-imaging python-scipy
0 upgraded, 3 newly installed, 0 to remove and 4 not upgraded.
Need to get 9,814 B/7,402 kB of archives.
After this operation, 29.2 MB of additional disk space will be used.
Do you want to continue? [Y/n] y
I receive the following error:
Err http://mirrordirector.raspbian.org/raspbian/ jessie/main python-imaging all 2.6.1-2+deb8u2
404 Not Found [IP: 93.93.128.193 80]
E: Failed to fetch http://mirrordirector.raspbian.org/raspbian/pool/main/p/pillow/python-imaging_2.6.1-2+deb8u2_all.deb 404 Not Found [IP: 93.93.128.193 80]
E: Unable to fetch some archives, maybe run apt-get update or try with --fix-missing?
I have tried to fix the issue, but I am not sure how to continue? Any assistance would be greatly appreciated.
Groove
Looks like at the time of the error the mirrordirector site might have been unavailable. Or your device wasn't connected to the internet.
It's up now though:
Code:
Pinging mirrordirector.raspbian.org [93.93.128.193] with 32 bytes of data:
Reply from 93.93.128.193: bytes=32 time=123ms TTL=52
Reply from 93.93.128.193: bytes=32 time=121ms TTL=52
Reply from 93.93.128.193: bytes=32 time=120ms TTL=52
Reply from 93.93.128.193: bytes=32 time=120ms TTL=52

Ping statistics for 93.93.128.193:
    Packets: Sent = 4, Received = 4, Lost = 0 (0% loss),
Approximate round trip times in milli-seconds:
    Minimum = 120ms, Maximum = 123ms, Average = 121ms
Maybe try again?
Groovetheory
Member
- Joined
- Nov 1, 2016
- Messages
- 5
- Reaction score
- 1
I can get to the site, the issue is the specified file is not in the folder.
http://mirrordirector.rasThe file name has change. The error occurs when I run sudo apt-get install python-scipy all other files update correctly.
pbian.org/raspbian/pool/main/p/pillow/python-imaging_2.6.1-2+deb8u2_all.deb
python-imaging_2.6.1-2+deb8u2_all.deb File name in python-scipy
python-imaging_2.6.1-2+deb8u3_all.deb File name in website, new version
I have update the following files on the RPI image
sudo pip3 install --upgrade numpy
sudo pip3 install --upgrade scipy
The scipy update still references the older python-imaging file . I am not sure how to fix this issue. All the other files update.
Groove
Groovetheory
Member
- Joined
- Nov 1, 2016
- Messages
- 5
- Reaction score
- 1
I can connect to the site, that is not the issue. The command 'sudo apt-get install python-scipy' references an older version of the file to install
python-imaging_2.6.1-2+deb8u2_all.deb File referenced in scipy
python-imaging_2.6.1-2+deb8u3_all.deb File in /raspbian/pool/main/p/pillow
I updated both numpy and scipy witht he following commands:
sudo pip3 install --upgrade numpy
sudo pip3 install --upgrade scipy
I still get the error. Is there a way to correct the reference in the file to have it process or am I missing a simple step?
Groove
MikeLastort
Well-Known Member
Have a look at post #1 of this thread.
I did. So that's a yes, right?
Bigdaddyale
Well-Known Member
Yes, you won't need to modify the fridge at all.I did. So that's a yes, right?
MikeLastort
Well-Known Member
Yes, you won't need to modify the fridge at all.
Cool, thanks. That was how I read that, I just wanted to confirm.
Hello Everyone. I've been having an issue for my last few brews where the temperature control acts perfectly normal for 5-7 days, then suddenly starts swinging and overshooting the set point, both high and low, for reasons unknown. Like this:
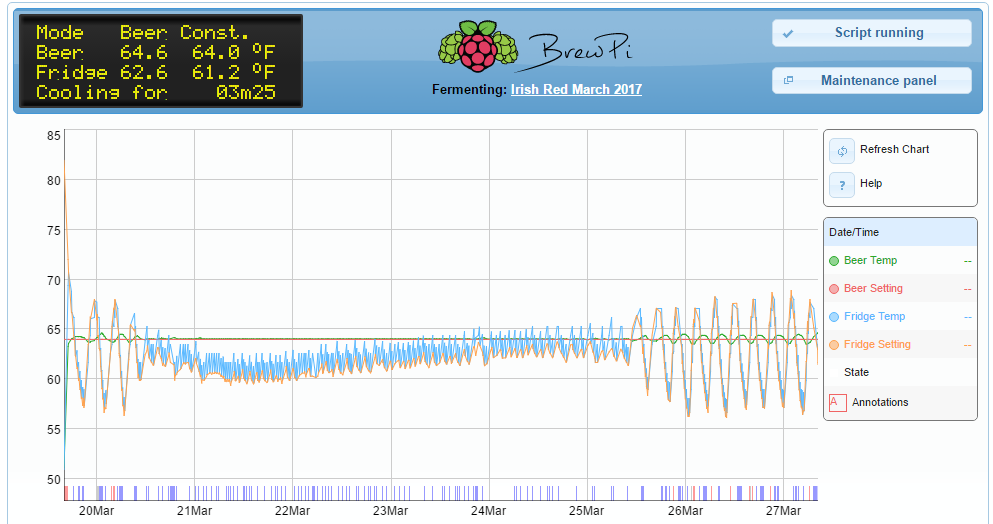
After many days of only needing short bursts of cooling, the controller will heat, cool, heat, cool, and the beer temperature will swing as much as +/-0.6F after days of steady state and after active fermentation has subsided.
Shutting down the Pi and then power cycling the power strip with the Pi, Arduino, fridge, and circulation fan on it and letting it all restart will usually solve the issue and everything goes back to being nice and smooth.
I'm on a Raspberry Pi B (pre-Wheezy) running the latest version of BrewPi from the legacy branch. Any thoughts on this? Thanks!
wbarber69
Well-Known Member
- Joined
- Oct 13, 2013
- Messages
- 2,191
- Reaction score
- 263
2 Ideas, either your fermentation is handling most of the necessary heating for the first 5-7 days and that's why the liquid stays pretty stable, or maybe there is a defrost cycle in the fridge that works on a mechanical timer
basically until it reaches zero again or is tripped by resetting the power, it will run alongside the compressor to keep the lines from freezing up. you may need to disable the defrost heater
Thanks, I like the defrost theory. That could be what's going on. The other doesn't seem likely, as the fridge is in my basement and the ambient down there isn't below 64 so there shouldn't be a need to heat much at all after the initial overshoot corrections.
When you look at the waves starting 1/2 way through the 25th they're nearly perfect cycles. It doesn't otherwise make sense that the temperature would vary so much when fermentation is done when it was so flat even during active fermentation.
I had a hell of a day since that post and was finally just now able to cycle the power on everything. I'll be interested to check the graph in the morning.
AlehCemy
Member
- Joined
- Jun 12, 2016
- Messages
- 16
- Reaction score
- 2
@FuzzeWuzze (Not sure if it's possible to tag someone)
Can I translate the contents of the http://diybrewpi.wikia.com/wiki/DIYBrewPi_Wikia to share with a few people that doesn't know English but want to build this DIY project?
Can I translate the contents of the http://diybrewpi.wikia.com/wiki/DIYBrewPi_Wikia to share with a few people that doesn't know English but want to build this DIY project?
Cool. What language?
Not speaking for Fuzze but you are welcome to do pretty much anything you want with any of my BrewPi related threads...
Cheers!
Not speaking for Fuzze but you are welcome to do pretty much anything you want with any of my BrewPi related threads...
Cheers!
AlehCemy
Member
- Joined
- Jun 12, 2016
- Messages
- 16
- Reaction score
- 2
Cool. What language?
Not speaking for Fuzze but you are welcome to do pretty much anything you want with any of my BrewPi related threads...
Cheers!
PT-BR. I mentioned in a group that I had seen a DIY project that could be adapted to a bread fermentation chamber and etc., and they were interested. But most of them doesn't know English, so it's unfair to those to share the content in English.
PT-BR. I mentioned in a group that I had seen a DIY project that could be adapted to a bread fermentation chamber and etc., and they were interested. But most of them doesn't know English, so it's unfair to those to share the content in English.
I use mine for my pizza dough ferment all the time. It works great!
Bigdaddyale
Well-Known Member
Might want to look at this thread. it controls humidity as well as tempt.PT-BR. I mentioned in a group that I had seen a DIY project that could be adapted to a bread fermentation chamber and etc., and they were interested. But most of them doesn't know English, so it's unfair to those to share the content in English.
https://www.homebrewtalk.com/showthread.php?t=520193
AlehCemy
Member
- Joined
- Jun 12, 2016
- Messages
- 16
- Reaction score
- 2
Might want to look at this thread. it controls humidity as well as tempt.
https://www.homebrewtalk.com/showthread.php?t=520193
Humidity I don't think it's really necessary, but definitely will look it out and ask if anyone is interested in a translated version. Thank you for the link!
Bigdaddyale
Well-Known Member
Yea- You're right, at least not for proofing bread dough but you need high humidity for bakingHumidity I don't think it's really necessary, but definitely, will look it out and ask if anyone is interested in a translated version. Thank you for the link!
AlehCemy
Member
- Joined
- Jun 12, 2016
- Messages
- 16
- Reaction score
- 2
Yea- You're right, at least not for proofing bread dough but you need high humidity for baking
Yeah, but it's easily solved by using a metal pan preheated together with the oven and boiling water.
I've been using my brewpi to great success for about a year now, but have recently come across an issue I've not seen before. During my current fermentation there seem to have been a couple of strange changes in behaviour, where the temperature fluctuations around the target temperature suddenly increase/decrease dramatically. I assume this is something to do with one of the control values for the algorithm changing, but looking at the logs I can't see anything that would explain it. Has anyone seen this behaviour before, or have any idea how to fix it?
I attach a couple of images for illustrative purposes, and the stderr from the relevant times.


I attach a couple of images for illustrative purposes, and the stderr from the relevant times.
Mar 28 2017 00:27:37 controller debug message: INFO MESSAGE 18: Negative peak detected: 9.3, estimated: 9.3. Previous cool estimator: 2.561, New cool estimator: 2.561.
Mar 28 2017 01:22:58 controller debug message: INFO MESSAGE 18: Negative peak detected: 9.1, estimated: 9.3. Previous cool estimator: 2.561, New cool estimator: 2.561.
Mar 28 2017 02:18:00 controller debug message: INFO MESSAGE 18: Negative peak detected: 9.1, estimated: 9.3. Previous cool estimator: 2.561, New cool estimator: 2.561.
Mar 28 2017 03:11:35 controller debug message: INFO MESSAGE 18: Negative peak detected: 9.0, estimated: 9.3. Previous cool estimator: 2.561, New cool estimator: 2.561.
Mar 28 2017 04:04:07 controller debug message: INFO MESSAGE 18: Negative peak detected: 9.0, estimated: 9.3. Previous cool estimator: 2.561, New cool estimator: 3.094.
Mar 28 2017 04:57:50 controller debug message: INFO MESSAGE 18: Negative peak detected: 9.0, estimated: 9.3. Previous cool estimator: 3.094, New cool estimator: 3.740.
Mar 28 2017 05:49:47 controller debug message: INFO MESSAGE 18: Negative peak detected: 9.0, estimated: 9.3. Previous cool estimator: 3.740, New cool estimator: 4.514.
Mar 28 2017 06:39:06 controller debug message: INFO MESSAGE 18: Negative peak detected: 9.3, estimated: 9.4. Previous cool estimator: 4.514, New cool estimator: 4.514.
Mar 28 2017 07:31:24 controller debug message: INFO MESSAGE 18: Negative peak detected: 9.8, estimated: 9.6. Previous cool estimator: 4.514, New cool estimator: 3.719.
Mar 28 2017 08:29:12 controller debug message: INFO MESSAGE 18: Negative peak detected: 10.1, estimated: 9.7. Previous cool estimator: 3.719, New cool estimator: 3.057.
Mar 28 2017 09:27:06 controller debug message: INFO MESSAGE 18: Negative peak detected: 9.7, estimated: 9.6. Previous cool estimator: 3.057, New cool estimator: 3.057.
Mar 28 2017 10:21:06 controller debug message: INFO MESSAGE 18: Negative peak detected: 9.8, estimated: 9.5. Previous cool estimator: 3.057, New cool estimator: 2.512.
Mar 28 2017 11:10:19 controller debug message: INFO MESSAGE 18: Negative peak detected: 11.5, estimated: 12.1. Previous cool estimator: 2.512, New cool estimator: 3.055.
Mar 28 2017 11:54:41 controller debug message: INFO MESSAGE 18: Negative peak detected: 11.4, estimated: 12.1. Previous cool estimator: 3.055, New cool estimator: 3.729.
Mar 28 2017 12:37:56 controller debug message: INFO MESSAGE 18: Negative peak detected: 11.0, estimated: 11.7. Previous cool estimator: 3.729, New cool estimator: 4.543.
Mar 28 2017 13:20:48 controller debug message: INFO MESSAGE 18: Negative peak detected: 10.8, estimated: 11.2. Previous cool estimator: 4.543, New cool estimator: 5.510.
Mar 28 2017 14:03:14 controller debug message: INFO MESSAGE 18: Negative peak detected: 10.6, estimated: 10.9. Previous cool estimator: 5.510, New cool estimator: 6.672.
Mar 28 2017 14:47:51 controller debug message: INFO MESSAGE 18: Negative peak detected: 10.4, estimated: 10.7. Previous cool estimator: 6.672, New cool estimator: 6.672.
Mar 28 2017 15:32:59 controller debug message: INFO MESSAGE 18: Negative peak detected: 10.4, estimated: 10.6. Previous cool estimator: 6.672, New cool estimator: 6.672.
Mar 28 2017 16:19:25 controller debug message: INFO MESSAGE 18: Negative peak detected: 10.4, estimated: 10.6. Previous cool estimator: 6.672, New cool estimator: 6.672.
Mar 28 2017 16:56:43 controller debug message: INFO MESSAGE 18: Negative peak detected: 11.1, estimated: 11.1. Previous cool estimator: 6.672, New cool estimator: 6.672.
Mar 28 2017 17:25:30 controller debug message: INFO MESSAGE 18: Negative peak detected: 11.3, estimated: 11.2. Previous cool estimator: 6.672, New cool estimator: 6.672.
Apr 01 2017 22:25:22 controller debug message: INFO MESSAGE 12: Received new setting: beerSet = 11.01
Apr 01 2017 22:30:45 controller debug message: INFO MESSAGE 12: Received new setting: beerSet = 11.02
Apr 01 2017 22:36:09 controller debug message: INFO MESSAGE 12: Received new setting: beerSet = 11.03
Apr 01 2017 22:41:33 controller debug message: INFO MESSAGE 12: Received new setting: beerSet = 11.04
Apr 01 2017 22:41:41 controller debug message: INFO MESSAGE 18: Negative peak detected: 12.1, estimated: 12.4. Previous cool estimator: 12.527, New cool estimator: 12.527.
Apr 01 2017 22:46:58 controller debug message: INFO MESSAGE 12: Received new setting: beerSet = 11.05
Apr 01 2017 22:52:22 controller debug message: INFO MESSAGE 12: Received new setting: beerSet = 11.06
Apr 01 2017 22:57:46 controller debug message: INFO MESSAGE 12: Received new setting: beerSet = 11.07
Apr 01 2017 23:03:11 controller debug message: INFO MESSAGE 12: Received new setting: beerSet = 11.08
Apr 01 2017 23:08:33 controller debug message: INFO MESSAGE 12: Received new setting: beerSet = 11.09
Apr 01 2017 23:13:57 controller debug message: INFO MESSAGE 12: Received new setting: beerSet = 11.1
Apr 01 2017 23:19:21 controller debug message: INFO MESSAGE 12: Received new setting: beerSet = 11.11
Apr 01 2017 23:24:45 controller debug message: INFO MESSAGE 12: Received new setting: beerSet = 11.12
Apr 01 2017 23:30:09 controller debug message: INFO MESSAGE 12: Received new setting: beerSet = 11.13
Apr 01 2017 23:35:34 controller debug message: INFO MESSAGE 12: Received new setting: beerSet = 11.14
Apr 01 2017 23:40:58 controller debug message: INFO MESSAGE 12: Received new setting: beerSet = 11.15
Apr 01 2017 23:46:22 controller debug message: INFO MESSAGE 12: Received new setting: beerSet = 11.16
Apr 01 2017 23:46:36 controller debug message: INFO MESSAGE 18: Negative peak detected: 12.1, estimated: 12.4. Previous cool estimator: 12.527, New cool estimator: 12.527.
Apr 01 2017 23:51:46 controller debug message: INFO MESSAGE 12: Received new setting: beerSet = 11.17
Apr 01 2017 23:57:09 controller debug message: INFO MESSAGE 12: Received new setting: beerSet = 11.18
Apr 02 2017 00:00:00 Notification: New day, creating new JSON file.
Apr 02 2017 00:02:33 controller debug message: INFO MESSAGE 12: Received new setting: beerSet = 11.19
Apr 02 2017 00:07:57 controller debug message: INFO MESSAGE 12: Received new setting: beerSet = 11.2
Apr 02 2017 00:13:21 controller debug message: INFO MESSAGE 12: Received new setting: beerSet = 11.21
Apr 02 2017 00:18:46 controller debug message: INFO MESSAGE 12: Received new setting: beerSet = 11.22
Apr 02 2017 00:24:10 controller debug message: INFO MESSAGE 12: Received new setting: beerSet = 11.23
Apr 02 2017 00:29:34 controller debug message: INFO MESSAGE 12: Received new setting: beerSet = 11.24
Apr 02 2017 00:34:57 controller debug message: INFO MESSAGE 12: Received new setting: beerSet = 11.25
Apr 02 2017 00:40:22 controller debug message: INFO MESSAGE 12: Received new setting: beerSet = 11.26
Apr 02 2017 00:44:20 controller debug message: INFO MESSAGE 18: Negative peak detected: 10.9, estimated: 9.6. Previous cool estimator: 12.527, New cool estimator: 9.934.
Apr 02 2017 00:45:45 controller debug message: INFO MESSAGE 12: Received new setting: beerSet = 11.27
Apr 02 2017 00:51:09 controller debug message: INFO MESSAGE 12: Received new setting: beerSet = 11.28
Apr 02 2017 00:56:33 controller debug message: INFO MESSAGE 12: Received new setting: beerSet = 11.29
Apr 02 2017 01:01:58 controller debug message: INFO MESSAGE 12: Received new setting: beerSet = 11.3
Apr 02 2017 01:07:22 controller debug message: INFO MESSAGE 12: Received new setting: beerSet = 11.31
Apr 02 2017 01:12:46 controller debug message: INFO MESSAGE 12: Received new setting: beerSet = 11.32
Apr 02 2017 01:18:10 controller debug message: INFO MESSAGE 12: Received new setting: beerSet = 11.33
Apr 02 2017 01:23:34 controller debug message: INFO MESSAGE 12: Received new setting: beerSet = 11.34
Apr 02 2017 01:28:57 controller debug message: INFO MESSAGE 12: Received new setting: beerSet = 11.35
Apr 02 2017 01:34:21 controller debug message: INFO MESSAGE 12: Received new setting: beerSet = 11.36
Apr 02 2017 01:38:44 controller debug message: INFO MESSAGE 18: Negative peak detected: 10.6, estimated: 9.7. Previous cool estimator: 9.934, New cool estimator: 8.012.
Apr 02 2017 01:39:45 controller debug message: INFO MESSAGE 12: Received new setting: beerSet = 11.37
Apr 02 2017 01:45:09 controller debug message: INFO MESSAGE 12: Received new setting: beerSet = 11.38
Apr 02 2017 01:50:34 controller debug message: INFO MESSAGE 12: Received new setting: beerSet = 11.39
Apr 02 2017 01:55:58 controller debug message: INFO MESSAGE 12: Received new setting: beerSet = 11.4
Apr 02 2017 02:01:22 controller debug message: INFO MESSAGE 12: Received new setting: beerSet = 11.41
Apr 02 2017 02:06:46 controller debug message: INFO MESSAGE 12: Received new setting: beerSet = 11.42
Apr 02 2017 02:12:09 controller debug message: INFO MESSAGE 12: Received new setting: beerSet = 11.43
Apr 02 2017 02:17:33 controller debug message: INFO MESSAGE 12: Received new setting: beerSet = 11.44
Apr 02 2017 02:22:57 controller debug message: INFO MESSAGE 12: Received new setting: beerSet = 11.45
Apr 02 2017 02:28:21 controller debug message: INFO MESSAGE 12: Received new setting: beerSet = 11.46
Apr 02 2017 02:30:43 controller debug message: INFO MESSAGE 18: Negative peak detected: 10.6, estimated: 10.5. Previous cool estimator: 8.012, New cool estimator: 8.012.
Looks exactly like the issue I started having recently, also after the better part of a year. See post 6940. It was suggested that it could be the fridge going into defrost mode but it doesn't seem so. I powered off the fridge for a while to see if it would reset something but that made no difference.
I haven't solved mine yet. Finished that fermentation and it's currently shut down. I'll have to see if it does it again after my next brew day in a couple of weeks. Definitely watching the thread though to see if anyone has any ideas.
I haven't solved mine yet. Finished that fermentation and it's currently shut down. I'll have to see if it does it again after my next brew day in a couple of weeks. Definitely watching the thread though to see if anyone has any ideas.
The heat/cool cycles indicate overcorrection going on. Try reducing your control constants.
I've collected all the basic parts, installed the brewpi software and ensured that the wifi could reach my router from my basement brew cave. The next step is to find a box to put it in. I can find sealed plastic enclosures, but I'm concerned about heat buildup. I can find vented metal enclosures, but those would likely interfere with the wifi signal. Are there any suggestions from the gallery?
CadiBrewer
Well-Known Member
No reason to worry about heat buildup, especially in a basement. My units are in a Southern California garage that reaches 100 deg f in the summer, with no problems for the units. These things are pretty bulletproof.
Most folks use plastic enclosures. Everything from Home Depot electrical boxes to Philmore project cases, like this: http://www.philmore-datak.com/mc/Page 276.pdf. If Radio Shack is still open in your area, they have a good box for like $9.
Most folks use plastic enclosures. Everything from Home Depot electrical boxes to Philmore project cases, like this: http://www.philmore-datak.com/mc/Page 276.pdf. If Radio Shack is still open in your area, they have a good box for like $9.
Ridemywideglide
Well-Known Member
I've got this up and testing with a Pi, works well so far. But I'm planning on using the pi for CBPi, and would like to implement a beaglebone black to leave dedicated for the chamber. Mainly because I don't like messing with it. It's running Debian 8.7, I've gone through the setup and making another user, etc. BrewPi is installed and in the default directories it used on the pi, but I get connection refused when trying to access it.
I'm not real familiar with the BBB as to it's default web page location, but from what google tells me it should be the same as the pi. I've disabled all the default services the BBB runs out of the box so they should not be interfering with it.
I'd just like to get it working and stuff it in a box to never have to see it again. LOL.
I know absolutely zip about the Beagle Bone Black (aside from it having the lamest name evah! ) but if you're using Apache2, check /etc/apache2/sites-available and look at the value assigned to html document root to see where the default inbound web request folder is located...
Cheers!
) but if you're using Apache2, check /etc/apache2/sites-available and look at the value assigned to html document root to see where the default inbound web request folder is located...Cheers!
Ridemywideglide
Well-Known Member
I know absolutely zip about the Beagle Bone Black (aside from it having the lamest name evah!
Cheers!
I stumbled across that be accident yesterday, and it's showing /var/www/html for the document root. But I still get connection refused.
Anyhow, after doing some reading, I'm going to go with the BrewPiLess with ESP8266 boards. This will free my Pi for the brewing tasks, AND let me connect wirelessly for the ferm data, solving 2 issues at once.
Think I'll relocate this beaglebone to the bottom drawer. And I agree on the lame name..
TheFlangerBeer
Active Member
- Joined
- Feb 18, 2017
- Messages
- 39
- Reaction score
- 18
Hi guys.
I am using brewpi legacy on a Raspberry pi 3 and arduino and I have a question about the software:
Anyone know how to find out how the "Chamber Fan" works in brewpi software?
I have a refrigerator (combi) with internal fan that is controlled by the main plate of the refrigerator and the problem is that when the defrost resistor is activated the fan stops working. In this way, the compressor (controlled externally from a relay and brewpi) works constantly: if the resistor is activated (defrost), the fan switches off and fails to reach the target temperature even though the compressor operates constantly.
So I came up with the idea of ​​drilling between the bottom (freezer) and the upper (fermentation chamber) and put a low voltage fan (one of a PC ie) with a 12V transformer controlled by a Relay and Brewpi (so it can raise the cold air regardless of the fan operation of the refrigerator) and connect it to Brewpi's "Chamber Fan" but I can not find information on how it works. I have observed how works in software it but it does not always work when I need.
In short, when and under what conditions does this "chamber fan" work?
Is this a "good idea" to drill both chambers?
TY
- Status
- Not open for further replies.
Similar threads
- Replies
- 3
- Views
- 1K
- Replies
- 9
- Views
- 2K
