New Plastic Conical Fermenter build

Homebrew Talk - Beer, Wine, Mead, & Cider Brewing Discussion Forum

Help Support Homebrew Talk - Beer, Wine, Mead, & Cider Brewing Discussion Forum:

This site may earn a commission from merchant affiliate links, including eBay, Amazon, and others.

rkhanso

Well-Known Member
Joined
Jan 24, 2017
Messages
774
Reaction score
174
Location
Plymouth, MN - terrible tap water for brewing
I thought I'd document the building of a heated/cooled plastic conical fermenter build (and likely questions asked along the way). That OTHER THREAD is pretty old and the text is in the WAYBACK MACHINE, the pictures are gone.


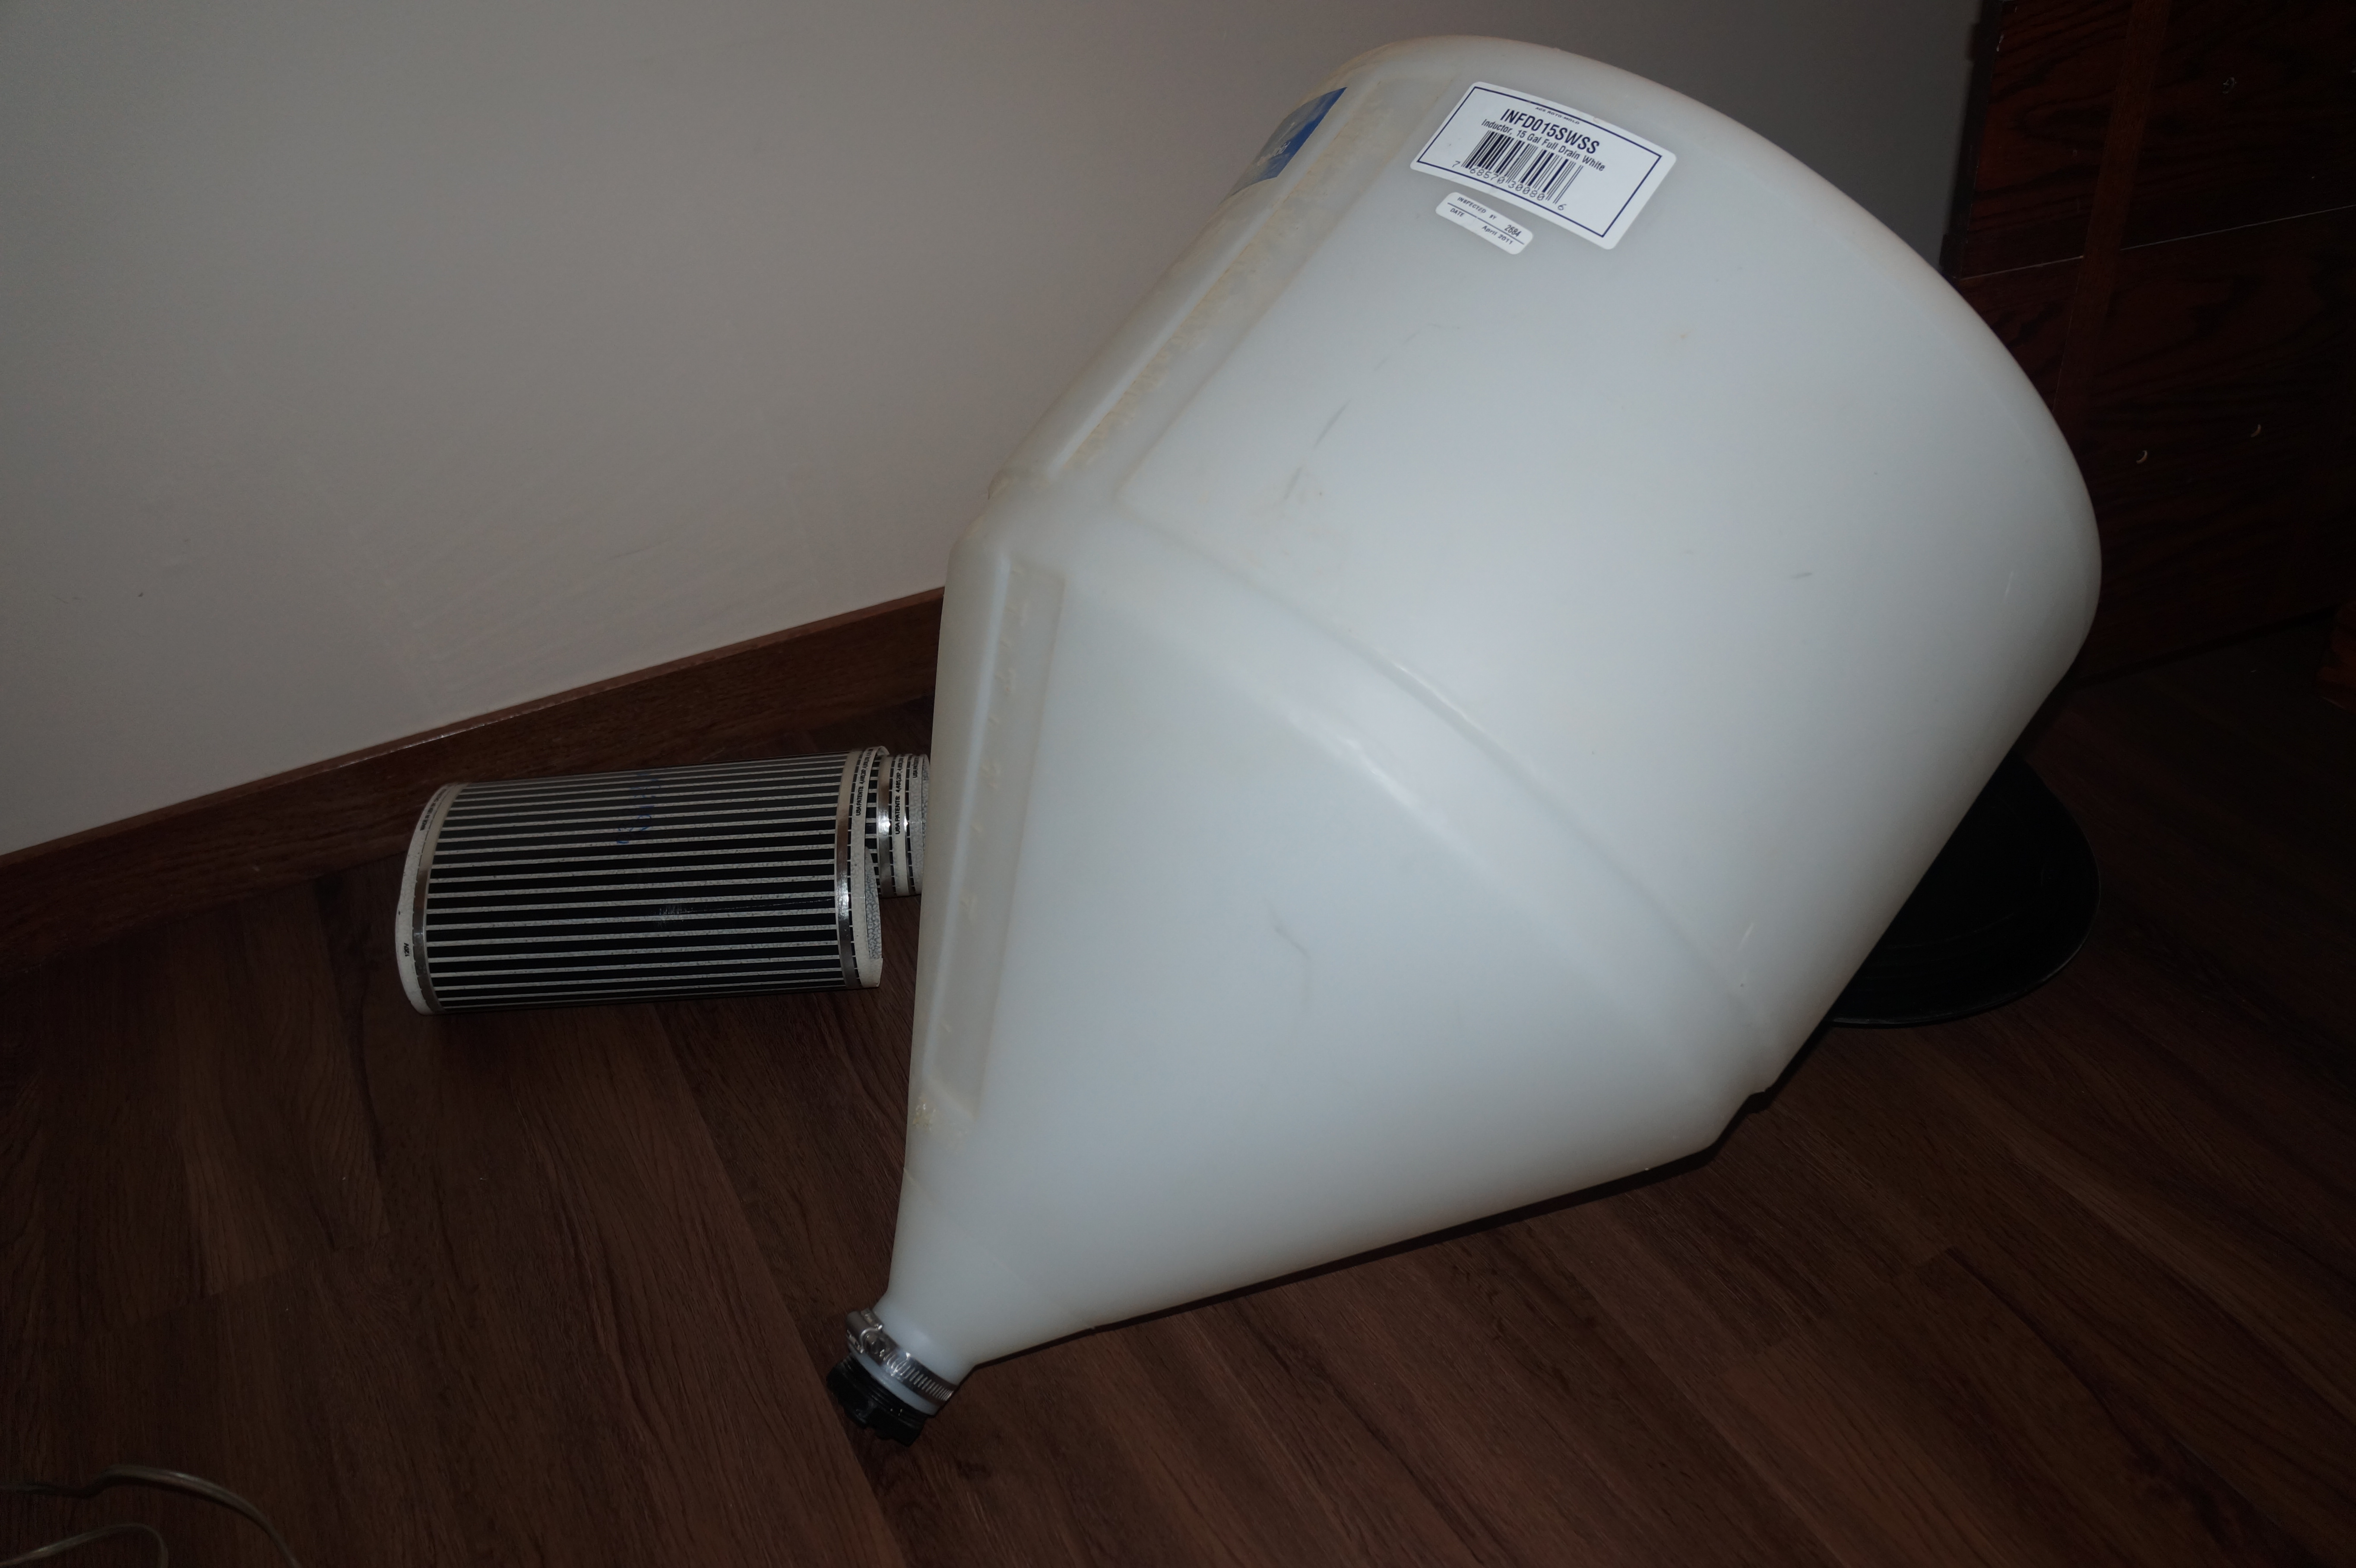
I picked up this 15 gal plastic Ace Roto-Mold full-drain conical from another local brewer off Craigslist for $15. I'm going to make a wooden stand for this single fermenter. The wife says I don't have the room, but would like to have multiple fermenters down the road.
545038-6b86fc510baa3779f89374b037f29184.jpg


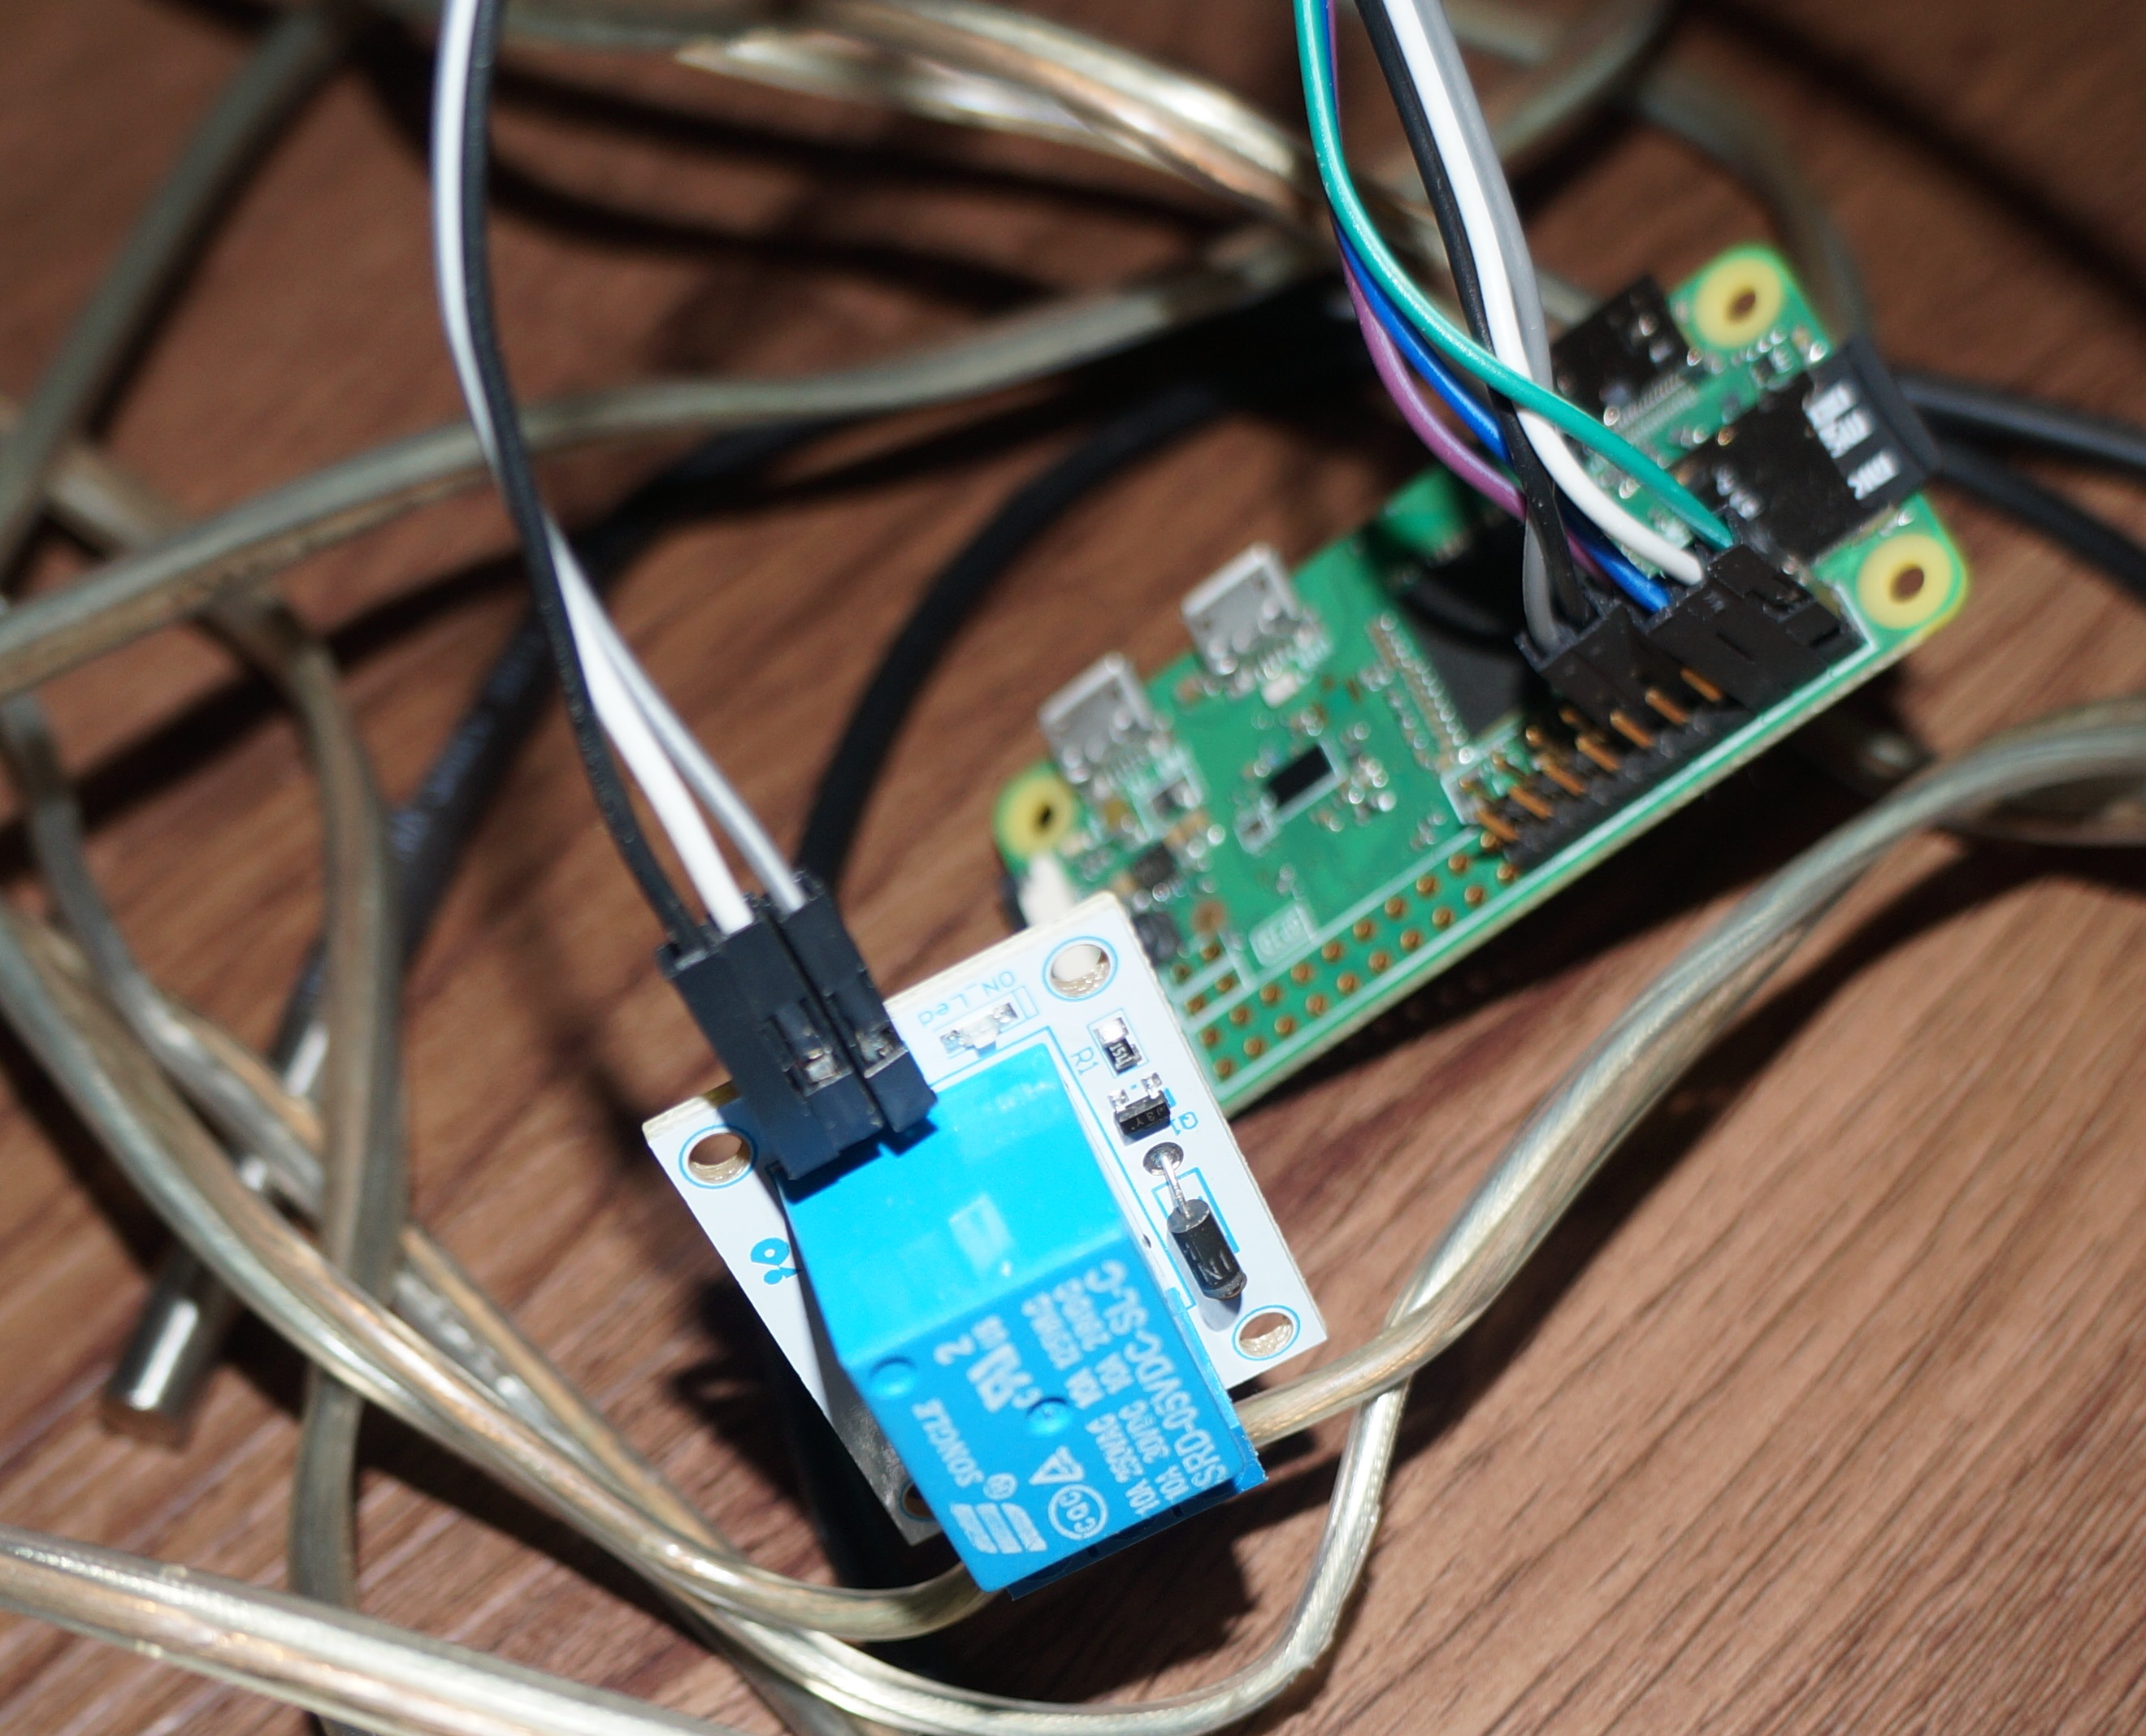
I have a Raspberry Pi Zero W with a 10a relay connected to run CraftbeerPi software (which is working). It's cold (winter) here in MN, so I don't need cooling now, but plan on getting the Glycol chiller setup working for the summer. Right now I only need heat, because this is going in the garage.
545045-4190598f12b4b986d2a6724f9ae21401.jpg


Right now, I need to decide where to drill a hole for a racking arm and figure the parts needed to make said racking arm. Not sure if plastic or stainless is the way to go on that. Since the conical is plastic, I can just go to the local Menards and get plastic fittings for it. I've seen pictures of plastic online HERE, but there is not a parts list for it, nor statement how well it works. It does say it's fixed. Not sure if that's acceptable or not. I think I'd rather have it be able to rotate - since I'm not sure what the level of the trub will be in the cone. Plastic bulkhead fittings are CHEAP. I suppose some will say to go stainless TC and that may be the best way to get it to rotate….


Next, I got some 11" Flexwatt heat tape for Christmas. 3 Feet of it. I think I should have asked for 3 or 4 inch so it fits on the cone better. It's going to be difficult to get it to be efficiently spread out on the cone part of the conical. If I only put it on the upper part of the tank (though everything I read says to put it on the cone part) - it's only covering the 6.5gal to 15gal marks of the tank. I plan on doing 10-11 gallon batches most of the time, so that won't work to mount it up there. I think a mixture of 11" and 2-4" would be better at covering the cone. So, I ordered some 2”, 3” and 4” flexwatt tape to fill in the holes where the 11” won’t cover.
545043-e86229fabb62703912f4cc2846d58ff9.jpg
545044-13a449f93c9cf95337519652cc190868.jpg


I was thinking about just going with a plastic dump valve (ball valve, since I’ve not seen any plastic butterfly valves). Menards has a 1.5” ball valve for $8. Plastic parts will save money, and I don’t think that it’s any worse for sanitation, is it? I can get plastic pipe, in straight, 45 and 60 degree elbows.
 

Attachments

  • DSC02095.JPG
    DSC02095.JPG
    3.3 MB · Views: 346
  • DSC02096.JPG
    DSC02096.JPG
    2.4 MB · Views: 331
  • DSC02097.JPG
    DSC02097.JPG
    1.7 MB · Views: 319
  • DSC02098.JPG
    DSC02098.JPG
    1.2 MB · Views: 326
I picked up some wood from Home Depot last night and am starting on the stand - for a single 15 gal conical.
2- 4x4 6' long (cut in half to get 4- 3' legs)
4- 2x4 4' long to use between the legs to build the stand
1- 2'x2' plywood 3/4" thick for the top

Here are some pictures of the table/stand:
IMG_20181229_134155073.jpg IMG_20181229_142739406.jpg IMG_20181229_134105678.jpg IMG_20181229_143223893.jpg IMG_20181229_144020451.jpg IMG_20181229_151222616.jpg IMG_20181229_151234445_HDR.jpg


I need to get the plumbing fittings and heat tape attached next.
 
Last edited:
I do BIAB brewing. The last couple brews, I've also put the hops in a big fine mesh bag during the boil. Because of those 2 things, I'm getting much less trub than I otherwise would. I'm not sure using a bag for hops is a good idea - if the hops flavors aren't as easily or thoroughly used up this way.

Would this negate the need for a "yeast catcher" on my fermenter? Or, would this be an even better reason to have one? I've read that some people get so much trub that it's packed down and little to nothing exits the bottom/drain port.

If there is not a huge amount of trub getting packed down at the bottom of the conical sine I BIAB, I can see where it might be easier to get to the yeast and a yeast catcher would have good results.

And, I'm still trying to figure out if I even need a racking port or if I can safely just use the bottom drain port for trub dump, yeast harvesting and bottling. Though I suppose I could use a racking port 6" up from the bottom as a thermowell if I can get by with racking from the bottom drain.

I don't want to drill holes that I'll regret later.
 
Water in the fermenter now. I got it a little too warm out of the tap so it'll have to cool a bit before the heat kicks in. I don't have any insulation yet - but will run to menards and get some today. I think I'll start out with the Refletix stuff and see how that works.
The heat tape is lightly taped down with painters tape right now - will put the foil tape on later.
I also need to make a plug at the fermenter to unplug the A/C power from it and not take all the stuff with it (raspberry Pi, relay, wires).

IMG_20181231_123731544.jpg IMG_20181231_123737339.jpg IMG_20181231_123746341.jpgfermenter1.JPG
 
Still maintaining about .1F temp range consistently. I think this amount of heat tape is plenty. I ended up using about 2.5' of 11" Flexwatt on the cone of the tank. It overlaps a good amount....maybe 50% or so.

It's -4F outside right now and +23F in my garage and this is my fermenting temps over 7+ hours:

fermenter3.JPG

I will have to let this go a few days to ensure consistency and reliability.


Now I need to finish putting the fittings on and get the heat tape finalized with a plug and foil taped down the rest of the way. I have left over Reflectix insulation and will probably put on another layer. Probably try to change the cone part into more of a blanket of Reflectix so it can be put on/off easily in it's entirety with some velcro.

I bumped up the target temp by 2 degrees. Waiting to see how it responds to that. It may take a long time to get the water temp raised.
 
Last edited:
Here's the chart after raising the target temp 2F. about 2 hours to raise it 2F.

Fermenter4.JPG

And the entire chart:

Fermenter5.JPG

I see that CraftbeerPi is telling the relay to go on/off frequently (every second or so) and I'm sure that's not good for the relay. I may have to switch to an SSR instead.
 
Getting ready to complete the fittings/blowoff/racking, etc.

I see some others just let the conical vent out all the leaks in the top and don't have blow-off or airlocks. Since it's winter here in MN, I'd have to use Vodka in the airlock or bucket with blow-off tube so it doesn't freeze. I'm just going to forego the blowoff system in winter.

Since I BIAB brew, I suspect my trub height might be lower than many others in this thread. I'm going to make a first brew (brown ale) with no racking arm/port. I'll just dump trub out the bottom dump-valve until it's clear and bottle from that same valve. I'll make a mark on the height of the trub in the conical for a potential future racking port location. I'm sure I will eventually put one in.

Still maintaining good steady temps. From 67.89F to 68.11F - only a .22F degree difference between high and low for over 4 days.

fermenter9.JPG

So, I guess that means it's about ready to use.
Now to find that recipe and buy ingredients....
 
Question for you. Did you put a o-ring in the lid to help seal the conical to the lid?
 
Question for you. Did you put a o-ring in the lid to help seal the conical to the lid?
I have not yet. I did buy the "D" shaped rubber insulation tape that I planned on adding under the ring/mount on the tank itself, as well as under the screw-on cover like others have done. If I do that, I may have to add a blow-off port though.

Some (many?) people ferment with no blowoff or airlock on the fermenting tank at all. They just let it leak out the gaps in the top.

I'm not sure which way I'll end up going since I would have the problem of the blow-off tube in frozen sanitizer in a bucket in my MN winter garage. I don't want to have to heat the sanitizer bucket for blow-off. Maybe for the warmer months though.
 
I like the work you have done so far on the temp charting. I am in the process my self of building 2 7g tanks and am back and forth on the heating. It looks to me you have 57w of heating and the bubble wrap insulation. Any idea how often the heat is having to kick on to maintain temps? In Tn we don't get neary as cold as MN my garage will get to high 30s. I am now back and forth on the insulation the bubble wrap (which really needs an air gap to work right) or neoprene sheets. The bubble wrap would be easier to get.
 
I'd also estimate a little less than 60 watts of heat on my fermenter.
When the garage temps were about +20F (because in MN, you have to state whether it's above or below zero) - the heat tape came on for about 10 minutes, then off for about 10 minutes. These are estimates by looking at the graphs. I didn't actually time it with a watch.
As it got warmer - say, closer to +30F, it came on for about 7 minutes and then off. I'm not sure how long it was off, I forgot and have it disconnected now. Again, these numbers are decent guesses.
The Reflectix bubble wrap insulation I have is silver on both sides and taped up tight to the cone of the fermenter. No air gap. The air bubble is the gap, I think. It was cheap at Menards - $10 for 25' of it 16" wide - on sale. Normally $14.
I have a 10A relay that came in an arduino parts kit running the heat tape. I may switch to an SSR at some point so I can dial it in with PID/PWM type controls. But as well as it keeps steady temps now, that may not be needed.

I still need to re-cut the Reflectix so I can put some velcro on it to make it an easy on/off blanket.
 
A little more work on the fermenter today.
I put the Raspberry Pi and relay in a box, ran cables to the inside, though I'll have to tidy it up a bit when I get some real jacks to mount on the box.

I made a DIY thermowell from a racking cane found in this video..... It's not ideal, but the LHBS had the racking cane on hand and it's done. The racking cane is water-tight. I heated the bottom and pinched it together. The picture below just looks like it has water in it - but it doesn't.

I made an extension cord for the Flexwatt heat tape to go between it and the CraftbeerPi temp controller in the new electrical box. Now it's not attached to the controller box. Just a pigtail at each end with the extension in between.

My brother and I are going to brew on Saturday, so I may wait to re-make the Reflectix insulation blanket with a velcro seam at the front for easy on/easy off. We're going to make Sparky's Nut Brown Ale.

One last thing I think I'll need before brewing is an Oxygen tank and stone to put oxygen in before the yeast. I don't want to use paddles on the inside of the tank and scratch it up and I can't shake it (will be 11gal batch). Gotta figure out the best way to oxygenate.

Here are some pictures:
IMG_20190106_173317600.jpg IMG_20190106_173339881.jpg IMG_20190106_173357476.jpg IMG_20190106_173433381.jpg
 
A final fermenting schedule test before brewing tomorrow.
I did a ramp up and down with CraftbeerPi. The temp/schedule didn't change the first time I started it, but it did on the 2nd time. Not sure what I did wrong.
Ran it 4-hrs at 60F, 4-hrs at 63F, 4-hrs at 65F and then drop to 40F (which it's on the way down to now).
fermenter10.JPG

Plus, I made a single insulation blanket for the cone. Well, not a single piece because I didn't buy wide enough insulation. If you go this route, get the 24" wide Reflectix, not the 16". I had to use 2 pieces to get full coverage. It'll work OK though. I foil taped the small piece onto the large one so it's stuck really well. Then I used velcro on the opening to wrap around the cone. Close enough for Jazz.

Hopefully my CFC will be able to get the beer down to close to 60F out of the boil kettle. It's going to be iffy. I may have to wait a while for the cold garage to help cool before pitching yeast.
 
There's wort in the fermenter now.
Brewday had a couple mishaps but learning experiences.
Fermenter is maintaining temps. No leaks (but only the bottom dump valve for a hole so far).
No blow-off or airlock used since I've read that the conical will leak at the top anyway. Can't see fermentation action through it since it's mostly opaque. Not going to take the lid off to check for at least a few days.
The CFC got the temp down from 200ish to 65 in one pass, but I had to really throttle the flow way back. I think the 10 gallons of wort took at least 15 minutes transfer to get down to that temp.
The Nottingham yeast was added at about 65F and then it took about 4 hours of cold garage temps to naturally drop it down to 60F.
 
Last edited:
temps holding fine? I have my stands built and painted. I am back and forth now on the dump valve if I want to go straight 1.5 out then step down or step down to 1 then valve. I will have a racking port so the bottom valve will be to just dump yeast and trub. I need to just make up my mind and get it done its taking up room in my garage with the other 3 full size fridges keggerator and soon to be new upright freezer turned keggerator oh and can't forget my gylcol system either that I am waiting on controls for to finish.
 
The temps were perfect for 4 days. Then recently in the past day, they started swinging a little wider. I'm not sure what changed.
I'm guessing it's one of 2 things....
  1. The yeast is active and causing temp changes
  2. My cheap 10A relay is not up to the task and is flaking out - maybe I need to change to an SSR. Though the heat tape is only using 60w of power.
The fermenting schedule is set to bump up the temp to 63F today or tomorrow. I'll see how it responds to that.

Csuho - It sounds like your garage is even fuller than mine. I can barely get one car in mine.

fermenter11.JPG

fermenter12.JPG
 
2 of the fridges will get sold off after I get the conials going. the chest freezer/keezer will get sold off once I finish the new upright keezer. it will actually free up a bunch of space to go with the conicals and upright keezer.

it shouldn't have taken 4 days to get fermentation going.

the 60w shouldn't even phase the 10a relay.
 
the 60w shouldn't even phase the 10a relay.
I guess I wasn't thinking the load on the relay was too high, but that frequent on/off cycles might cause trouble on the contacts or wear it out.
The temp swings are now 2F instead of the .25F I was seeing the first 4 days.
Going ONLY by the charts and guessing when the power might be applied to the heat tape, it looks like the relay may change states around 15-20 every 10 minutes, then take a break for a while until the temp drops again. I may just switch to an SSR to eliminate the issue of cycle life of a traditional relay.

Though I did just check the Fermenter settings in the Hardware Settings and see that the heater offsets are both (off and on) set to ZERO. But this was always the case and I've not changed it since starting this fermentation.
I'm using Hysteresis logic on the Fermenter.
I'm using GPIO Simple on the heat output.

Could the software just have adjusted itself out of whack from the great temp tracking of the first 4 days?
 
Crud - I think some of the Flexwatt heat tape is not working. A couple of the panels are cold to to the touch when it's supposed to be on. I'm thinking this is why the temp swings are wider now.

Well, it's cheap Amazon knock-off and not the real Flex Watt brand. Amazon is full of fake products.

I'll have to check it out after this beer is done. Maybe find a different type of heat tape or other product. Or get the real Flexwatt brand.
 
I added a little extra heat and the temp swings have settled down to about where they were at first. I just put a small space heater under the stand the conical is in.

Looking at changing from the Flexwatt heat tape to something a little more robust and durable. Something like rubber silicone heat pad or heat cable/tape meant for pipes. You can get that in low watt density.

Graph with smoothed out swings:
fermenter13.JPG
 
Last edited:
Bad news.

Since I had a panel of the Flexwatt die and I put an additional ceramic space heater to give a little more heat to keep the temp swings to a minimum, that heater overloaded the little 10A relay I'm using. The temp is supposed to be at 63F, but has dropped down to 59.4F since the relay didn't pass any 120v to the heaters.

I connected the Flexwatt up direct to an outlet and still have the space heater trying to give a boost to get it back up to 63F.

But later the relay started working again and only the flexwatt tape is connected to it again.
 
Last edited:
With the outside temps dropping to -10F outside here in Minnesota - the heat tape is still keeping the temps steady. Tonight will be a better test - as it's supposed to be -27F tonight actual temperature ---- and -45F to -65F tonight, with the windchill.
Looking at the charts, with the garage ambient temp at +17F right now, the heat tape has been powered about 20 minutes and off for 10 minutes to keep the beer at 66F.
 
Getting colder and I think getting closer to the fringe of the heat tape able to keep up. On for 25 min, off for 10. Outside air is -12F. Garage temp is +15F.

Still, pretty impressive. I only have the one temp sensor about 1/2 way down into the beer level inside a plastic racking cane/tube. I don't have a sensor at the top and the bottom of the fermenter. I could use a handheld at the top of the beer level, but I don't think I will - to not risk an infection. I've not opened the fermenter up since the start of fermenting.

Beer temp:
fermenter14.JPG

Ambient temp:
ambienttemp1.JPG
 
Yes, the old window A/C in a cooler and pump the glycol through an immersion chiller trick. Controlled by CraftbeerPi.
The chiller I bought online won't work very well and I'm contemplating options. Sending it back for one custom made, or something else.
Trying to save money, but it may not be possible for this part.

Here are some of the parts for the improved controller that will do both heating and cooling.
IMG_20190521_072717216.jpg

And the chiller that won't work:
IMG_20190516_174043995.jpg
 
Very nice! I wish I had the time and patience to get brewpi functioning properly. Every time I think I might move that direction, I read the 100’s of posts of this, that, and another problem. I know that’s part of the draw (troubleshooting, and customization), but just not for me “yet”....
Are the dimensions of the heat exchanger just not right to fit your conical?
 
The chiller coil is not tall enough. If I have the in/out just at or above the lid, the bottom coils are not down far enough into the fermenter. I'd like it to get lower so if I wanted to do smaller than 10-gal batches that the coils could control the temps. And with it not down far enough, there are coils above where the top level of the wort is - so it's not going to be as efficient the either. I should have just ordered custom made to start with. Mistakes cost money.

I've had pretty good success with CraftbeerPi. Never have used BrewPi.
 
I know the feeling about trying to save money. It was the way I was raised, and is hard to change my ways. Double buying sucks for sure. That being said......... :) you might get with Bobby at brewhardware.com and see what solutions he has to simply extend the the vertical sections of your heat exchanger.
 
I thought about that, or even simply extending the vinyl tubing down into the fermenter lid to make the coil lower in the tank....but then imagined a leak and ruining the beer with glycol. I suppose there's a risk either way - whether the connections are above or below the lid. I guess I'm a bit reluctant of doing that because of my anticipation if anything can go wrong, it surely will.

But hey - life is a risk.
 
I'm going to wire up the control panel.
I can use either 16 or 18 gauge lamp cord to wire the SSR and outlet for the air conditioner unit, right?
I know it'll be more than adequate for the little aquarium pump through the 10A relay.

But for the window Air Conditioner:
My used window air conditioner says on the side it uses max of 6.3A.
I think the 16 gauge lamp cord can take up to 13A and 18 gauge up to 10A, right?
Plus, I'm only going to have 6" or less of the wire inside this box.

Soes it sound OK to use either 18 or 16 gauge lamp cord for the 120v AC power for the window air conditioner?
 
Back
Top