Double Pipe wort Chiller Calculations

Homebrew Talk - Beer, Wine, Mead, & Cider Brewing Discussion Forum

Help Support Homebrew Talk - Beer, Wine, Mead, & Cider Brewing Discussion Forum:

This site may earn a commission from merchant affiliate links, including eBay, Amazon, and others.

cank

Supporting Member
HBT Supporter
Joined
Nov 17, 2012
Messages
523
Reaction score
36
Location
Jonesboro
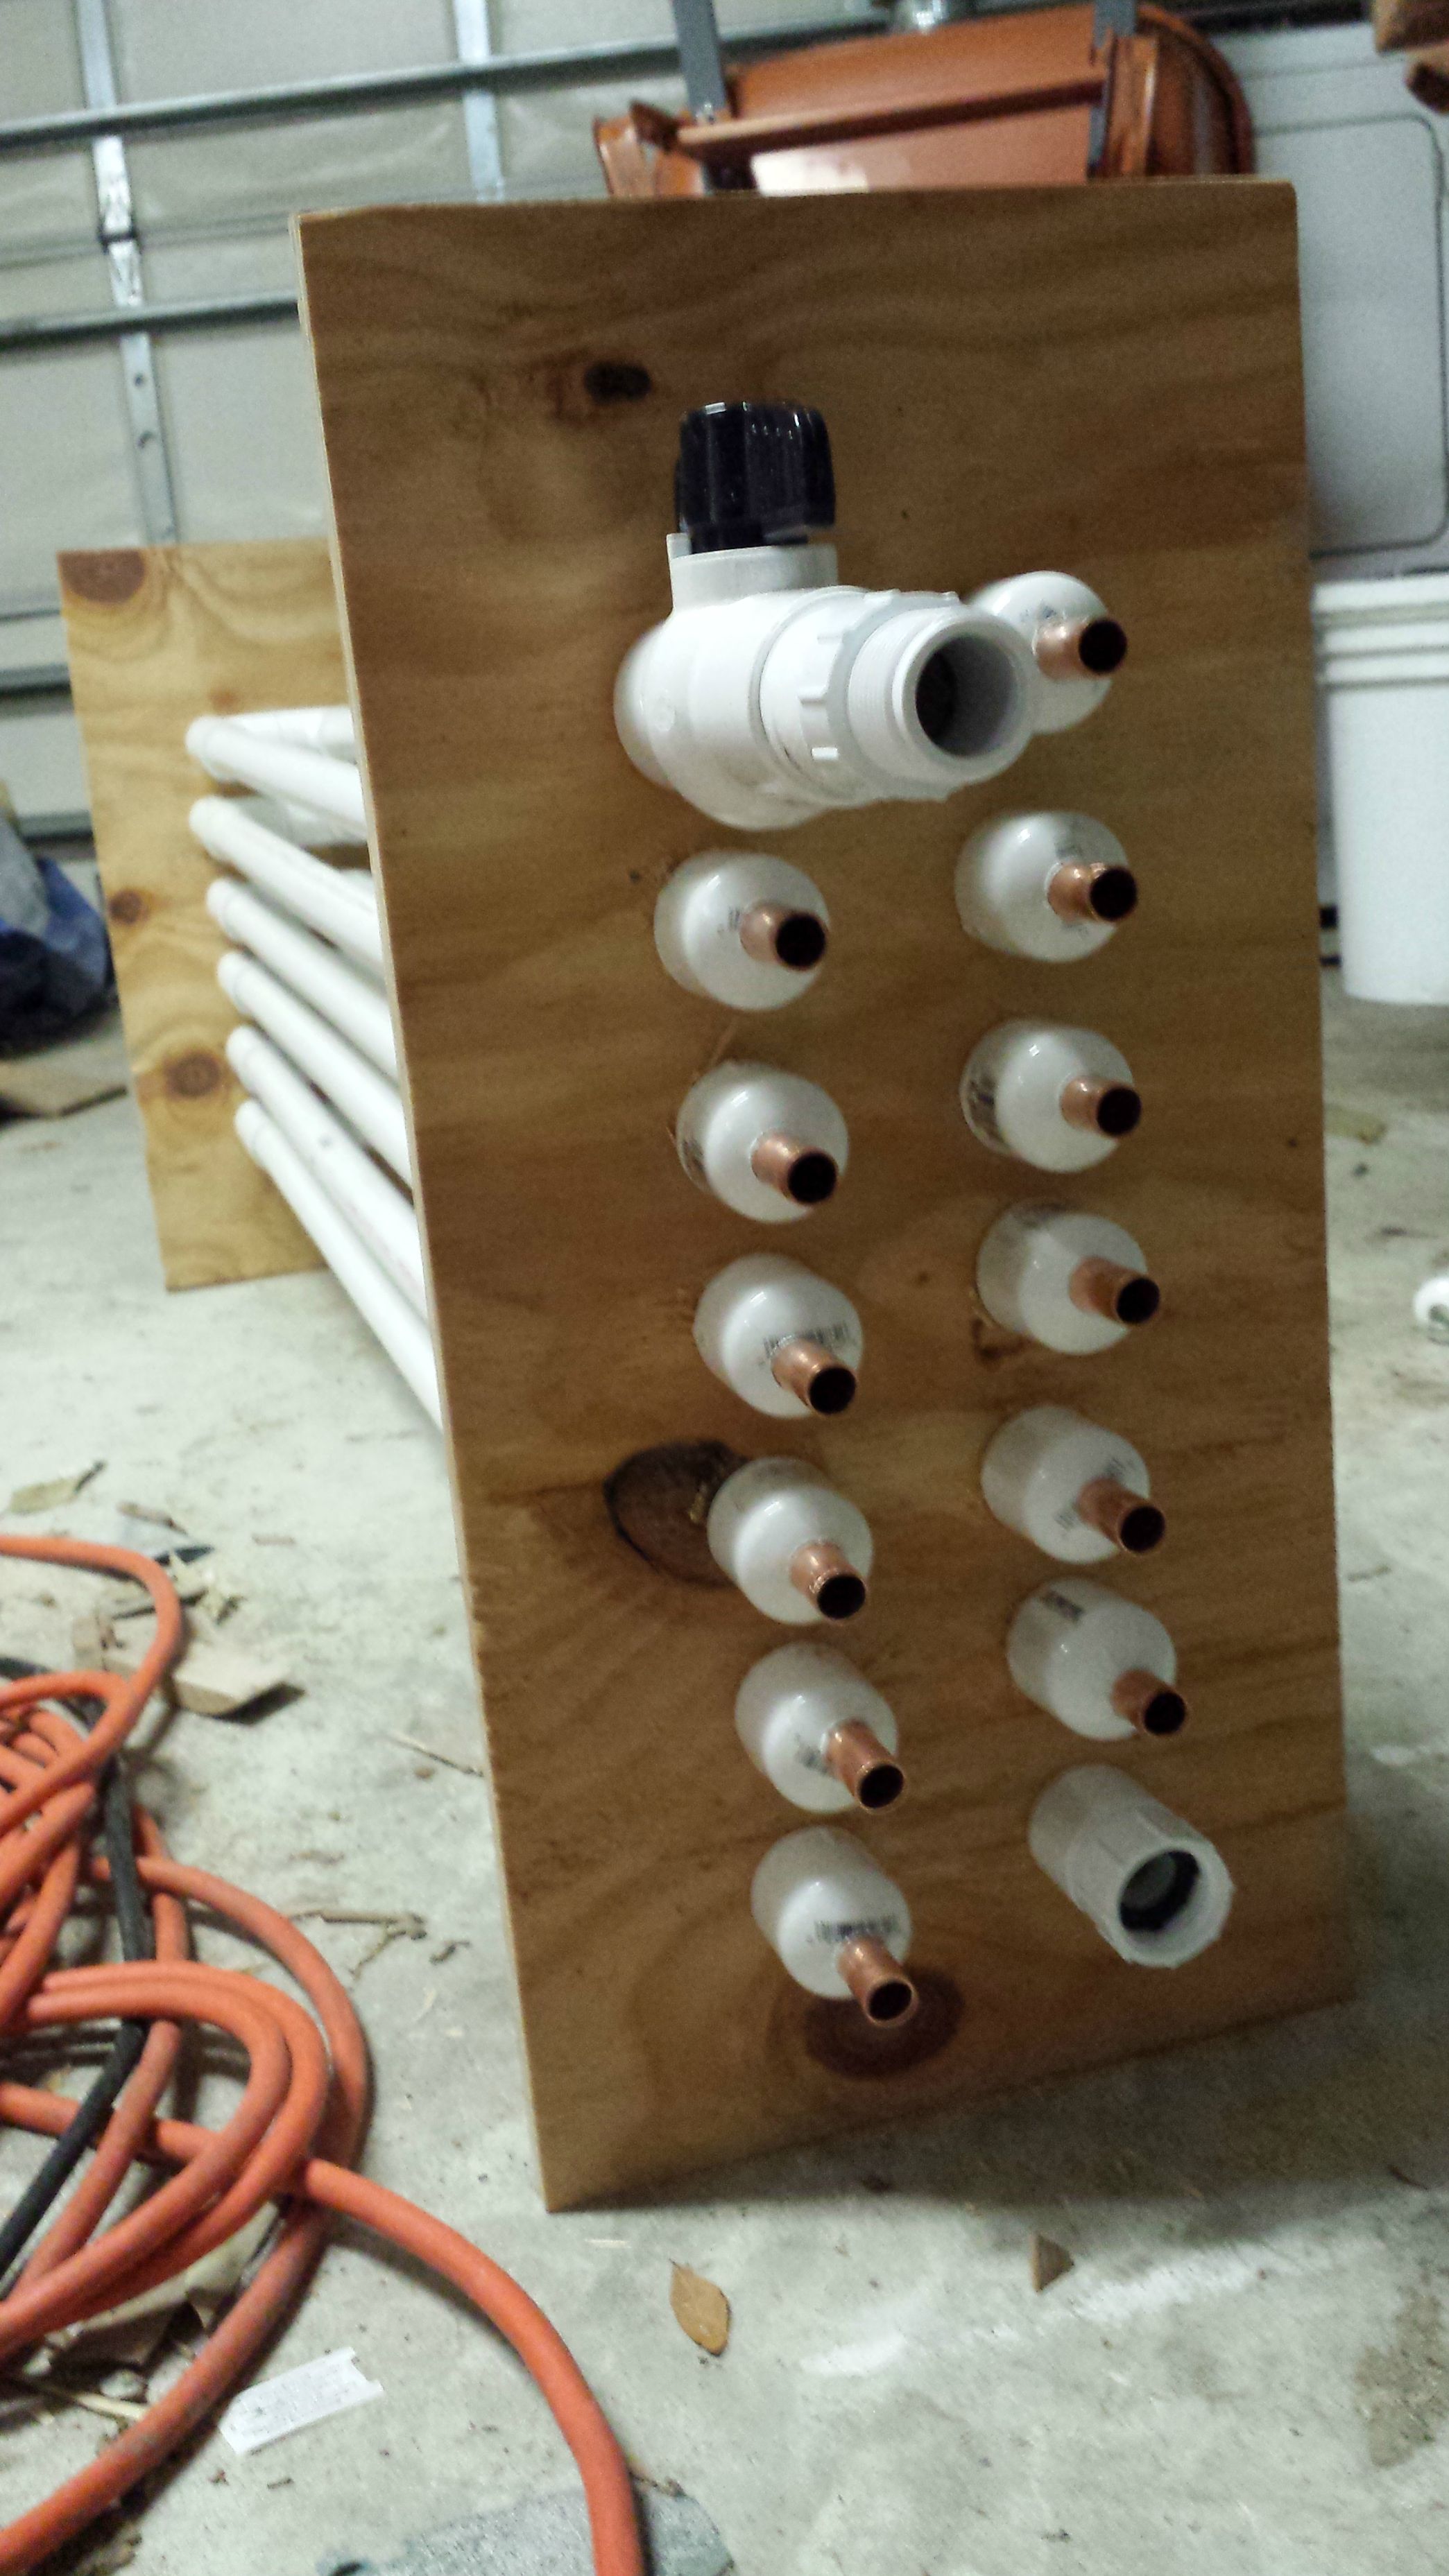
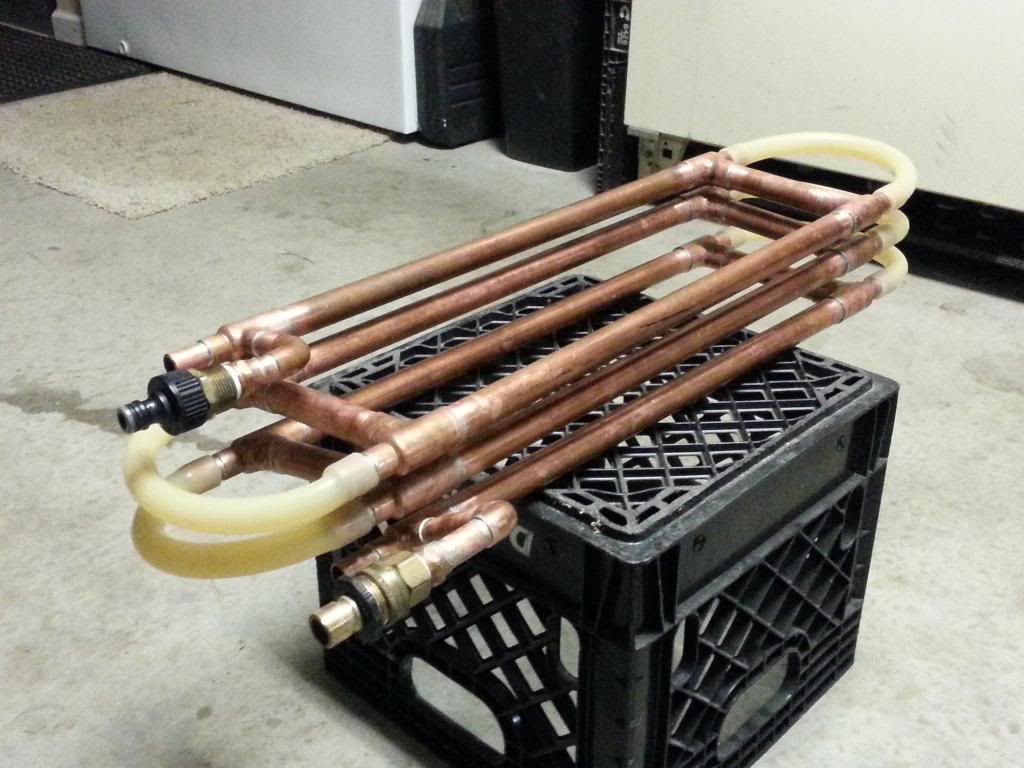
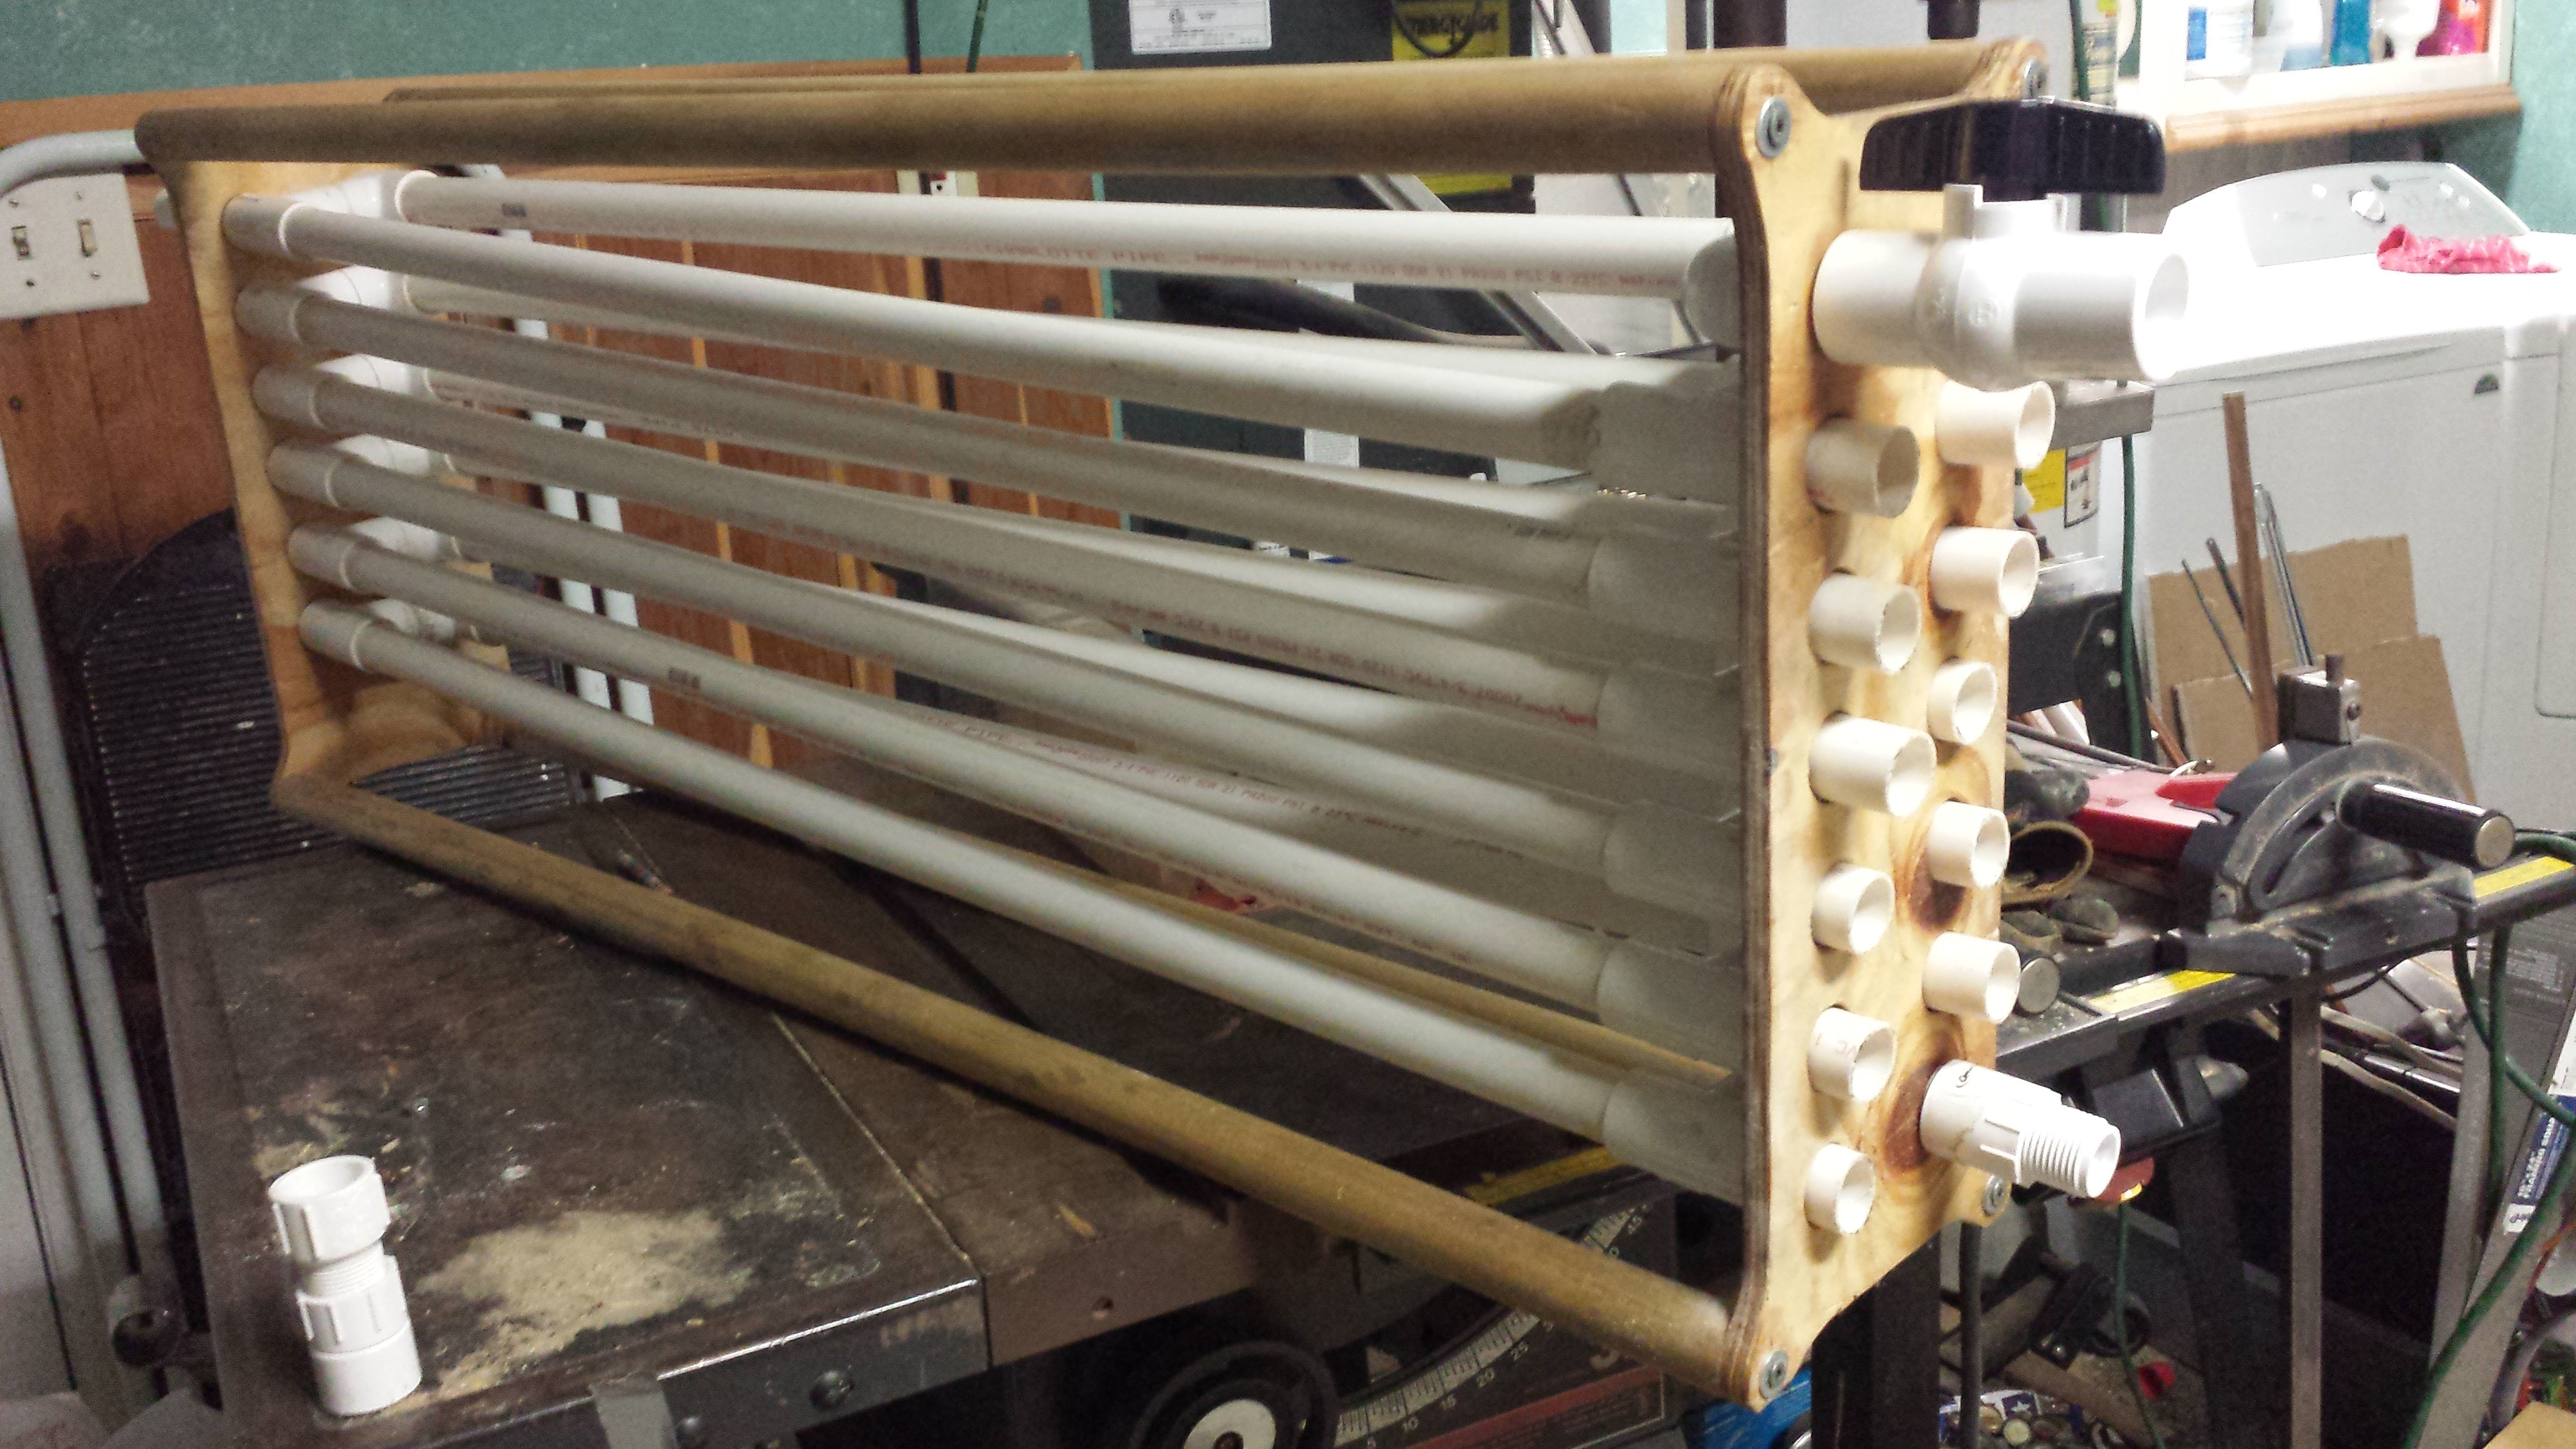
I really want to make a double pipe wort chiller like in Jaded Brewing CFC

I found the BYO article that talks about calculating the efficiency and had some questions about the formulas.

I emailed BYO last week but no response yet, so I'll try here.

I wanted to make sure I was estimating the values correctly in a spreadsheet I was putting together.

I wanted to know where the article of BYO got the values they used for:
1. An average of 0.9 cooling efficiency
2. U (overall heat transfer) = 7.56 BTU/min Ft2 °F (Upper end of here?)
3. LMTD (log mean temperature differential) = 37 °F (3 °C)
4. Cp is the specific heat of wort (about 0.95). (From 2006 Article)


I've looked:
http://www.online-pdh.com/engcourses/file.php/177/Heat_Exchangers.pdf
http://www.brighthubengineering.com...-heat-exchanger-design-calculations-involved/
One from MIT but I couldn't follow some of it:
http://web.mit.edu/16.unified/www/SPRING/propulsion/notes/node131.html

Overall Heat Transfer Coefficient, U:
http://www.engineeringtoolbox.com/overall-heat-transfer-coefficient-d_434.html
Another good one:
http://www.tlv.com/global/TI/steam-theory/overall-heat-transfer-coefficient.html
this one has a U value for forced water cooling:
http://www.engineeringtoolbox.com/overall-heat-transfer-coefficient-d_434.html
This one has the thermal conductivity of copper and water:
http://www.engineeringtoolbox.com/thermal-conductivity-d_429.html

LMTD calculator but it didn't match BYO
http://checalc.com/solved/lmtd.html

Difference between Specific Heat and Heat capacity:
http://www.iun.edu/~cpanhd/C101webnotes/matter-and-energy/specificheat.html

Specific Heat Capacity calculator:
http://www.calculator.org/property.aspx?name=specific+heat+capacity


This post helped but I'm still trying to compare some of the equations.
https://www.homebrewtalk.com/f13/convoluted-chiller-wont-chill-437581/index2.html#post5681293

I like the looks of this but wanted it shorter.
https://www.homebrewtalk.com/f51/byo-double-pipe-wort-chiller-428922/index3.html#post5590786

Here is a link to an excel spreadsheet that is messy right now but it has three different pages where I have tried to make sense of all of this.
https://drive.google.com/file/d/0B3IXnGfupr85bUFFWDF2WVFUT0U/edit?usp=sharing

Any Help explaining it would be appreciated. My Head HURTS!
 
Yeah, I'm not a science guy or very smart but for some reason this is interesting and I want to know.

Cool thing tho, BYO got back with me and I've been chatting with the author of the article and he explained some things and sent me a spreadsheet that he used.
I made a test section and am going to run an experiment tonight to see what my U value is going to be based on flow rate and how many sections I will need to fabricate for the final chiller.

I plan on doing a write up and sharing the data and spreadsheet for other people to use.
 
We have done extensive research and testing in this area and we have a few insights that might come in helpful for you.

1) The wort flow rate. When using 3/8” tubing your chilling times are going to be limited by this. For our JaDeD CFC (which uses 3/8” inner tubing), the maximum flow rate with a high pressure/flow food grade pump (chugger/march 815) is 1 gallon per minute. This is using about 25’ of total length (the copper and silicone) of tubing. If you go to a 50’ section of tubing, it will be closer to .75 - .5 GPM which will limit your chilling speed to 7.5 to 10 minutes for the absolute fastest speed.

2) Using larger tubing is going to give you a better flow rate but a decrease in efficiency per foot of CFC. As the tubing size increases, you have two main issues. The first is that the wort on the very center of the tubing is far enough away from the actual area of heat transfer that it will reduce the overall efficiency of the chiller. Second, the surface area per wort volume is decrease (yes, it is similar to, and the cause of the first reason).

When we originally tested our Cyclone CFC, we used a single pass method, and were very disappointed with the results. The 5/8” tubing yielded a chilling times in the 25 to 30 minute range (for 10 degrees above tap water temp). We then purchased a “convoluted” type chiller to compare our chiller to. We ran multiple tests with differing wort flow, and the results were very similar to our Cyclone chiller. The main information we gleaned from this was that as you increase the flow rate of the CFC (non-plate type), the single pass ability is significantly diminished.


Another thing you need to keep in mind when designing a chiller is your chilling water flow rate (both pre and post chiller) and tap water temperature. Both are VERY important and will each have as big of an impact as your chiller’s design characteristics. If you have 70 degree tap water, you are not going get good chilling times (sub 10 minute) with any CFC, including a plate chiller. Also, if you water flow rate is below 5 GPM, there is not going to be enough water flow to quickly chill your wort. This should go without saying, but the best design will use a high flow rate of chilling water with good water usage efficiency. We would recommend that it has high efficiency, but you really start running into diminishing returns on a high efficiency when attempting to increase the chilling speed. Let us know if you guys have any questions about our design, and we will do our best to answer them.
 
JaDeD,
Thanks so much for the input. I am figuring these things out too. I am using 1/2" copper for the inside(mainly because I got a 50' roll for $25 at HD a few months back) and some 3/4" copper from my father-in-laws shop(he has plenty of scraps).

I had time to do a few test runs with my sample section. I thought a slower flow rate and more heat transferred would be good but the U value dropped to 3. The sweet spot so far seemed to be 1 GPM of wort to 5 GPM of water. That got my U value up to 7.

I am also thinking of making a "mixer" that I could slide inside the wort tubes to create turbulence and see if that increases the U value. I've seen some examples of one with twisted copper but I might just use some copper wire and put some kinks in it every few inches or wrap it like a spring?

I've been busy lately but will run more tests later.

U-value.jpg


IMG_4488.jpg
 
Subbed! I'm in the process of gathering parts to build one of these custom fit to my brew stand. I'm also trying to build/design it so that it drains well.
 
With the talk of the "turbulence" and "convoluted" chillers increasing the efficiency of the heat transfer............Why couldn't you take a "C" clamp or the like, and partially "flatten" the tube containing the wort, ( several places, mid span, so as not to wreak havoc with your fittings), and use that to create your turbulence?

In the case of copper inner and outer, you could do the outer as well, although I think with only the inner "dimpled" as such, you would create the turbulence needed in the cooling medium as well.

Watching all this!
 
Here is one I have been working on. It has 12 x 45" lengths of the 1/2" copper going through 3/4" PVC; between 42" and 43" of the copper is in contact with the water so it gives me about ~43' of cooling tube.
I've been thinking about doing something like stealthcruiser is suggesting to convolute the copper tubing but i havent thought up a good, consistent way to do it yet.
i also have been trying to find something inexpensive to put in the T-joints to create more turbulance in the cooling water's flow but
b8ncEpY.jpg
 
That's a beast! Have you run any tests yet to see what type of cooling you can achieve?

I wonder if just coiling some bare copper wire loosely around the outside tube would create enough turbulence?

I really didn't want to "kink" the tubing as that could not be changed once it was put together. I wanted something I could take out and clean or inspect. On one of the sites I found it showed a way to create turbulence was to place alternating "paddles" inside the tube. I figured I could do this with copper wire too.

I'll have more time to experiment and play next week and report back.

If any of you have girls that play softball, you'll understand my lack of time right now!
 
i dont know why my post got cut short up there but i was saying i havent looked around the hardware store yet since i got everything cut and fitted.
i havent done any testing yet but i tried to do the math a while ago; i converted everything to metric to make life a little easier, and when i started plugging numbers in i found them to be all over the place. i also realized that there were a bunch of other factors like turbulence that i wasn't taking into account so i scraped the math and went with 30' as a minimum (taken from BYO) and since i'm in florida some extra footage would be good. I ended up with 45" lengths because i wanted it to fit under a 50" table, so thats how i got to my 43'. how well it will work i still have no idea
 
Nebulous, do you own, or have access to a drill press?

If so, get some thin copper sheet, and trim it into strips the length of your rigid copper tubing, the width of which will fit inside your copper tubing.
Fold the end so it will fit into the drill chuck, and clamp the other end with some Vise-Grips, so you can stand on the pliers.
Swivel the drill press table to the side, chuck up your copper strip, stand on the Vise-Grips, and slowly turn the chuck BY HAND, until you have a long spiral.

There's your removable, cleanable, "vortex generator" for your wort.

For the water side, about anything would do..........Plastic pot scrubbers strategically placed, "half washers", to cradle the rigid tube inside the PVC, with them spaced 180 degrees out every 6-8 inches or so, forcing the water in essence to go "left to right or up and down" path wise to reach the exit.
 
Having a good friend that owns a plumbing company and likes good beer is very helpful in this hobby. :mug:
We threw this together last night. The pipe spacing is kind of weird but I was trying to set it up so the wort would drain. It's not been tested yet I hope to do that this evening. I need to pump hot PBW and then starsan through it to clean it anyway. I'll just turn on the cold water and see how long it takes to chill the PBW down.
20140403_200355.jpg
 
JaDeD,
Thanks so much for the input. I am figuring these things out too. I am using 1/2" copper for the inside(mainly because I got a 50' roll for $25 at HD a few months back) and some 3/4" copper from my father-in-laws shop(he has plenty of scraps).

I had time to do a few test runs with my sample section. I thought a slower flow rate and more heat transferred would be good but the U value dropped to 3. The sweet spot so far seemed to be 1 GPM of wort to 5 GPM of water. That got my U value up to 7.

I am also thinking of making a "mixer" that I could slide inside the wort tubes to create turbulence and see if that increases the U value. I've seen some examples of one with twisted copper but I might just use some copper wire and put some kinks in it every few inches or wrap it like a spring?

I've been busy lately but will run more tests later.


Looking at the picture, it seems that you are running the hot water in down flow? If this was the case, very likely the pipes are not flooded with liquid therefore the heat transfer will be diminished. I would rather plumb the hot liquid to flow from the bottom up. Also make sure the cooling water is pumped in counterflow to wort. The critical numbers to look at for water savings are cold/hot liquids ratio vs cooling efficiency. Cheers!
 
JaDeD,
Thanks so much for the input. I am figuring these things out too. I am using 1/2" copper for the inside(mainly because I got a 50' roll for $25 at HD a few months back) and some 3/4" copper from my father-in-laws shop(he has plenty of scraps).

I had time to do a few test runs with my sample section. I thought a slower flow rate and more heat transferred would be good but the U value dropped to 3. The sweet spot so far seemed to be 1 GPM of wort to 5 GPM of water. That got my U value up to 7.

I am also thinking of making a "mixer" that I could slide inside the wort tubes to create turbulence and see if that increases the U value. I've seen some examples of one with twisted copper but I might just use some copper wire and put some kinks in it every few inches or wrap it like a spring?
What you are seeing is the difference between laminar and turbulent flow on the wort side. It also looks like there could be more chilling power to gain by a faster flow rate as you have not topped out the flow rate vs wort temp in your chart. For the best results, you should be using either a March 815 or Chugger for pushing the wort, it will help to clear any air out of the wort lines and give you a wider range of turbulent flow rates.
The only reason to add a flow "mixer" on the wort side would be if the finished chiller's flow rate to reach pitching temps is below the turbulent flow threshold.

For the chilling water side, using a "mixer" is even less useful. The chilling water flow rate should always be high enough to be above the turbulent threshold and adding a mixer is going to slow down the water flow rate, causing the chilling speed to decrease. Essentially, adding a mixer on the water side will mimic having a smaller outside diameter tubing. This will increase the efficiency of the water used, but not make it slower and could cause the wort side to need a mixer to maintain a turbulent flow.

Docruw, you are going to want to remove those quick disconnects. The openings are too small and are going to kill your flow rate through the chiller. Also, that design works best as a recirculation type CFC. With that in mind, you also will want to make sure all the wort fittings on your setup are 1/2" I.D or larger (your hose barbs should be 5/8" I.D.). Also, you are going to want a Chugger or March 815 pump.
I know we push the 815 and Chugger a lot, but it is due to the head pressure and flow rates of these pumps. This is a very important part of chilling, whether you are using a whirlpool arm with an IC or a CFC, the higher pressure and flow rate a pump is, the better.

Thanks for the tips! Recirculation has been the plan. I've got the "high flow" cam locks for all my hoses and a chugger pump for the wort side. I'll pull those QD's off they were left overs from my IC.
 
nebulous, Would be possible to shoot a side pic so I can tell whats going behind the mounting board?

On the front, it looks to me that you have the 3/4" pvc "Water Pipe" with a cap on each end with the 1/2" copper "Wort Pipe" drilled through the pvc cap.. are you planning to use 1/2" ID silicone hose to loop 2 of the copper pipes together without having a water jacket at that point? I want to make something like this so any info will help, Thanks

Are these the pics you're looking for? The cooling water in and out break off a tee to an elbow. The wort in will just be a silicone hose clamped to the copper pipe, and then yes, short lengths of silicon hose will be used to complete the chain of copper.

dF9uMFH.jpg

41PNmn1.jpg


I have since scraped the use of the pvc caps; there is another thread somewhere on here where someone tried doing the pvc cap with JB weld and while it worked, after a few uses it started to leak so he switched to compression fittings.
I had ordered some brass compression fittings but the seller canceled my order so I'm waiting to hear back from a different seller to see if i can get the quantity I need.
I looked at getting PVC compression fittings, but they cost just as much as stainless fittings which is stupid. I need 24 of them for my design so they get expensive fast and the idea of this build was to be cheap since I had most the parts on hand(or so I thought).
I did come up with a way to add some turbulence to the cooling water's flow without too much hassle. I used some copper ground wire to create a cross in each of the connecting pipes.

hYp8Wln.jpg


and in a very un-scientific way I compared the flow from just the straight pipe to the same length pipe and water flow but with the copper across it.

Bz1DAQN.jpg

7wb1rHA.jpg


To me it seemed like a success since that was just one and there are 13 in total (every junction except for the cooling water out).

Basically I'm just waiting on compression fittings and then I might actually have some numbers to post. And just to let you know, gluing the pipe together so that it fit into the face boards was a real pain in the ass.
 
Interesting project and I was looking at doing something similar after seeing the BYO article a while back.

I was hoping to get away with less than 20' of stainless tubing but haven't done the math yet. Those convoluted counterflow chillers only use about 12' of tubing if I recall correctly.

One variation I was thinking about was to split off the water inlet such that each "run" of stainless or every other one would be using water at it's source temp.

I was also planning on using CPVC so the water could be reused for cleaning with minimal concern.
 
Old thread I know, and this might be a really retarded question...but when you use this style of chiller.. does the silicon tubing at the end wear enough to need replaced often or need clamps to hold in on?
 
I was thinking that would be necessary, but none of the pictures have clamps. So would it be worth it to install quick connects on there to keep from having to loosen and tighten clamps every time you clean it?
 

Latest posts

Back
Top